Table of Contents
Advertisement
Quick Links
Advertisement
Table of Contents

Related Manuals for JiGMO JVR-31


Summary of Contents for JiGMO JVR-31
- Page 1 User Manual JiGMO JVR-31 8GB USB Voice Recorder / Dictaphone...
- Page 3 Preface Thank you very much for using our Voice Recorder. If this is the first time you are using this product, please read all the information carefully in this manual, which will help you use this product better. Although we have collated and checked the manual carefully, we cannot guarantee the manual is completely free of any errors and omissions.
- Page 4 INTRODUCTION ● The JiGMO JVR-31 has a zinc alloy molding shell with an ultra-thin body and sapphire double mirrors, sporting a borderless design. ●It has a professional voice recording chip with dual core noise reduction, and supports HD lossless linearity 1536kbps recording.
- Page 5 ●Supports MP3/WMA/FLAC/APE and other lossless music formats, which can reach HiFi level (MP3). ●Supports loop playback function, A-B repeat and variable speed playback function. ●Built in high fidelity loudspeaker. ●Password on start up function. Protects confidential recordings and data from being easily accessible to third parties without the password.
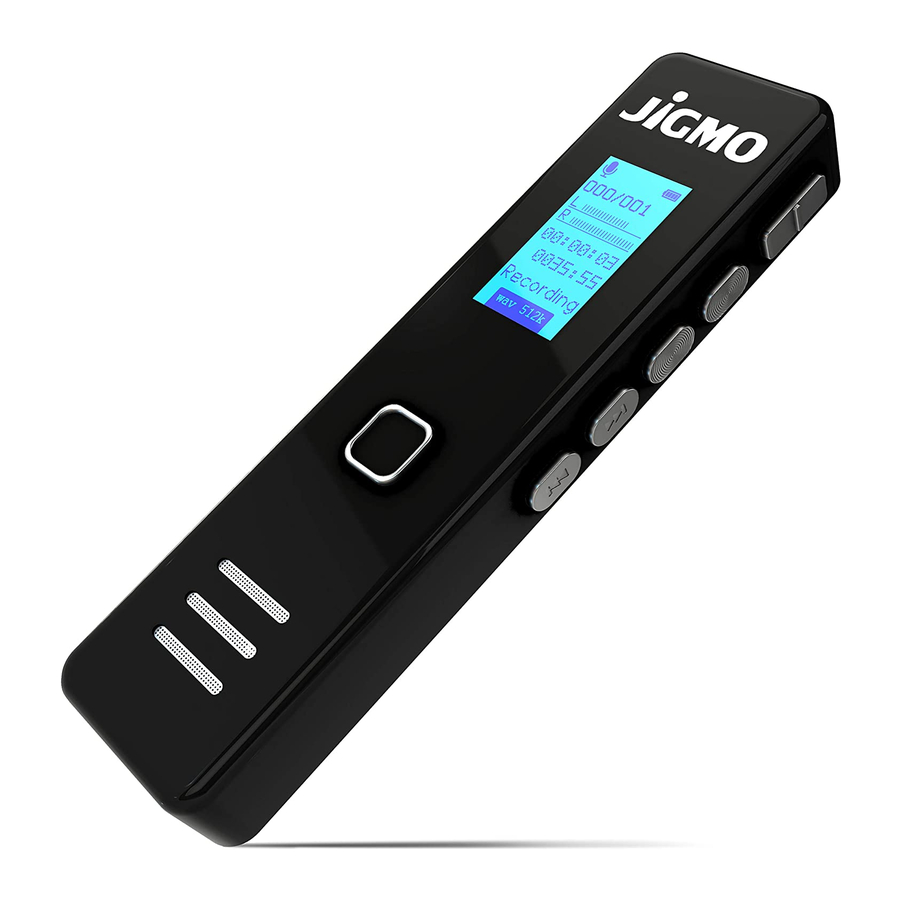
- Page 6 ●Supports USB2.0 computer connection, easy to upload and download voice or music. Microphone Earphone On /off Key...
- Page 7 USB port Display screen Play key (PLAY) Loudspeaker Record Key (REC-SAVE) Menu Key (MENU) Volume Key (VOL) Last Song Key ( Next Song Key ( CHARGING...
-
Page 8: Operation
When charging, please turn the power switch ON before you plug in your USB cable into the recorder. Carefully check the battery indicator to see if it shows it is charging properly. Insert one end of the USB cable into the USB port and insert the other end into the USB port of your computer or your charger. - Page 9 When you switch the recorder ON, after the startup screen, you will get the main menu or home screen. You will see the options in this order: Music | Record | Set | Last Played (only available when a file has just played) To access: Scroll through the various screens by pressing the (UP) or...
- Page 10 SET: This is for accessing Settings for the device. LAST PLAYED: This is for accessing the file you played last on the device. At any point, press MENU to exit to the main menu. ●PLAYING A SONG / FILE IN MUSIC MODE To access: While on Music Screen>PLAY>...
-
Page 11: Saving Your Recordings
●RECORDING AND SAVING FILES RECORDING: To access: REC-SAVE to REC. Press PLAY for PAUSE. Press PLAY to resume. SAVING YOUR RECORDINGS: To access: REC-SAVE to REC. Your recorder will automatically save the current recording file. PLAYING YOUR RECORDING BACK: To access: Press PLAY after your recording has been saved. - Page 12 To access: While on Music or Record Screen>PLAY> Press to select file>PLAY Press to scroll between files (music or recordings). Press PLAY to play the current file. PAUSE: To access: Press PLAY to pause during playback. Press PLAY again to resume playing. CHANGING SONGS / FORWARD/ BACKWARD To access:...
-
Page 13: Volume Control
In playback mode, press scroll through files. During file playback, press and hold to enter the fast forward mode and press and hold to access the fast rewind mode. VOLUME CONTROL: To access: VOL/ When in playback mode, press VOL and the volume control will appear on the screen. -
Page 14: Battery Life
To access: Hold down PLAY. Press the PLAY button once briefly and release it. Once the screen lights up, please hold down the PLAY button for a few seconds. Next you should see a screen with 1, 2, 3 highlighted in a sequence – like a countdown. -
Page 15: Playback Menu
PLAYBACK MENU: While a file is playing, hold down MENU to access the playback menu. Options available: Repeat | Repeat Settings | Equalizer | Variable Speed Playback | Bookmarks | Delete | Delete All 1. REPEAT MODE: (While file is playing): To access: Hold down MENU/Repeat /PLAY/Select Repeat Mode/A-B... - Page 16 This is a very useful function to have. For example, if you are trying to transcribe an audio file, you might want to review a few words that are not so clear and you might find this function useful, since you can keep playing back a certain segment over and over until you manage to figure out what the person is saying.
-
Page 17: Repeat Settings
2. REPEAT SETTINGS: To access: File playing>Hold down MENU>Select Repeat Set>PLAY>Select Repeat Time>PLAY>Change setting ( In PLAY mode, press and hold MENU to enter the setting list, press to select Repeat Set choose the number of times you want the file to playback repeatedly. - Page 18 To access: File playing>Hold down MENU>Select Repeat Set>PLAY>Select Repeat Interval>PLAY>Change setting ( In PLAY mode, press and hold MENU to enter the playback settings list, press to choose the intervals. Press to select between 1-10 times. After selecting, press PLAY to confirm the setting.
-
Page 19: Variable Speed Playback
Press to scroll through the equalizer settings and press PLAY again. Press to select equalizer settings between rock, funk, jazz, hip-hop, classical, or electronic music. After making your selection, press PLAY to confirm and press MENU to get back to the home screen. 5. - Page 20 playback speed (-0 to -8). Press PLAY to confirm your selection and save it, and press MENU to quit. 6. BOOKMARKS: To access: file playing>Hold down MENU>Bookmark>PLAY>Add bookmark>Select Option. You can bookmark a certain point in a file to refer to, so that you can come back to it at a later time and play it from that point without having to listen all the way from the beginning and look for that particular point in that file.
- Page 21 notes, you can simply bookmark this point for easy recall at a later time. You have the following options: Add bookmarks | Go to bookmark |Delete bookmark These are self-explanatory. A bookmark is only valid for the current file that is playing. You may have upto 10 bookmarks. Press PLAY to confirm your bookmark and return to the playback interface.
- Page 22 Enter the list of music files or recorded files, select the file you want to delete. Press and hold MENU and then on the next screen, press to select ‘Delete’ (Single file) or ‘Delete All’ (Delete all files). Press PLAY to confirm again and then press to choose ‘Yes’...
-
Page 23: System Settings
When you are in PLAY mode (MUSIC), simply press MENU to exit to the main menu. You can scroll through the options by using the keys. SYSTEM SETTINGS: To access: Home Screen> to select System setting>PLAY to Enter. After doing this, please proceed as instructed below. - Page 24 1. Recording format: To access: PLAY> press to select format>PLAY to select your bitrate>PLAY to confirm selection. Press PLAY to enter and press or to select "MP3 Format" (32Kbps/128Kbps/192Kbps) or "WAV Format". WAV is the highest audio quality, but uses up more disk space.
- Page 25 2 Modes: - Normal mode (voice activated mode switched off) or - Voice activated or AVR mode (voice activated mode turned on). Note: If voice activated mode is switched on, in recording mode, the machine will automatically start recording audio above a certain threshold.
- Page 26 This feature allows you to use the supplied earphones to monitor your recording as it is happening in real-time. This is a very useful to ensure that your recordings are going well and in case you need to change any settings to fine tune things. 4.
- Page 27 Common Scene | Train Scene | Meeting Scene | Long distance Scene | Disable Noise Cancellation. Select the recording mode according to your preference. 5. Recording segmentation: To access: PLAY> to select Recording Subsection>PLAY to Enter> to select option Options available: Always on | 30 minutes | 60 minutes | 90 minutes...
- Page 28 This feature allows you to decide how often the file is saved to the device. The options give you the intervals to select from. If you select ‘always on’, the recorder saves your recordings per every 2GB of space used. 6.
- Page 29 Time setting: To access: to select Time Setting>PLAY to Enter> to select option Options available: Set time | Set Date 1. To Set Time: Use VOL to select "Hours "or "Minutes", to adjust the numbers and after setting the time, press PLAY to confirm and save.
- Page 30 To access: to select>PLAY to enter> to select language (22 languages)> PLAY to confirm and save. Then the system language will be displayed according to your preferred selection. Contrast adjustment: To access: to select ‘Contrast Adjustment’>PLAY to enter> to select option (15 options from 0-15)>...
- Page 31 Disk space: To access: to select ‘Disk space’>PLAY to enter>view Data available: Available space | Total Space Tools: To access: to select Tools>PLAY to enter> to select option>PLAY to enter Options available: Auto Record On/Off | Start Time | End Time...
-
Page 32: Password Setting
Auto Record: Press PLAY to select ‘ON’ or ‘OFF’. Press PLAY to confirm and save. Start time: Press to select the ‘Start Time’ and press PLAY to select ‘Hour’ or ‘Minute’. Press VOL Key to toggle between Hrs and Min. Press to adjust digits. -
Page 33: Alternative Method
Press to select ‘Password setting’ and press PLAY to select ‘New Password’ 0000 and press VOL to change digits. Then press to adjust digits. Press PLAY to confirm and save. Note: The password is off by default. If you need to access the function, please take note of the following: If you forget your password, please enter 9999 as the password, and adjust the digits as... - Page 34 When you turn the recorder on, please type 9999, as instructed. Then hold down the VOL key. This will bypass the password screen and get you back into the recorder. Auto Switch Off: To access: to select>PLAY to enter> select option. Options available: Shutdown | 1minute | 5 minutes | 10 minutes | 30 minutes | 60 minutes.
- Page 35 Factory settings: To access: to select>PLAY to enter> select option Options available: Yes | No Press PLAY to confirm and save. Format device: To access: to select>PLAY to enter> select option Options available: Yes | No Press the "Play Key ' to confirm and save.
- Page 36 Note: Formatting will clear all data on this machine. Please be careful when you use this function. Connecting to the computer Insert one end of the USB cable into the USB port of your machine and insert the other end of the USB cable into the USB port of your computer.
- Page 37 recorder. (Note: For Windows 2000 or later, please select "FAT32" low-level format) 2. No matter what the OS (operating system) of your computer is, the method is the same as formatting any removable drive. Statement Please retain this manual. Our company is not responsible for data loss or damage caused by incorrect operation on the software or hardware, or any other unexpected situation which may occur...
-
Page 38: Troubleshooting
something. We cannot guarantee that the instructions contained within this manual (either in part or wholly) may or may not be misconstrued, or understood fully, or will be understood clearly by every individual. Therefore, our company cannot be held responsible for any accidental loss as a result of using the manual and no damages to a third party can be claimed as a result of using this product. - Page 39 Problem Possible Reason Solution LCD display Battery power Make sure you not turning shortage; charge the device in time; Please check whether the Turn on the power machine is on/off ; Device will Recording mode Adjust the may need recording mode ; record adjusting ;...
- Page 40 recorded shortage; Check if there is a file file to play on the No recording file; device; The volume is Adjust volume to turned down to make sure level is minimum loud enough Speaker Make sure there Remove the does not are no earphones;...
- Page 41 Earphones Make sure the Connect do not headset is earphones ; work connected properly; Adjust volume; Check if the Check to see volume level is whether the raised sufficiently; recording or MP3 file is damaged or Recordings or MP3 not. files maybe corrupted;...
- Page 42 files cable is connected Reconnect the properly. USB cable properly; Check whether there is a blank Delete blank memory; Technical specification parameters Product Bitrate specifications Recording 1536Kbps Upto 12 time storage capacity format 1024Kbps Upto 18 on disk...
- Page 43 512Kbps Upto 36 192Kbps Upto 96 format 32Kbps Upto 580 Maximum recording A total of 999 segments segments Recommended -5 to 40 degrees Celsius Environmental Conditions Frequency response 8KHz to 48KHz of recording playback Recording distortion 0.05%...
- Page 44 degree Signal to Noise Ratio >80db Actual maximum 300mw output Music format, flow MP3, 8-320Kbps, WMA, rate 32-192Kbps Battery 3.7V/ 200MA lithium battery Battery Life Between 13-16 hrs (full charge) Display screen 1.2 inches (OLED Ultra USB communication High speed 2.0 standard...
- Page 45 Body weight About 45 grams Volume size About 90*22*9MM Warranty 1 year Contact: customer@jigmoworld.com Warranty Registration: www.myjigmo.com...
Need help?
Do you have a question about the JVR-31 and is the answer not in the manual?
Questions and answers