
Related Manuals for monolith HTP-1


Summary of Contents for monolith HTP-1
- Page 1 HTP-1 16 Channel Dolby Atmos, DTS:X, Auro3D HOME THEATER PROCESSOR W/ DIRAC & ALEXA COMPATIBILITY 37887 User’s Manual...
-
Page 2: Table Of Contents
Step 3 : HDMI Source and TV Step 4 : Power on the Unit Step 5 : Get to Know the Front Panel Step 6 : Connect to the HTP-1 Web Server Step 7 : Get to Know the Homepage 7a : Input Selection Alternative... - Page 3 Dirac Calibration Calibration Steps Manual Calibration Adjust the Bass Manager Naming the Audio/Video Sources Setting up ARC/eARC and CEC Connecting HTP-1 to TV for ARC/eARC CEC Settings CEC Control Options Alternate TV Input TV Audio Priority System Audio Audio Features...
- Page 4 HTP-1 Installation and User Guide Version 0.5 For Highest Quality Audio Connectivity Using WiFi BlueTooth Video Features UHD Support EDID Management Dolby Vision Triggers Using Roon Firmware Upgrades Specifications Signal Processing Flow IR Code Table Revision History Important Information Page 4...
-
Page 5: Safety
Do not remove the 3rd prong (earth ground). The HTP-1 should be disconnected from power while making connections to the back of the unit. There is a power switch on the back of the unit that can be used to disconnect the unit from AC power, or you can simply unplug the unit. -
Page 6: Licenses
(XLR), analog outputs. It has seven digital audio inputs, two stereo analog inputs, and one secondary stereo analog output. Monolith HTP-1 is designed to be configured from a web page that is accessible on a tablet, PC, laptop or smartphone. -
Page 7: In The Box
Basic Setup The best way to become familiar with the HTP-1 is to start using it. Let’s start simple. For this exercise, you will connect one HDMI source, a TV, your amplifier and get some sound to come out. Follow the steps below to get you started. -
Page 8: Step 3 : Hdmi Source And Tv
Connect the provided power cable to the 120V/240V wall socket. Flip the switch on the back of the unit to the ON position; this will cause the unit to boot up. The HTP-1 has a slow boot/ eco mode and a fast boot mode. -
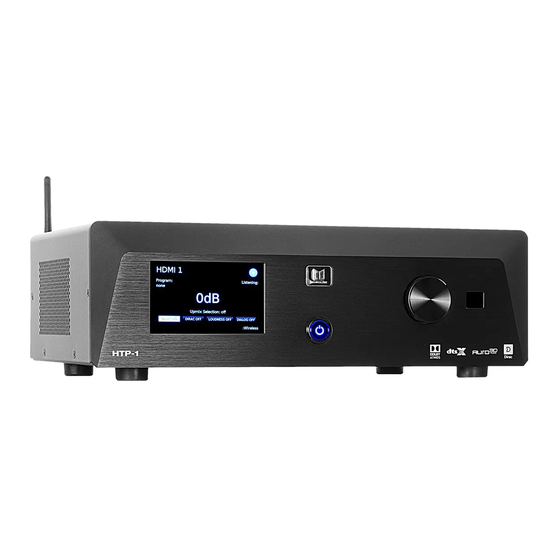
Page 9: Step 5 : Get To Know The Front Panel
Some browsers default to https. This will not work. Touching the blue “gear” in the upper right corner brings up a display designed to help you connect the HTP-1 to your home WiFi network. Refer to the WiFi setup section later in this document. If the gear is yellow that means that there is an update available for the unit. -
Page 10: Step 6 : Connect To The Htp-1 Web Server
If you connected the HTP-1 to your home network via a wired ethernet connection, after booting up the HTP-1, it will have acquired a local IP address, which will be displayed on the front panel of the unit, in the lower left hand corner. -
Page 11: Step 7 : Get To Know The Homepage
Step 7 : Get to Know the Homepage The homepage is the primary control and configuration interface for the HTP-1. The current active input is displayed in the upper left corner. Here it says “Sony DTS." This text is configured on the Input Setup Tab detailed later in this document. -
Page 12: 7A : Input Selection Alternative
Step 8 : Listen to Audio At this point, if the HDMI source device is playing, the amplifier is on, the volume is up, the HTP-1 is configured for the correct input, and the TV is set to the input that the HTP-1 is connected to, you should then be able to hear audio. -
Page 13: The Remote Control
HTP-1 Installation and User Guide Version 0.5 The Remote Control The HTP-1 comes with an infrared (IR) remote control. The IR remote allows you to make the same selections that you can from the homepage and more. Power - turns power on and off. -
Page 14: Advanced Setup Topics
HTP-1 Installation and User Guide Version 0.5 Advanced Setup Topics If you followed the Basic Connections instructions above you should be ready to use some of the more advanced features. About Speaker Configurations A speaker configuration (also called a listening mode) is described by three numbers and an optional letter. -
Page 15: Speaker Location Diagrams
HTP-1 Installation and User Guide Version 0.5 Speaker Location Diagrams These two diagrams illustrate the ideal placement of main level and upper level speakers. Real world rooms may not allow for ideal placement. This is just a guide. Do the best you can. The main level speakers should be placed at the ear level of the listener. -
Page 16: Valid Speaker Configurations
Version 0.5 Valid Speaker Configurations The HTP-1 can support up to 16 output channels. There can be up to 9 main level channels, 6 upper/height channels, and up to 3 subwoofers. These can be allocated in various ways. Some of the more complex ways are discussed in the following sections. - Page 17 Dolby content is typically authored with upper level speakers on the ceiling. DTS and Auro-3D content are typically authored with speakers high on the wall. The HTP-1 system “remaps” the source material to match the user-defined speaker configuration. The upper speakers are configured as follows:...
-
Page 18: Mapping Channels To Speakers
The setup allows many choices so you can configure the decoders to drive the speakers that you have. But a few configurations are preferred: The HTP-1 supports up to 3 subwoofers depending on main and upper level channel allocation. 5.1.2 is a “minimum object audio” recommendation. -
Page 19: Speaker Setup
60Hz or maybe 10Hz above the cutoff. Choosing a cutoff that is clearly in the linear region of the speaker ensures that the crossover operates as designed and is not affected by the natural filtering of the speaker. The HTP-1 uses a fourth-order Linkwitz-Riley crossover. -
Page 20: Enabling Speakers
When you first open the speakers configuration pane only the front left and right speakers are enabled. The sliders will not allow you to select an unsupported speaker configuration. Refer to the tables above for supported speaker configurations. HTP-1 follows rules set by the Dolby and DTS decoders. Some of the rules are: The L/R rear surround speakers cannot be enabled until the L/R surround speakers are enabled. -
Page 21: Example Speaker Setups
The back panel of the unit is shown below along with a diagram of the XLR connectors on the back of the HTP-1. The diagram will be used in the following sections to show you how to connect an amplifier to the unit for various speaker configurations. - Page 22 HTP-1 Installation and User Guide Version 0.5 The actual assignment is displayed at the bottom of the speaker configuration page. Page 22...
-
Page 23: Example 7.1.4H Speaker Configuration (Upper Level On The Wall)
HTP-1 Installation and User Guide Version 0.5 Example 7.1.4h Speaker Configuration (Upper Level On the Wall) This speaker configuration uses 7 surround sound speakers, 1 subwoofer and 4 height speakers. The height speakers are mounted high on the walls, in the corners of the listening area. -
Page 24: Example 7.2.6C Speaker Configuration (Upper Level On The Ceiling)
HTP-1 Installation and User Guide Version 0.5 Example 7.2.6c Speaker Configuration (Upper Level On the Ceiling) This speaker configuration uses 7 surround sound speakers, 2 subwoofers and 6 height speakers. The height speakers are mounted in the ceiling. Page 24... -
Page 25: Example 9.3.4C Speaker Configuration (Upper Level On The Ceiling)
HTP-1 Installation and User Guide Version 0.5 Example 9.3.4c Speaker Configuration (Upper Level On the Ceiling) This speaker configuration uses 9 surround sound speakers, 3 subwoofers and 4 height speakers. The height speakers are mounted in the ceiling. Page 25... -
Page 26: Example 9.1.6C Speaker Configuration (Upper Level On The Ceiling)
HTP-1 Installation and User Guide Version 0.5 Example 9.1.6c Speaker Configuration (Upper Level On the Ceiling) This speaker configuration uses 9 surround sound speakers, 1 subwoofer and 6 height speakers. The height speakers are mounted high on the walls, in the corners of the listening area. -
Page 27: Volume Range And Amplifier Input Sensitivity
If the sensitivity of your amplifier is unknown, begin by setting HTP-1 to 1 volt. Set the max volume to zero. Run the volume up and see if it gets as loud as you want it to be. If you think it should be louder, increase the amplifier sensitivity. -
Page 28: Dirac Calibration
The Monolith HTP-1 system makes it easy to do a Dirac calibration, and we expect all users to perform such a calibration. Setting up your speakers correctly is a key part of getting the best sound out of your system. -
Page 29: Calibration Steps
Using the built-in mic of a PC is not recommended. 4) Open DiracLive and connect to the Monolith HTP-1. 5) Choose a microphone. 6) Notice that interaction with the UI of the Monolith HTP-1 is blocked while you are doing a Dirac calibration. Page 29... - Page 30 HTP-1 Installation and User Guide Version 0.5 7) Set the volumes for calibration. Begin by setting the mic gain to full (100%). Then press the play arrow under the left front speaker and adjust the master volume to reach approximately -20dB on the scale for the channel.
- Page 31 HTP-1 Installation and User Guide Version 0.5 9) The Dirac tool encourages you to run sweeps at multiple locations. We suggest you first try a calibration with one location, just to see how it goes. Then do a calibration with a full set of measurement locations for better correction.
- Page 32 13) Export the filter. This takes a minute or two. In the end the resulting filter is installed and enabled on Monolith HTP-1. You can inspect it using the “calibration” page from the Gear icon. Q: What if the calibration dialog is not cleared on Monolith HTP-1? A: The dialog box should close when you exit the Dirac Live tool.
- Page 33 HTP-1 Installation and User Guide Version 0.5 14) Now open the calibration tab on Monolith HTP-1. Here Monolith HTP-1 is set up for a 5.1 configuration and a 5.1 calibration is chosen. If a calibration is for less speakers than the current configuration, the uncalibrated channels will then be passed without any filtering.
- Page 34 HTP-1 Installation and User Guide Version 0.5 Here is an earlier calibration page for the 7.1.4 setup. Notice the wide variation in trims. This might be better corrected with the volume on the amplifiers, but the calibration tool handles it without any problems.
-
Page 35: Manual Calibration
HTP-1 Installation and User Guide Version 0.5 Manual Calibration The system can be calibrated manually. The Dirac calibration is preferred as it is very accurate and quite simply executed. Users who are familiar with the manual calibration process are directed to the calibration page where delay and trim values can be entered. -
Page 36: Naming The Audio/Video Sources
Electronic Control) is a key part of ARC while eARC is not dependent on CEC (but some TV vendors require CEC support to be enabled in the Amp (like HTP-1) in order for eARC to be used). At this time eARC is not a feature that is very common, mostly found on a TV manufacturer’s higher end TV lineup (if... -
Page 37: Connecting Htp-1 To Tv For Arc/Earc
HTP-1 Installation and User Guide Version 0.5 ARC/eARC path to get audio from the TV to the HTP-1. Also, some sources will be connected directly to the TV’s HDMI input presenting another reason to use ARC/eARC as the audio path to the HTP-1. -
Page 38: Cec Control Options
Alternate TV Input If your TV does not support ARC/eARC or you must connect the HTP-1 HDMI output to an HDMI TV input that does not support ARC/eARC, you may use the “Alternate TV input” pop-up menu to specify an... -
Page 39: Tv Audio Priority
CEC has a feature called System Audio. When System Audio is On, the Amplifier (such as HTP-1) is asked to render the audio for the system. When Off, the TV is asked to render audio for the system. The HTP-1 will always turn on System Audio when it is first powered on and attempt to determine where it should pick up audio from. -
Page 40: Audio Features
Version 0.5 Audio Features The HTP-1 includes a full range of audio features. These are utilities that “make it sound better." As such their application may be a matter of taste, but they all prove useful in certain situations. Using Surround Modes The Monolith HTP-1 system supports a number of “surround modes."... - Page 41 HTP-1 Installation and User Guide Version 0.5 known only to DTS. An obvious rule is that material common to the left and right channels is extracted and routed to the center channel. Neural-X can be applied to any signal having 8 or less channels. There is no point in applying it to signals that have more channels.
-
Page 42: Equalization
Version 0.5 Equalization The equalization page presents tone controls and parametric EQ. The HTP-1 includes a simple interface to these features. Up to 16 bands of parametric EQ are supported with settings per channel. This fine- grained control can be used to tune a room. -
Page 43: Night Mode
ISO 226:2003. Wikipedia has a good article on the equal loudness contours. Older audio receivers often included a “loudness” button that simply boosted the bass. The HTP-1 uses a six pole filter carefully designed to match the equal loudness contours. It is calibrated against the volume bar so that 90% volume represents “natural”... -
Page 44: Bass Enhancement (Aka Bass Reinforcement)
(SNR) will be achieved when the output is set to match the amplifier and the HTP-1 volume is at maximum for the amplifier. The HTP-1 uses a high quality analog volume control. It also reserves some of its digital dynamic range using a small amount of digital attenuation. -
Page 45: Connectivity
Power up the unit. After it boots note the IP address listed on the front panel display. On a laptop, tablet, or PC navigate to the HTP-1 IP address by entering it into your browser’s address field. -
Page 46: Video Features
Video Features The video system of the HTP-1 supports HDMI 2.0 and HDCP 2.3 on all ports. It is the job of the HDMI “repeater” inside of the HTP-1 to pass video according to the rules of HDMI while extracting the audio for local decoding. -
Page 47: Dolby Vision
HTP-1. The trigger input is designed to turn on the HTP-1. Applying 12V to the trigger in will cause HTP-1 to turn on. If you use the trigger input you should not use the remote or the front panel to turn the unit on or off as the trigger input takes precedence. - Page 48 With your Roon controller ready, select the Roon input on the HTP-1. With the Roon input selected, the Roon audio is routed through the HTP-1. You can enable upmixing as you desire, or enjoy the pure 192k sample rate (as available) if preferred.
-
Page 49: Firmware Upgrades
Version 0.5 Firmware Upgrades The Monolith HTP-1 software may see periodic improvements and it is easy to install an update from the network when one becomes available. Click on the “Info” button in the lower left of the homepage to access the update page. -
Page 50: Specifications
HTP-1 Installation and User Guide Version 0.5 Specifications Forthcoming Signal Processing Flow This diagram gives a rough idea of the signal flow inside of the HTP-1. Page 50... -
Page 51: Ir Code Table
HTP-1 Installation and User Guide Version 0.5 IR Code Table The tables below illustrate the entire set of supported IR codes. The HTP-1 accepts NEC format remote codes at address 0x36C9. The first table lists the codes sent by the remote. Function... -
Page 52: Revision History
Beta release for review. Important Information Information in this document is provided solely to aid users of the HTP-1 in understanding its operation. Monoprice reserves the right to make changes without further notice to any products herein. Monoprice makes no warranty,... - Page 53 Product pictures are for reference only. Specifications described herein are subject to change without prior notification. All trademarks are the sole property of their respective companies. Monolith™ and the Monolith logo are trademarks of Monoprice Inc. Copyright © 2020 Monoprice, Inc. All rights reserved.
Need help?
Do you have a question about the HTP-1 and is the answer not in the manual?
Questions and answers