Table of Contents
Advertisement
Quick Links
RainScapes
Watering System
Landscape & Garden Watering Kit
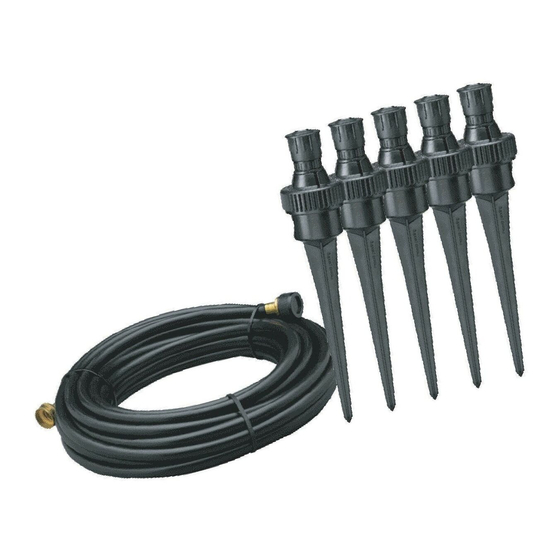
Parts List
A.
B.
Installation & Operating Instructions
Rainscapes Watering System™ is so easy to use, you might not even need this 7-step
guide. But if you do, just follow this step-by-step.
Step 1: Roll out the tubing.
To avoid kinks in the tubing, place something heavy, such as a brick, on one end of the tubing
and continue to roll out the remainder.
Step 2: Lay the tubing through the area you want watered.
It's not necessary, but you could draw yourself a map. Start by connecting the end of the tubing
directly to your outdoor faucet or to a hose connected to the faucet. Next, lay the tubing through
the area you want watered. Now, stand back and admire your progress.
Step 3: Placement of the spikes.
Grab a sprinkler from the box. They are black spikey-looking things. Unscrew the cap from the
spike by twisting the vertical grooves on the cap to the left. Repeat with remaining 4 sprinklers.
Gently push the spikes into the ground at the places that you would like the sprinklers to be
located. Place the tubing through the slot at the top of each spike. Your RainScapes Watering
System™ nozzles have an adjustable spray distance of 1 foot to 12 feet, so make sure you have
placed each spike a minimum of 1 foot apart and no more than 12 feet. Note: You do not have to
use all 5 of the sprinklers provided. Your system will work just as well with 3 or 4.
Step 4: Assemble the sprinklers.
With the tubing placed through each stake, screw the caps back onto the stakes, making sure that
the plastic bar with the metal piercing unit fits into the slot on the stake. Do not over-tighten. It is
not important which direction the metal piercing unit opening faces.
Step 5: Add hold-down stakes.
Hold-down stakes are included to help put unruly tubing in its place. Add stakes between nozzles
or use in areas where it is difficult to "hide" your Simple Soaker. Push the stakes into the ground at
a slight angle for the best staying power. Tip: Just cover the tubing with mulch or rock to blend into
the landscape.
Step 6: Turn on the water.
Turn the water on slowly until the spray diameter has stopped increasing.
™
E.
D.
C.
A. (50 feet)
F.
B. (5)
C. (10)
D. (5)
E. (8)
F. (5)
continued on back
1/2 in. tubing
Adjustable nozzles with spikes
Risers
Half-circle nozzle adaptors
Tubing "goof" plugs
Hold down stakes
Step 1 & 2
Step 3
Step 4
Step 5
50180
Advertisement
Table of Contents

Subscribe to Our Youtube Channel
Related Manuals for Nelson RainScapes Watering System Series


Summary of Contents for Nelson RainScapes Watering System Series
- Page 1 50180 RainScapes Watering System ™ Landscape & Garden Watering Kit Parts List A. (50 feet) 1/2 in. tubing B. (5) Adjustable nozzles with spikes C. (10) Risers D. (5) Half-circle nozzle adaptors E. (8) Tubing “goof” plugs F. (5) Hold down stakes Installation &...
- Page 2 50180 RainScapes Watering System ™ Landscape & Garden Watering Kit continued from other side Step 6 & 7 Step 7: Adjust the spray. With just a couple of twists of your fingers, you can change the distance of the spray. So even if you are all thumbs, it’s easy to adjust the nozzles just the way you want them.
Need help?
Do you have a question about the RainScapes Watering System Series and is the answer not in the manual?
Questions and answers
Replacement adjustable nozzle