Table of Contents
Advertisement
Quick Links
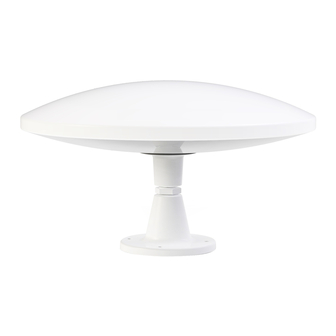
Step 1: Choosing a Location: Make sure the mounting location has a
sufficient flat area so the antenna's mounting stand can be mounted flat.
Step 2: Drilling holes: Use the mounting bracket as a template to determine
where to drill the holes.
Step 3: Assembling the Antenna: Rotate the antenna's locking nut all the
way down on the base. Gently pull the antenna's cables thru the mounting
stand. Screw the antenna onto the mounting stand then rotate up the locking
nut to lock the antenna into place.
Step 4: Attaching the Antenna: Feed the cables thru the hole on the roof.
Put the mounting bolts thru the holes in the mounting stand. On the interior,
place the mounting bracket then use the nuts to secure the antenna.
Step 5: Wiring: Connect the cables from the antenna to distribution wall
plate and to the radio. Connect the power cables from the distribution wall
plate according to the diagram below.
LAVA Electronics Inc
E
mail
support
.
-
:
Tech Support
909
235
6611
www.lavasat.com
:
-
-
AM:520-1719KHz FM:47-230MHz
UHF:470-862MHz
Gain:30dBPower
Supply: DC 12V==50mA
lavasat
com
@
.
RVHD-2000
OMNIPRO series
Advertisement
Table of Contents

Subscribe to Our Youtube Channel
Related Manuals for Antop OMNIPRO Series


Summary of Contents for Antop OMNIPRO Series
- Page 1 RVHD-2000 OMNIPRO series Step 1: Choosing a Location: Make sure the mounting location has a AM:520-1719KHz FM:47-230MHz sufficient flat area so the antenna’s mounting stand can be mounted flat. UHF:470-862MHz Step 2: Drilling holes: Use the mounting bracket as a template to determine...
- Page 2 RVHD-2000 OMNIPRO series LAVA Electronics Inc mail support lavasat Tech Support 6611 www.lavasat.com...
Need help?
Do you have a question about the OMNIPRO Series and is the answer not in the manual?
Questions and answers