Table of Contents
Advertisement
Advertisement
Table of Contents

Related Manuals for MakerPi K5 Plus


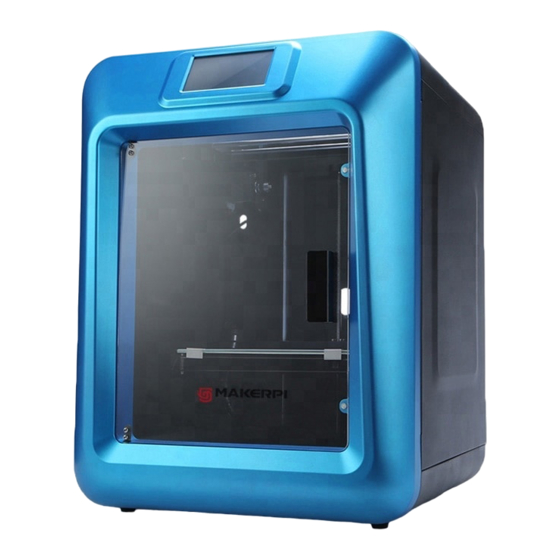
Summary of Contents for MakerPi K5 Plus
-
Page 2: Table Of Contents
Content Chapter 1 Learn about your 3D printer..............3 1.1 3D printer introduction...................4 1.2 Cautions......................5 Chapter 2 Preparation before printing..............6 Chapter 3 Adjustments to the printing platform............9 3.1 Coarse tuning....................9 3.2 Fine tuning....................11 Chapter 4 Printer functions..................13 4.1 Preparation......................14 4.1.1 Return to zero.................. - Page 3 Chapter 5 Software usage introduction..............23 5.1 Slicing software installation................23 5.2 Introduction to the application of slicing software........26 5.2.1 Fast print(Not recommended for use).......... 26 5.2.2 Full mode printing................26 5.2.3 Basic setup..................26 5.2.4 Advanced setup.................. 28 5.2.5 CURA print interface................29 5.3 View the model.....................30 Chapter 6 Printing exercises..................
-
Page 4: Chapter 1 Learn About Your 3D Printer
Chapter 1 Learn about your 3D printer 3D printer introduction... -
Page 6: Cautions
Cautions The nozzle temperature is up to 200 ℃ during the working period of the 3D printer and after printing. So do not touch the nozzle with your hand; Please follow the instructions in the guide to operate and use the machine. If you have any questions, you can contact the after-sales department;... -
Page 7: Chapter 2 Preparation Before Printing
Chapter 2 Preparation before printing Take out the machine and use it for packing, remove the tape, open the front door, and remove the foam. Take out the accessory box, etc. Take out the power cord from the accessory box, connect the power cord. - Page 8 Install WIFI antenna on the side of the machine, Rotate clockwise to fix the antenna. Install white feeding pipe, separate the two ends insert into hole.
-
Page 9: Chapter 3 Adjustments To The Printing Platform
Chapter 3 Adjustments to the printing platform Coarse tuning Platform leveling, filament must be unloaded. When the platform is down, confirm that there is no debris inside the machine. Remove the swift-change nozzle, replace the leveling module. - Page 10 Tighten the four nuts counterclockwise. Twist the nut according to screen indicated...
- Page 11 Turn off the power Replace the swift-change nozzle...
-
Page 12: Fine Tuning
Fine tuning Select a model and wait for the printer to start printing, look at the print platform, again to see the distance between the nozzle and the platform is probably a piece of paper, and then start to print the debugging file, adjust.gcode, by looking at the the effect of the first layer to fine-tune platform, print out the first layer can stop printing, fine-tune and adjustment of the next print. - Page 13 If the distance between the nozzle and the platform is too large or too small, please stop printing and adjust the platform until the distance is appropriate. In most cases, the printing failure is caused by the platform not being adjusted properly. Therefore, please debug repeatedly as required to ensure that the platform height has been adjusted to a better level.
-
Page 14: Chapter 4 Printer Functions
Chapter 4 Printer functions Preparation Each function in the "Prepare" option on the main interface is the preparatory work before we print the model. Click the corresponding option to operate. We will describe them in detail below. 4.1.1 R eturn to zero The machine moves to zero automatically, and the XYZ coordinate is 0. -
Page 15: Load Filament
4.1.3 L oad filament When loading, we confirm again whether the filament is stuck to the transmission gear of the filament feeder. After confirming it, select "Prepare" and click " Load filament". The machine will be zeroed and then lowered for a short distance. At the same time, the nozzle will be heated, when the nozzle is heated to 230°C, the filament feeder will evenly and... -
Page 16: Xyz Move Axis
4.1.5 XYZ move axis In use, we often need to manually move the axis. Select "XYZ move axis". Then it will enter the coordinate movement interface of XYZ. Every touch of "+" and "-" will change the coordinate to 1, and the long press will change the coordinate to 10. -
Page 17: Cool
4.1.7 Cool When you choose not to print after you select preheating, you can choose to cool down the nozzle and hotbed temperature, machine will cool down automatically after printing.Select “Cool”. You can see that the interface is back to the main interface, and that the temperature of the nozzle and the hot bed is set to zero. -
Page 18: Machine Setting
Determine the printed Gcode file again, and then wait for the machine to warm up and print automatically. Machine setting In the machine settings, you can calibrate the machine key sound settings and alarm sound settings, as well as the Z distance measurement.(This function is required if there is a power failure.) 4.3.1 K... -
Page 19: Touch Calibration
4.3.3 Touch calibration When the touch screen keys are inaccurate, you can recalibrate the touch screen click "Touch calibration". After the calibration starts, click the red point center until the calibration is completed. The screen will indicate whether the calibration succeeded or failed. -
Page 20: Other Functions
You can see the machine information and the firmware version of the machine and the running time. Other functions 4.5.1 Basic functions Pause printing: Click "Pause printing" and the machine will pause, the interface will change to "Continue printing". Click "Continue printing", and the machine will print... -
Page 21: Temperature, Printing Speed And Nozzle Fan Adjustment
Confirm the midway filament change operation, the machine will unload filament automatically. When the machine finish to unload the filament, a prompt screen will appear. We need to manually install the new filament, and then click OK to enter the loading operation after it is stuck to the gear of the wire feeder. -
Page 22: Wifi Connection And Video Monitoring
Click the nozzle temperature icon, and the screen will display the adjustment interface nozzle temperature and printing speed. The printing speed 1.0 represents 100% of the set speed, and 0.5 represents 50% of the set speed. Click the hot bed temperature icon, and the screen will display the adjustment interface of the hot bed temperature and fan speed. - Page 23 Enter the last 8-digit password of WIFI name. Open the mobile browser and enter the url 10.10.10.10 to enter Enter the interface can observe the printing process through video, or select the command to operate the printer.
-
Page 24: Chapter 5 Software Usage Introduction
Chapter 5 Software usage introduction Slicing software installation Slicing software program CURA is in the WIN (file name) of SD card software (Please choose mac - file name for Apple computer) Double-click and run CURA software installation package, follow the software instructions, note that if you need to open OBJ and AMF files when using CURA, you need to check the corresponding component when installed. - Page 25 Next Click Finish option, the driver installation is complete. Next will continue to install the slicing software. After the green progress bar is complete, click the option "Next". Finally, click Finish to complete the slicing installation. After installation, the software ...
-
Page 26: Introduction To The Application Of Slicing Software
Introduction to the application of slicing software 5.2.1 Fast print (Not recommended for use) Click ”Experts configuration” - switch to “Fast print mode” Fast print: No need for users to set parameters themselves, all parameters will be set to the corresponding default value as required. - Page 27 Effect: If there is a top hole in the print model, you can increase this value appropriately. Fill rate: 0 is hollow and 100 is solid. Effect: Decreasing fill can save printing time but affect the intensity. Hollows can sometimes be caused by too thin wall thicknesses, cannot complete model printing. proper filling is sometimes necessary.
-
Page 28: Advanced Setup
5.2.4 Advanced setup Nozzle diameter: 0.4 This value is currently fixed. Reverse speed: The speed of reverse pumping. Effect: Theoretically, it will be better if it is faster, but it may cause no filament. Inverted length: The length of the reversed withdrawal wire. These two parameters are the basic settings, by default, reverse pumping is allowed. -
Page 29: Cura Print Interface
11. Layer minimum printing time: The minimum time for each layer of printing, when the printing is too fast, the machine will be based on this. The minimum printing time is reduced by the layer to ensure sufficient cooling time. Effect: Control the minimum printing time for each layer of the machine to ensure sufficient cooling time. - Page 30 Scale: Scale model Reset model Maximize model Scale the model proportionally Scale represents the Size Scale of the model. You can choose to change the size scale to change the model size. Size represents the Size of the model. You can change the value directly to change the size of the model and the size of one of the directions.
-
Page 31: View The Model
After the uniform icon changed to unlock, the size of X was changed, the size ratio of Y and Z remained unchanged, and the size was not changed by itself. Auto mirror: mirror Mirror in X direction Mirror in Y direction Mirror in Z direction View model See if the model size can be printed... - Page 32 View mode:Located in the upper right corner of the software : Normal status view : View overhang. Overhang that requires support appears in red. : Transparent mode : X-ray model : View layer by layer, simulate the printing process. Basic operation of model view ...
-
Page 33: Chapter 6 Printing Exercises
Chapter 6 Printing exercises In the previous chapter we learned about the functionality of the slicing software. Now let's take a look at the actual operation! To complete one printing, we need the following procedures: "STL file"→ "gcode file"→"3D printer". The specific operation is as follows: Open Cura , click the icon or select “Open model or gcode”... - Page 34 Next set the parameters needed for printing manually adjust position and angle of the model. After settings completed, software will compile itself, software will display the time and filament needed for printing after the compilation completed. Note: the information provided by the software can be used to check whether the filament are sufficient and the platform is well adjusted.
- Page 35 Select “Print”, find the previously saved gcode file, and print. Wait for the model to start printing, and then the model will be printed! Note: the model will adhere to the platform after printing, and the bottom can be slowly removed with a shovel.
-
Page 36: Flat Bottom
Chapter 7 Printing tips The principle of the FDM type 3D printer determines its printing characteristics. Only by mastering these characteristics can the ideal graphics be printed better. The main conclusions are as follows: Flat bottom When printing, select the bottom side to be flat. Since printing starts from the bottom and prints layers, the bottom layer determines the print quality of the object, Therefore, printing the... - Page 37 There's also an overhang in this direction. So finally decided to print in this direction. 二.Avoid overhang in design. Overhang appears in this model and cannot avoided changing location. So divide overhanging incline and pillar from main part, print them separately and stick them together with glue in the end.
-
Page 38: Assemble Matching Graphic Tolerances
Overhang appears in the bottom of this model, belongs assembling part. Assembled parts printed separately and reassembled later. Assemble matching graphic tolerances If the printed objects are graphics that need to be assembled, such as the matching of screws and nuts, gears, due to the heat expansion cold shrink of the plastic during printing process as well as the underlying swollen edge printing, the tolerances need to be enlarged a little, general tolerance is set to 0.4 mm, depending on the actual graphics... -
Page 39: Chapter 8 Printing Picture Relief
Chapter 8 Printing picture relief Through our 3D printer, you can print the images you like into reliefs. With Cura software, you can directly generate the images you like into gcode files that can be printed, and then print the reliefs by machine operation. After selecting a good picture, it is best to use PS to change the background to transparent and then save it as PNG format. - Page 40 After setting the parameters, click "OK" and the model file as shown in the figure will appear (the effect will be better if the picture is pressed upright). After generating gcode, it can be printed.
-
Page 41: Chapter 9 Exports Stl Format Files
Chapter 9 Exports STL format files Pro/E exports STL files Select the "File" column and click "Save Copy" in "Save As". Check the format of (*stl) in the ”Type” column of the saved file, name the file, and click OK. -
Page 42: Ug Export Stl File
Next, select "Binary" as the format of the parameter, and enter the "Chord height" and "Angle control" input values, and then confirm that the export is completed. UG export STL file Select column "Export", "STL" format. - Page 43 Enter “0” ”Triangle Tolerance” ”Adjacent Tolerance”, and click OK. Name the component and click “OK”. Click OK. Select the model file you want to convert and click...
-
Page 44: Solidworks Export Stl Files
Click OK, and the selection box that pops up after that, select OK until the export of the file is completed. Solidworks export STL files Click on the "File" column and select "Save As". Select "STL(.*stl)" in the "Save as type"... - Page 45 Then select the "Options" button at the bottom left of the interface. As the options shown in the figure above, the output is "Binary", adjust the "Error" and "Tolerance" parameters to the far right, and then click Then click save to complete the format conversion.
-
Page 46: Chapter 10 Analysis Of Common Problems
Chapter 10 Analysis of common problems 1. Electrified by the machine when using it The metal-clad machine itself is electrostatically charged, which does not harm the human body. The reason for static electricity is that there is no ground wire at home. The solution to this problem is: (1) Connect the ground when laying wires at home;...
Need help?
Do you have a question about the K5 Plus and is the answer not in the manual?
Questions and answers