Table of Contents
Advertisement
Quick Links
Advertisement
Table of Contents

Subscribe to Our Youtube Channel
Related Manuals for Xcruiser XS9900D

Summary of Contents for Xcruiser XS9900D
- Page 3 In case of any inquires after a period of usage, please contact the manufacturer. - Please charge the battery before using your meter for the first time. (Recommend 5 hours) © COPYRIGHT 2011 XCRUISER CORPORATION KOREA...
- Page 4 XS9900D...
-
Page 5: Table Of Contents
Switch-on the Device ..................13 Lithium-ions-battery ..................14 Charging the battery ..................14 Storing of the batteries ..................15 System setting ....................15 Timer ....................... 17 Delete channels ....................17 Factory reset ....................17 Software Version ..................... 17 XS9900D Xcruiser Satellite-Meter ENG-... - Page 6 Lining satellite aerial up .................. 22 Satellite setting ..................... 24 Automatic search ..................30 Angle calculation ..................32 Spectrum Analyzer ..................36 Adjustment ...................... 36 Disposal ......................36 Technical specifications ................41 Warrenty ......................43 Declaration of conformity ................43 XS9900D Xcruiser Satellite-Meter ENG-...
-
Page 7: Description
The scope of supply contains, among the charger, a USB cable which allows you to update software. A carrying case serves as protection and for the transport. It cares for better readability of the display at sunshine. XS9900D Xcruiser Satellite-Meter ENG-... -
Page 8: Safety Instructions
Safety of persons Ensure that nobody can be hurt by falling tools or parts of the satellite antenna during the adjustment and installation of the antenna. For your own security use a rope on sloping roofs. XS9900D Xcruiser Satellite-Meter ENG-... -
Page 9: General Information
Do not operate with the device: • if it has visible damage, • if there are loose parts in the device, • if the device was located outdoors or in damp rooms a extended period of time. XS9900D Xcruiser Satellite-Meter ENG-... -
Page 10: Appropriate Usage
• a car adapter cable 12 V, • an extern charger, • a power cable. • an user manual, • an AV in/out cable • a CD-ROM including the Software If the above packing list was incomplete, contact your specialist dealer. XS9900D Xcruiser Satellite-Meter ENG-... -
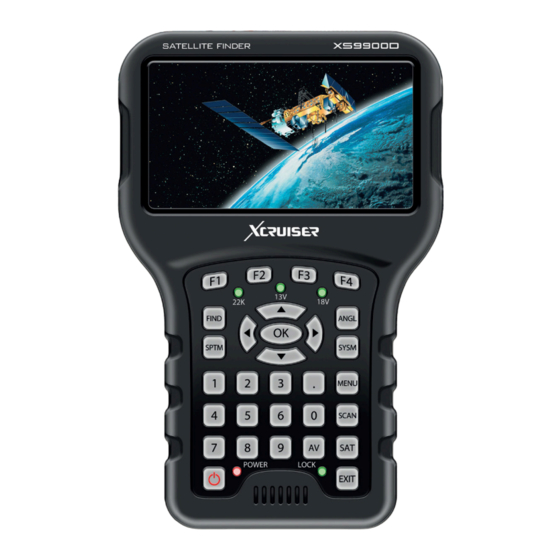
Page 11: Device Overview
XS9900D Device overview Figure 1 : Front of the meter XS9900D Xcruiser Satellite-Meter ENG- 10... - Page 12 FIND menu: for a quick and easy alignment of a satellite antenna Menu-button Display the main menu EXIT-button Leave the current menu, cancel operation ANGLE-button Display the calculation menu Configuration of all system parameter. SYSTEM-button Display current software version. XS9900D Xcruiser Satellite-Meter ENG- 11...
- Page 13 USB-Port USB port for PC connection SPTRUM button Display the menu of spectrum AV button Press for AV in and out AV port AV input / output SAT button Press for the satellist Speaker Sound XS9900D Xcruiser Satellite-Meter ENG- 12...
-
Page 14: Start Of Operation
Load the accumulator during the first loading procedure at least 5 hours. The maximum battery charging time is approximately 12 hours. Switch-on the Device � Press 2 seconds the red power button on the meter. XS9900D Xcruiser Satellite-Meter ENG- 13... -
Page 15: Lithium-Ions-Battery
� Connect the external AC adapter to the power grid. � Connect the AC adapter to the low-voltage port at the bottom. � The battery is charged as soon as you connect the AC adapter to the meter XS9900D Xcruiser Satellite-Meter ENG- 14... -
Page 16: Storing Of The Batteries
Loading the accumulator at a longer storage every two weeks to avoid a depth discharge. System setting � Press the MENU button. � Select the point system setting. � Confirm your selection using the OK button. XS9900D Xcruiser Satellite-Meter ENG- 15... - Page 17 Press the SYSTEM button to change the menu language. � Select the point Language select. � Choose your desired language using the ◄- or ►- button. � After your selection press the EXIT button and follow the instructions on. XS9900D Xcruiser Satellite-Meter ENG- 16...
-
Page 18: Timer
This menu item is described on page 15. Software Version � Press the SYSTEM button. � At software version you can read the topical software state of the Satellite meter. � How to update the software is described on page 26. XS9900D Xcruiser Satellite-Meter ENG- 17... - Page 19 XS9900D Note! In the support area at http://www.xcruiser.net, you have got the option to download the topical software. XS9900D Xcruiser Satellite-Meter ENG- 18...
-
Page 20: Factory Reset
� Press the SYSTEM button to display the System setting menu. � Select the point factory reset. � Note the instructions on the display and confirm your selection with the OK button or cancel it using the EXIT button. � XS9900D Xcruiser Satellite-Meter ENG- 19... - Page 21 After reset to factory default you will have to enter the registration code. You can find the appropriate registration code at the back of the measuring device. Please contact your dealer in case of a missing registration code. XS9900D Xcruiser Satellite-Meter ENG- 20...
-
Page 22: Satellite Finding
Press the FIND button to display the Satellite Finding menu. � Figure 4: Satellite Finding Finding channels manual � Press the FIND button to display the menu satellite finding. � Press the ◄- or ►- button to select a satellite. XS9900D Xcruiser Satellite-Meter ENG- 21... -
Page 23: Lining Satellite Aerial Up
� Turn the receiving dish as long as the LOCK- LED lights, or the joists of the signal level and signal quality are green. Once a signal is found, the bar graph shows the signal strength and quality. In addition C/N, FEC and a.BER (after BER) are displayed. In addition an acoustic signal is represented. XS9900D Xcruiser Satellite-Meter ENG- 22... - Page 24 Or in the case if the signal about a multi-counter should be distributed to several buyers. The higher the C/N value, the better. The BER value behind “10E” is important. The higher, the better. The value should be minimal 10E-4. The optimum is > 10E-6. XS9900D Xcruiser Satellite-Meter ENG- 23...
-
Page 25: Satellite Setting
� Press the MENU button to display the main menu. � Press the ▲- or ▼- button to move the cursor. � Select the point satellite setting and press the OK button Figure 5: Satellite setting XS9900D Xcruiser Satellite-Meter ENG- 24... - Page 26 Figure 6: Edit satellites � Press the ◄- or ►- button to switch between the satellites and transponder list of the chosen satellite. � Press the OK button to display the angle and position of the current satellite. XS9900D Xcruiser Satellite-Meter ENG- 25...
- Page 27 � Press the OK button. After that you can modify the frequency, polarisation and the symbol rate. (Press the ◄- or ►- button first, then input the numbers) � To store your changes select save and press the OK button. XS9900D Xcruiser Satellite-Meter ENG- 26...
- Page 28 XS9900D Figure 8: Edit transponders � Select the point Dish Set-up and press OK-button. XS9900D Xcruiser Satellite-Meter ENG- 27...
- Page 29 � Press the ◄- or ►- button to modify the value of the selected item. Use the NUMERIC buttons if necessary. • Satellite • LNB-Type • Low L.O.F. • Hight L.O.F. • 22K • LNB power • DiSEqC-Level • Switch inuput • Motor XS9900D Xcruiser Satellite-Meter ENG- 28...
- Page 30 Switch Input: 1, 2, 3, 4 Motor: Fixed, DiSEqC 1.2, USALS Press the F4 button to save the setting, or the EXIT button to store the settings or to leave the menu. Follow the instructions on the display. XS9900D Xcruiser Satellite-Meter ENG- 29...
-
Page 31: Automatic Search
Mode: ALL, FTA, Scrambled Search: Satellite, transponder � Having your selection press the OK button to start the search. � After the completion of the search you can leave the menu using the EXIT button. XS9900D Xcruiser Satellite-Meter ENG- 30... - Page 32 XS9900D Figure10: Auto Scan XS9900D Xcruiser Satellite-Meter ENG- 31...
-
Page 33: Angle Calculation
� Press the ◄- or ►- button or use the NUMERIC keys to change the configuration of the selected menu point. Figure 11: Angle Calculation � Press the ▲- or ▼- button to select the following points: • Satellite • Longitude • Location • Latitude • Hemisphere • Angle calculation XS9900D Xcruiser Satellite-Meter ENG- 32... - Page 34 Polarity: shows the polarity angle of the chosen satellite Channel selection �Press the OK button and choose the desired program using the ▲- or ▼-button. Press the OK button again. XS9900D Xcruiser Satellite-Meter ENG- 33...
- Page 35 If you know the channel number, you can enter it with the NUMERIC buttons and wait 2 seconds until the channel is changed. Channel information � Press the F3 button in the TV mode to get additional information about the current channel. XS9900D Xcruiser Satellite-Meter ENG- 34...
- Page 36 System-Button You can request current information or the software version of your device. Note: This information is useful to check if there is a newer software available version than the current version on your device. XS9900D Xcruiser Satellite-Meter ENG- 35...
-
Page 37: Spectrum Analyzer
In this menu you can control the transponders over the whole spectrum. � Choose Spectrum analyzer in the main menu, or Start the Spectrum-analyzer by choosing SPECTRUM Figure 13: Spectrum analyzer Adjustment Changes the sampling-frequency between 4MHz und 16MHz Changes between 13V and 18V (horizontal, vertical) XS9900D Xcruiser Satellite-Meter ENG- 36... - Page 38 Marks individual transponders (red triangle); the signal-strength of the transponders shown � F2 LNB setting Figure 14: LNB Setting � Chose the category and adjustment with the Buttons ▲- ▼ and ◄- ► LNB-Type UNIVERSAL, 5150, 9750, 10750, 11300, 10700, Customized (s. technical Data LNB) XS9900D Xcruiser Satellite-Meter ENG- 37...
- Page 39 � When see the waveform, you want to double-check if it’s the right satellite, just choose the frequency and press OK. It will auto-search the symbol rate, polarity and will give the name of satellite. You can press SEARCH key to scan the channels under this Frequency. XS9900D Xcruiser Satellite-Meter ENG- 38...
- Page 40 XS9900D Figure 15: Transponder search XS9900D Xcruiser Satellite-Meter ENG- 39...
- Page 41 2003 on used electrical and electronic equipment it must be disposed of properly. At the end of its service life take this unit for disposal at a relevant official collection point. Help to keep our environment clean which we are living in! XS9900D Xcruiser Satellite-Meter ENG- 40...
-
Page 42: Technical Specifications
Length x width x height 9,5 x 15,5 x 4,5 cm SDRAM 16 MByte Gross-weight 0,5 Kg FLASH 2 MByte Temperature EEPROM 8Kbyte Operating temperature 0°C to +40°C Storage temperature -40°C to +65°C XS9900D Xcruiser Satellite-Meter ENG- 41 XS9900D Xcruiser Satellite-Meter ENG- 42... -
Page 43: Declaration Of Conformity
XS9900D Warranty The warranty for the Satellite meter of the company Xcruiser Corporation, Korea is in conformity with the prevailing statutory regulations at the time of purchasing the product. Declaration of conformity • The company Xcruiser Corporation, Korea hereby declares conformity with the following guidelines and standards for this product: •... - Page 45 XS9900D Digital Satellite Finder Xcruiser Corporation, Korea...
Need help?
Do you have a question about the XS9900D and is the answer not in the manual?
Questions and answers