
Related Manuals for Alpha MULTIPOINT Series


Summary of Contents for Alpha MULTIPOINT Series
- Page 1 INSTANT WATER HEATER QUICK INSTALLATION GUIDE (You are still required to refer to the instruction manual before installation)
- Page 3 FOR SINGLE POINT OPENED For M5 and Smart OUTLET 18 Series only. HEATER...
- Page 4 TOOLS YOU NEED Hammer Safety Shoe PTFE Tape Screwdriver Plier Drill Spanner Water Pump Plier Wire Cutter Test Pen...
- Page 5 ELECTRICAL REQUIREMENT Direct Wiring installation Wire Wire cable (2.5mm) for 3.5kW Wire cable (2.5mm) for 4.5kW Wire cable (4.0mm) for 5.5kW Wire cable (4.0mm) for 6.0kW Wire cable (6.0mm) for 8.0kW Incoming water source...
- Page 6 ELECTRICAL REQUIREMENT 13A (3 pin Plug) 15A (3 pin Plug)
- Page 7 ELECTRICAL REQUIREMENT 3.5kW use 20A MCB 4.5kW use 25A MCB 5.5kW use 32A MCB 6.0kW use 32A MCB 8.0kW use 40A MCB...
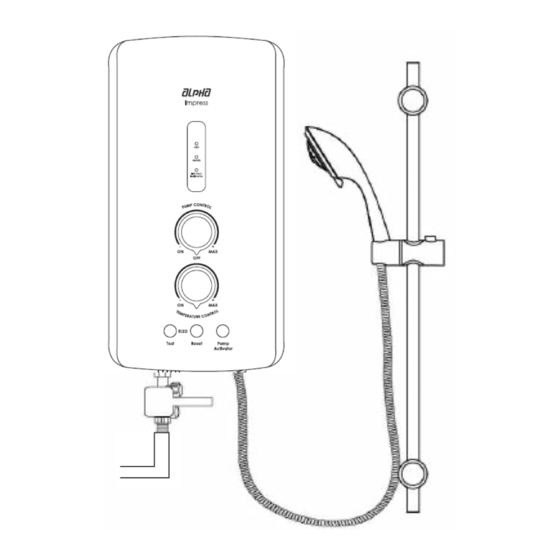
- Page 8 PARTS IDENTIFICATON...
- Page 9 PARTS IDENTIFICATON (RAIN SHOWER)
- Page 10 INSTALLATION PROCEDURE...
- Page 11 all incoming electricity & water supply CHECK 0 current Heater Switch Incoming Cable Water Supply...
- Page 12 Decide heater installation height. Decide Rainshower installation height. Recommended to install at 1.5m from the Recommended to install at 2m from the ground ground to user’s eye level Eye Level Eye Level 2m / 7 feet 1.5m / 5 feet 1.5m / 5 feet...
- Page 13 1. Remove screw from the bottom of the heater and lift up the cover 2. Mark out 4 mounting points on the wall and drill them with 5.0mm diametre drill bit Install wall plugs and install the heater onto the wall with the provided screws 3.
- Page 14 – Live – Neutral – Earth 1. You can choose to insert the wires from the side or wall (embedded entry) 2. Make sure the wires are fully tightened and installed as per indicated (Live, Neutral, and Earth) 3. Install the heater cover and fasten the screw. 4.
- Page 15 TIPS Please use the provided rubber grommet if you opted for side entry for the wires. The rubber grommet prevents Insects and lizards as well as water from entering the heater and causing damage.
- Page 16 TEST RUN 1. Turn on stop valve and let water flows through the hand shower. 2. Switch on heater switch outside the bathroom. ELSD / Auto Test will light up. 3. Turn on Temperature Control Knob. 4. The HEATER indicator will light up and water shall get warm a few seconds later. Water will get warmer as the knob is turned clockwise.
- Page 17 CHECK ELSD - EARTH LEAKAGE SENSING DEVICE 1. Press TEST button: unit shall trip and cut-off power supply . 2. Press RESET button: unit shall resume normal function. If the above mentioned steps prevailed, it means ELSD is functioning normally. Note: ELSD and ELCB(Earth Leakage Circuit Breaker) are the same...
- Page 18 CHECK BUILT-IN PUMP– only for heaters with built-in pump 1. The pump canbe independently controlled by using the Pump Control Knob. The knob can be used to adjust the pump speed to obtained the desired water flow 2. The Pump Activator can be pressed if the water pressure is too weak to trigger the built-in pump. Just press the button and the pump will spring into action.
- Page 19 SHOWER ACCESSORIES INSTALLATION...
- Page 20 RAIN SHOWER ACCESSORIES INSTALLATION...
- Page 21 RAIN SHOWER ACCESSORIES INSTALLATION...
- Page 22 RAIN SHOWER ACCESSORIES INSTALLATION...
- Page 23 MULTIPOINT INSTALLATION 8.0 kW 6.0 kW...
- Page 24 MULTIPOINT INSTALLATION Installation & Test Run is very similar to single point water heater. Several areas need to be taken note Pressure Relief Valve 1. Identify INLET and OUTLET 2. Install the given Pressure Relief Valve at the INLET 3. Turn the mixer tap to the left (Hot) and let water flows through the tap before turning on the heater switch out side the bathroom.
- Page 25 Auto Test (for M5 and Smart 18 Series only) is a self inspection routine to alert user to any potential hazards. If ELCB is faulty, Auto Test indicator will blink When the Auto Test indicator light up in RED and electric supply to heater will be GREEN, heater’s ELCB is in ‘safe’...
- Page 26 Auto Test (for M5 and Smart 18 Series only) is a self inspection routine to alert user to any potential hazards. When the Auto Test indicator light up in If ELCB is faulty, Auto Test indicator will blink GREEN, heater’s ELCB is in ‘safe’ mode RED and electric supply to heater will be cut off...
- Page 27 COMMON MISTAKES – when installing single point heater Reverse inlet & outlet No stop valve Stop valve installed at outlet Inlet on LEFT side (Close outlet) YOU CANNOT DO THIS TO SINGLE POINT OPEN OUTLET HEATERS ALWAYS CHECK INLET AND OUTLET LABEL AT THE BOTTOM OF THE HEATER BEFORE INSTALLATION...
- Page 28 GUIDANCE...
- Page 29 MAINTENANCE – clean stop valve...
- Page 30 MAINTENANCE – clean hand shower filter mesh...
- Page 31 MAINTENANCE – Pressure Relief Valve (FOR MULTIPOINT MODELS)
- Page 32 TROUBLESHOOT...
- Page 33 TROUBLESHOOT...
Need help?
Do you have a question about the MULTIPOINT Series and is the answer not in the manual?
Questions and answers