Table of Contents
Advertisement
Available languages
Available languages
Quick Links
"MINI" LIGHT FOR SPAS
PROJECTEUR "MINI" POUR SPAS
PROYECTOR "MINI" PARA SPAS
FARO "MINI" PER SPA
MINI-SCHEINWERFER FÜR WHIRPOOLS
PROJECTOR "MINI" PARA SPAS
INSTALLATION AND MAINTENANCE MANUAL
MANUEL D'INSTALLATION ET D'ENTRETIEN
MANUAL DE INSTALACIÓN Y MANTENIMIENTO
MANUALE DI INSTALAZIONE E MANUTENZIONE
EINBAU-UND BETRIEBSANLEITUNG
MANUAL DE INSTRUÇÕES E MANUTENÇÃO
1
Advertisement
Table of Contents

Related Manuals for Astralpool 33709


Summary of Contents for Astralpool 33709
- Page 1 “MINI” LIGHT FOR SPAS PROJECTEUR “MINI” POUR SPAS PROYECTOR “MINI” PARA SPAS FARO “MINI” PER SPA MINI-SCHEINWERFER FÜR WHIRPOOLS PROJECTOR “MINI” PARA SPAS INSTALLATION AND MAINTENANCE MANUAL MANUEL D’INSTALLATION ET D’ENTRETIEN MANUAL DE INSTALACIÓN Y MANTENIMIENTO MANUALE DI INSTALAZIONE E MANUTENZIONE EINBAU-UND BETRIEBSANLEITUNG MANUAL DE INSTRUÇÕES E MANUTENÇÃO...
-
Page 2: General Characteristics
ENGLISH IMPORTANT: The instruction manual you are holding includes essential information on the safety measures to be implemented for installation and start-up. Therefore, the installer as well as the user must read the instructions before beginning installation and start-up. Keep this manual for future reference. To achieve optimum performance of the Mini light for SPAS, follow the instructions provided below: 1. -
Page 3: Maintenance
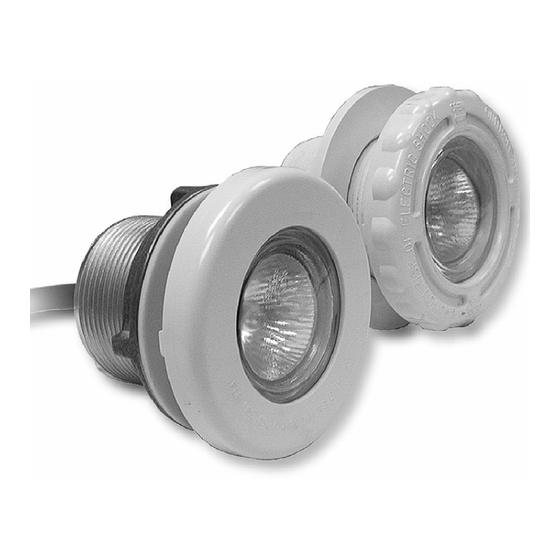
Recommendations for the installation of the light: • Never install in vertical position with the lamp down. • Before installing, check that the gland seal is very tight. • Always install the body in order an easy manipulation from the outside, or in one way that you can extract it out without many difficulties. -
Page 4: Montage
FRANÇAIS IMPORTANT: le manuel d’instructions que vous avez entre les mains contient des informations de première importance sur les mesures de sécurité à adopter au moment de l’installation et de la mise en service. Il est par conséquent indispensable que l’installateur et l’utilisateur lisent attentivement les instructions avant de commencer le montage et la mise en marche. -
Page 5: Entretien
3. Introduire le câble du projecteur à l’intérieur de la traversée (Fig. 9). Le câble doit être suffisamment long pour pouvoir amener le projecteur sur la partie supérieure de la piscine. 4. Introduire ensuite le projecteur, et visser le corps du projecteur sur la traversée (Fig. 10). Recommandations pour l’installation de la Lumière: •... -
Page 6: Instalación
ESPAÑOL IMPORTANTE: El manual de instrucciones que usted tiene en sus manos, contiene información fundamental acerca de las medidas de seguridad a adoptar a la hora de la instalación y la puesta en servicio. Por ello, es imprescindible que tanto el instalador como el usuario lean las instrucciones antes de pasar al montaje y la puesta en marcha. -
Page 7: Mantenimiento
3. Introducir el cable del proyector a través del pasamuros (Fig. 9). Dejar suficiente cable para poder extraer el proyector hasta la parte superior de la piscina. 4. A continuación introducir el proyector roscándolo en el pasamuros hasta su posición definitiva (Fig. 10). Recomendaciones para la instalación del Proyector Mini para SPAS: •... -
Page 8: Caratteristiche Generali
ITALIANO IMPORTANTE: Il manuale d’istruzioni in suo possesso contiene informazioni fondamentali sulle misure di sicurezza da adottare per l'installazione e la messa in servizio. Per ciò è imprescindibile che sia l’installatore che l’utente leggano le istruzioni prima di iniziare il montaggio e la messa in servizio. Conservi questo manuale per poter consultare in futuro in merito al funzionamento di questo apparecchio. -
Page 9: Manutenzione
3. Introdurre il cavo del faro attraverso il passante a muro (Fig. 9). Lasciare sufficiente cavo per estrarre il proiettore fino alla parte superiore della piscina. 4. A continuazione introdurre il faro avvitando il corpo del faro al passante a muro (Fig. 10). Raccomendazioni per l’installazione del Proiettore Mini par SPA: •... - Page 10 DEUTSCH WICHTIG: Das Handbuch mit den Betriebsanleitungen, das Sie in Händen halten, enthält wichtige Information über die anzuwendenden Sicherheitsmaßnahmen für die Installation und Inbetriebnahme. Es ist daher unerläßlich, daß die Anweisungen vom Installateur und vom Benutzer vor der Montage und Inbetriebnahme aufmerksam durchgelesen werden.
-
Page 11: Wartung
2. Die Wanddurchführung muss mit einem Rohr so verlängert werden, dass sich das Ende oberhalb des höchsten Niveaus des Beckens oder Whirlpools befindet (Fig. 8). 3. Das Kabel des Scheinwerfer durch die Wanddurchführung durchstecken (Fig. 9). Es ist ausreichend Kabel zurückzulassen, damit der Strahler bis zum oberen Teil des Swimmingpools hochgezogen werden kann. -
Page 12: Características Gerais
PORTUGUÊS IMPORTANTE: O manual de instruções que você tem nas mãos contém informação fundamental sobre as medidas de segurança a tomar ao realizar a instalação e a colocação em funcionamento. Por isso, é imprescindível que tanto o instalador como o utilizador leiam as instruções antes de realizar a montagem e a colocação em funcionamento. Guarde este manual para futuras consultas sobre o funcionamento deste aparelho. -
Page 13: Colocação Em Funcionamento
4. De seguida introduzir o projetor, roscando corpo do projetor ao passamuros (Fig. 10). Recomendações para a instalação do Projetor Mini para SPAS. • Nunca instalar em posição vertical com a lâmpada virada para baixo. • Antes de instalar, comprovar que o bucim está bem apertado. •... - Page 15 ENGLISH Nº CODE DESCRIPTION 33709 33685 CANT 18881/18882 (*) Coloured lens: Red / Yellow (*) 18883/18884 (*) Coloured lens: Green / Blue (*) 08554R0005 Decorative cover 17883R0003 Decorative cover 17883R0002 Floodlamp ring 08523 D.63 floodlamp lens 19334 GX-5.3 50W 12V Halogen bulb with reflector...
- Page 16 ESPAÑOL Nº CODIGO DESCRIPCIÓN 33709 33685 CANT 18881/18882 (*) Lente de color Rojo / Amarillo (*) 18883/18884 (*) Lente de color Verde / Azul (*) 08554R0005 Tapa embellecedora 17883R0003 Tapa embellecedora 17883R0002 Anillo proyector 08523 Lente D.63 proyector 19334 Lámpara halógena GX-5.3 50W 12V reflector...
- Page 17 DEUTSCH Nº ARTIKEL NR. BESCHREIBUNG 33709 33685 MENG 18881/18882 (*) Farblinse Rot / Gelb (*) 18883/18884 (*) Farblinse Grün / Blau (*) 08554R0005 Verschönerungsdeckel 17883R0003 Verschönerungsdeckel 17883R0002 Ring des Kaltlichtslrahlers 08523 Linse D. 63 Kaltlichtslrahler 19334 Halogene lampe GX-5.3 50W 12V mit reflektor...
- Page 19 •...
- Page 20 CARACTERISTICAS TECNICAS • • DATI TECNICI • TECHNISCHE ANGABEN CARACTERISTICAS TECNICAS • Model: 33709 Model: 33685 DESCRIPTION Model “MINI” Rated voltage / Tension nominale / Tensión nominal 12 V AC Tensione nominale / Anschlusspannung / Tensão nominal 12V AC 50 W Halogen lamp with aluminised reflector and front lens Réflecteur aluminise et lentille frontale...
Need help?
Do you have a question about the 33709 and is the answer not in the manual?
Questions and answers