Table of Contents
Advertisement
Advertisement
Table of Contents

Related Manuals for Avantik QS12

Summary of Contents for Avantik QS12
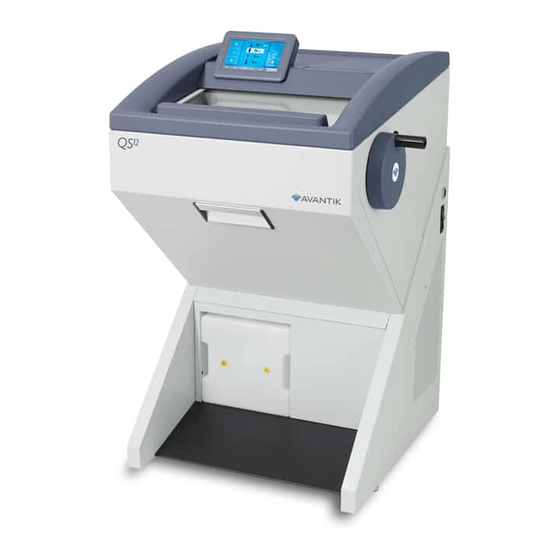
- Page 1 M A N U A L T H E R E V O L U T I O N A R Y C R Y O S T A T The Avantik QS and QS Cryostats 12UV Your laboratory...refined, efficient, easy.
-
Page 2: Notes
Notes... - Page 3 Notes...
-
Page 4: Important Note Regarding Instrument Variants
Company Information Important Note Regarding Instrument Variants is document is designed for use with the Only two variants UVC and non UVC are available on this instrument and the instructions contained in this manual are not speci c to any one variant. us some features described may not be available on your instrument. -
Page 5: Symbols
Company Information Symbols e following symbols and conventions may be used throughout this document and on the instrument: is symbol is used on the instrument, or in a document, to indicate that instructions must be followed for safe and correct operation. If this symbol appears on the instrument, always refer to the operator guide. -
Page 6: Table Of Contents
Company Information Table of Contents Notes ....................................2-3 Important Note Regarding Instrument Variants ........................4 Symbols ....................................5 Table of Contents .................................. 6 1 - Safety Information ................................9 General Safety ................................... 9 Chemical Safety ................................10 Environment ................................... 10 Warranty Statement ................................ 10 2 - Introduction................................... - Page 7 Troubleshooting Tables ..............................49 Tips for Successful Sectioning ............................51 Temperature list for cryo-sectioning ..........................51 6 --- Maintenance and Care of the QS12 ........................53 Cleaning the Touch Screen Display ..........................53 Shutting O for Cleaning ............................... 53 Cleaning and Care ................................54...
- Page 8 Chapter 1 -- - Safety Information Cleaning the cooling Vent ............................54 Conditions for the transportation of the instrument ......................55 Returning the instrument for repair or routine Maintenance ..................55 Accessories standard equipment ............................57 Index ....................................58...
-
Page 9: Safety Information
Chapter 1 -- - Safety Information 1 - Safety Information Avantik Biogroup instruments are designed for convenient and reliable service; however, improper use or handling by a user may damage the instrument, or cause a hazard to health. e instrument must not be used in a manner not speci ed by Avantik Biogroup. -
Page 10: Chemical Safety
Good Laboratory Practice. Warranty Statement Avantik is proud of our quality, reliability and of our after-sales service. We continuously strive to improve our service to our customers. Please ask your distributor or Avantik representative about service contracts which can help maintain your instrument in an optimal operating condition. -
Page 11: Introduction
Any other use of this instrument is considered as improper operation. Instrument Features e QS12 is a precision-engineered, ergonomically-designed, high-performance cryostat in modular design with a stainless steel cooling chamber. Some of its features are: •... - Page 13 Chapter 2 - Introduction Cooling Specifications Cryobar Cooling (Peltier Element) Max. - 55°C (-67°F) Chamber Temperature Max. -35°C -2K/+1K (-31°F -2K/+1K) at +20°C room Temp. (decrease 0,7°C/1°C room temp. increase) Defrosting Options Programmed / Immediate Microtome and Sectioning Specifications - - - - - - - - - m in 1 m steps...
- Page 14 Chapter 2 - Introduction Factory settings Counter Mode Retraction Language English Chamber Temperature -20°C Fine Trim Chamber Light 100% Screen Brightness 100% Stepper Motor Initialization Cryobar Defrost Cycle (Automatic) ON (00:00 Night) Section Counter Section Sum...
-
Page 15: Instrument Setup
Do not tip the QS12 more than 30° from the upright position. After moving the QS12, wait at least 8 hours before switching on to allow the refrigerant to settle - failure to do so may cause damage to the unit. - Page 16 Chapter 3 -- - Instrument Setup Note e upper wooden cover now serves as a ramp (fig. 1a.1) on which the QS12 can be moved from the pallet to the oor by using the handle ( g. 1a) (item 2).
- Page 17 r e t - - - Instrument Setup The installation site must also be free from: • Draught by open doors or by air conditioning systems. • Direct exposure to sunlight into the cooling chamber. Note Both measures reduce the formation of frost and therefore result in more favourable work conditions.
-
Page 18: Location & Setup
- - - Instrument Setup Location & Setup When deciding where to locate the QS12, the following items must be taken into consideration: • Approximately 10 cm (4 in) must be allowed around the cooling system to allo •... -
Page 19: Identi Cation Of Parts
Chapter 3 -- - Instrument Setup Identification of Parts Overview Cryo chamber Cryo chamber Window Touch Screen Connections Panel Handwheel Mechanical Lock Handwheel Water Drain Reservoir Connections Panel USB port Power Switch Power Socket Cryochamber Cryobar and Cooled Storage Area Specimen Head Tool storage Handwheel Mechanical Brake Button... -
Page 20: Solid Knife Holder
Chapter 3 -- - Instrument Setup Solid Knife Holder Inserting the knife: e knife is inserted into the slot behind the clamping plate. Clamping Plates Clamping Screws Anti-roll Plate Anti-roll Plate Turning Lever Knurled Screw Anti-roll Plate Knurling Screw Knife Guards Clearance Angle Clamping Lever Clearance Angle Scale Inserting the knife:... -
Page 21: Disposable Blade Holder Ec
Chapter 3 -- - Instrument Setup Selecting the clearance angle: • Loosen the clamping lever on the left side of the knife carrier. • Swivel the upper part of the knife carrier on the base until the desired clearance angle is reached. •... -
Page 22: Disposable Blade Holder Ec 70
Chapter 3 -- - Instrument Setup If the cutting area of the blade is no longer usable, the blade carrier can be moved: • e blade itself is clamped solidly into the blade carrier. e complete carrier is moved. • Open the clamping lever for the carrier and move the carrier to the left or right side. - Page 23 • e selected clearance angle is now xed in its position. Note Usable cuts are only achieved at a clearance angle of 10° or more. Specimen Head QS12 Microtome base plate Electrical connector Specimen Chuck Release Lever Specimen Head Clamping Lever...
-
Page 24: Set Up
Chapter 3 -- - Instrument Setup Set Up Before sectioning, the blade holder and the cryo chamber should be at a stable temperature close to the desired cutting temperature. ese temperatures should be selected to suit the consistency of the specimen. All tools which come into contact with the sections or which are used to manipulate the specimen must also be cooled to prevent the tissue from sticking to them. -
Page 25: Specimen Setup
r e t - - - strument Setup Specimen Setup Before sectioning can begin, the specimen must be correctly clamped and oriented in the specimen head. To clamp and orient the specimen: • Loosen the specimen chuck release lever and insert the specimen chuck into the center hole of the specimen head. Specimen Chuck Release Knob Specimen Head Clamping Lever •... -
Page 26: 4- Operation
Note No other instruments should be connected to the circuit used for the QS12, as the compressor needs high surge currents when started. Do not use multi-socket power outlets with small wire sizes for the supply of the instrument. -
Page 27: System Interfacing
System Interfacing Using the Touch screen e QS12 has an embedded touch screen user interface which is used to set all preferences. Note Avoid using sharp or pointed objects to press buttons on the touch screen. It is recommended that a clean nger is used to operate the touchscreen. - Page 28 Chapter 4 -- - Operation "Arrow" button e ‘‘Arrow’’ buttons are used in several menus to increase or decrease values. • Use the arrow button to adjust the value to the required setting. Decreases the selected value by multiple steps. Decreases the selected value by 1 step.
-
Page 29: Setting Preferences
Chapter 4 -- - Operation Setting Preferences Quick Freezing of the Specimen e cryobar provides on-demand, quick freezing of specimens. Note When the cryobar is activated, it will take approximately 2 - 3 minutes for the cryobar to reach a temperature of maximum -55°C. e cryobar remains active for approximately 10 minutes indicating by the timeline display below the cryobar button on the screen. -
Page 30: To Set The Specimen Head Position
Chapter 4 -- - Operation To set the Specimen Head Position: • Move the Specimen Head to the desired position and press the ‘‘Position’’ button on the Main screen for about 3 seconds. • e colour will change to yellow, showing that the position has been saved and the required position is stored. •... -
Page 31: Trim And Fine Section Ickness
Chapter 4 -- - Operation • Either select one of the preset temperatures (-35°C, -30°C, -20°C or -10°C) or adjust the temperature using the arrow keys. • Press "OK" to con rm the setting and to return to the Main screen. •... -
Page 32: Multi Function Bar
r e t - - - i t a Multi Function Bar ulti function bar provides the user access to useful information and functions. located at bottom of the Main screen. TRIM button Time/Date Counter (section thickness / section counter) Retraction Trim Button After the specimen orientation and the blade angle have been set, trimming can be carried out using the trimming function. - Page 33 r e t - - - i t a Multi Function Bar ulti function bar provides the user access to useful information and functions. located at bottom of the Main screen. TRIM button Time/Date Counter (section thickness / section counter) Retraction Trim Button After the specimen orientation and the blade angle have been set, trimming can be carried out using the trimming function.
- Page 34 Chapter 4 -- - Operation Counter To Toggle between the Section Counter and the Section ickness Sum: Section Counter • e section counter adds up the number of the produced sections. After each downward movement of the specimen head, the number on the section counter increases by 1 To reset the section counter: •...
-
Page 35: Handwheel Lock
Chapter 4 -- - Operation • Press the ‘‘OK’’ button on the screen to turn on the Retraction. e button will display ‘‘R On’’. • Press the ‘‘Back’’ button to return to the Main screen without saving the changes. Handwheel Lock •... -
Page 36: Language
Chapter 4 -- - Operation Language To set the Language: • Press the "Menu" button on the Main screen. • e Menu screen will be displayed. • Press the "Language" button. • e Menu-Language screen will be displayed. • Select the desired language by pressing the respective button •... - Page 37 Chapter 4 -- - Operation Set the Day: • Press the ‘‘Day’’ button to highlight it. • Use the arrow buttons to select the desired day and date. Set the Month: • Press the "Month" button to highlight it. • Use the arrow buttons to select the desired month.
- Page 38 Chapter 4 -- - Operation • e Time screen will be displayed. Set the minutes • Press the "Minute" button to highlight it. • Use the arrow keys to select the desired minute. Set the hour • Press the "Hour" button to highlight it. •...
-
Page 39: Set The Duration Of The Uv Cycle
r e t - - - i t a UV Option • Press the "Menu" button on the Main screen • • Press the "UV" button • n will be displayed • Select Duration, Now, or Cyclic Set the Duration of the UV Cycle: •... -
Page 40: Chamber Light
Chapter 4 -- - Operation • Press ‘‘abort’’ to stop the cycle. • Press ‘‘OK’’ when the Errorcode: 007-003 window comes up. • Set the Time for the UV cycle to start: • Press ‘‘Cyclic” to set a programmed time for the UV cycle to start: •... -
Page 41: Standby Mode
(0%) to the highest (100%) level. Standby mode When the QS12 is switched on but has been inactive for 1 hour, it will automatically enter the Standby mode. QS12 maintains the user adjusted temperature during Standby. -
Page 42: Defrost
Remove the specimens from the cryo chamber during defrosting, as the temperature inside the chamber will increase. Do not leave or store specimens inside the QS12 over a long period of time. Due to a power failure or other unexpected malfunctions of the instrument, specimens might be damaged. -
Page 43: Programming The Daily Defrost Cycle
Chapter 4 -- - Operation To abort the defrosting: • Press the "Abort" button on the Defrosting progress screen. • e Main screen will appear, displaying an error message. • Press the "OK" button to remove the error message. Note e Defrosting cycle can be aborted at any time. -
Page 44: Log File
r e t - - - i t a • To change the standard setting, press the "Hour" and / or the "Minute" button. • Adjust the time by using the arrow keys. • Press the "OK • Press the "Back" button three times to return to the Main screen. Log File ecords all events and error messages on the QS1 original USB-Stick for Service purposes in case of a malfunction. -
Page 45: Factory Settings
r e t - - - i t a Factory Settings If required, the instrument can be reset to the factory settings. To restore the Factory settings: • Press the "Menu" button on the Main screen. • • Press the "Factory settings" button. •... -
Page 47: Sectioning Procedures
Chapter 4 -- - Operation Sectioning Procedures Cutting Movement and Retraction Front Rear Lateral view into instrument Note e retraction prevents the surface of the specimen being damaged during the return stroke of the specimen head. e retraction can be switched o - se e "Switching the Retraction On - O ". e retraction distance required is 20 µm and cannot be changed. -
Page 48: Sectioning And Taking O Sections
Chapter 4 -- - Operation Sectioning and Taking Off Sections • Set the desired section thickness - see Cutting ickness. • Place the anti-roll plate against the blade. • Turn the hand wheel in a clockwise direction to carry out sectioning. Note e section slides into the space between the blade and the anti-roll plate. -
Page 49: How To Avoid Malfunctions
Chapter 4 -- - Operation How to Avoid Malfunctions To cut usable sections, the following points are of utmost importance: • Fit the knife edge, possibly move it horizontally to the left or right. • Check adjustment of anti-roll plate guide and correct it, if necessary. •... -
Page 50: Troubleshooting
Cause Removal Ambient temperature too high Lower ambient temperature by fresh air, climate. Please note the speci ed temperature of +20°C! QS12 is in uenced by near, heat- Change site of installation QS12 temperature generating instruments cannot be achieved Draught into the QS12... - Page 51 Chapter 5 - Troubleshooting Problem Cause Removal Sections do not stretch, Clean with a dry cloth or brush Knife and/or anti-roll plate are although the correct not clean temperature has been selected Replace anti-roll plate and the anti-roll plate has been Edge of anti-roll plate is damaged adjusted correctly Blunt knife...
-
Page 52: Tips For Successful Sectioning
During defrosting, remove the specimens from the cryo chamber, as the temperature inside the chamber will increase. Do not leave or store specimens inside the QS12 over a period of time. Due to a power failure or other unexpected malfunctions of the instrument, the specimen might be damaged. - Page 53 Chapter 5 - Troubleshooting Muscle Breast without fat Brain Bone Marrow Lungs Intestine Range B -20 to -30°C Prostate Cervix Uterus Pancreas Adrenal Skin without fat Adipose Omentum Breast with fat Range C -30 to -60°C Cheese Butter Industrial Waxes Soft Rubber Additional cooling with liquid nitrogen or dry ice might be necessary...
-
Page 54: Maintenance And Care Of The Qs12
Shutting Off for Cleaning Cleaning, care and decontamination of the QS12 depends on how frequently the instrument is used. In accordance with regulations, ks due to environmental conditions. As the following work might be hazardous because of the danger of freezing burns from contact with frozen parts and potentially contaminated material, it should only be performed by skilled or trained personnel. -
Page 55: Cleaning And Care
Chapter 6 --- Maintenance and Care of the QS12 Cleaning and Care Cleaning and care during routine work: A regular and/or immediate disinfection of the blade carrier, the cryo chamber as well as all the other potentially contaminated parts of the instrument is highly recommended. -
Page 56: Conditions For The Transportation Of The Instrument
Chapter 6 --- Maintenance and Care of the QS12 Conditions for the transportation of the instrument Returning the instrument for repair or routine Maintenance Repair or maintenance work is normally carried out at the site of installation. If this is not possible for some special reason, the instrument can be returned to manufacturer. - Page 57 Arrange the dismounted accessories into the intended transportation packaging . Note Before the further transportation, tighten the fastening screws so that the instrument does not move during transportation. • Slightly tilt the QS12 and insert the foam parts underneath it. • Place the case over the instrument. •...
-
Page 58: Accessories Standard Equipment
Chapter 6 --- Maintenance and Care of the QS12 Accessories standard equipment The microtome QS12 is equipped with the following accessories: Description Cat. No. Specifications Specifications 6 chucks, 30 mm round 715110 Instrument dimensions 29”W x 30”D x 45.3”H Instrument dimensions 29”W x 30”D x 45.3”H... -
Page 59: Index
Index...
Need help?
Do you have a question about the QS12 and is the answer not in the manual?
Questions and answers