
Related Manuals for Evenheat RampMaster II


Summary of Contents for Evenheat RampMaster II
- Page 1 RampMaster II Operating Manual RMII – Aug. 2015 RampMaster ® Control Operating Manual Page 1 of 26 Use your Smart-phone to scan this QR code to watch RampMaster II how-to Programming Videos!
-
Page 2: Table Of Contents
You’ll also find a host of “On-the-Fly” features that give you complete control of the firing process. Please take some time to read this manual. Not only does it cover the basics, it also contains some little gems that are sure to make your command of the RampMaster II a thoroughly rewarding experience. -
Page 3: Quick Cone Fire Mode Programming
The Cone Fire Mode of programming allows you to fire ceramics by choosing the desired total firing time and the cone number you would like to fire to. With these simple questions the RampMaster II calculates the firing parameters and fires your ware accordingly. Many artists will find the Cone Fire mode to offer everything they need in a firing. -
Page 4: Quick Ramp Mode Programming
2. The RampMaster II begins its initiation process and the display will illuminate. 3. The RampMaster II will finish the initiation process and then display IdLE along with chamber temperature. 4. Press the Enter Prog key one time. USER is displayed along with some number. -
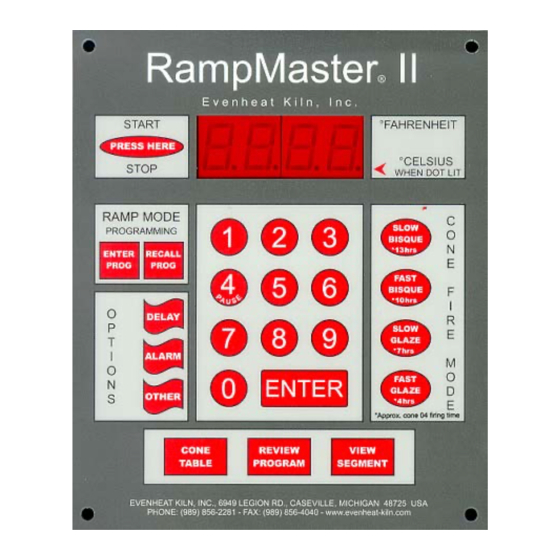
Page 5: Rampmaster Ii Key Layout
RampMaster II Key Layout The RampMaster II key layout and key functions are designed to provide easy and uncomplicated use. Check out the RampMaster Key Descriptions on the next page, along with a Key Function Table on page 19, for detailed key information. -
Page 6: Rampmaster Ii Key Descriptions
The Alarm key provides direct access to the Alarm feature. OTHER The Other key is used to access the menu area of the RampMaster II. This menu area contains various set-up and configurations options that allow you to tailor the RampMaster II to your needs. -
Page 7: Detailed Cone Fire Mode Programming
4. Press the Enter key. HOLd is displayed along with the previously used hold time. The RampMaster II is asking if you would like to hold the final temperature for any period of time. Do you have to? No. Most artists leave it set to 0.00. -
Page 8: Detailed Ramp Mode Programming
2. Press the Enter key. SEGS is displayed along with the some number. The RampMaster II wants to know the total number of segments you would like to use for the program. You can use up to 8 segments for your program. -
Page 9: Viewing Current Segment Data
Ramp Mode Programming Continued from Previous Page 8. Press the Enter key. HLD2 is displayed. The RampMaster II is now asking for the amount of time you want to hold at your segment 2 temperature. Simply key in the amount of desired hold time. -
Page 10: Skip To Next Segment
Numerical keys to choose the desired alarm temperature and press the Enter key. Setting the Alarm to 9999 disables the alarm. Adding Time to a Hold The RampMaster II allows you to add time to a previously programmed hold period. This feature comes in handy when you desire to hold at temperature longer than what you initially programmed. -
Page 11: Initialization (Boot Up)
Programming Time The RampMaster II accepts time as Hours and Minutes. When programming a time value, a red dot will illuminate in the middle of the four display digits. Numbers to the left of the dot indicate hours and numbers to the right of the dot indicate minutes. -
Page 12: Reviewing Your Program Before Starting
Reviewing Your Program Before Firing It’s always a good idea to see what the kiln’s programmed to do before it does it. The RampMaster II has a Review Program key just for this purpose. The Review Program automatically displays the program settings for your review. This feature does not start the program, it simply allows you to see what’s programmed to run when you do. -
Page 13: Zone Control
The display will briefly show the equivalent cone temperature and then display IdLE. See page 23 for the Factory equivalent cone temperatures. Reset Thermocouple Offset & Error Codes The RampMaster II allows you to offset the thermocouple temperature and disable certain error codes. The Reset function allows you to zero-out theses changes. That is, set them back to original factory specifications. -
Page 14: Pre-Heat Feature
Pre-Heat Feature The RampMaster II features a special Pre-heat procedure that allows you to hold your ware at 200°F (93°C) for period of time at the beginning of a Cone Fire Mode program. This feature allows you to dry your ware before the actual firing. The Pre-heat feature uses a rate of 60°/hr. up to 200°F (93°C). Pre- heat hold time at 200°F is determined by you. -
Page 15: Cone Offset
RampMaster II to fire slightly higher or lower for a given cone number. Maximum offset is +/- 45°. If you do decide to offset a cone’s equivalent temperature keep in mind that the change stays within the RampMaster II until you decide to change it again. -
Page 16: Change Temperature Scale (°F Or °C)
The RampMaster II uses many parameters to determine if all is going well during a firing. Under normal conditions exceeding these parameters indicates a problem. When this happens the RampMaster II stops the firing and displays an error code describing the problem (see page 23 for a detailed listing of all error codes). -
Page 17: Percent 4
Example 2: to lower thermocouple temperature 12°. Your 4 digits would be 9012. Percent 4 When cycling through the OTHER menu selections you will see a prompt labeled as PCT4. The RampMaster II does not use this feature on ceramic kilns. -
Page 18: Rampmaster Ii Display Conditions
Indicates the value being displayed is a time value. Dot Displayed to the Right of the 1’s Digit Indicates that a Celsius temperature is being displayed. If no dot is displayed the RampMaster II is displaying in Fahrenheit. Display Alternating Between Any Value and ERRP Indicates a brief power failure has occurred. -
Page 19: Rampmaster Ii Display Messages
RampMaster II Operating Manual RMII – Aug. 2015 RampMaster II Display Messages Listed below are all display messages you will encounter while using the RampMaster II. Most are self explanatory. To learn more about the messages go to the page number indicated. ALRM... -
Page 20: Key Function Table
At Any Other Position Pressing once Allows You to Pressing once Allows You to No Function Set the Alarm Temperature Set the Alarm Temperature Page 20 of 26 Use your Smart-phone to scan this QR code to watch RampMaster II how-to Programming Videos! -
Page 21: Use Your Smart-Phone To Scan This Qr Code To Watch Rampmaster Ii How-To Programming Videos
Initiates the Cone Fire Mode Programming Process and Selects the 4 hour Preset Cone Fire No Function No Function Mode Program. Page 21 of 26 Use your Smart-phone to scan this QR code to watch RampMaster II how-to Programming Videos! - Page 22 Used to store currently displayed data. No Function No Function In many instances, pressing ENTER also moves you to the next point in programming. Page 22 of 26 Use your Smart-phone to scan this QR code to watch RampMaster II how-to Programming Videos!
-
Page 23: Preset Cone Fire Mode Firing Data Table
Reserved Reserved Final Temp minus 250°F User Defined Hold Time Reserved Reserved Reserved Reserved Reserved 0 Min. 0 Min. Not Used Page 23 of 26 Use your Smart-phone to scan this QR code to watch RampMaster II how-to Programming Videos! -
Page 24: Cone Table
RampMaster II Error Messages The RampMaster II monitors each firing and compares performance to a set of standards. If the firing does not meet performance standards the RampMaster II automatically stops the firing and displays a corresponding Error Code describing the fault. Pressing any key at this point, displays the elapsed time and temperature at which the error occurred. -
Page 25: Kiln Trouble Shooting
E– 8 causes are Control Relay Failure, Element Failure or Sudden Drop in Supply Voltage. Improper thermocouple installed or improper thermocouple software setting. Standard thermocouples for all Evenheat models is TYPE K. The E– 9 exception is our line of Crucible Furnaces which use TYPE S. - Page 26 The thermocouple (temperature sensor) circuit is faulty. The thermocouple circuit is broken at some point, usually the thermocouple itself. The thermocouple circuit consists of the thermocouple, any connecting blocks and the thermocouple lead wire connecting to the RampMaster II. Circuit Protection Opens (“Blown” Breaker or Fuse) Circuit protection can open for various reasons.
Need help?
Do you have a question about the RampMaster II and is the answer not in the manual?
Questions and answers
Kiln will not shut down. Keeps cycling thru program.