Table of Contents
Advertisement
Available languages
Available languages
Quick Links
Installation Guide . . . . . . . . . . . . . . . . . . . . . . . 2
Guía de instalación . . . . . . . . . . . . . . . . . . . . . 11
Notice d'installation . . . . . . . . . . . . . . . . . . . 20
Installationsanleitung . . . . . . . . . . . . . . . . . . 29
Guida all'installazione . . . . . . . . . . . . . . . . . . 38
Installatiehandleiding . . . . . . . . . . . . . . . . . . 47
Monteringsveiledning . . . . . . . . . . . . . . . . . . 56
Instrukcja montażu . . . . . . . . . . . . . . . . . . . . 65
安装指南 . . . . . . . . . . . . . . . . . . . . . . . . . . . . . . 74
安裝指南 . . . . . . . . . . . . . . . . . . . . . . . . . . . . . . 83
設置ガイド . . . . . . . . . . . . . . . . . . . . . . . . . . . . . 92
101
دليل التركيب
Advertisement
Table of Contents

Related Manuals for Bose Professional FreeSpace 3


Summary of Contents for Bose Professional FreeSpace 3
-
Page 1: Table Of Contents
FreeSpace 3 Series II Acoustimass Bass Module Flush-mount Satellites Surface-mount Satellites Installation Guide . . . . . . . . . . . . . . . . . . . . . . . 2 Monteringsveiledning . - Page 2 Do not attempt to service this product yourself. Refer all servicing to authorized service centers, and recycling helps protect natural resources, human health and the environment. installers, technicians, dealers or distributors. To contact Bose Professional or to find a dealer or For more information on disposal and recycling of this product, contact your local distributor near you, visit PRO.BOSE.COM.
-
Page 3: Installation Guide
391 mm 356 mm (14.0 in) (13.6 in) (15.4 in) (14.0 in) 189 mm (7.4 in) Flush-mount Satellites 113 mm 157 mm (4.5 in) (6.2 in) 53 mm (2.1 in) 123 mm (4.8 in) 119 mm 71 mm 71 mm (4.7 in) (2.8 in) (2.8 in) 108 mm (4.3 in) 104 mm (4.1 in) 127 mm (5.0 in) Installation Guide • FreeSpace 3 Loudspeaker System English • 3... -
Page 4: Series Ii Acoustimass Bass Module
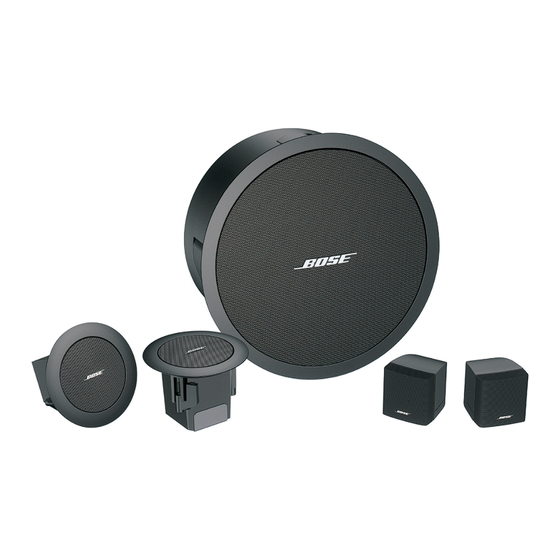
NFPA-70, National Electrical Code, 2002, Article 300.22(C) NFPA 90A, 2002, Installation of Air Conditioning and Ventilation Systems, Paragraph 4.3.10.2.6.5 The Bose Freespace 3 Surface-mount Satellites described in this guide are not UL listed. 4 • English FreeSpace 3 Loudspeaker System • Installation Guide... - Page 5 FreeSpace Omni Pendant-mount Kit Flush-mount Satellites Required FreeSpace 3F Satellite Loudspeaker Rough-in Pan FreeSpace 3F Satellite Loudspeaker Tile Bridge Optional FreeSpace 3F Satellite Loudspeaker Cosmetic Covers Surface-mount Satellites FreeSpace Omni Pendant-mount Kit Installation Guide • FreeSpace 3 Loudspeaker System English • 5...
- Page 6 Setup PRO.BOSE.COM Wiring the Loudspeaker Wire Gauge FreeSpace 3 loudspeakers are designed to work with 18 AWG (0.8 mm ) to 14 AWG (2.1 mm ) size wire only. Wiring Terminals Series II Acoustimass bass module: Remove the Flush-mount Satellites: Remove the Surface-mount Satellites: Push and rear cover plate to access the wiring terminals.
- Page 7 Flush-mount Satellites as long as your wire them with the correct polarity.) You can use the FreeSpace 3 Series II Acoustimass module with other Bose loudspeakers, including but not limited to FreeSpace, DesignMax, or Panaray models. If you do this, connect both the loudspeakers and the module directly to the amplifier, using separate channels.
- Page 8 Attach rough-in pan to the ceiling furring or wood studs. The rough-in pan includes multiple pre-drilled holes to accommodate different stud spacing, loudspeaker orientations, and loudspeaker placements. After the ceiling is finished, cut a hole in the finished ceiling, using the rough-in pan as a guide. 8 • English FreeSpace 3 Loudspeaker System • Installation Guide...
- Page 9 WARNING: Over-tightening the screws may result in damage to the anchor attachment point or the ceiling, which could lead to a falling hazard. Using both hands, position the grille against the loudspeaker. Gently push the grille against the loudspeaker to secure it. Installation Guide • FreeSpace 3 Loudspeaker System English • 9...
- Page 10 10. Insert the screw (which you removed in Step 1) into the rotating joint. Tighten the screw to secure the loudspeaker to the wall-mount bracket at the desired angle. M4 (#10) × 4 10 • English FreeSpace 3 Loudspeaker System • Installation Guide...
-
Page 11: Guía De Instalación
4 satélites); 5 Ω por canal Información de la garantía (sistema de 2 satélites) Este producto está cubierto con una garantía limitada. Para ver los detalles de la garantía, visite PRO.BOSE.COM. Guía de instalación • Sistema de altavoces FreeSpace 3 Español (Latinoamérica) • 11... -
Page 12: Contenido De La Caja
157 mm (4.5") (6.2") 53 mm (2.1") 123 mm (4.8") 119 mm 71 mm 71 mm (4.7") (2.8") (2.8") 108 mm (4.3") 104 mm (4.1") 127 mm (5.0") 12 • Español (Latinoamérica) Sistema de altavoces FreeSpace 3 • Guía de instalación... - Page 13 Estándar NFPA 90A, 2002, instalación de sistemas de aire acondicionado y ventilación, Párrafo 4.3.10.2.6.5 Los satélites para montaje en superficie Bose Freespace 3 descritos en esta guía no aparecen en la lista de UL. Guía de instalación • Sistema de altavoces FreeSpace 3...
- Page 14 Puente de mosaico para los altavoces satelitales FreeSpace 3F Opcional Cubiertas estéticas para los altavoces satelitales FreeSpace 3F Satélites para montaje en superficie Kit de montaje colgante FreeSpace Omni 14 • Español (Latinoamérica) Sistema de altavoces FreeSpace 3 • Guía de instalación...
- Page 15 PRO.BOSE.COM Cableado de los altavoces Calibre de cable Los altavoces FreeSpace 3 están diseñados para funcionar únicamente con cables que midan de 18 AWG (0.8 mm ) a 14 AWG (2.1 mm Terminales de cableado Módulo de graves Acoustimass Serie II: Quite Satélites para montaje al ras: Quite...
- Page 16 PRECAUCIÓN: No conecte directamente al módulo ningún altavoz que no sean los altavoces satelitales FreeSpace 3. Conecte el módulo de graves Acoustimass FreeSpace 3 Serie II a los satélites para montaje al ras o montaje en superficie FreeSpace 3. (En esta página, el módulo Acoustimass Serie II se muestra conectado a los satélites para montaje al ras. Puede sustituir los satélites para montaje en superficie por cualquier satélite para montaje al ras, siempre y cuando los conecte con la polaridad correcta).
- Page 17 Después de que el techo esté terminado, corte un agujero en el techo utilizando la bandeja empotrada como guía. Guía de instalación • Sistema de altavoces FreeSpace 3 Español (Latinoamérica) • 17...
- Page 18 Coloque la rejilla frente al altavoz usando ambas manos. Empuje suavemente la rejilla contra el altavoz para asegurarla. 18 • Español (Latinoamérica) Sistema de altavoces FreeSpace 3 • Guía de instalación...
- Page 19 10. Inserte el tornillo (que quitó en el paso 1) en la junta giratoria. Apriete el tornillo para fijar el altavoz al soporte para montaje en pared en el ángulo deseado. M4 (n.º 10) × 4 Guía de instalación • Sistema de altavoces FreeSpace 3 Español (Latinoamérica) • 19...
- Page 20 Pour contacter humaine et l’environnement. Pour plus d’informations sur l’élimination et le recyclage de Bose Professional ou pour trouver un revendeur ou un distributeur près de chez vous, rendez-vous à l’adresse PRO.BOSE.COM.
- Page 21 Présentation PRO.BOSE.COM Contenu de l’emballage Module de basses Acoustimass série II Enceintes satellites Enceintes satellites encastrables pour montage en surface × 2 × 2 × 2 × 2 × 1 × 1 Dimensions du produit Module de basses Acoustimass série II 205 mm (8,1 po) 356 mm 347 mm...
- Page 22 Présentation PRO.BOSE.COM Enceintes satellites 149 mm 77 mm pour montage en surface (5,9 po) (3,0 po) 48 mm (1,9 po) 67 mm 77 mm 77 mm (3,0 po) (2,6 po) (3,0 po) 41 mm (1,6 po) 149 mm (5,9 po) 102 mm (4,0 po) 20 mm (0,8 po) 77 mm 43 mm (1,7 po) 41 mm (1,6 po) (3,0 po) 16 mm (0,6 po) 18 mm (0,7 po) 18 mm (0,7 po) Caractéristiques techniques Vous trouverez des informations techniques, des instructions et des spécifications supplémentaires sur toutes les enceintes FreeSpace sur le site bosepro.link/freespace.
- Page 23 Installation PRO.BOSE.COM Informations importantes concernant l’installation L’installateur est responsable du respect de tous les codes et règlements locaux et nationaux en vigueur applicables à l’installation et au montage des enceintes. Consultez les autorités locales compétentes avant d’installer ce produit. Il incombe à l’installateur d’assurer la sécurité de l’installation de l’enceinte. L’installation incorrecte de l’enceinte est susceptible d’entraîner des dommages et des blessures, voire la mort.
- Page 24 Installation PRO.BOSE.COM Câblage des enceintes Épaisseur des câbles Les enceintes FreeSpace 3 sont conçues pour fonctionner avec des câbles de taille 18 (0,8 mm ) à 14 AWG (2,1 mm ) uniquement. Bornes de connexion Module de basses Acoustimass série II : retirez Enceintes satellites encastrables : Enceintes satellites pour montage en la plaque arrière pour accéder aux bornes de retirez la plaque arrière pour accéder surface : maintenez le bouton enfoncé...
- Page 25 Installation PRO.BOSE.COM Transformateur contourné (mono direct) Transformateur contourné (stéréo directe) Pour contourner le transformateur et préparer l’enceinte à une Pour contourner le transformateur et préparer l’enceinte à une utilisation en 4 Ω et à une entrée mono, retirez les deux câbles utilisation en 6 Ω...
- Page 26 Installation PRO.BOSE.COM Préparation de l’installation Positionnement de l’enceinte Remarque : une installation à proximité immédiate de surfaces de cuisson, où l’enceinte peut être exposée directement à des huiles de cuisson, de la vapeur ou des températures élevées, comme dans une cuisine en milieu professionnel, peut réduire les performances ou la fiabilité...
- Page 27 Installation PRO.BOSE.COM Montage de l’enceinte Module de basses Acoustimass série II Vérifiez que vous avez effectué tous les câblages nécessaires au niveau de l’enceinte. Consultez la section Câblage des enceintes (page 24) pour plus d’informations sur le câblage. Insérez l’enceinte dans l’ouverture et à l’intérieur de la plaque de renfort ou de la plaque de montage en faux plafond. Maintenez l’enceinte en place.
- Page 28 Installation PRO.BOSE.COM Enceintes satellites pour montage en surface Dévissez la vis qui permet de fixer le bras de l’enceinte au support de montage mural, puis séparez les deux parties. Séparez la plaque arrière du support de montage mural. Utilisez le gabarit pour marquer sur le mur le centre de chaque trou de vis. Insérez les quatre vis M4 (#10) pour fixer au mur la plaque du support de montage mural.
-
Page 29: Installationsanleitung
Ressourcen, die Gesundheit und die Umwelt zu schützen. Weitere Informationen zur nur von autorisierten Servicepartnern, Monteuren, Technikern, Händlern oder Distributoren durchführen. Die Bose Professional Kontaktdaten für Ihr Land finden Sie auf PRO.BOSE.COM. Entsorgung und zum Recycling dieses Produkts erhalten Sie von Ihrer zuständigen Kommune, Ihrem Entsorgungsdienst oder dem Geschäft, in dem Sie dieses Produkt gekauft haben. -
Page 30: Series Ii Acoustimass Bass Module
Übersicht PRO.BOSE.COM Verpackungsinhalt Series II Acoustimass Bassmodul Flush-Mount Surface-Mount Satellites Satellites × 2 × 2 × 2 × 2 × 1 × 1 Produktabmessungen Series II Acoustimass Bassmodul 205 mm 356 mm 347 mm 391 mm 356 mm 189 mm Flush-Mount Satellites 113 mm 157 mm 53 mm 123 mm 119 mm 71 mm 71 mm 108 mm 104 mm... - Page 31 Übersicht PRO.BOSE.COM Surface-Mount 149 mm Satellites 77 mm 48 mm 77 mm 67 mm 77 mm 41 mm 149 mm 102 mm 20 mm 77 mm 43 mm 41 mm 16 mm 18 mm 18 mm Technische Spezifikationen Weitere Daten, Anweisungen und technische Informationen zu den FreeSpace Lautsprechern finden Sie unter bosepro.link/freespace. Series II Acoustimass Bassmodul Flush-Mount Satellites Surface-Mount Satellites Produktabmessungen Höhe ×...
- Page 32 Systemeinrichtung PRO.BOSE.COM Wichtige Installationshinweise Der Monteur ist dafür verantwortlich, sicherzustellen, dass die Installation der Lautsprecher und der Halterung gemäß allen geltenden Vorschriften durchgeführt wird, einschließlich örtlicher Bauvorschriften und -bestimmungen. Wenden Sie sich vor der Installation dieses Produkts an die zuständige abnehmende Behörde. Die Gewährleistung der Sicherheit der Lautsprechermontage obliegt demjenigen, der den Lautsprecher anbringt.
- Page 33 Systemeinrichtung PRO.BOSE.COM Verkabeln der Lautsprecher Kabeldurchmesser Die FreeSpace 3 Lautsprecher wurden für den ausschließlichen Gebrauch mit Kabeln der Größen 18 AWG (0,8 mm ) bis 14 AWG (2,1 mm entwickelt. Kabelanschlüsse Series II Acoustimass Bassmodul: Nehmen Flush-Mount Satellites: Nehmen Sie Surface-Mount Satellites: Halten Sie die hintere Abdeckplatte ab, um auf die die hintere Abdeckplatte ab, um auf Sie beim Einstecken der Kabel die Kabelanschlüsse zuzugreifen.
- Page 34 Systemeinrichtung PRO.BOSE.COM Niederohmig (Mono direkt) Niederohmig (Stereo direkt) Um den Übertrager zu umgehen und den Lautsprecher für den Um den Übertrager zu umgehen und den Lautsprecher für Einsatz mit 4 Ω und Mono-Sound vorzubereiten, entfernen den Einsatz mit 6 Ω und Stereo-Sound vorzubereiten, entfernen Sie die beiden Überbrückungskabel von den Übertrager- Sie alle Überbrückungskabel.
- Page 35 Systemeinrichtung PRO.BOSE.COM Vorbereitung der Montage Platzierung der Lautsprecher Hinweis: Eine Installation in unmittelbarer Nähe einer Kochstelle, wo der Lautsprecher Speiseöl, Dämpfen oder hohen Temperaturen ausgesetzt ist (wie z. B. in gewerblichen Räumlichkeiten mit Kochstellen), kann die Leistung oder Zuverlässigkeit des Lautsprechers beeinträchtigen.
-
Page 36: Flush-Mount Satellites
Installation PRO.BOSE.COM Befestigung des Lautsprechers Series II Acoustimass Bassmodul Vergewissern Sie sich, dass alle Lautsprecherkabel ordnungsgemäß angeschlossen sind. Weitere Informationen zur Verkabelung finden Sie unter Verkabeln der Lautsprecher (Seite 33). Führen Sie den Lautsprecher in die Tile Bridge oder in die Rough-in-Pan-Montageplatte ein. Halten Sie den Lautsprecher weiterhin an seinem Platz. -
Page 37: Surface-Mount Satellites
Installation PRO.BOSE.COM Surface-Mount Satellites Lösen Sie die Schraube, die die Lautsprecherhalterung mit der Wandhalterung verbindet, und trennen Sie die beiden Teile. Lösen Sie die Rückwand von der Abdeckung der Wandhalterung. Markieren Sie mit der Schablone die Mitte aller vier Schraubenlöcher an der Wand. Setzen Sie vier Schrauben M4 (#10) ein, um die Wandhalterung an der Wand zu befestigen. -
Page 38: Guida All'installazione
Uno smaltimento e un riciclaggio corretti aiutano a preservare le risorse naturali, la salute e l’ambiente. Per ulteriori informazioni sullo smaltimento e sul riciclaggio di Bose Professional o per trovare il rivenditore o distributore più vicino, visita PRO.BOSE.COM. questo prodotto, rivolgersi alle autorità locali, al servizio di smaltimento dei rifiuti Leggere queste istruzioni. -
Page 39: Contenuto Della Confezione
Dimensioni del prodotto Modulo bassi Acoustimass serie II 205 mm 356 mm 347 mm 391 mm 356 mm 189 mm Satelliti per installazione ad incasso 113 mm 157 mm 53 mm 123 mm 71 mm 71 mm 119 mm 108 mm 104 mm 127 mm Guida all’installazione • Sistema di diffusori FreeSpace 3 Italiano • 39... -
Page 40: Specifiche Tecniche
1,8 kg Conformità alle norme di sicurezza Il modulo Acoustimass Bose Freespace 3 serie II ed i satelliti per installazione ad incasso sono dotati di certificazione UL per la sicurezza nei seguenti casi: Diffusori per impieghi generici conformi ad UL1480, UL categoria UEAY, Numero file S 5591 Adatti per l'uso in ambienti interni caratterizzati da umidità. - Page 41 Rough-in pan per diffusore satellite FreeSpace 3BF oppure Tile bridge per diffusore satellite FreeSpace 3BF Opzionale Cover per diffusore satellite FreeSpace 3F Satelliti per installazione a parete Kit di montaggio a sospensione Omni FreeSpace Guida all’installazione • Sistema di diffusori FreeSpace 3 Italiano • 41...
- Page 42 PRO.BOSE.COM Cablaggio dei diffusori Diametro dei cablaggi I diffusori FreeSpace 3 sono concepiti esclusivamente per l’impiego con cavi di dimensioni comprese tra 18 AWG (0,8 mm e 14 AWG (2,1 mm Cablaggio dei terminali Modulo bassi Acoustimass serie II: rimuovere la...
- Page 43 ATTENZIONE: non collegare direttamente al Modulo bassi diffusori diversi dai satelliti FreeSpace 3. Collegare il modulo bassi Acoustimass FreeSpace 3 serie II ai satelliti per installazione ad incasso o a parete FreeSpace 3. (In questa pagina, il modulo Acoustimass serie II è collegato ai satelliti per installazione ad incasso. È possibile sostituire i satelliti per installazione a parete con quelli ad incasso se collegati con la corretta polarità.)
- Page 44 Agganciare il rough-in pan al rivestimento o ai montanti in legno del soffitto. Il rough-in pan include diversi fori preforati per adattarsi a varie opzioni di distanza tra i montanti ed orientamento e posizionamento dei diffusori. Praticare un foro nel soffitto usando il rough-in pan come guida. 44 • Italiano Sistema di diffusori FreeSpace 3 • Guida all’installazione...
- Page 45 AVVERTENZA: un serraggio eccessivo delle viti può danneggiare il punto di aggancio dell’elemento di ancoraggio o il soffitto, con conseguenti rischi di caduta. Con entrambe le mani, posizionare la griglia contro il diffusore. Spingere delicatamente la griglia contro il diffusore per fissarla. Guida all’installazione • Sistema di diffusori FreeSpace 3 Italiano • 45...
- Page 46 10. Inserire la vite (rimossa al punto 1) nel giunto girevole. Serrare la vite per fissare il diffusore alla staffa per l'installazione a parete all’angolazione desiderata. M4 (n. 10) 4 pz. 46 • Italiano Sistema di diffusori FreeSpace 3 • Guida all’installazione...
- Page 47 Om contact op te nemen met Bose Professional beschermen. Voor meer informatie over het afvoeren en recyclen van dit product neemt u en voor informatie over de dichtstbijzijnde dealer of distributeur, gaat u naar PRO.BOSE.COM.
-
Page 48: Series Ii Acoustimass Bass Module
× 1 × 1 Afmetingen van het product Series II Acoustimass bass module 205 mm 356 mm 347 mm 391 mm 356 mm 189 mm Inbouwsatelliet- luidsprekers 157 mm 113 mm 53 mm 123 mm 71 mm 119 mm 71 mm 108 mm 104 mm 127 mm 48 • Nederlands FreeSpace 3 Loudspeaker System • Installatiehandleiding... - Page 49 2,3 kg 1,8 kg Veiligheid en naleving van regelgeving De Bose FreeSpace 3 series II Acoustimass module en flush-mount satellites hebben een UL-veiligheidskeurmerk voor: universele luidsprekers conform UL1480, UL-categorie UEAY, dossiernummer S 5591 Geschikt voor gebruik op vochtige locaties binnen. Geschikt voor installatie middels bekabelingsmethoden Klasse 1, Klasse 2 of Klasse 3 conform NFPA 70, National Electric Code, 2002,...
- Page 50 FreeSpace 3BF Bass Loudspeaker plenum cover FreeSpace Omni hangbevestigingskit Inbouwsatellietluidsprekers Vereist FreeSpace 3F Satellite Loudspeaker inbouwplaat FreeSpace 3F Satellite Loudspeaker tegelbrug Optioneel FreeSpace 3F Satellite Loudspeaker cosmetische covers Opbouwsatellietluidsprekers FreeSpace Omni hangbevestigingskit 50 • Nederlands FreeSpace 3 Loudspeaker System • Installatiehandleiding...
- Page 51 Installatie PRO.BOSE.COM De luidsprekers bekabelen Bekabelingsdiameter FreeSpace 3 loudspeakers zijn uitsluitend ontworpen voor bedrading van 18 AWG (0,8 mm ) tot 14 AWG (2,1 mm Kabelaansluitingen Series II Acoustimass bass module: Verwijder de Inbouwsatellietluidsprekers: Verwijder Opbouwsatellietluidsprekers: Houd de achterplaat voor toegang tot de kabelaansluitingen.
- Page 52 U kunt de FreeSpace 3 series II Acoustimass module gebruiken met andere typen luidsprekers van Bose, onder andere de FreeSpace, DesignMax of Panaray. Als u dit doet, sluit dan beide luidsprekers en de module direct en via gescheiden kanalen aan op de versterker.
- Page 53 Bevestig de inbouwplaat aan het metalen of houten raamwerk. In de inbouwplaat zitten meerdere voorgeboorde gaten die bevestiging op verschillende punten en diverse luidsprekeroriëntaties en luidsprekerplaatsingen mogelijk maken. Nadat het plafond is afgewerkt, snijdt u een gat in het plafond met de inbouwplaat als sjabloon. Installatiehandleiding • FreeSpace 3 Loudspeaker System Nederlands • 53...
-
Page 54: Series Ii Acoustimass Bass Module
WAARSCHUWING: Wanneer u de schroeven te vast draait, kan het ankerbevestigingspunt of het plafond beschadigen, wat kan leiden tot een risico op vallen. Plaats met beide handen de grille tegen de luidspreker. Druk de grille voorzichtig op de luidspreker vast. 54 • Nederlands FreeSpace 3 Loudspeaker System • Installatiehandleiding... - Page 55 10. Plaats de schroef (die u in stap 1 hebt verwijderd) in het scharnier. Zet de schroef vast om de luidspreker in de gewenste hoek op de wandsteun te bevestigen. M4 (#10) × 4 Installatiehandleiding • FreeSpace 3 Loudspeaker System Nederlands • 55...
-
Page 56: Monteringsveiledning
Kontakt de lokale myndighetene som har Utstyrsnavn: Typebetegnelse: domsmyndighet før du monterer dette produktet. FreeSpace 3 Series II Acoustimass-bassmodul 040147, 040148 • Utrygg montering eller opphenging av tunge gjenstander kan forårsake alvorlig skade Innebygde FreeSpace 3-satellitter 040150, 040149 eller død, samt skade på... - Page 57 × 2 × 2 × 2 × 2 × 1 × 1 Produktmål Series II Acoustimass-bassmodul 205 mm 356 mm 347 mm 391 mm 356 mm 189 mm Innebygde satellitter 113 mm 157 mm 53 mm 123 mm 119 mm 71 mm 71 mm 108 mm 104 mm 127 mm Monteringsveiledning • FreeSpace 3-høyttalersystem Norsk • 57...
- Page 58 UL-2043, branntest og utløser for synlig røyk for diskré produkter og tilbehør som er montert i ventilasjonsområder NFPA -70, National Electrical Code, 2002, artikkel 300.22(c) NFPA 90-A, 2002, montering av klimaanlegg og ventilasjonssystemer, paragraf 4.3.10.2.6.5 De overflatemonterte Bose Freespace 3-satellittene i denne veiledningen er ikke UL listet. 58 • Norsk FreeSpace 3-høyttalersystem • Monteringsveiledning...
- Page 59 FreeSpace 3Bf-basshøyttaler med overflatemonteringssett FreeSpace 3Bf-basshøyttaler med Plenum-deksel FreeSpace Omni-høyttaler med sokkelmonteringssett Innebygde satellitter Obligatorisk FreeSpace 3F-satellitthøyttaler med Rough-in Pan eller FreeSpace 3F-satellitthøyttaler med monteringsbro Tilleggsutstyr FreeSpace 3F-satellitthøyttaler med pyntedeksler Overflatemonterte satellitter FreeSpace Omni-høyttaler med sokkelmonteringssett Monteringsveiledning • FreeSpace 3-høyttalersystem Norsk • 59...
- Page 60 Konfigurering PRO.BOSE.COM Koble til høyttalerne Kabeldiameter FreeSpace 3-høyttalerne er utformet for å fungere kun med kabler på mellom 18 AWG (0,8 mm ) til 14 AWG (2,1 mm Kabelkontakter Series II Acoustimass-bassmodul: Fjern Innebygde satellitter: Fjern Overflatemonterte satellitter: Trykk på bakdekselplaten for å få tilgang til kabelkontaktene.
- Page 61 Du kan bruke FreeSpace 3 Series II Acoustimass-modulen med andre Bose-høyttalere, inkludert, men ikke begrenset til FreeSpace-, DesignMax- eller Panaray-modeller. Hvis du gjør dette, kobler du både høyttalerne og modulen direkte til forsterkeren ved hjelp av separate kanaler.
- Page 62 Fest rough-in pan til bjelkelaget. Rough-in pan har flere forhåndsborede hull tilpasset for ulike mellomrom i bjelkelaget og høyttalerens montering. Når taket er ferdig, skjærer du ut et hull i det ferdige taket med rough-in pan som mal. 62 • Norsk FreeSpace 3-høyttalersystem • Monteringsveiledning...
- Page 63 ADVARSEL: Hvis skruene strammes for mye, kan dette forårsake skade på ankerfestepunktet eller taket, og at høyttaleren faller ned. Bruk begge hendene når du plasserer grillen mot høyttaleren. Skyv grillen forsiktig mot høyttaleren for å feste den. Monteringsveiledning • FreeSpace 3-høyttalersystem Norsk • 63...
- Page 64 Juster de vertikale og horisontale vinklene på høyttaleren etter behov. 10. Sett inn skruen (som du fjernet i trinn 1) i den roterende koblingen. Trekk til skruen for å feste høyttaleren til veggmonteringsbraketten i ønsket vinkel. M4 (#10) × 4 64 • Norsk FreeSpace 3-høyttalersystem • Monteringsveiledning...
- Page 65 • Niebezpieczny montaż lub podwieszenie ciężkiego ładunku może spowodować poważne Nazwa urządzenia: Oznaczenie typu: obrażenia lub śmierć oraz uszkodzenie mienia. Do obowiązków instalatora należy ocena Moduł basowy Acoustimass głośnika FreeSpace 3 series II 040147, 040148 niezawodności każdej metody montażu stosowanej w tym przypadku. Montaż podwieszanych FreeSpace 3 — satelity montowane podtynkowo 040150, 040149 FreeSpace 3 —...
- Page 66 113 mm 157 mm (4,5 cala) (6,2 cala) 53 mm (2,1 cala) 123 mm (4,8 cala) 119 mm 71 mm 71 mm (4,7 cala) (2,8 cala) (2,8 cala) 108 mm (4,3 cala) 104 mm (4,1 cala) 127 mm (5,0 cali) 66 • Polski System głośników FreeSpace 3 • Podręcznik instalacji...
-
Page 67: Dane Techniczne
NFPA -70, National Electric Code, 2002, art. 300.22(C) NFPA 90A, 2002, Instalacja systemów klimatyzacji i wentylacji, paragraf 4.3.10.2.6.5 Opisane w tej instrukcji satelity do montażu powierzchniowego Bose Freespace 3 nie są zgodne z normami UL. Podręcznik instalacji • System głośników FreeSpace 3 Polski • 67... - Page 68 Satelity do montażu podtynkowego Wymagane Podkładka montażowa do satelity FreeSpace 3F Mostek płytkowy do satelity FreeSpace 3F Opcjonalnie Osłonki do satelity FreeSpace 3F Satelity do montażu powierzchniowego Zestaw do montażu podwieszanego FreeSpace (wielokierunkowy) 68 • Polski System głośników FreeSpace 3 • Podręcznik instalacji...
- Page 69 Konfiguracja PRO.BOSE.COM Okablowanie głośników Grubość przewodu Do montażu głośnika FreeSpace 3 należy stosować wyłącznie przewody o rozmiarze od 18 AWG (0,8 mm ) do 14 AWG (2,1 mm Przyłącza przewodów Moduł basowy Acoustimass series II: Zdjąć Satelity do montażu podtynkowego: Satelity do montażu tylną pokrywę, aby uzyskać dostęp do przyłączy Zdjąć...
- Page 70 Modułu Acoustimass FreeSpace 3 Series II można używać z innymi głośnikami Bose, w tym między innymi modelami FreeSpace, DesignMax i Panaray. W takim przypadku należy podłączyć zarówno głośniki, jak i moduł bezpośrednio do wzmacniacza, używając oddzielnych kanałów.
- Page 71 Przymocować podkładkę montażową do profili sufitowych lub kołków drewnianych. W podkładce montażowej nawiercono wstępnie wiele otworów umożliwiających umieszczenie kołków i głośników w różnych miejscach. Po przygotowaniu sufitu wyciąć otwór w suficie, korzystając z otworów w podkładce jako punktów odniesienia. Podręcznik instalacji • System głośników FreeSpace 3 Polski • 71...
- Page 72 OSTRZEŻENIE: zbyt mocne dokręcenie śrub może spowodować uszkodzenie punktu mocowania zaczepu lub sufitu, co może prowadzić do zagrożenia upadkiem. Oburącz nałożyć osłonę na głośnik. Delikatnie docisnąć osłonę do głośnika, aby ją zamocować. 72 • Polski System głośników FreeSpace 3 • Podręcznik instalacji...
- Page 73 Ustawić kąt głośnika w pionie i w poziomie zgodnie z własnymi wymaganiami. 10. Włożyć śrubę (wykręconą w kroku 1) do połączenia obrotowego. Dokręcić śrubę, aby zamocować głośnik do wspornika do montażu ściennego pod żądanym kątem. M4 (10) × 4 Podręcznik instalacji • System głośników FreeSpace 3 Polski • 73...
-
Page 74: 安装指南
本产品含有磁性材料。有关这是否会影响到您的植入式医疗 X: 表示此零件所用全部均质材料中至少有一种包含的这种有毒 器械,请咨询您的医生。 或有害物质高于 GB/T 26572 标准的限定要求。 • 所有 Bose 产品的安装都必须遵守当地、州、联邦和行业规范。安装 中国台湾危险物质限用表 人员有责任确保扬声器和安装系统的安装都符合适用的法规,包括 当地的建筑法规和规定。安装本产品前,请咨询拥有司法管辖权的 设备名称: 机型名称: 当地监管机构。 FreeSpace 3 II 型 Acoustimass 低音箱 040147、040148 FreeSpace 3 天花吸顶卫星扬声器 040150、040149 • 以不安全的方式登高安装或吊装任何重物可能导致严重的人身伤 FreeSpace 3 壁装卫星扬声器 040144、040143 害、死亡或财产损失。安装人员有责任评估在其应用中所使用的任 何安装方法的可靠性。只有正确了解硬件且掌握安全安装方法的专 限用物质及其化学符号 业安装人员才能尝试以吊装的方式安装任何扬声器。 铅... - Page 75 53 毫米(2.1 英寸) 123 毫米 (4.8 英寸) 119 毫米 71 毫米 71 毫米 (4.7 英寸) (2.8 英寸) (2.8 英寸) 108 毫米 (4.3 英 104 毫米 寸) (4.1 英寸) 127 毫米 (5.0 英寸) 安装指南 • FreeSpace 3 扬声器系统 简体中文 • 75...
- Page 76 适合使用 1 级、2 级或 3 级接线方法安装,符合 NFPA 70 美国国家电气法规 (2002) 第 640 条规定 当与 PC-FS3B 和 PC-FS3F 通风盖配件一起使用时,适合在空气流动的场所使用: UL-2043,在空气调节场所中安装的分离性产品及其配件的防火测试及可见烟雾释放 NFPA-70,美国国家电气法规 (2002) 第 300.22(C) 条 NFPA 90A (2002),空调和通风系统的安装,第 4.3.10.2.6.5 节 本指南中介绍的 Bose Freespace 3 壁装卫星扬声器没有 UL 认证。 76 • 简体中文 FreeSpace 3 扬声器系统 • 安装指南...
- Page 77 或 FreeSpace 3BF 低音扬声器安装桥板 可选 FreeSpace 3BF 低音扬声器垂吊安装套件 FreeSpace 3BF 低音扬声器壁装套件 FreeSpace 3BF 低音扬声器通风盖 FreeSpace 全向垂吊安装套件 天花吸顶卫星扬声器 必需 FreeSpace 3F 卫星扬声器螺丝孔型桥板 或 FreeSpace 3F 卫星扬声器安装桥板 可选 FreeSpace 3F 卫星扬声器装饰盖 壁装卫星扬声器 FreeSpace 全向垂吊安装套件 安装指南 • FreeSpace 3 扬声器系统 简体中文 • 77...
- Page 78 设置 PRO.BOSE.COM 为扬声器布线 线规 FreeSpace 3 扬声器仅可与 18 AWG(0.8 平方毫米)至 14 AWG(2.1 平方毫米)规格的接线一起使用。 接线端子 II 型 Acoustimass 低音箱:拆下后盖板以便接触到接线 天花吸顶卫星扬声器:拆下后盖板以便接触 壁装卫星扬声器:按住后面板上的按钮, 到接线端子。完成所有接线的连接后,装回 然后完全插入接线。 端子。完成所有接线的连接后,装回后盖板。 后盖板。 功放输出连接 注意:务必先完成所有接线的连接,然后再将功放连接至电源或接通其电源。 100V 70V 并联 (第二个低音箱) 变压器抽头设置 变压器抽头出厂时设置为使用 200W 功率。要将其设置为使用较低的功率,请拔下连接至 200W 接线端子的 + 跳线的末端,然后将其重新连接至相应的 抽头:100W、50W 或 25W。...
- Page 79 立体声音源 卫星扬声器连接 注意:请勿将除 FreeSpace 3 卫星扬声器以外的任何扬声器直接连接到低音箱。 将 FreeSpace 3 II 型 Acoustimass 低音箱连接到 FreeSpace 3 天花吸顶卫星扬声器或壁装卫星扬声器。(本页显示的是连接到天花吸顶卫星扬声器的II 型 Acoustimass 低音箱。您可以使用壁装卫星扬声器来代替任何天花吸顶卫星扬声器,只要您确保它们的接线极性正确。) 您可以将 FreeSpace 3 II 型 Acoustimass 低音箱与其他 Bose 扬声器一起使用,包括但不限于 FreeSpace、DesignMax 或 Panaray 型号。 如果要这样做,请使用单独的通道将扬声器和低音箱直接连接到功放。确保对所有其他扬声器应用适当的带通滤波和/或建议的均衡(如适用)。 请访问 PRO.BOSE.COM 并查看每种型号的技术参数表。 2 个卫星扬声器 4 个卫星扬声器...
- Page 80 Bose 建议使用安全接线或安全绳作为 II 型 Acoustimass 低音箱和天花吸顶卫星扬声器的第二个固定装置。对于实施的任何辅助固定装置, 请遵循制造商的说明。 每个扬声器型号都有一个或多个可用的连接点: II 型 Acoustimass 低音箱 从后盖板上拆下一个 M6 螺钉,然后将安全绳连接到该螺钉孔。 天花吸顶卫星扬声器 将一根安全绳连接到后盖板上金属卡舌的开口处。 准备天花板和配件 在安装低音箱或卫星扬声器之前,请按照说明准备您将在安装过程中使用的天花板和任何配件。有关每个扬声器型号必需或可选的配件的列表,请参见安 装选件(第 77 页)。 准备吊顶板 切割吊顶板 卸下吊顶板,然后使用模板在吊顶板上描画扬声器孔。为了将模板放在吊顶板的中心位置,可连接对角线画一个“X”,然后利用交叉点使模板居中。 在吊顶板上开一个孔。 装好安装桥板 将安装桥板穿过吊顶龙骨放置。必要时,调节安装桥板,使滑轨靠在吊顶龙骨上。 将吊顶板装回天花板上。 使用螺丝孔型桥板(新结构)准备硬顶天花板 将螺丝孔型桥板固定到轻钢龙骨或木质龙骨上。螺丝孔型桥板包括多个预钻孔,以适应不同的龙骨间隔、扬声器方位或扬声器布置。 对天花板进行表面处理后,将螺丝孔型桥板作为参考,在经过表面处理的天花板上开孔。 80 • 简体中文 FreeSpace 3 扬声器系统 • 安装指南...
- Page 81 PRO.BOSE.COM 安装 安装扬声器 II 型 Acoustimass 低音箱 确保完成所有扬声器接线的连接。有关接线信息,请参阅为扬声器布线(第 78 页)。 将扬声器穿过孔插入安装桥板或螺丝孔型桥板。继续将扬声器固定到位。 拧紧锚臂螺钉以固定扬声器。如果使用电钻,请设为低扭矩设置。在松开扶住扬声器的手之前,确保已拧紧所有锚栓。 警告:过度拧紧螺钉可能会导致锚柱安装点或天花板损坏,进而导致产品掉落。 用双手将网罩定位到扬声器上。轻轻地将网罩推到扬声器上以将其固定。网罩固定后,您可以旋转徽标。 天花吸顶卫星扬声器 确保完成所有扬声器接线的连接。有关接线信息,请参阅为扬声器布线(第 78 页)。 将扬声器穿过孔插入安装桥板或螺丝孔型桥板。继续将扬声器固定到位。 拧紧锚臂螺钉以固定扬声器。如果使用电钻,请设为低扭矩设置。在松开扶住扬声器的手之前,确保已拧紧所有锚栓。 警告:过度拧紧螺钉可能会导致锚柱安装点或天花板损坏,进而导致产品掉落。 用双手将网罩定位到扬声器上。轻轻地将网罩推到扬声器上以将其固定。 安装指南 • FreeSpace 3 扬声器系统 简体中文 • 81...
- Page 82 安装 PRO.BOSE.COM 壁装卫星扬声器 拧松将扬声器臂连接到壁装支架的螺钉,然后将两部分分开。 将壁装支架的后板与盖分开。 使用模板在墙壁上标记所有四个螺钉孔的中心。 插入四颗 M4 (#10) 螺钉,将壁装支架固定到墙壁上。确保扬声器接线在墙壁的出口位置与支架上的槽口对准。 将壁装支架盖重新连接到支架片上,并将扬声器接线穿过壁装支架盖的中心孔。 将接线连接到扬声器。有关接线信息,请参阅为扬声器布线(第 78 页)。 使用随附的螺钉将扬声器臂连接到扬声器后面板上的螺纹插件上。 通过对准旋转接头的两个部分(在步骤 1 中分开的),将扬声器臂连接到壁装支架上。 根据需要调节扬声器的垂直和水平角度。 10. 将螺钉(在步骤 1 中拆下的)插入旋转接头。拧紧螺钉,以所需角度将扬声器固定到壁装支架上。 M4 (#10) × 4 82 • 简体中文 FreeSpace 3 扬声器系统 • 安装指南...
- Page 83 GB/T 26572 中的限制規定。 X: 表示至少一種用於此零件的同類材料中,此有毒或危險物質 本產品含有磁性材料。請諮詢醫生以瞭解這是否會影響您的 高於 GB/T 26572 中的限制規定。 植入式醫療設備。 台灣有害物質限用表 • 所有 Bose 產品的安裝必須遵守當地、州、聯邦和行業規範。安裝人 員有責任確保揚聲器和安裝系統的裝設都符合適用的法規,包括當 設備名稱: 型號: FreeSpace 3 II Acoustimass 低音箱 040147、040148 地的建築法規和規定。安裝本產品前,請諮詢擁有司法權的當地政 FreeSpace 3 Flush-Mount Satellites 崁入式 040150、040149 府機關。 安裝衛星揚聲器 040144、040143 • 以不安全的方式安裝或高處懸吊任何重物都可能導致嚴重的人身傷 FreeSpace 3 Surface-Mount Satellites 面裝...
-
Page 84: 安裝指南
356 公釐 (14.0 吋) (13.6 吋) (15.4 吋) (14.0 吋) 189 公釐 (7.4 吋) 崁入式安裝 衛星揚聲器 113 公釐 157 公釐 (4.5 吋) (6.2 吋) 53 公釐 (2.1 吋) 123 公釐 (4.8 吋) 119 公釐 71 公釐 71 公釐 (4.7 吋) (2.8 吋) (2.8 吋) 108 公釐 (4.3 吋) 104 公釐 (4.1 吋) 127 公釐 (5.0 吋) 84 • 繁體中文 FreeSpace 3 揚聲器系統 • 安裝指南... - Page 85 UL-2043,《Fire Test and Visible Smoke Release for Discrete Products and their Accessories Installed in Air Handling Spaces》 (裝於空氣調節空間之分離性產品及其配件的防火測試及可視煙霧釋放) NFPA-70,2002 年,《National Electrical Code》(美國國家電氣規程) 第 300.22(C) 條 NFPA 90A,2002 年,《Installation of Air Conditioning and Ventilation Systems》(空調與排氣系統安裝),第 4.3.10.2.6.5 項 本指南中所述之 Bose Freespace 3 Surface-mount Satellites 面裝衛星揚聲器,尚未獲得 UL 安全認證。 安裝指南 • FreeSpace 3 揚聲器系統 繁體中文 • 85...
- Page 86 FreeSpace 3BF Bass Loudspeaker 低音揚聲器面裝套件 FreeSpace 3BF Bass Loudspeaker 低音揚聲器氣室罩 FreeSpace 全向吊裝套件 崁入式安裝衛星揚聲器 必要 FreeSpace 3F Satellite Loudspeaker 衛星揚聲器放樣板 或 FreeSpace 3F Satellite Loudspeaker 衛星揚聲器天花板跨橋板 選配 FreeSpace 3F Satellite Loudspeaker 衛星揚聲器美化外蓋 面裝衛星揚聲器 FreeSpace 全向吊裝套件 86 • 繁體中文 FreeSpace 3 揚聲器系統 • 安裝指南...
- Page 87 PRO.BOSE.COM 設定 揚聲器接線 線規 FreeSpace 3 揚聲器的設計僅可使用 18 AWG (0.8 公釐 ) 至 14 AWG (2.1 公釐 ) 的線材。 接線端子 II Acoustimass 低音箱:拆下後方蓋板,以使用接線端子。 崁入式安裝衛星揚聲器:拆下後方蓋板, 面裝衛星揚聲器:按壓住後面板上的按鍵, 以使用接線端子。完成所有的接線連線後, 同時接線,以使其完全插入。 完成所有的接線連線後,重新裝回後方蓋板。 重新裝回後方蓋板。 擴大機輸出連線 注意:您必須先完成所有的接線連線,才能將擴大機連線至電源或開啟電源。 100V 70V 並聯 (第第第第第第) 變壓器抽頭設定 變壓器抽頭原廠設定為適用於 200W。若要將其設為較低瓦數,請拆下連線至 200W 端子的 + 跳線端,然後將其重新連線至適用的抽...
- Page 88 立體聲訊號源 衛星揚聲器連線 注意:請勿將 FreeSpace 3 衛星揚聲器以外的其他任何揚聲器直接連線至模組。 請將 FreeSpace 3 II Acoustimass 低音箱連線至 FreeSpace 3 Flush-mount Satellites 崁入式安裝衛星揚聲器或 Surface-mount Satellites 面裝衛星 揚聲器。(在本頁中,所示之 II Acoustimass 低音箱是連線至 Flush-mount Satellites 崁入式安裝衛星揚聲器。您可以用 Surface-mount Satellites 面 裝衛星揚聲器來替代任何的 Flush-mount Satellites 崁入式安裝衛星揚聲器,只要您使用正確的極性來連接設備即可。) 您可以將 FreeSpace 3 II Acoustimass module 低音箱與其他 Bose 揚聲器搭配使用,包括但不限於 FreeSpace、DesignMax 或 Panaray 機型。...
- Page 89 PRO.BOSE.COM 設定 安裝準備 揚聲器位置 備註:若揚聲器安裝的位置靠近料理檯面,可能會直接接觸烹調油脂、水蒸氣、煙霧或高溫 (例如商業料理環境),即可能會降低揚聲器的效能或可靠性。 使用安全纜線 部分地區的建築法規要求使用輔助方式固定揚聲器以增強結構支撐力,加強安全性。請遵守當地的建築法規和規定,選擇合適的安裝位置、 方式和五金部件。 Bose 建議使用安全索或安全纜索來作為 FreeSpace 3 II Acoustimass 低音箱與 Flush-mount Satellites 崁入式安裝衛星揚聲器的輔助固定機制。 請遵守製造商的指示來施作任何輔助固定機制。 每個揚聲器型號都會有一或多個可能的安裝點: FreeSpace 3 II Acoustimass 低音箱 拆下後方蓋板的 M6 螺絲,然後將安全纜索安裝至該螺絲孔。 崁入式安裝衛星揚聲器 將安全纜索安裝至後方蓋板金屬調整片的開口。 天花板與配件準備工作 在安裝低音箱或衛星揚聲器之前,請依照指示進行天花板與您將用於安裝之任何配件的準備工作。請參閱安裝選項 (第 86 頁),以瞭解各揚聲器型號的必要 或選配配件清單。 聲學天花板板材準備工作 裁切天花板板材 取下天花板板材,然後使用定位卡將揚聲器孔洞描繪於板材上。為將定位卡置於板材正中央,請自四個角畫出交叉的對角線,利用交叉點將定位卡置中。...
- Page 90 安裝 PRO.BOSE.COM 安裝揚聲器 FreeSpace 3 II Acoustimass 低音箱 請確定所有揚聲器的接線連線均已完成。如需瞭解配線資訊,請參閱「揚聲器接線」 (第 87 頁)。 將揚聲器穿過孔洞,並置入天花板跨橋板或放樣板中。持續使揚聲器保持定位。 鎖緊錨座支臂螺絲以固定揚聲器。如果使用電動工具,請調整為低扭力設定。在放開揚聲器之前,請務必確認所有的錨座均已鎖緊。 警告:螺絲過度鎖緊可能會對錨座安裝點或天花板造成損壞,進而導致墜落危險。 請使用雙手將網罩對準揚聲器。將網罩對著揚聲器輕推,以固定網罩。網罩固定之後,即可旋轉標誌。 崁入式安裝衛星揚聲器 請確定所有揚聲器的接線連線均已完成。如需瞭解配線資訊,請參閱「揚聲器接線」 (第 87 頁)。 將揚聲器穿過孔洞,並置入天花板跨橋板或放樣板中。持續使揚聲器保持定位。 鎖緊錨座支臂螺絲以固定揚聲器。如果使用電動工具,請調整為低扭力設定。在放開揚聲器之前,請務必確認所有的錨座均已鎖緊。 警告:螺絲過度鎖緊可能會對錨座安裝點或天花板造成損壞,進而導致墜落危險。 請使用雙手將網罩對準揚聲器。將網罩對著揚聲器輕推,以固定網罩。 90 • 繁體中文 FreeSpace 3 揚聲器系統 • 安裝指南...
- Page 91 PRO.BOSE.COM 安裝 面裝衛星揚聲器 鬆開將揚聲器支臂連接至壁掛支架的螺絲,並使兩者分離。 使後方蓋板與壁掛支架保護蓋分離。 使用定位卡在牆面上標示出全部四個螺絲孔的中心。 插入四枚 M4 (#10) 螺絲,將壁掛支架安裝板固定於牆面。確保揚聲器接線從牆面伸出的位置點,與安裝板的凹口對齊。 重新將壁掛支架保護蓋裝回安裝板,將揚聲器接線穿過壁掛支架保護蓋的中心孔洞。 將接線連線至揚聲器。如需瞭解配線資訊,請參閱「揚聲器接線」 (第 87 頁)。 使用隨附的螺絲,將揚聲器支臂安裝至揚聲器後面板的螺絲吊點。 藉由對齊旋轉接頭的兩個部分 (即步驟 1 中分離的部分),將揚聲器支臂安置於壁掛支架上。 依需求調整揚聲器的垂直與水平角度。 10. 將螺絲 (即步驟 1 中拆下的螺絲) 裝入旋轉接頭。鎖緊螺絲,依需求角度將揚聲器固定於壁掛支架。 M4 (#10) × 4 安裝指南 • FreeSpace 3 揚聲器系統 繁體中文 • 91...
- Page 92 いる医療機器への影響については、 医師にご相談ください。 台湾で制限されている有害/危険物質一覧 • ボーズ製品を設置する際は、 必ず地域と業界指導の安全基準に従ってく ださい。 各地域の建築に関する条例や規制など、 適用される全ての法律に 機器名: 型式: 従って本製品およびそのマウントシステムを設置することは施工業者の責 FreeSpace 3 Series II Acoustimass Bass Module 040147、 040148 任です。 本製品を設置する前に、 各地域の管轄官庁に相談してく ださい。 FreeSpace 3 Flush-mount Satellites 040150、 040149 FreeSpace 3 Surface-mount Satellites 040144、 040143 • 重量物の不安定な設置や頭上吊り下げは、 重傷または死亡、 および設...
- Page 93 × 2 × 2 × 1 × 1 製品寸法 Series II Acoustimass Bass Module 205 mm 356 mm 347 mm 391 mm 356 mm 189 mm Flush-mount Satellites 113 mm 157 mm 53 mm 123 mm 119 mm 71 mm 71 mm 108 mm 104 mm 127 mm 設置ガイド • FreeSpace 3 Loudspeaker System 日本語 • 93...
- Page 94 UL-2043、 Fire Test and Visible Smoke Release for Discrete Products and their Accessories Installed in Air Handling Spaces NFPA-70、 米国電気工事規程、 2002年、 第300.22 (C) 条 NFPA 90A、 2002年、 Installation of Air Conditioning and Ventilation Systems、 第4.3.10.2.6.5節 このガイドで説明されているBose Freespace 3 Surface-mount Satellitesは、 ULのリストには準拠されていません。 94 • 日本語 FreeSpace 3 Loudspeaker System • 設置ガイド...
- Page 95 FreeSpace 3BF Bass Loudspeakerプレナムカバー FreeSpace オムニペンダントマウントキッ ト Flush-mount Satellites 必須 FreeSpace 3F Satellite Loudspeaker ラフインパン または FreeSpace 3F Satellite Loudspeaker タイルブリッジ オプシ ョン FreeSpace 3F Satellite Loudspeaker コスメティ ックカバー Surface-mount Satellites FreeSpaceオムニペンダントマウントキッ ト 設置ガイド • FreeSpace 3 Loudspeaker System 日本語 • 95...
- Page 96 セッ トアップ PRO.BOSE.COM スピーカーの配線 ケーブルゲージ FreeSpace 3スピーカーで使用できるケーブル径は、 18 AWG (0.8 mm ) ~14 AWG (2.1 mm ) のみです。 配線ターミナル Series II Acoustimass bass module: リアカバープレー Flush-mount Satellites: リアカバープレ Surface-mount Satellites: リアパネルのボ トを取り外すと、 配線ターミナルがあります。 配線が完了した ートを取り外すと、 配線ターミナルがありま タンを押しながら、 ケーブルを最後までしっか ら、 リアカバープレートを再度取り付けます。...
- Page 97 ステレオソース サテライ トスピーカーの接続 注意: FreeSpace 3 satellite loudspeaker 以外のスピーカーをモジュールに直接接続しないでください。 FreeSpace 3 Series II Acoustimass bass moduleをFreeSpace 3 Flush-mount Satellites/Surface-mount Satellitesに接続します (このページで は、 Series II Acoustimass moduleはFlush-mount Satellitesに接続されています。 Surface-mount SatellitesをFlush-mount Satellitesの各モデルに 置き換えることができます。 ただし、 正しい極性で接続する必要があります) 。 FreeSpace 3 Series II Acoustimass moduleは、 FreeSpace、 DesignMax、 Panarayモジュールなどの他のボーズスピーカーと組み合わせて使用するこ...
- Page 98 必須またはオプションのアクセサリーについては、 「 設置オプシ ョン」 ( 95ページ) を参照してください。 タイル天井の準備 タイル天井を切り抜く タイルを取り外し、 テンプレートを使ってスピーカーの穴の位置を示す線をタイルに引きます。 タイルの中央にテンプレートを合わせるには、 角を対角線で 結んで 「X」 を書き、 交点を使います。 タイルに穴を開けます。 タイルブリ ッジを設置する タイルブリッジを天井グリッ ドに渡します。 必要に応じてタイルブリッジを調節して、 レールが天井のグリッ ドにしっかり引っかかるようにします。 タイルを天井に戻します。 ラフインパンを使用して新築の硬い天井に設置の準備をする 天井のさんや木製のスタッ ドにラフインパンを取り付けます。 ラフインパンには事前に穴が空けられており、 サイズの異なるネジを使用したり、 スピーカー の向きや設置位置を調整することができます。 天井が完成した後で、 ラフインパンをガイドにしながら、 天井に穴を開けます。 98 • 日本語 FreeSpace 3 Loudspeaker System • 設置ガイド...
- Page 99 両手を使って、 スピーカーにグリルを取り付けます。 スピーカーに向けてグリルを慎重に押し、 グリルを固定します。 グリルを固定する際に、 ロゴを回転させ ることができます。 Flush-mount Satellites すべてのスピーカーの配線が完了していることを確認してください。 配線について詳しくは、 「 スピーカーの配線」 ( 96ページ) を参照してください。 スピーカーを穴に通し、 タイルブリッジまたはラフインパンに挿入します。 スピーカーを所定の位置に保持します。 アンカーアームのネジを締めてスピーカーを固定します。 電動ドリルを使用する場合、 トルクを低速に設定してください。 スピーカーから手を放す前に、 す べてのアンカーが締まっていることを確認してください。 警告: ネジを強く締めすぎると、 アンカーの取り付けポイントや天井が壊れて、 落下事故を招くおそれがあります。 両手を使って、 スピーカーにグリルを取り付けます。 スピーカーに向けてグリルを慎重に押し、 グリルを固定します。 設置ガイド • FreeSpace 3 Loudspeaker System 日本語 • 99...
- Page 100 M4 (#10) ネジ x 4を挿入し、 壁掛けブラケッ トのプレートを壁に取り付けます。 壁から出ているスピーカーケーブルの位置とプレートの溝の位置が合って いることを確認してください。 壁掛けブラケッ トカバーをプレートに再度取り付け、 スピーカーケーブルをカバーの中央の穴に通します。 スピーカーにケーブルを接続します。 配線について詳しくは、 「 スピーカーの配線」 ( 96ページ) を参照してください。 付属のネジを使用して、 スピーカーアームをスピーカーのリアパネルのネジ穴に取り付けます。 手順1で分離した回転式ジョイントのスピーカーアームを壁掛けブラケッ トの上に再度配置し、 位置を合わせます。 必要に応じてスピーカーの垂直および水平角度を調整します。 10. 回転式ジョイントに、 手順1で取り外したネジを挿入します。 ネジを締め、 スピーカーを目的の角度で壁掛けブラケッ トに固定します。 M4 (#10) × 4 100 • 日本語 FreeSpace 3 Loudspeaker System • 設置ガイド...
- Page 101 لكل قناة (نظام مؤل ّ ف من )مكبر َ ي صوت صغير َ ين .يأتي هذا المنتج مع ضمان محدود .PRO.BOSE.COM للحصول على تفاصيل حول الضمان، تف ض ّل بزيارة • دليل التركيبFreeSpace 3 نظام مكبر الصوت 101 • العربية...
- Page 102 )35 مم (1,2 بوصة 321 مم )(8,4 بوات 911 مم 17 مم 17 مم )(7,4 بوصات )(8,2 بوصات )(8,2 بوصات 801 مم )(3,4 بوصات 401 مم )(1,4 بوصة 721 مم )(0,5 بوصات 102 • العربية FreeSpace 3 دليل التركيب • نظام مكبر الصوت...
- Page 103 4.3.10.2.6.5 ، العام 2002، تركيب أجهزة تكييف الهواء وأنظمة التهوية، الفقرةNFPA 90A إن مكبرات الصوت الصغيرة المر ك ّ بة على السطحFreeSpace 3 منBose الموصوفة في هذا الدليل غير مدرجة ضمن معيارUL • دليل التركيبFreeSpace 3 نظام مكبر الصوت...
- Page 104 FreeSpace 3BF عارضة ألواح مكبر الصوت الصغير العناصر االختيارية FreeSpace 3BF أغطية تزيينية لمكبر الصوت الصغير مكبرات الصوت الصغيرة المر ك ّبة على السطح FreeSpace حزمة التركيب المتدلي في كل األماكن لمكبر الصوت 104 • العربية FreeSpace 3 دليل التركيب • نظام مكبر الصوت...
- Page 105 قياس األسالك .) فقط ) إلى 41 بمعيار السلك األمريكي (1,2 مم لتعمل بأسالك مقاس 81 بمعيار السلك األمريكي (8,0 ممFreeSpace 3 تم تصميم مكبرات الصوت أطراف األسالك مكبرات الصوت الصغيرة المر ك ّبة على السطح: اضغط مكبرات الصوت الصغيرة المرك ب ّ ة على مستوى الحائط: قم...
- Page 106 . مباشرة بالوحدةFreeSpace 3 تنبيه: ال تقم بتوصيل أي مكبرات صوت غير مكبرات الصوت الصغيرة .FreeSpace 3 بمكبرات الصوت الصغيرة المر ك ّ بة على مستوى الحائط أو مكبرات الصوت الصغيرة المرك ب ّة على السطحFreeSpace 3 II السلسلةAcoustimass قم بتوصيل وحدة صوت باس...
- Page 107 ث ب ّت القاعدة المسط ّ حة الصلبة باألخشاب المحصصة في السقف أو الدعامات الخشبية. تتض م ّ ن القاعدة المسط ّ حة الصلبة فتحات متعددة محفورة مسب ق ً ا الستيعاب مختلف مسافات الدعامات واتجاهات مكبر الصوت .ووضعيات مكبر الصوت .بعد االنتهاء من تحضير السقف، أحدث ثق ب ًا في السقف الجاهز، مستخد م ً ا القاعدة المسط ّ حة الصلبة كدليل • دليل التركيبFreeSpace 3 نظام مكبر الصوت 701 • العربية...
- Page 108 .تحذير: قد يؤ د ّي شد البراغي بشكل مفرط إلى إلحاق ضرر بنقطة تثبيت الخطاف أو السقف، ما قد يتسبب بخطر السقوط .باستخدام كلتا الي د َ ين، ض َ ع الحاجز الشبكي على مكبر الصوت. ادفع الحاجز الشبكي برفق على مكبر الصوت لتثبيته 108 • العربية FreeSpace 3 دليل التركيب • نظام مكبر الصوت...
- Page 109 .أدخ ِ ل البرغي (الذي قمت بإزالته في الخطوة 1) في وصلة التدوير. ش د ّ البرغي لتثبيت مكبر الصوت على الكتيفة المثبتة على الحائط على الزاوية المطلوبة )10 (رقمM4 4 × • دليل التركيبFreeSpace 3 نظام مكبر الصوت 901 • العربية...
- Page 112 ©2019 Bose Corporation, All rights reserved. Framingham, MA 01701-9168 USA PRO.BOSE.COM AM263579 Rev. 03 October 2019...
Need help?
Do you have a question about the FreeSpace 3 and is the answer not in the manual?
Questions and answers