
Related Manuals for Toro 23511


Summary of Contents for Toro 23511
- Page 1 Form No. 3421-217 Rev B 18in Turf Seeder Model No. 23511—Serial No. 400000000 and Up *3421-217* B Register at www.Toro.com. Original Instructions (EN)
- Page 2 Whenever you need service, genuine Toro parts, or additional information, contact an Authorized Service Dealer or Toro Customer Service and have the model and serial numbers of your product ready. Figure illustrates the location of the model and serial numbers on the product.
-
Page 3: Table Of Contents
Contents Safety Safety ............... 3 Improperly using or maintaining this machine can Safe Operating Practices........3 result in injury. To reduce the potential for injury, Safety and Instructional Decals ......5 comply with these safety instructions and always pay Setup ................ 8 attention to the safety-alert symbol, which means Unfolding the Handle .......... - Page 4 Do not operate the machine while ill, tired, or optimal performance of your Toro equipment, under the influence of alcohol or drugs. count on Toro genuine parts. When it comes • Lightning can cause severe injury or death. If to reliability, Toro delivers replacement parts...
-
Page 5: Safety And Instructional Decals
Safety and Instructional Decals Safety decals and instructions are easily visible to the operator and are located near any area of potential danger. Replace any decal that is damaged or missing. decal93-7321 93-7321 1. Warning—stay away from moving parts; keep all guards in place. - Page 6 decal127-4061 127-4061 1. Cutting blades 4. Hold the handle to start the engine. 2. Fast 5. Release the handle to shut off the engine. 3. Slow decal130-8322 130-8322 1. Use only gasoline that 3. Do not use gasoline that contains 10% ethanol by contains more than 10% volume (E10) or less.
- Page 7 decal125-3809 125-3809 1. Warning—read the Operator’s Manual. 5. Thrown object hazard—keep bystanders away from the machine. 2. Warning—do not operate this machine unless you are trained. 6. Warning—shut off the engine before walking away from the machine. 3. Thrown object hazard—shut off the engine and remove any 7.
-
Page 8: Setup
Checking the Engine-Oil Setup Level Unfolding the Handle The machine comes from the factory with oil in the engine crankcase; however, you may need to add oil. Raise the handle to the operating position Refer to Checking the Engine-Oil Level (page 17). -
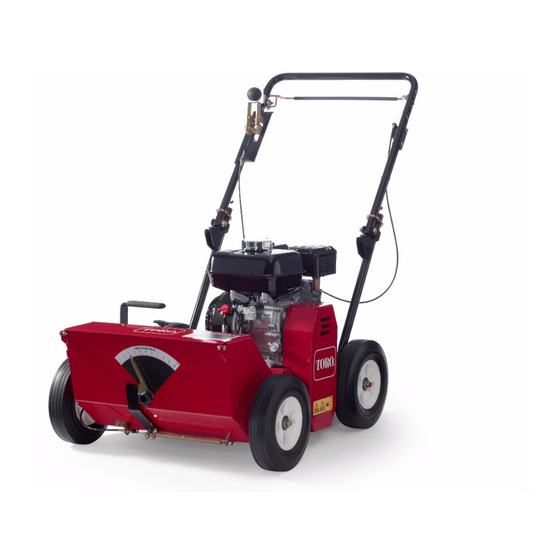
Page 9: Product Overview
Controls Product Overview g023178 Figure 5 1. Recoil-starter handle 4. Choke lever 2. Sediment cup 5. Throttle lever 3. Fuel-shutoff valve Recoil-Start Handle To start the engine, pull the recoil-start handle (Figure 5) quickly to turn the engine over. Refer to Starting the Engine (page 13) for the correct starting procedure. - Page 10 Throttle Lever Depth-Control Lever Move the control forward to increase the engine speed The depth-control lever allows you to set the depth of and rearward to decrease speed; refer to Figure the cutting blades in 10 cutting positions along with 1 position for transportation.
- Page 11 Seeding-Rate Gauge Seed-Gate-Control Lever Use the seeding-rate gauge to set the seed flow rate. Push the seed-gate-control lever (Figure 10) forward It is calibrated with the machine speed to give you to start the seed flow, and pull it rearward to stop the an even seeding rate at any speed.
-
Page 12: Specifications
Authorized Service Dealer or Distributor or go to • Do not store the machine or fuel container where www.Toro.com for a list of all approved attachments there is an open flame, spark, or pilot light, such and accessories. as on a water heater or other appliance. -
Page 13: Starting The Engine
Starting the Engine • Cleans the engine while it runs • Eliminates gum-like varnish buildup in the fuel Move the choke lever to the left if you are system, which causes hard starting starting a cold engine. Important: Do not use fuel additives Move the throttle lever midway between the containing methanol or ethanol. -
Page 14: Operating Tips
Operating Tips • As seed flow varies greatly between different seed types, fill the hopper with a minimal amount of seed, and run a trial portion of the yard to ensure you have the desired seed output. • For optimal coverage, reduce the seed flow to 1/2 the desired amount and seed the entire yard in 1 direction, then complete a second coverage perpendicular to the first. -
Page 15: Maintenance
Maintenance Recommended Maintenance Schedule(s) Maintenance Service Maintenance Procedure Interval • Change the engine oil. After the first 25 hours • Clean debris form the machine. • Inspect the air-cleaner elements. • Check the engine-oil level. • Check the belt tension. If the engine is working but the cutting blades seem Before each use or daily underpowered, check the belt tension. -
Page 16: Engine Maintenance
Engine Maintenance Remove the foam element from the paper element (Figure 13). Inspect the foam and paper elements, and Servicing the Air Cleaner replace them if they are damaged or excessively dirty. Service Interval: Before each use or daily—Inspect If the paper element is excessively dirty, replace the air-cleaner elements. -
Page 17: Checking The Engine-Oil Level
Checking the Engine-Oil Level Service Interval: Before each use or daily Park the machine on a level surface, disengage the cutting blades, shut off the engine, and wait for all moving parts to stop, and turn the engine switch to the O position. -
Page 18: Changing The Engine Oil
Changing the Engine Oil Service Interval: After the first 25 hours Every 100 hours WARNING Oil may be hot after the engine has been run, and contact with hot oil can cause severe personal injury. Avoid contacting the hot engine oil when you drain it. -
Page 19: Servicing The Spark Plug
Remove the sediment cup and O-ring (Figure 18). g027478 Figure 19 Checking the Spark Plug Important: Do not clean the spark plug(s). Always replace the spark plug(s) when it has a black coating, worn electrodes, an oily film, or cracks. If you see light brown or gray on the insulator, the g020282 engine is operating properly. -
Page 20: Belt Maintenance
Belt Maintenance Adjusting the Belt Tension To tighten the belt, loosen the 4 mounting nuts securing the engine to the frame. Checking the Belt Tension Service Interval: Before each use or daily—Check the belt tension. If the engine is working but the cutting blades seem underpowered, check the belt tension. -
Page 21: Blade Maintenance
Blade Maintenance Remove the 4 bolts and 4 nuts securing the belt cover to the left side of the machine, and remove the cover. Replacing Worn Cutting Remove the cutting blades drive belt from the machine. Blades Tilt the machine forward onto its nose, resting on a block of wood. -
Page 22: Storage
Removing the Machine Storage from Storage Park the machine on a level surface, disengage Check and tighten all fasteners. the cutting blades, shut off the engine, and wait for all moving parts to stop, and turn the engine Inspect the spark plug and replace it if it is dirty, switch to the O position. - Page 23 Notes:...
- Page 24 While the exposure from Toro products may be negligible or well within the “no significant risk” range, out of an abundance of caution, Toro has elected to provide the Prop 65 warnings. Moreover, if Toro does not provide these warnings, it could be sued by the State of California or by private parties seeking to enforce Prop 65 and subject to substantial penalties.
Need help?
Do you have a question about the 23511 and is the answer not in the manual?
Questions and answers