Advertisement
Quick Links
ATTACH YOUR
ATTACH
ATTACH
ATTACH
YOUR
YOUR
YOUR RECEIPT
RECEIPT
RECEIPT HERE
RECEIPT
Serial
Serial
Number
Number
Serial Number
Serial
Number
1 1 1 1
Questions,
Questions,
Questions,
Questions, problems,
service department
service
service
service
department at at at at 1-877-292-9888
department
department
Friday.
Friday.
Friday.
Friday." " " "
HERE
HERE
HERE
Purchase
Purchase
Purchase Date
Purchase
problems, missing
problems,
problems,
missing parts?
missing
missing
1-877-292-9888
1-877-292-9888
1-877-292-9888 with
Date
Date
Date
parts?
parts?
parts?
Before
Before
returning
returning
returning to to to to your
" " " " Before
Before returning
with
with
with hours
hours
hours of of of of operation
hours
operation
operation
operation 9:00am
1
CHARCOAL
CHARCOAL
CHARCOAL
CHARCOAL GRILL
MODEL: 58812TS
your
your
retailer,
retailer,
call
call
our
our
your retailer,
retailer, call
call our
our customer
9:00am – – – – 5:00pm
9:00am
9:00am
5:00pm
5:00pm
5:00pm EST,
EST,
EST, Monday
EST,
Monday – – – –
Monday
Monday
GRILL
GRILL
GRILL
customer
customer
customer
Advertisement

Related Manuals for Red Stone 58812TS


Summary of Contents for Red Stone 58812TS
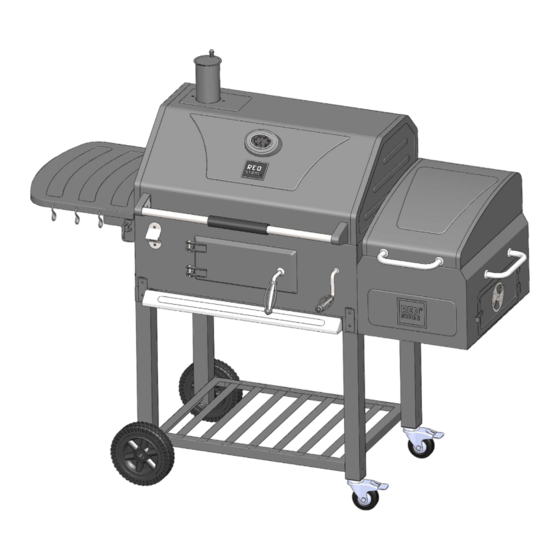
- Page 1 CHARCOAL CHARCOAL GRILL GRILL CHARCOAL CHARCOAL GRILL GRILL MODEL: 58812TS ATTACH ATTACH ATTACH ATTACH YOUR YOUR YOUR YOUR RECEIPT RECEIPT RECEIPT RECEIPT HERE HERE HERE HERE Serial Serial Number Number Purchase Purchase Date Date Serial Serial Number Number Purchase Purchase Date...
-
Page 2: Table Of Contents
TABLE TABLE TABLE TABLE OF OF CONTENTS CONTENTS CONTENTS CONTENTS Safety Information …………………………………………………………………………………….3 Parts List ……………………………………………………………………………………………….4 Hardware List……………………………………………………………………………………………9 Assembly or Installation Instructions..................11 Operation Instructions………………………………………………………………………………..24 Care and Maintenance…………………………………………………………………………………28... -
Page 3: Safety Information
SAFETY SAFETY SAFETY SAFETY INFORMATION INFORMATION INFORMATION INFORMATION � Outdoor use only. DO NOT use grill indoors or in an enclosed or non-ventilated area. � Keep a fire extinguisher near this product at all times. � Household use only. DO NOT operate this grill for other than its intended use. �... -
Page 4: Parts List
PARTS PARTS PARTS PARTS LIST LIST LIST LIST... - Page 5 Part Part Part Part Picture Picture Part Name Part Name Part Name Part Name Picture Picture Number Number Number Number Hood 1 pc 2 pcs Chimney Lid Chimney 1 pc Upper Hinge 4 pcs Lower Hinge 4 pcs Hood Handle 1 pc Handle Bottom 2 pcs...
- Page 6 Part Part Part Part Part Name Picture Picture Part Name Part Name Part Name Picture Picture Number Number Number Number Side Shelf Bracket 1 pc Front Side Shelf Bracket 1 pc Rear 3 pcs Hooks 2 pcs Cooking Grid 1 pc Ash Pan 1 pc Decorative...
- Page 7 Part Part Part Part Picture Picture Part Name Part Name Part Name Part Name Picture Picture Number Number Number Number Right Transmission 1 pc Support Firebox 1 pc Bottle Opener 1 pc Vent Knob 1 pc Vent 1 pc Vent Gear 1 pc Stabilizing Plate (Left) 1 pc...
- Page 8 Part Part Part Part Picture Part Name Part Name Picture Picture Picture Part Name Part Name Number Number Number Number Wheel 2 pcs Bottom Shelf 1 pc Caster 2 pcs Legs (Right) 2 pcs Stabilizing Plate 1 pc (Right) Charcoal Pan Crank 1 pc Handle Bar Grip 1 pc...
-
Page 9: Hardware List
Part Part Part Part Picture Part Name Part Name Picture Picture Picture Part Name Part Name Number Number Number Number Charcoal Door Locking 1 pc Lever Smoker Handle 1 pc Air Vent 1 pc Smoker Handle Base 4 pcs Smoker Handle 2 pcs Smoker 1 pc... - Page 10 H H H H ARDWARE ARDWARE ARDWARE ARDWARE LIST LIST LIST LIST Part Part Part Part Picture Picture Name Name Name Name Picture Picture Number Number Number Number 43 pcs M6 Nut 49 pcs M6X12 Bolt M6 Half Screw 2 pcs Thread Bolt 16 pcs M6X40 Bolt...
-
Page 11: Assembly Or Installation Instructions
ASSEMBLY ASSEMBLY ASSEMBLY ASSEMBLY INSTRUCTIONS INSTRUCTIONS INSTRUCTIONS INSTRUCTIONS 1 1 1 1 ..Attach the Stabilizing Plate (Right) (A6) to 1 1 1 1 the Legs (Right) (A5) from left to right using M6 x 65 bolts (EE) and M6 nuts (AA). Using M6X12Bolts (BB) from up to down. - Page 12 ASSEMBLY ASSEMBLY ASSEMBLY ASSEMBLY INSTRUCTIONS INSTRUCTIONS INSTRUCTIONS INSTRUCTIONS 4. 4. 4. 4. Slide the wheel axle (A1) through the 4 4 4 4 holes on the legs. Attach the wheels (A2) onto the ends of the wheel axle (A1) using 2 cotter pins (LL).Take out casters (A4) and screw them tightly into the bottom holes of legs (A5).
- Page 13 ASSEMBLY ASSEMBLY ASSEMBLY ASSEMBLY INSTRUCTIONS INSTRUCTIONS INSTRUCTIONS INSTRUCTIONS 6. 6. 6. 6. Attach the charcoal door handle (A9) 6 6 6 6 Charcoal Door Handle Base (A10) and Charcoal Door Locking Lever (A11) to the charcoal door attached using M6 nut (AA), flat washer (HH) and lock washer (II).
- Page 14 ASSEMBLY ASSEMBLY ASSEMBLY ASSEMBLY INSTRUCTIONS INSTRUCTIONS INSTRUCTIONS INSTRUCTIONS 8. 8. 8. 8. Assemble the Side Shelf Bracket 8 8 8 8 Front (J) and Side Shelf Bracket Back (K) on the firebox (T) using M6X12 bolts (BB) and M6 nuts (AA) for each bracket.
- Page 15 ASSEMBLY ASSEMBLY ASSEMBLY ASSEMBLY INSTRUCTIONS INSTRUCTIONS INSTRUCTIONS INSTRUCTIONS 10. Attach the lower hinges (E) to the smoker (A16) using M6 x 40 bolts (DD), flat washers (HH) and lock washers (II) with M6 Nut (AA) and tighten. 11. Attach the Air Vent (A13) to the 11 11 smoker charcoal door using M6 x 12 bolt (BB), flat washers (HH) and lock...
- Page 16 ASSEMBLY ASSEMBLY ASSEMBLY ASSEMBLY INSTRUCTIONS INSTRUCTIONS INSTRUCTIONS INSTRUCTIONS 1 1 1 1 2. 2. 2. 2. Install the smoker handles (A15) and hood handle bases (A14) to the smoker (A16) using M6 x 12 bolts (BB) and flat washers (HH). 1 1 1 1 3.
- Page 17 ASSEMBLY ASSEMBLY ASSEMBLY ASSEMBLY INSTRUCTIONS INSTRUCTIONS INSTRUCTIONS INSTRUCTIONS 1 1 1 1 4. 4. 4. 4. Attach the right transmission support (S) to the transmission shaft (Q) using axle pin (JJ) and cotter pin (LL). Attach the left transmission support (R) to the other side of the transmission shaft in the same way.
- Page 18 ASSEMBLY ASSEMBLY ASSEMBLY ASSEMBLY INSTRUCTIONS INSTRUCTIONS INSTRUCTIONS INSTRUCTIONS 1 1 1 1 6. 6. 6. 6. Attach the handle bar grip (A8) and the right transmission support (S) to the firebox (T) front panel using M6 x 12 bolts (BB). Attach the left transmission support (R) to the left side of the firebox (T) front panel using M6 x 12 bolts (BB).Lock the bar of the transmission shaft (R) onto the...
- Page 19 ASSEMBLY ASSEMBLY ASSEMBLY ASSEMBLY INSTRUCTIONS INSTRUCTIONS INSTRUCTIONS INSTRUCTIONS 1 1 1 1 8. 8. 8. 8. Attach the upper hinges (D) to the hood (A) using M6 nuts (AA), M6 x 40 bolts (DD), flat washers (HH) and lock washers (II). 1 1 1 1 9.
- Page 20 ASSEMBLY ASSEMBLY ASSEMBLY ASSEMBLY INSTRUCTIONS INSTRUCTIONS INSTRUCTIONS INSTRUCTIONS 20. Insert the chimney (C) through the inside of the hood (A). Secure the chimney (C) to the hood (A) using M6 nuts (AA) and M6 x 12 bolts (BB)..Attach the chimney lid (B) to the chimney (C) using spring (GG) and M8 nut (FF).
- Page 21 ASSEMBLY ASSEMBLY ASSEMBLY ASSEMBLY INSTRUCTIONS INSTRUCTIONS INSTRUCTIONS INSTRUCTIONS 22. Attach the hood (A) to the firebox assembly by inserting 2 hinge pins (KK) through the holes on the upper hinges (D) and lower hinges (E). You may need to slightly lift up the hood (A) so that the holes on the hinges (D and E) line up properly.
- Page 22 ASSEMBLY ASSEMBLY ASSEMBLY ASSEMBLY INSTRUCTIONS INSTRUCTIONS INSTRUCTIONS INSTRUCTIONS 24. Place the cooking grids (M) and Charcoal Grid of Smoker (A18) into the firebox assembly. 25. Attach the bottle opener(U) firebox(T) using M6X12bolts(BB). Put the hooks(L) on the side shelf(I)
- Page 23 ASSEMBLY ASSEMBLY ASSEMBLY ASSEMBLY INSTRUCTIONS INSTRUCTIONS INSTRUCTIONS INSTRUCTIONS 26. Attach the decorative (O) to the ash pan (N) using M6x12bolts (BB) and M6 nut (AA) and insert the firebox (T). 27. The grill is now assembled.
-
Page 24: Operation Instructions
OPERATION OPERATION OPERATION OPERATION INSTRUCTIONS INSTRUCTIONS INSTRUCTIONS INSTRUCTIONS This grill has an adjustable charcoal tray. By turning the crank handle, the charcoal tray can be raised or lowered to desired height. This allows for different heat settings depending on the food you are cooking and the temperature you want to cook at. - Page 25 OPERATION OPERATION OPERATION OPERATION INSTRUCTIONS INSTRUCTIONS INSTRUCTIONS INSTRUCTIONS Controlling Controlling Controlling Controlling the the Fire Fire Fire Fire � Allow enough time for properly building the fire and getting the grill up to desired temperature before attempting to cook. You simply cannot cook properly in a cold grill, nor can you nurse a fire to life while busy with the food.
- Page 26 OPERATION OPERATION OPERATION OPERATION INSTRUCTIONS INSTRUCTIONS INSTRUCTIONS INSTRUCTIONS Cooking Cooking Cooking Cooking Methods Methods Methods Methods You can use your GRILL to cook three different ways – depending on the type of food, and how you want to prepare it. GRILLING �...
- Page 27 OPERATION OPERATION OPERATION OPERATION INSTRUCTIONS INSTRUCTIONS INSTRUCTIONS INSTRUCTIONS SMOKING WOODS � Adding smoking woods to your CHARCOAL GRILL is an easy and effective way to create wonderful flavor combinations for all types of grilled, barbecued, or slow smoked foods. Wood chips are typically used for shorter cooking times, where chunks are better for longer cooking times.
-
Page 28: Care And Maintenance
CARE CARE CARE CARE AND AND MAINTENANCE MAINTENANCE MAINTENANCE MAINTENANCE Grill Maintenance Grill Grill Grill Maintenance Maintenance Maintenance Frequency of cleaning is determined by how often the grill is used. Make sure coals are completely extinguished and the grates are cooled down before cleaning inside of the unit. To remove the stains on the lid and front panel caused by the fumigation while grilling, use of a cleaning pad is recommended.
Need help?
Do you have a question about the 58812TS and is the answer not in the manual?
Questions and answers