Advertisement
Available languages
Available languages
Quick Links
Lana Modern 3-in-1 TV Stand
This item is designed to be a 3-in-1 configuration. Please choose the option that best suits your
needs. DO NOT discard any of the hardware or parts that you will not use on your chosen option.
This will allow you to use this TV Stand in different configurations at a later date, if desired.
If you have any questions regarding assembly or if parts are missing, DO NOT return this item to
the store where it was purchased. Please call our toll-free customer service number and have
your instructions and parts list ready to provide the model name, part name or factory number:
Pacific Standard Time: 8:30 a.m. - 4:30 p.m., Monday - Friday
Or visit our web site 24 hours a day, 7 days a week for product assistance at
THIS INSTRUCTION BOOKLET CONTAINS IMPORTANT SAFETY INFORMATION.
Stock # BH47-084-899-01
U.S. Patent 9,215,927
ADULT ASSEMBLY REQUIRED
www.whalenstyle.com
Or e-mail your request to parts@whalenfurniture.com
PLEASE READ AND KEEP FOR FUTURE REFERENCE.
Date 2018-08-20
866-942-5362
LOT NUMBER:
DATE PURCHASED:
Rev. 0001-B
/
/
Advertisement

Summary of Contents for Better Homes and Gardens Lana Modern 3-in-1
- Page 1 LOT NUMBER: DATE PURCHASED: Lana Modern 3-in-1 TV Stand Stock # BH47-084-899-01 U.S. Patent 9,215,927 This item is designed to be a 3-in-1 configuration. Please choose the option that best suits your needs. DO NOT discard any of the hardware or parts that you will not use on your chosen option.
- Page 2 M A X I M U M R E C O M M E N D E D W E I G H T L O A D S MANUFACTURER: Whalen Furniture Manufacturing CATALOG: Lana Modern 3-in-1 TV Stand MODEL # BH47-084-899-01 MADE IN CHINA HOLDS MOST 42”...
- Page 3 IMPORTANT FINAL Before you begin: Open, identify and count all parts prior to assembly. Lay out parts on a flat and non-abrasive surface. You will need the parts identified on page 4, 5 and 6 of this instruction manual. NOTE: IT IS VERY IMPORTANT TO USE GLUE WITH DOWELS.
- Page 4 Parts and Hardware List Please read completely through the instructions and verify that all listed parts and hardware are present before beginning assembly. A- Top Panel B- Lower Shelf with Metal Frame C- Drawer Box Back Panel (Qty. 1) (Qty. 2) (Qty.
- Page 5 Parts and Hardware List Please read completely through the instructions and verify that all listed parts and hardware are present before beginning assembly. V- Back Frame (Qty. 1) W- Swiveling Bracket (Qty. 1) X- Mounting Frame (Qty. 1) Y- Monitor Bracket (Qty. 2) Z- Cable Wheel (Qty.
- Page 6 Parts and Hardware List Please read completely through the instructions and verify that all listed parts and hardware are present before beginning assembly. (16) Large Flat Washer (17) Concrete Anchor (18) Handle and Back Plate (Qty. 4+1 extra) (Qty. 4) (Qty.
- Page 7 Drawer Assembling M6 x 30 mm Wood Dowel M4 x 32 mm Screw (2 used in this step) (4 used in this step) ⑥ ⑤ 1. Unpack the unit and confirm that you have all the hardware and required parts. 2.
- Page 8 Drawer Assembling M4 x 32 mm Screw (2 used in this step) ⑥ 3. Fasten one Drawer Bottom Support (Q) to the Drawer Back Panel (M) with two 32 mm Screws (6).
- Page 9 Drawer Assembling 4. Slide one Drawer Bottom Panel (P) into the grooves between the Drawer Left and Right Side Panels (N and O) until fully inserted into the groove of the Drawer Back Panel (M).
- Page 10 Drawer Assembling Small Cam Lock M6 x 30 mm Wood Dowel Cam Bolt (5 used in this step) (5 used in this step) (3 used in this step) ① ⑤ ③ 5. Securely screw five Cam Bolts (3) into the designated small holes on one Drawer Front (L). 6.
- Page 11 Drawer Assembling Handle Bolt Handle and Back Plate (2 used in this step) (1 used in this step) ⑲ ⑱ 7. Turn the assembled drawer upright. Attach one Handle and one Bake Plate (18) to the front side of the Drawer Front (L) with the provided Handle Bolts (19). 8.
- Page 12 Assembly Instructions Cam Bolt (30 used in this step) ③ 9. Securely screw the Cam Bolts (3) into the designated small holes on the Top Panel (A), Back Panel (C), Drawer Box Side Panels (F and H) and Drawer Box Front Panels (G and I) using a Phillips screwdriver.
- Page 13 Assembly Instructions M8 x 30 mm Wood Dowel M4 x 32 mm Screw (2 used in this step) (2 used in this step) ④ ⑥ 10. Attach one Fixed Shelf (J) to the Drawer Box Left Side Panel (F) with two M8 x 30 mm Wood Dowels (4) and two 32 mm Screws (6).
- Page 14 Assembly Instructions M8 x 30 mm Wood Dowel Large Cam Lock (3 used in this step) (3 used in this step) ④ ② 11. Attach the Drawer Box Left Front (G) to the Fixed Shelf (J) and the Drawer Box Left Side Panel (F) with three Large Cam Locks (2) and three M8 x 30 mm Wood Dowels (4).
- Page 15 Assembly Instructions M8 x 30 mm Wood Dowel M4 x 32 mm Screw (2 used in this step) (2 used in this step) ④ ⑥ 12. Attach the other Fixed Shelf (J) to the Drawer Box Right Side Panel (H) with two M8 x 30 mm Wood Dowels (4) and two 32 mm Screws (6).
- Page 16 Assembly Instructions M8 x 30 mm Wood Dowel Large Cam Lock (3 used in this step) (3 used in this step) ④ ② 13. Attach the Drawer Box Right Front (I) to the Fixed Shelf (J) and the Drawer Box Right Side Panel (H) with three Large Cam Locks (2) and three M8 x 30 mm Wood Dowels (4).
- Page 17 Assembly Instructions M8 x 30 mm Wood Dowel Large Cam Lock (4 used in this step) (4 used in this step) ④ ② 14. Attach the Front and Back Stretchers (D and E) between the Drawer Box Side Panels (F and H) with four Large Cam Locks (2) and four M8 x 30 mm Wood Dowels (4).
- Page 18 Assembly Instructions M8 x 30 mm Wood Dowel M4 x 32 mm Screw (2 used in this step) (2 used in this step) ④ ⑥ 15. Attach the Partition Panel (K) to the Front and Back Stretchers (D and E) with two M8 x 30 mm Wood Dowels (4) and two 32 mm Screws (6).
- Page 19 Assembly Instructions M8 x 30 mm Wood Dowel Large Cam Lock (6 used in this step) (6 used in this step) ④ ② 16. Attach the Drawer Box Back Panel (C) to the Drawer Box Side Panels (F and H) and the Fixed Shelves (J) with six Large Cam Locks (2) and six M8 x 30 mm Wood Dowels (4).
- Page 20 Drawer Assembling M4 x 32 mm Screw (6 used in this step) ⑥ 17. Fasten the Drawer Box Back Panel (C) to the Back Stretcher (E) and the Partition Panel (K) with six 32 mm Screws (6).
- Page 21 Assembly Instructions Large Cam Lock M8 x 30 mm Wood Dowel (14 used in this step) (12 used in this step) ② ④ 18. Position the Top Panel (A) upside down on a smooth and protected surface. 19. Align and attach the previous assembly to the Top Panel (A) with the M8 x 30 mm Wood Dowels (4) and the Large Cam Locks (2).
- Page 22 Assembly Instructions 9 13 8 13 14 3/4” Bolt (4 used in this step) ⑧ 1-1/4” Bolt (4 used in this step) ⑨ Flat Washer Lock Washer ⑳ 2-5/8” Bolt (12 used in this step) (12 used in this step) (4 used in this step) ⑬...
- Page 23 Assembly Instructions Flat Washer 1-1/4” Bolt Lock Washer (6 used in this step) (6 used in this step) (6 used in this step) ⑨ ⑬ ⑭ 23. Align and attach the Back Frame (V) to the Metal Frames (B and T) starting with Middle Shelf (B), using six 1-1/4”...
- Page 24 Assembly Instructions 3/4” Bolt (2 used in this step) ⑧ Flat Washer Lock Washer 1-1/4” Bolt (4 used in this step) (4 used in this step) (2 used in this step) ⑨ ⑭ ⑬ 24. Turn the previous assembly upright. 25.
- Page 25 Assembly Instructions 1-3/4” Bolt Flat Washer Lock Washer (2 used in this step) (2 used in this step) (2 used in this step) ⑩ ⑭ ⑬ 26. Lay the assembled unit at its front edge carefully. Fasten the Drawer Box Front Panels (G and I) to the Legs (R and S) with two 1-3/4”...
- Page 26 Assembly Instructions 27. Turn the previous assembly upright and insert the assembled drawers into the frame. Extend the Ball Bearing Slide Tracks on the Panels all the way forward (including ball bearing cart). Then align the Slide Runners on the assembled drawers with the Slide Tracks and push the drawers carefully inside until it stops.
- Page 27 Assembly Instructions for Table-top Stand 3/4” Bolt (4 used in this step) ⑧ 28. Attach 2 Cable Wheels (Z) to the backside of the Drawer Box Back Panel (C) or Back Frame (V) with four 3/4” Bolts (8). Tighten the bolts with the enclosed hex wrench. NOTE: You can use the cable wheels to help keep your entertainment center’s cables and cords organized.
- Page 28 Assembly Instructions for Table-top Stand Tools required (not provided): Phillips screwdriver, stud finder, power drill and 3 mm/0.1 in drill bit. 29. Position the assembled stand at the desired location against a wall. If necessary, adjust the pre-attached Floor Levelers at the bottom of Legs (R and S) to level the unit. Now, follow the instructions printed on the plastic bag containing the Tipping Restraint Hardware to attach the tip-over restraint to the Back Frame and the wall.
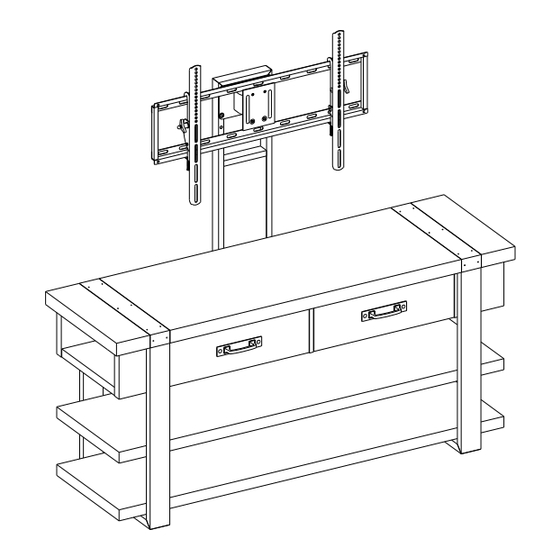
- Page 29 A s s e m b l y I n s t r u c t i o n s f o r : F l o a t i n g S w i v e l M o u n t 2-1/4”...
- Page 30 Assembly Instructions for Floating Swivel Mount 2-1/4” Bolt (4 used in this step) ⑪ Flat Washer Hex Nut Lock Washer (8 used in this step) (4 used in this step) (8 used in this step) ⑭ ⑫ ⑬ 32. Attach the Swiveling Bracket (W) to the top of Floater Post (U) with the pivoting bolt head up. Securely tighten with the provided open wrench and 4 mm hex wrench.
- Page 31 Assembly Instructions for Floating Swivel Mount Flat Washer 1/2” Bolt Lock Washer (4 used in this step) (4 used in this step) (4 used in this step) ⑭ ⑬ ⑦ 33. Hold and attach the flat side of the Mounting Frame (X) to the Swiveling Bracket (W) using four 1/2”...
- Page 32 Mounting the Monitor Brackets to a television with a Flat Back NOTE: For televisions with a curved or recessed back, proceed directly to next page. 34. Determine the correct diameter of the bolt the TV requires by hand threading them into the threaded insert on the back of the TV.
- Page 33 Mounting the Monitor Brackets to a television with a Curved/Recess Back 36. Determine the correct diameter of the bolt the TV requires by hand threading them into the threaded insert on the back of the TV. If you encounter any resistance, stop immediately. If you are unable to find the correct bolt consult a local hardware store.
- Page 34 Assembly Instructions for Floating Swivel Mount YL/YR YL/YR MAKE SURE ALL BOLTS ARE TIGHT AND THE SPINE IS AT A 90 DEGREE ANGLE. USE A QUALITY LEVEL TO VERIFY THE MOUNTING FRAME IS LEVEL PRIOR TO INSTALLATION OF TV. 38. Ask for assistance to lift the television up to hang the Monitor Brackets (YL/YR) onto the Mounting Frame (X).
- Page 35 Assembly Instructions for Floating Swivel Mount 40. The Monitor Brackets (YL/YR) can tilt up to 11˚ downward and 5˚ upward, depending on your optimum viewing position. Keep the enclosed 3/16” Hex Wrench to ensure the Tilt Adjustment Knobs remain tightly fastened.
- Page 36 Assembly Instructions for Floating Swivel Mount ttach two Cable Wheels (Z) to the back side of Floater Post (U) with four 3/4” Bolts (8). 42. Carefully move the stand and position it at the desired location against a wall. If necessary, adjust the pre-attached Floor Levelers at the bottom of Legs (R and S) to level the unit.
- Page 37 The following steps are only for those who wish to mount their TV directly to the wall. If you have already mounted your TV to the Swinging Floater or plan to display your TV on the top surface of the Stand, disregard the following steps. Assembly Instructions for Universal Wall Mount Installing the Mounting Frame onto a WOODEN STUD WALL NOTE: If you are mounting your TV onto brick, solid concrete or concrete block walls, skip this...
- Page 38 Assembly Instruction for installing the Mounting Frame onto BRICK, SOLID CONCRETE OR CONCRETE BLOCK WALLS 2.50" (63 mm) Maximum weight 135 lb. (61.3 kg) Concrete Anchors should only be used for masonry mounting. NEVER use the wall anchors to mount the unit to drywall. NOTE: If you are mounting your TV to a wall with wooden studs, skip this section.
- Page 39 Assembly Instructions 50. Attach the Monitor Brackets (YL/YR) to the back of the television following steps 34 and 35, or 36 and 37, depending on the type of TV that you own. 51. Ask for assistance to lift the television up to attach the Monitor Brackets onto the Mounting Frame (X).
-
Page 40: Quality Guarantee
Care and Maintenance Use a soft, clean cloth that will not scratch the surface when dusting. Use of furniture polish is not necessary. Should you choose to use polish, test first in an inconspicuous area. Using solvents of any kind on your furniture may damage the finish. ... - Page 41 NÚMERO de LOTE: FECHA de COMPRA: Estante moderno para televisor 3 en 1 Lana Serie # BH47-084-899-01 Patente de U.S. 9,215,927 Esté producto está diseñado para ser una configuración 3-en-1. Por favor escoja la opción que mejor sirva a sus necesidades. NO tire el material de ferreterí a o partes que no usara para la opción escogida.
- Page 42 M Á X I M O S P E S O S R E C O M E N D A D O S FABRICANTE: Whalen Furniture Manufacturing CATALOGO: Estante moderno para televisor 3 en 1 Lana MODELO # BH47-084-899-01 HECHO EN CHINA PARA LA MAYORÍ...
- Page 43 IMPORTANTE FINAL Antes de comenzar: Abra, identifique y cuente todas las partes antes del ensamble. Coloque las piezas sobre una superficie plana y no abrasiva. Tendrá las partes identificadas en la página 4 de este manual de instrucciones. NOTA: ES MUY IMPORTANTE EL USO DE GOMA CON LAS CLAVIJAS DE MADERA. EL. EXCESO DE PEGAMENTO SE PUEDE LIMPIAR CON UN PAÑO HÚMEDO.
- Page 44 Lista de partes y material de ferreterí a Por favor lea completamente las instrucciones y verifique que estén todas las partes antes de iniciar el ensamblado A- Panel superior B- Repisa inferior con marco de metal C- Panel posterior de la caja cajó n (Cant.
- Page 45 Lista de partes y material de ferreterí a Por favor lea completamente las instrucciones y verifique que estén todas las partes antes de iniciar el ensamblado V- Marco posterior (Cant. 1) W- Soporte del pivote (Cant. 1) X- Marco de montaje (Cant. 1) Y- Soporte de monitor (Cant.
- Page 46 Lista de partes y material de ferreterí a Por favor lea completamente las instrucciones y verifique que estén todas las partes antes de iniciar el ensamblado (16) Arandela plana grande (17) Ancla para concreto (18) Manija y placa posterior (Cant. 4+1 extra) (Cant.
- Page 47 Ensamble del cajón Clavija de madera de Perno de M4 x 32 mm M6 x 30 mm (4 usados en este paso) (2 usados en este paso) ⑥ ⑤ 1. Desempacar la unidad y confirmar que se tiene todo el material de ferreterí a y partes requeridas.
- Page 48 Ensamble del cajón Perno de M4 x 32 mm (2 usados en este paso) ⑥ 3. Sujetar un soporte inferior del cajó n (Q) al panel posterior del cajón (M) con 2 pernos de 32 mm (6).
- Page 49 Ensamble del cajón 4. Deslizar un panel inferior del cajó n (P) en las ranuras entre los paneles izquierdo y derecho del cajón (N y O) hasta que esté completamente insertado en la ranura del panel inferior del cajón (M).
- Page 50 Ensamble del cajón Tuerca de fijació n chica Perno de fijación Clavija de madera de (5 usados en este paso) (5 usados en este paso) M6 x 30 mm (3 usados en este paso) ① ③ ⑤ 5. Atornillar 5 pernos de fijación (3) en los agujeros chicos designados en un frente del cajón (L). 6.
- Page 51 Ensamble del cajón Perno de manija Manija y placa posterior (2 usados en este paso) (1 usado en este paso) ⑲ ⑱ 7. Voltear el cajó n ensamblado en posición vertical. Adjuntar la manija y una placa posterior (18) a lado frontal del frente del cajón (L) con los pernos de manija (19). 8.
- Page 52 Ensamble del cajón Perno de fijación (30 usados en este paso) ③ 9. Atornillar los pernos de fijación (3) en los agujeros chicos designados en el panel superior (A), en el panel posterior (C), en los paneles laterales de la caja cajó n (F y H) y en los paneles frontales de la caja cajón (G y I) usando el desarmador estrella.
- Page 53 Instructivo de ensamble Clavija de madera de Perno de M4 x 32 mm M8 x 30 mm (2 usados en este paso) (2 usados en este paso) ⑥ ④ 10. Adjuntar una repisa fija (J) al panel izquierdo de la caja cajón (F) con 2 clavijas de madera de M8 x 30 mm (4) y 2 pernos de 32 mm (6).
- Page 54 Instructivo de ensamble Clavija de madera de Tuerca de fijació n grande M8 x 30 mm (3 usados en este paso) (3 usados en este paso) ② ④ 11. Adjuntar el frente izquierdo de la caja cajón (G) a la repisa fija (J) y al panel izquierdo de la caja cajó...
- Page 55 Instructivo de ensamble Clavija de madera de Perno de M4 x 32 mm M8 x 30 mm (2 usados en este paso) (2 usados en este paso) ⑥ ④ 12. Adjuntar la repisa fija (J) al panel derecho de la caja cajón (H) con 2 clavijas de madera de M8 x 30 mm (4) y 2 pernos de 32 mm (6).
- Page 56 Instructivo de ensamble Tuerca de fijació n grande Clavija de madera de (3 usados en este paso) M8 x 30 mm (3 usados en este paso) ② ④ 13. Adjuntar el frente derecho de la caja cajó n (I) a la repisa fija (J) y al panel derecho de la caja cajón (H) con 3 tuercas de fijación grandes (2) y 3 clavijas de madera de M8 x 30 mm (4).
- Page 57 Instructivo de ensamble Clavija de madera de Tuerca de fijació n grande M8 x 30 mm (4 usados en este paso) (4 usados en este paso) ② ④ 14. Adjuntar los soportes frontal y posterior (D y E) entre los paneles laterales de la caja cajón (F y H) con 4 tuercas de fijación grandes (2) y 4 clavijas de madera de M8 x 30 mm (4).
- Page 58 Instructivo de ensamble Clavijas de madera de Perno de M4 x 32 mm M8 x 30 mm (2 usados en este paso) (2 usados en este paso) ⑥ ④ 15. Adjuntar el panel divisor (K) a los soportes frontal y posterior (D y E) con 2 clavijas de madera de M8 x 30 mm (4) y 2 pernos de 32 mm (6).
- Page 59 Instructivo de ensamble Clavija de madera de Tuerca de fijació n grande M8 x 30 mm (6 usados en este paso) (6 usados en este paso) ② ④ 16. Adjuntar el panel posterior de la caja cajón (C) a los paneles laterales de la caja cajón (F y H) y a las repisas fijas (J) con 6 tuercas de fijación grandes (2) y 6 clavijas de madera de M8 x 30 mm (4).
- Page 60 Instructivo de ensamble Perno de M4 x 32 mm (6 usados en este paso) ⑥ 17. Sujetar el panel posterior de la caja cajó n (C) al soporte posterior (E) y al panel posterior (K) con 6 pernos de 32 mm (6).
- Page 61 Instructivo de ensamble Clavija de madera de Tuerca de fijació n grande M8 x 30 mm (14 usados en este paso) (12 usados en este paso) ② ④ 18. Posicionar el panel superior (A) boca abajo en una superficie suave y protegida. 19.
- Page 62 Instructivo de ensamble 9 13 8 13 14 Perno de 3/4” usados en este paso ⑧ Perno de 1-1/4” usados en este paso ⑨ Arandela plana Perno de 2-5/8” Arandela de presión ⑳ (12 usados en este paso) usados en este paso usados en este paso) ⑭...
- Page 63 Instructivo de ensamble Arandela plana Arandela de presión Perno de 1-1/4” (6 usados en este paso) usados en este paso) usados en este paso ⑨ ⑬ ⑭ 23. Adjuntar el marco posterior (V) a los marcos de metal (B y T) comenzando por la repisa intermedia (B), usando 6 pernos de 1-1/4”...
- Page 64 Instructivo de ensamble Perno de 3/4” (2 usados en este paso) ⑧ Arandela de presión Arandela plana Perno de 1-1/4” usados en este paso usados en este paso usados en este paso ⑨ ⑬ ⑭ 24. Voltear el ensamble previo en posición vertical. 25.
- Page 65 Instructivo de ensamble Arandela plana Perno de 1-3/4” Arandela de presión usados en este paso (2 usados en este paso) usados en este paso ⑩ ⑬ ⑭ 26. Descansar la unidad montada en su parte frontal cuidadosamente. Sujetar los paneles frontales de la caja cajón (G y I) a las patas (R y S) con 2 pernos de 1-3/4”...
- Page 66 Instructivo de ensamble 27. Voltear el ensamble previo en posición vertical y insertar los cajones ensamblados en el marco. Extender los carriles de la corredera de baleros en los paneles laterales todo el camino hacia enfrente (incluyendo el carrito de baleros). Luego alinear los complementos de corredera en el cajón ensamblado con los carriles de corredera y empujar el cajón hacia adentro hasta que tope.
- Page 67 Instructivo de ensamble para la consola tipo mesa Perno de 3/4” (4 usados en este paso) ⑧ 28. Adjuntar 2 guí as de cable (Z) a la parte posterior del panel posterior de la caja cajó n (C) y al marco posterior (V) con 4 pernos de 3/4”...
- Page 68 Instructivo de ensamble para la consola tipo mesa Herramientas necesarias (no incluidas): Desarmador estrella, detector de vigas, taladro elé ctrico y taladro de 3mm (0.1"). 29. Poner la unidad ensamblada en el lugar deseado contra la pared. Si fuera necesario, ajustar los niveladores de piso pre-adjuntados a la parte inferior de las patas para nivelar la unidad.
- Page 69 I n s t r u c t i v o d e e n s a m b l e p a r a : M a r c o f l o t a d o r Perno de 2-1/4” Arandela plana Arandela de presión (4 usados en este paso)
- Page 70 Instructivo de ensamble para la montura del marco flotante Perno de 2-1/4” (4 usados en este paso) ⑪ Arandela de presión Arandela plana Tuerca hexagonal usados en este paso usados en este paso (4 usados en este paso) ⑬ ⑫ ⑭...
- Page 71 Instructivo de ensamble para la montura del marco flotante Arandela plana Arandela de presión Perno de 1/2” (4 usados en este paso) (4 usados en este paso) (4 usados en este paso) ⑬ ⑭ ⑦ 33. Mantener y adjuntar el lado plano del marco de montaje (X) al soporte del pivote (W) usando 4 pernos de 1/2”...
- Page 72 Para montar el marco en televisiones con respaldo plano NOTA: Para televisiones con respaldos curvos o desnivel proceda directamente a la siguiente página. Determine el diámetro correcto de pernos que utilizará en su televisión atornillando con sus manos para asegurar que entren bien, si encuentra resistencia deténganse inmediatamente. Si no encuentra el perno adecuado consulte a su tienda de ferreterí...
- Page 73 Para montar el marco en televisiones con respaldo curvo/desnivel Determine el diámetro correcto de pernos que utilizará en su televisión atornillando con sus manos para asegurar que entren bien, si encuentra resistencia deténganse inmediatamente. Si no encuentra el perno adecuado consulte a su tienda de ferreterí a local 37.
- Page 74 Instructivo de ensamble para la montura del marco flotante YL/YR YL/YR ASEGURAR QUE LOS PERNOS ESTEN APRETADOS Y QUE EL POSTE ESTEN EN UN ANGULO DE 90 GRADOS. USANDO UN NIVEL DE CALIDAD PARA VERIFICAR QUE EL MARCO DE MONTAJE ESTÉ NIVELADO ANTES DE LA INSTALACIÓN DE LA TV 38.
- Page 75 Instructivo de ensamble para la montura del marco flotante 40. Los soportes de monitor (YL/YR) pueden inclinarse hasta 11˚ para abajo y 5˚ para arriba, dependiendo de su posición de mayor visión. Mantener la llave hexagonal de 3/16” para asegurar de que las perillas de ajuste estén apretadas.
- Page 76 Instructivo de ensamble para la montura del marco flotante Adjuntar 2 guí as de cable (Z) a la parte posterior del poste largo (U) con 4 pernos de 3/4” (8). 42. Poner la unidad ensamblada en el lugar deseado contra la pared. Si fuera necesario, ajustar los niveladores de piso pre-adjuntados a la parte inferior las patas (R y S) para nivelar la unidad.
- Page 77 Los siguientes pasos son solo para ellos que desean montar su TV en la pared. Si ya monto su TV en el pivote flotante o planea mostrar su TV en la superficie superior de la consola, olvide los siguientes pasos. Instructivo de ensamble para el montaje de pared universal Instalando el marco de montaje en una PARED DE MADERA NOTA: Si está...
- Page 78 Instructivo de ensamble para instalar el marco de montaje a PAREDES DE LADRILLO, CONCRETO SOLIDO O BLOQUES DE CONCRETO 2.50" (63 mm) Peso máximo 135 lb. (61.3 kg) Las anclas de concreto deberí an ser usadas solamente para montar en masonerí a. NUNCA usar las anclas para montar la unidad en tablaroca. NOTA: Si está...
- Page 79 Instructivo de ensamble 50. Adjuntar los soportes de monitor (YL/YR) a la espalda de la TV siguiendo los pasos 34 y 35, o 36 y 37, dependiendo del tipo de TV que tenga. 51. Pedir asistencia para levantar la TV para adjuntar los soportes de monitor en el marco de montaje (X).
- Page 80 Mantenimiento y Cuidados Use una toalla suave y limpia para evitar daños y rayaduras. Uso de cera para pulir muebles no es necesario. Si desea usar cera, pruébela en un área que no sea visible para revisar su funcionamiento. ...
Need help?
Do you have a question about the Lana Modern 3-in-1 and is the answer not in the manual?
Questions and answers