Table of Contents
Advertisement
Advertisement
Table of Contents

Related Manuals for TouchTunes Fusion Music System

Summary of Contents for TouchTunes Fusion Music System
- Page 1 Fusion Music System Installation and Setup Guide...
- Page 3 Guide. • TouchTunes will not be held liable for any damages resulting from the use of this Guide or the product(s) described in this Guide. TOUCHTUNES PROVIDES NO WARRANTY WITH REGARD TO THIS GUIDE OR ANY OTHER...
- Page 4 TouchTunes' copyrighted material. Intellectual Property All Intellectual Property (as defined below) owned by or which is otherwise the property of TouchTunes or its respective suppliers or licensors relating to Fusion Music System, including accessories, parts or software relating thereto (the "Product"), is proprietary to TouchTunes and protected under Federal and State laws and international treaty provisions.
-
Page 5: Table Of Contents
Fusion Music System Interior Components ........ - Page 6 4 Installing Fusion Music System Moving the Fusion Music System to its Mounting Location ......32 Unpacking the Fusion Music System .
- Page 7 About Fusion Music System Maintenance ........
-
Page 9: Welcome
Welcome This section introduces the Fusion Music System, provides important safety information, and describes how to get technical support. Topics Welcome About This Guide Disclaimer and Important Safety Information Contacting TouchTunes Fusion Music System Installation and Setup Guide 901095-001 Rev 01... -
Page 10: Welcome
About This Guide This guide is intended for Operators of the Fusion Music System and their technicians, as well as TouchTunes technical support and field service personnel. It provides important information about the installation and setup of the Fusion Music System. - Page 11 Connection to speakers should be performed by a skilled person in compliance with local building codes. Class 2 wiring is required for speaker cables. Use of external speakers outside the ratings stated at the speaker jack may result in a shock injury or damage to the Fusion Music System, or equivalent.
-
Page 12: Contacting Touchtunes
Fusion Music System. WARNING: The Fusion Music System is not secured to the wall until the pivot latches are in the vertical (locked) position. -
Page 13: Introducing Fusion Music System
Introducing Fusion Music System This section introduces the hardware and software features of the Fusion Music System. Topics Introducing Fusion Music System User Interface Fusion Music System Features Overview • Custom Music Programming (CMP) Fusion Music System Interior Components •... -
Page 14: Introducing Fusion Music System
The Fusion Music System’s advanced 64-bit CPU provides great performance and superior graphics quality. High Capacity Storage With a high-resilience 500-gigabyte hard drive, the Fusion Music System allows for the local storage of music and multimedia content. Wall Mounting Bracket Fusion Music System’s mounting bracket has an auto-locking design and its dimensions are specific for supporting... -
Page 15: Custom Facade
Custom Facade The beta release of the Fusion Music System is delivered with a new custom facade, which must be installed as a cover to the chassis. There is a separate installation guide for the facade, Fusion Music System Barrel Facade Installation Guide (P/N 901096-001). -
Page 16: Modular Hardware Platform (Mhp)
Introducing Fusion Music System Fusion Music System Interior Components Modular Hardware Platform (MHP) The following figure shows the components on Fusion Music System’s Modular Hardware Platform. Computer I/O Board Power Supply Unit Zone 2 amplifier Zone 1 amplifier Fusion Music System Installation and Setup Guide... - Page 17 Fusion Music System Interior Components Computer The central computer in the Fusion Music System is a specially designed computer mounted inside the Fusion Music System. The computer contains a 500 gigabyte SATA hard drive and connectors for attaching peripherals. Computer top panel...
- Page 18 Introducing Fusion Music System Fusion Music System Interior Components I/O Board The I/O Board is an interface between the computer and Fusion Music System’s other components, providing controls and status indicators. Wired remote (top of panel) Squid (main) Zones 1 through 3 audio...
- Page 19 Introducing Fusion Music System Fusion Music System Interior Components Power Supply Unit Fusion Music System Installation and Setup Guide...
- Page 20 Fusion Music System Interior Components Amplifiers Fusion Music System’s two amplifiers are specially-designed with integrated power supply and each provides an independently controllable audio zone. Each amplifier has a handle that provides an easy way to remove the component when needed. The following shows the Zone 2 amplifier.
-
Page 21: Payment Means
Introducing Fusion Music System Payment Means Payment Means The standard payment configuration for the Fusion Music System is: • two ICT bill acceptors (with 300-note stackers) * International Currency Technologies Corp. Fusion Music System Installation and Setup Guide... -
Page 22: Cable Management Hardware
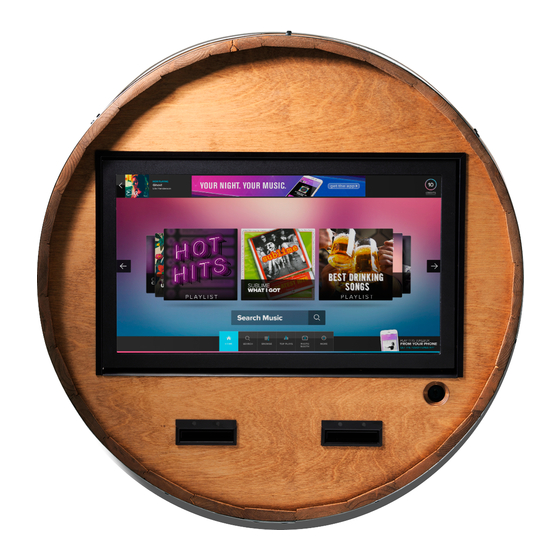
User Interface The Fusion Music System user interface has an inviting layout that presents patrons with an attractive, entertaining, and user-friendly experience that invites them to play more music. Evolving from TouchTunes’ state of the art software architecture, the OpenStage 2 software platform comprises a user interface that includes the following features: •... -
Page 23: Custom Music Programming (Cmp)
The UI always resets to the default language when a new session starts. To configure the language options, in the Operator interface, select a default language from SOFTWARE > Languages and reboot Fusion Music System. For instructions on how to change the language options, see Changing Languages. - Page 24 Introducing Fusion Music System User Interface Fusion Music System Installation and Setup Guide...
-
Page 25: Preparing For Installation
Preparing for Installation This chapter explains how to prepare to install a Fusion Music System for a location, including checking Fusion Music System components and setting up communications connections. Topics Checking Fusion Music System Components Setting Up a Broadband Connection... -
Page 26: Checking Fusion Music System Components
Checking Fusion Music System Components The Fusion Music System is delivered along with hardware components and an Accessory kit. The hard drive (necessary for Fusion Music System to function) and facade are shipped with the Fusion Music System, but in separate packaging. - Page 27 Preparing for Installation Checking Fusion Music System Components Fusion Music System dimensions To check that you have all Fusion Music System components: 1. Verify that you have received the following components for the Fusion Music System: Component Component TouchTunes Part...
-
Page 28: Setting Up A Broadband Connection
4-PIN, RIGHT ANGLE 3. The wall bracket (P/N 600260-001) comes in its own package and is included with the Fusion Music System. Verify that the wall bracket package is included with the Fusion Music System and is in good condition. -
Page 29: Preparing Tools And Materials For Installation
Fusion Music System. Preparing Tools and Materials for Installation You require the following tools and materials to install the Fusion Music System. Ensure that you have all items at hand before beginning the installation. •... - Page 30 Preparing for Installation Preparing Tools and Materials for Installation Fusion Music System Installation and Setup Guide...
-
Page 31: Installing Fusion Music System
Installing Fusion Music System This chapter explains how to install the Fusion Music System, including setting up its hardware and connecting it to a broadband network. Topics Moving the Fusion Music System to its Mounting Location Unpacking the Fusion Music System... -
Page 32: Moving The Fusion Music System To Its Mounting Location
Unpacking the Fusion Music System In this section, you remove Fusion Music System from its packaging in preparation to wall mount it. 1. Open the top cover. 2. Remove the wall bracket package and set it aside for the next procedure. - Page 33 Packaging elements 5. Remove the foam packaging from both sides of the Fusion Music System. 6. Leave the protective bag on the Fusion Music System until you are ready to mount it to the wall (in the next procedure). Fusion Music System Installation and Setup Guide...
-
Page 34: Wall-Mounting The Fusion Music System
Wall-Mounting the Fusion Music System Wall-Mounting the Fusion Music System In this section, you install Fusion Music System, level it so it is stable and then open its case to access internal components. IMPORTANT: TouchTunes has conducted extensive ergonomic studies to determine the optimal viewing height, viewing angle, and relaxed sight range for wall-mounting a Fusion Music System. - Page 35 • Install a screw on the wall, at 62 inches from the floor (as measured in the previous step), in the horizontal center of the area where you will install Fusion Music System. • With enough of the screw protruding from the wall, hang the wall bracket onto the screw using the center hole.
- Page 36 The Fusion Music System’s connection to the AC mains was designed for a detachable AC cable (C13 to 5-15P). Refer to your local electrical code for correct installation. 6. Identify the receptacles on the rear of the Fusion Music System. The receptacles fit onto the flange hooks on the wall bracket.
- Page 37 TouchTunes advises that two people perform the following steps. 9. Using two people, lift the Fusion Music System so that its top is slightly higher than the top of the wall bracket. 10. Align the receptacles (highlighted in red in the following figure) on Fusion Music System with the flange hooks on the wall bracket ensuring that the pivot latches on the bottom of the wall bracket also align with the corresponding openings (highlighted in green in the following figure) on the back of the Fusion Music System.
- Page 38 12. Locate the keys for the Fusion Music System. A Fusion Music System is shipped with two keys. 13. Unlock the Fusion Music System from the lock on the right side of the door and then slowly swing open the Fusion Music System door.
- Page 39 Wall-Mounting the Fusion Music System 14. Turn the wall bracket pivot latches to the vertical (locked) position to completely secure the Fusion Music System to the wall bracket. The location of the pivot latches are circled in red in the following figure.
-
Page 40: Installing The Modular Hardware Platform
15. Pull the speaker, network, and wired remote cables through the access opening (highlighted in green in the previous figure) to connect inside the Fusion Music System. The speaker wires should be routed towards the bottom of the chassis and the network and wired remote cables should be routed towards the top of the chassis before installing the Modular Hardware Platform in the next procedure. - Page 41 5. Leaving the Modular Hardware Platform at an angle, make sure the network cable has been routed from the cable access hole to the top of the chassis (for later connection to the Modular Hardware Platform). Fusion Music System Installation and Setup Guide...
- Page 42 7. While supporting the Modular Hardware Platform with one hand, install the two wingnuts that were set aside earlier. The wingnut holes are located at the top right and left sides of the Modular Hardware Platform. Installing the right-side wingnut Fusion Music System Installation and Setup Guide...
- Page 43 Installing Fusion Music System Installing the Modular Hardware Platform 8. Attach the payment squid to the bottom of the Modular Hardware Platform. Attaching the payment squid Fusion Music System Installation and Setup Guide...
- Page 44 Installing Fusion Music System Installing the Modular Hardware Platform 9. Attach the main squid to the I/O Board (with a flat head screwdriver. Attaching the main squid Fusion Music System Installation and Setup Guide...
- Page 45 Installing the Modular Hardware Platform 10. Attach the DVI (video) cable to the computer. Hand-tighten each side in increments to ensure that the cable is fully aligned with the connection on the computer. Attaching the DVI cable Fusion Music System Installation and Setup Guide...
- Page 46 Installing Fusion Music System Installing the Modular Hardware Platform 11. Attach the network cable to the LAN connection on the computer. Attaching the network cable Fusion Music System Installation and Setup Guide...
- Page 47 Installing Fusion Music System Installing the Modular Hardware Platform 12. Plug the AC cable into the Power Supply Unit at AC IN. Plugging in the AC cable Fusion Music System Installation and Setup Guide...
-
Page 48: Installing The Hard Drive
3. Ensure that the computer is powered OFF at the switch on the power supply. 4. Locate the hard drive for the Fusion Music System. The hard drive for a TouchTunes Fusion Music System is contained in an enclosure. The hard drive and its enclosure are shipped separately from the main Fusion Music System hardware. - Page 49 Do not over-tighten. WARNING: Do not, under any circumstances, attempt to force the wrong type of hard drive into the HD slot of the Fusion Music System computer. By doing so, you risk serious damage to the hard drive and the computer.
-
Page 50: Applying The Custom Facade
Applying the Custom Facade For instructions on how to install the beta version of the custom facade, see the Fusion Music System Barrel Facade Install Guide (P/N 901096-001). -
Page 51: Setting Up Touchtunes Wireless Broadband (Optional)
The TouchTunes Wireless Broadband hardware kit (part number [P/N] 600263-001) contains everything you will need to provide your Fusion Music System with a wireless broadband Internet connection. This kit comes with its own installation guide (Wireless Broadband Installation Guide (AT&T Beam) P/N 901024-001) that will guide US operators through the proper steps for setting up a wireless broadband connection. -
Page 52: Connecting Speakers To The Fusion Music System
Connecting Speakers to the Fusion Music System Connecting Speakers to the Fusion Music System To connect external speakers to Fusion Music System’s amplifier, you must use the 4-pin Euroblock connector (P/N 100000-001). WARNING: The speaker output of the Fusion Music System can exceed 10 Watts and could cause a shock injury. - Page 53 6. Attach the Euroblock connector to the connector on the Zone 1 or Zone 2 amplifier. 7. Connect the other end of the cables to the speakers. The cables were routed into the Fusion Music System during Wall-Mounting the Fusion Music System procedure.
-
Page 54: Connecting The Wired Remote
The connection location is highlighted in red in the following figure. Note that the wired remote is required to bring the Fusion Music System out of night mode as described in the Activating the Fusion Music System Screen procedure. Following completion of that procedure, you can remove the wired remote and proceed with using an RF remote if preferred. -
Page 55: Activating The Fusion Music System Screen
Activating the Fusion Music System Screen When you power up a Fusion Music System for the first time, it automatically goes into night mode: the computer and other internal components of Fusion Music System are running, but the touchscreen and amplifiers are disabled. - Page 56 Installing Fusion Music System Activating the Fusion Music System Screen Fusion Music System Installation and Setup Guide...
-
Page 57: Activating Fusion Music System
Activating Fusion Music System This section describes how to activate the Fusion Music System after you have completed the hardware installation. Topics Powering on Fusion Music System Configuring Fusion Music System • Calibrating the Touchscreen • Selecting Configuration Settings •... -
Page 58: Powering On Fusion Music System
After the Fusion Music System is initialized, the Calibration screen appears. NOTE If there is a corruption in the Fusion Music System’s ID chip or other serious error, the Calibration screen does not appear and an error message appears. See Major System Error. -
Page 59: Selecting Configuration Settings
The Settings screen appears. Selecting Configuration Settings On the Settings screen, you select the source for Fusion Music System’s settings. Settings include mixer levels, credit rules, the remote ID, and the other configurable options available from the Operator interface or from the TouchTunes Tempo site (https://tempo.touchtunes.com). -
Page 60: Selecting Languages
Languages screen After the initial setup, you can change the languages at any time. To change the language options, in the Operator interface, select a default language from Software > Languages and then reboot Fusion Music System. NOTE Language options apply only to the user interface. English is used for the Operator interface menus. -
Page 61: Choosing Fusion Music System Settings
1. Touch one of these selections. NOTE On a new Fusion Music System, the only option available is the first one displayed. The others are for cases where the hard drive has been replaced, such as when migrating from previous- generation software. -
Page 62: Choosing Calling Window And Connection Type
Choosing Calling Window and Connection Type After you choose the Fusion Music System settings, the Calling window and Connection type screen appears. From here you select the nightly time range during which the Fusion Music System communicates with the TouchTunes server and the type of connection the Fusion Music System uses. - Page 63 Activating Fusion Music System Configuring Fusion Music System Use the plus (+) and minus (-) buttons to set the starting and ending times for when the Fusion Music System communicates with the TouchTunes server. Time of day to begin Set this to one half hour after the last person leaves and locks the doors.
- Page 64 5. Enter the Gateway, DNS-1, DNS-2, and Netmask information supplied by the ISP by using the associated Config buttons and numeric keypad windows. 6. After you enter information in all the required fields, press Proceed to validation at the upper right-hand area of the Calling window and Connection type screen. Fusion Music System Installation and Setup Guide...
-
Page 65: Verifying The Configuration
1. Watch the progress on the Communication screen. The Communication screen shows the progress of the Fusion Music System as it communicates with the TouchTunes server. The network status LEDs display each communication step, with corresponding information in the Activity messages. - Page 66 TouchTunes Tempo site on the TouchTunes server, data access can be offline. In this case, the Fusion Music System can still receive new music, but any settings you make for it through the TouchTunes Tempo site are not registered on the Fusion Music System until data access is restored.
- Page 67 Configuring Fusion Music System 3. Check the information in the Activity messages. Communication screen - Activity messages After the Fusion Music System is fully initialized, the Attract screen of the customer interface appears. Fusion Music System Installation and Setup Guide...
-
Page 68: Updating Software
Activating Fusion Music System Updating Software Updating Software After you activate Fusion Music System, TouchTunes recommends that you make sure that Fusion Music System has the most up-to-date software. 1. Locate the Manager (MNGR) button on the I/O Board. Manager button on I/O Board... - Page 69 Updating Software 2. Press and release the MNGR button. The Operator interface main menu appears. Operator interface main menu 3. On the main menu, press the DIAGNOSTIC button. Diagnostic menu - Network status screen Fusion Music System Installation and Setup Guide...
-
Page 70: Installation Errors
Corruption in the ID Chip or Hard Drive Corruption in the ID chip or hard drive can result in the Fusion Music System being unable to play songs on the hard drive. In this case, the Fusion Music System must download information from the TouchTunes server to fix the problem. -
Page 71: Setting Up Fusion Music System
Setting up Fusion Music System This section describes how to set up the Fusion Music System after you complete the hardware installation and software activation. Topics Opening the Operator Interface Setting the Remote Control ID Learning the Remote ID Configuring the Bill Acceptors... -
Page 72: Opening The Operator Interface
Opening the Operator Interface 1. On the I/O Board, press and release the Manager (MNGR) button to display the Operator interface. A call-out to the Manager button is shown in the Updating Software section. Operator interface Fusion Music System Installation and Setup Guide... -
Page 73: Setting The Remote Control Id
3. The red indicator light lights up for three seconds to confirm your selection. If you enter an invalid code, the light blinks five times. 4. You must now make the Fusion Music System learn the remote ID. Go to Learning the Remote Learning the Remote ID 1. -
Page 74: Remote Key Assignments And Functionality
The display shows a confirmation message and returns to the Options screen. MIC VOL prompt 4. Test the remote by raising and lowering the Fusion Music System volume as it is playing. Remote Key Assignments and Functionality The keys on the remote are preprogrammed for the following functions. - Page 75 VOLUME ZONE 1, 2, 3 Raises and lowers the volume of the selected zone within the limits set on the Sound Mixer screen. F1, F2, F3, F4 For future use. Left-arrow, right-arrow, OK For future use. Fusion Music System Installation and Setup Guide...
-
Page 76: Configuring The Bill Acceptors
Music System. 1. On the Operator interface, open the HARDWARE > Options screen. Hardware Options screen From this menu, you can configure the Fusion Music System to use two bill acceptors or one. By default, this option is turned ON. •... -
Page 77: Testing The Bill Acceptors
You can verify that the bill acceptors are functioning properly using the testing controls on the Money > Options screen of the Operator interface. 1. Open the Operator interface. 2. Select the MONEY menu and then press the Options button. The Money > Options screen appears. Money Options screen Fusion Music System Installation and Setup Guide... - Page 78 To change the settings, follow the directions on the side of the bill acceptor stacker. 6. Make sure that the bill is properly stacked. Instructions for removing the bill are located on the back of the bill acceptor stacker. Fusion Music System Installation and Setup Guide...
-
Page 79: Enabling Bass Boost
The Bass Boost feature — individually controllable for all 3 audio zones — is by default turned off in the Fusion Music System software and must be turned on through the Operator interface. To enable Bass Boost: 1. -
Page 80: Connecting An External Audio Source
System. The Fusion Music System automatically switches to the external source under two conditions: 1. When the Fusion Music System is not in use. That is, no songs are playing and the Fusion Music System is not paused. 2. CMP (Custom Music Programming, also known as non-interactive background music) is not scheduled for the current time. - Page 81 Connecting an External Audio Source To connect an external audio source to Fusion Music System: To connect an external audio source to the Fusion Music System, use a line-input DI box (P/N 700167-001). Refer to the following figure when performing this procedure.
-
Page 82: Connecting A Microphone
Fusion Music System to the external audio device. Connecting a Microphone A microphone can be connected to the Fusion Music System. The Fusion Music System automatically mutes the song that is currently playing when the talk button on the microphone is activated. - Page 83 To connect a microphone to Fusion Music System: To connect a microphone to the Fusion Music System, you must use the MIC box (P/N 700166-001) and the 4-pin Euroblock connector (P/N 100000-001) supplied with the microphone kit (sold separately). Refer to the following figure when performing this procedure.
- Page 84 9. Open either of the cable access ports on the rear of the Fusion Music System. 10. Route the cable through the cable channel on the rear of the cabinet and then into the Fusion Music System. 11. Plug the other end of the Cat 5 cable into the port labeled MIC IN on the I/O Board.
-
Page 85: Applying Filters And Credit Rules
Applying Filters and Credit Rules NOTE If you are replacing an existing TouchTunes jukebox with a Fusion Music System, you must manually apply any music filters and credit rules from the old jukebox to the Fusion Music System if you want such filters and rules to apply to the Fusion Music System. -
Page 86: Setting Local Favorites Options
Setting Local Favorites Options Setting Local Favorites Options You can change the default view and sorting order of the Favorites from the Operator interface on the MUSIC > Options screen. Setting Local Favorites Fusion Music System Installation and Setup Guide... -
Page 87: Setting Custom Music Programming (Cmp) Levels
Setting CMP levels Changing Languages When you activated the Fusion Music System, you selected a default language, but you can change your language selection any time. To change the language options, on the Operator interface, select a default language from SOFTWARE >... -
Page 88: Note About Applying Stickers To The Fusion Music System Touchscreen
You can professionally display the location and your contact information on the Fusion Music System screen by adding it to the Owner profile page and enabling the Owner Profile page to display from the Fusion Music System’s Operator interface under SOFTWARE > Location Info. -
Page 89: Service And Maintenance
Service and Maintenance This section has information to assist you with the service and maintenance of the Fusion Music System. Topics Important Safety Instructions and Warranty Information About Fusion Music System Maintenance Offline Diagnostic Tool • Starting the ODT •... -
Page 90: Important Safety Instructions And Warranty Information
Important Safety Instructions and Warranty Information Important Safety Instructions and Warranty Information Before you service or replace parts in the Fusion Music System, familiarize yourself with the following information. WARNING: To prevent risk of electrical shock, do not attempt any replacement procedure without first shutting down the Fusion Music System and disconnecting all electrical power to the Fusion Music System. -
Page 91: Offline Diagnostic Tool
Money devices a.k.a bill acceptors • Sound If a test fails, then the affected component may need to be replaced. Contact TouchTunes to purchase replacement units. Starting the ODT The ODT is started by holding the Manager (MNGR) button for about 20 seconds on the I/O Board of the Fusion Music System while it is initializing. -
Page 92: Hard Drive Tests
A short S.M.A.R.T. test is run on a random selection of sectors on the disk, while a long S.M.A.R.T. test is run on all sectors of the disk. The other options in the sub-menu provide information about past tests that were run, specifications about the disk, and how much memory is left on the hard drive. Fusion Music System Installation and Setup Guide... -
Page 93: Bridging The Internal Amplifiers
Bridging the Internal Amplifiers Amplifier bridging enables the Fusion Music System’s internal amplifiers to produce up to 475W per channel for a maximum of 950W. Topics Bridged Amplifiers Configuration Bridging the Amplifiers Bridging Safety Considerations and Recommendations Troubleshooting Amplifier Bridging... -
Page 94: Bridged Amplifiers Configuration
5. Re-connect the Euroblock connectors into the appropriate Zone 1 and Zone 2 amplifiers. 6. On the Fusion Music System, launch the Operator interface. 7. Navigate to SOUND > Zone X Out (where X is the zone you are bridging) and change the following settings as required: •... - Page 95 8. Next, go to SOUND > Bridge Zones. Bridge Zones 9. Turn on bridging ONLY for the zone(s) you rewired. 10. Touch the CONFIRM button to apply the change. 11. You will be prompted to confirm again. Confirmation message Fusion Music System Installation and Setup Guide...
-
Page 96: Bridging Safety Considerations And Recommendations
Bridging the Internal Amplifiers Bridging Safety Considerations and Recommendations 12. If CMP was already active on the Fusion Music System, music should now be playing through the rewired speakers. 13. Queue up a few songs to help you adjust the volume levels. -
Page 97: Troubleshooting Amplifier Bridging
• Make sure Fusion Music System is not electrical problem (short-circuit, paused, then raise the output volume slowly. overload, etc). •... - Page 98 Bridging the Internal Amplifiers Troubleshooting Amplifier Bridging Fusion Music System Installation and Setup Guide...
-
Page 99: Connection Diagram
Fusion Music System and other external components such as the remote. You can refer to this diagram while setting up the Fusion Music System in a location, or as a post-installation check to ensure that all the components are connected correctly. - Page 100 Connection Diagram Fusion Music System Installation and Setup Guide...
- Page 101 Connection Diagram Fusion Music System Installation and Setup Guide...
- Page 102 Connection Diagram Fusion Music System Installation and Setup Guide...
-
Page 103: Acronyms
Fastener Field Replacement Unit GPIO General Purpose Input/Output High Definition HDMI High Definition Multimedia Interface Input/Output International Currency Technologies Corporation Integrated Drive Electronics Internet Service Provider Label Light Emitting Diode Fusion Music System Installation and Setup Guide 901095-001 Rev 01... - Page 104 Power Supply Unit Power Return Authorization Revision Radio Frequency Registered Jack Root Mean Square SATA Serial Advanced Technology Attachment S.M.A.R.T. Self-Monitoring, Analysis and Reporting Technology Touchscreen User Interface Upgrade Kit Universal Serial Bus Fusion Music System Installation and Setup Guide...
- Page 107 The Octave Music Group, Inc. Technical Support 7250 Mile End, Suite 202 888-338-5853 850 Third Ave, 15th Floor Montreal, Quebec, www.touchtunes.com New York, NY 10022 Canada, H2R 3A4 Copyright © 2018 The Octave Music Group, Inc. (formerly known as TouchTunes Interactive Networks, Inc.)
- Page 108 901095-001 Rev 01...
Need help?
Do you have a question about the Fusion Music System and is the answer not in the manual?
Questions and answers