
Subscribe to Our Youtube Channel
Related Manuals for Moduline GCE106T

Summary of Contents for Moduline GCE106T
- Page 1 Cod. 9200181 COOKING VERSION T SYSTEMS Ed. 0117 Warning: read the instructions before using the appliance...
-
Page 2: Table Of Contents
original instructions CONTENTS 1 • GENERAL RECOMMENDATIONS FOR THE INSTALLER 1.1 • RECOMMENDATIONS 1.2 • SPECIAL INSTRUCTIONS 1.3 • LAWS, TECHNICAL REGULATIONS AND STANDARDS 2 • INSTALLATION INSTRUCTIONS 2.1 • TECHNICAL DATA 2.2 • INSTRUCTIONS FOR POSITIONING 2.3 • INSTRUCTIONS FOR ELECTRICAL CONNECTION AND UNIPOTENTIAL SYSTEM 2.4 •... - Page 3 CONTENTS 17 • MANAGING RECIPES IN THE FAVORITES MENU 17.1 • FAVORITES - MULTILEVEL 17.2 • FAVORITES - REGENERATION 17.3 • FAVORITES - HOLDING 17.4 • FAVORITES - THAWING 18 • RECIPE MIx 19 • ExTRA PROGRAMS 19.1 • EXTRA PROGRAMS - SETTINGS 19.1.1 •...
-
Page 4: General Recommendations For The Installer
installation 1 • GENERAL RECOMMENDATIONS FOR THE INSTALLER 1.1 • RECOMMENDATIONS • Installation, start-up and maintenance of the appliance should be carried out by qualified engine- ers, licensed fitters or personnel authorised by the manufacturer. • Carefully read the recommendations in this instruction booklet, as they provide important advice for safe installation, operation and maintenance. -
Page 5: Installation Instructions
[Vac] [kPa] Minimum cross section of connection cable (mm2) GCE060T GCE060T 5 x 1,5 GCE061T GCE061T 11,2 5 x 1,5 GCE106T GCE106T 3N - 400 11,2 5 x 1,5 150 ÷ 500 GCE101T GCE101T 15,4 22,3 5 x 2,5 GCE110T... -
Page 6: Instructions For Water Connection
2 • INSTALLATION INSTRUCTIONS 2.4 • INSTRUCTIONS FOR WATER CONNECTION Water connection (excluding models with the optional water reservoir tank) At the back of the machine, there are 2 inputs for hydraulic connection with ¾ male thread. They are indicated with a label of 2 different colours: •... - Page 7 2 • INSTALLATION INSTRUCTIONS 2.4 • INSTRUCTIONS FOR WATER CONNECTION Models with the optional water reservoir tank (machines not provided with the cooling of exhaust fumes, hand shower, automatic washing) No water in the tank is signaled directly on the electronic board as on the bottom of the compartment that houses the tank, it is placed a sensor.
-
Page 8: Control And Safety System
2 • INSTALLATION INSTRUCTIONS 2.5 • CONTROL AND SAFETY SYSTEM Safety thermostat of the cooking chamber Intervenes in case of anomaly, so that the cooking chamber temperature of the appliance does not exceed permissible limits. Power circuit protection A remote control switch protects the power circuit. Auxiliary circuit switch Fuses positioned next to the terminal board protect the electric circuit. -
Page 9: General Recommendations For The User
3 • GENERAL RECOMMENDATIONS FOR THE USER WARNING! Read the instructions in the following chapter very carefully. It contains important advice concerning the safe use and maintenance of your appliance. Failure to observe these fundamental rules may compromise your own safety and that of the appliance. The manufacturer declines all re- sponsibility if the original functions of the appliance are altered through mishandling, the installation instructions are not followed, modifications take place or other devices are added. -
Page 10: Cleaning And Maintenance
3 • GENERAL RECOMMENDATIONS FOR THE USER WARNING! In the event of malfunctioning: • Switch off the appliance immediately • And cut out and / or turn off all mains supplies (electricity and water) • Only call the service centre or an authorised dealer and ask for original spare parts 4 •... -
Page 11: Description Of Controls
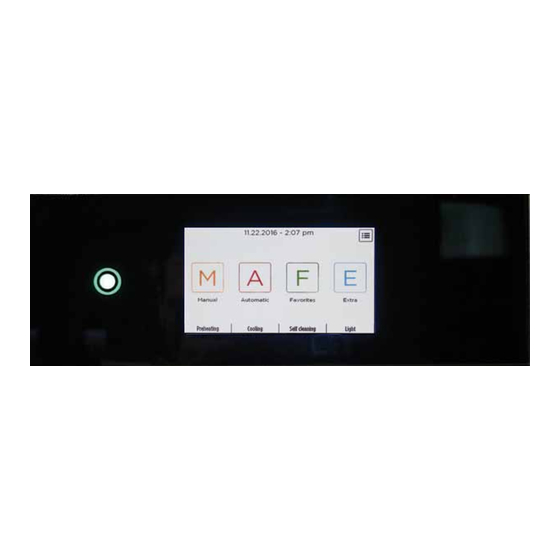
5 • DESCRIPTION OF CONTROLS The LCD touch screen control panel lets you select icons and functions on the display using light finger pressure on the screen. Status indicator led / Display Drop-down Stand-by button Touch Screen Menù Favorites Manual recipes Core probe Port... -
Page 12: The Core Probe
5 • DESCRIPTION OF CONTROLS 5.1 • THE CORE PROBE The core probe enables cooking regulated by the core temperature of the product. The appliance stops cooking when the core of the product reaches the set temperature, regardless of the time setting. -
Page 13: Switching On
6 • SWITCHING ON To switch on the machine, press the ON/OFF button. The switch is turned on and the status indicator led (close to the display) turns a steady green. The display turns white and takes about forty secon- ds to bring up the main screen (HOME). -
Page 14: Preheat
7 • PREHEAT before each cooking process, preheating of the empty cooking chamber is recommended in order to reduce the time needed for subsequent operations and ensu- re good results. From the “HOME” screen, press “PREHEATING”. You go to a screen where you can choose the type of preheating more suitable for the subsequent cooking;... -
Page 15: Preheating Delayed Start
8 • PREHEATING DELAYED START Inside the preheating menu, there is the PREHEATING DELAYED START option to start one or more prehea- ting of the cavity during the day. To set a programmed preheating, select ADD. To change the values, select the preheating and click MODIFY (pencil icon). -
Page 16: Cooling
9 • COOLING On the “HOME” screen, press “COOLING”. After selecting the “Cooling” item, it's displayed the “Open the door” item. After opening the door, the cooling starts automatical- ly and brings the cavity temperature below 50°C. NOTE - 50°C is the temperature set by default and cannot be changed. -
Page 17: Manual
11 • MANUAL Selecting M icon on the HOME screen, you enter the MANUAL menu, which lets you use three types of cooking: • STEAM • • CONVECTION To return to the HOME screen, press bACK. 11.1 • MANUAL - TIMED CONVECTION COOKING CYCLE Selecting the MANUAL item on home, you can ac- cess a screen as shown in the figure. - Page 18 11.1 • MANUAL - TIMED CONVECTION COOKING CYCLE NOTE - Time has priority over the chamber, so as soon as the set time is reached, the cycle will finish even if the temperature in the chamber has not rea- ched the set value. Then set the fan speed, by default, it is set to its maxi- mum;...
- Page 19 11.1 • MANUAL - TIMED CONVECTION COOKING CYCLE When the program is running, you cannot change from timed mode to probe mode, and vice versa within the same cycle. During the cycle, it is possible to open the door; in this case, the led flashes white and the cycle is mo- mentarily interrupted until the door is closed again.
-
Page 20: Manual - Convection Cooking Cycle With Core Probe
11.2 • MANUAL - CONVECTION COOKING CYCLE WITH CORE PROBE Selecting the MANUAL item on home, you can access a screen as shown in the figure. Chamber temperature by default, the screen is set in convection mode with timed cycle. Cooking Core probe time... - Page 21 11.2 • MANUAL - CONVECTION COOKING CYCLE WITH CORE PROBE NOTE - The C key will cancel all the values entered (after pressing it, you must enter the new value and confirm with NOTE - The core probe has priority over the chamber, so as soon as the probe reaches the set temperature, the cycle will finish even if the temperature in the chamber has not reached the set value.
- Page 22 11.2 • MANUAL - CONVECTION COOKING CYCLE WITH CORE PROBE To return to the previous screen, press any part of the screen (except STOP). NOTE - The values set can also be modified when the cycle is running. You can add further cycles even when the program is running.
-
Page 23: Manual - Timed Steam Cooking Cycle
11.3 • MANUAL - TIMED STEAM COOKING CYCLE Selecting the MANUAL item on the home screen, you access a screen for cooking cycle setting. Chamber temperature by default, the screen is set in convection mode with timed cycle. Cooking Core probe time temperature To switch to the steam cooking mode, press the... - Page 24 11.3 • MANUAL - TIMED STEAM COOKING CYCLE NOTE - If the door is open, the cycle will not start and the message “ATTENTION DOOR OPEN” will be displayed. Close the door firmly and press START again. Once the cycle has started, the word STOP appears at the bottom of the screen allowing you to halt the cycle in progress, if necessary.
-
Page 25: Manual - Steam Cooking Cycle With Core Probe
11.4 • MANUAL - STEAM COOKING CYCLE WITH CORE PROBE Selecting the MANUAL item on the home screen, you access a screen for cooking cycle setting. Chamber temperature by default, the screen is set in convection mode with timed cycle. Cooking Core probe time... - Page 26 11.4 • MANUAL - STEAM COOKING CYCLE WITH CORE PROBE NOTE - The C key will cancel all the values entered (after pressing it, you must enter the new value and confirm with NOTE - The core probe has priority over the chamber, so as soon as the probe reaches the set temperature, the cycle will finish even if the temperature in the chamber has not reached the set value.
- Page 27 11.4 • MANUAL - STEAM COOKING CYCLE WITH CORE PROBE During the cycle, it is possible to open the door; in this case, the led flashes white and the cycle is mo- mentarily interrupted until the door is closed again. WHITE With the cycle running, in addition to the STOP and LIGHT items (see the relevant section), on the bottom...
-
Page 28: Manual - Timed Mixed Cooking Cycle
11.5 • MANUAL - TIMED MIXED COOKING CYCLE Selecting the MANUAL item on the home screen, you access a screen for cooking cycle setting. Chamber temperature by default, the screen is set in convection mode with timed cycle. Cooking Core probe time temperature To switch to the mix mode, press the corresponding... - Page 29 11.5 • MANUAL - TIMED MIXED COOKING CYCLE Finally set the values for the humidity by inserting a percentage between 1 and 99%. Depending on the value entered, the equipment manages the “Clima- chef” device, the opening of the vent and the humidi- fication water injection.
-
Page 30: Manual - Mixed Cooking Cycle With Core Probe
11.6 • MANUAL - MIXED COOKING CYCLE WITH CORE PROBE Selecting the MANUAL item on the home screen, you access a screen for cooking cycle setting. Chamber temperature by default, the screen is set in convection mode with timed cycle. Cooking Core probe time... - Page 31 11.6 • MANUAL - MIXED COOKING CYCLE WITH CORE PROBE NOTE - The C key will cancel all the values entered (after pressing it, you must enter the new value and confirm with NOTE - The core probe has priority over the chamber, so as soon as the probe reaches the set temperature, the cycle will finish even if the temperature in the chamber has not reached the set value.
- Page 32 11.6 • MANUAL - MIXED COOKING CYCLE WITH CORE PROBE NOTE - The values set can also be modified when the cycle is running. You can add further cycles even when the program is running. When the program is running, you cannot change from core probe mode to timed mode, and vice versa within the same cycle.
-
Page 33: Manual - Multiple Phase Programs
11.7 • MANUAL - MULTIPLE PHASE PROGRAMS Enter the manual menu and set a first phase of coo- king in “timed” mode. Once you have set all the values for the first phase (as shown in the previous chapters), press PHASES. The screen for displaying and managing the phases opens displaying a summary of the cycle settings just entered plus four icons for managing the phases:... - Page 34 11.7 • MANUAL - MULTIPLE PHASE PROGRAMS The MOVE command lets you change the order of the phases. To access it, select a phase and click on MOVE. A window opens asking you where you want to posi- tion the selected phase; scroll on the cycle column to the desired position and press YES to confirm.
-
Page 35: Saving Programs
12 • SAVING PROGRAMS After finishing the program in manual mode (i.e. cooking by core probe), you can save it in Favorites programs. Click on the icon to open the drop-down menu. Select SAVE RECIPE. A window appears prompting you to insert a name for the recipe. -
Page 36: Program Summary
13 • PROGRAM SUMMARY Once the program has finished, a drop-down menu will appear when you select the icon If you select SUMMARY, you can bring up a window showing the values that have been set in the recipe and the time it took to create it. In the phase panel, the time taken to create it, is displayed while the total time for all the phases is shown at the bottom of the screen. -
Page 37: Manual - Options
15 • MANUAL - OPTIONS Select OPTIONS in a manual program to open a drop down menu that allows you to perform various ope- rations. If the display is set to a timed cooking, the displayed options are: • Cooling (see the relevant chapter) •... -
Page 38: Manual - Options - Delta T (With Core Probe Only)
15.2 • MANUAL - OPTIONS - DELTA T (WITH CORE PROBE ONLY) To set a cooking with Delta T system, select Delta T from the options menu. Set a value for the Delta T by using the keyboard and confirm with NOTE - The new value that you want to set will con- tinue to flash until it is confirmed. -
Page 39: Managing Recipes In The Automatic Menu
16 • MANAGING RECIPES IN THE AUTOMATIC MENU Entering the AUTOMATIC menu, you can view the following programs: • Cooking • Pasteurization • Slow cooking • Sous-vide cooking • Others • Leavening Accessing the submenus, you can view the recipes already preloaded at factory. -
Page 40: Automatic Cooking - Preloaded Recipes
16.2 • AUTOMATIC COOKING - PRELOADED RECIPES TYPE HUMIDITY CAVITY TIME CORE PROBE RECIPE CYCLE FAN SPEED OF COOKING TEMPERATURE (minutes) TEMPERATURE Steamed octupus Steam Normal Savoury flan Convection Normal Convection Normal Vol au vent Convection Normal Sole Rolls Steam Normal Fish terrine Steam... - Page 41 16.2 • AUTOMATIC COOKING - PRELOADED RECIPES TYPE HUMIDITY CAVITY TIME CORE PROBE RECIPE CYCLE FAN SPEED OF COOKING TEMPERATURE (minutes) TEMPERATURE Mixed meat skewer Mixed Normal Mixed Normal Roast duck Convection Normal Convection Normal Roast pork loin Mixed Normal Convection Normal Mixed...
- Page 42 16.2 • AUTOMATIC COOKING - PRELOADED RECIPES TYPE HUMIDITY CAVITY TIME CORE PROBE RECIPE CYCLE FAN SPEED OF COOKING TEMPERATURE (minutes) TEMPERATURE Steamed spinach Steam Normal (frozen) Steamed Steam Normal asparagus Steamed green Steam Normal beans (frozen) Convection Normal Fennel au gratin Convection Normal Convection...
- Page 43 16.2 • AUTOMATIC COOKING - PRELOADED RECIPES TYPE HUMIDITY CAVITY TIME CORE PROBE RECIPE CYCLE FAN SPEED OF COOKING TEMPERATURE (minutes) TEMPERATURE baguettes Convection Normal (precooked and Convection Normal frozen) Pizza slices Convection Normal (frozen) Convection Normal Pizza slices (fresh) Convection Normal Round pizza...
-
Page 44: Automatic - Pasteurization
16.3 • AUTOMATIC - PASTEURIZATION In the initial screen of the AUTOMATIC PASTEURI- ZATION recipes, there are the recipes preset at the factory. The “clock” or “pin” symbols to the right of the recipe identify if it is a timed cooking or a core probe coo- king. -
Page 45: Automatic - Sous-Vide Cooking
16.5 • AUTOMATIC - SOUS-VIDE COOKING The process of vacuum cooking requires the raw pro- ducts, after being cleaned, to be introduced in sealed packages, in which the vacuum is created and where they remain for all stages of the production process (cooking, chilling, storage, potential heating). -
Page 46: Managing Recipes In The Favorites Menu
17 • MANAGING RECIPES IN THE FAVORITES MENU Entering the Favorites menu, you can view the fol- lowing programs: • Cooking • Pasteurization • Slow cooking • Sous-vide cooking • Leavening • Multilevel • Regeneration • Holding • Thawing Accessing the first 5 sub-menus (cooking, pasteuriza- tion, slow cooking, sous-vide cooking and leavening), you can view the previously saved recipes. -
Page 47: Favorites - Multilevel
17.1 • FAVORITES - MULTILEVEL This feature allows you to cook up to 6/10 trays simultaneously (depending on the oven model). Selecting “Multi-Level”, a screen appears as shown aside. Select the desired type of cooking (steam, mix or convection). Set the cavity temperature. Then set the level number, selecting the relevant icon and pressing modify. - Page 48 17.1 • FAVORITES - MULTILEVEL Once all the desired levels are set, set also the fan speed and humidity as described in previous chap- ters. Press START to begin the multilevel. During the cycle, it's displayed an information screen that summarizes the set mode for the various levels and the cavity temperature.
-
Page 49: Favorites - Regeneration
17.2 • FAVORITES - REGENERATION This feature allows you to warn a previously cooked product. Select the “Favorites” icon and choose “REGENERA- TION”. It will be displayed the 3 icons setting screen. Select the cavity temperature icon and set the value of the cavity temperature to be used during the regene- ration cycle (max. -
Page 50: Favorites - Holding
17.3 • FAVORITES - HOLDING This allows you to maintain the temperature of a coo- ked product or reclaimed previously, thus allowing to serve the “customized hot” product. Selecting HOLDING opens a screen that lets you choose if you can run it with the probe or in the timed mode. -
Page 51: Favorites - Thawing
17.4 • FAVORITES - THAWING This feature enables the defrosting of frozen foods. The defrosting time in the oven is less than the time needed to defrost food at room temperature. Place the food from which liquid may flow in a perfo- rated container and place a non-perforated container under it. -
Page 52: Extra Programs
19 • EXTRA PROGRAMS Other functions are grouped under the “EXTRA” icon: • Settings • Service info • HACCP • Locks • Upload / Download recipes 19.1 • EXTRA PROGRAMS - SETTINGS In the settings menu, you can change the: •... -
Page 53: Extra Programs - Settings - Date And Time
19.1.2 • EXTRA PROGRAMS - SETTINGS - DATE AND TIME Select “DATE” via the touch screen. The screen for changing the month appears; set the correct month and confirm by pressing OK. Once the month has been set, the setting for the day automatically appears on the screen. -
Page 54: Extra Programs - Settings - Connections
19.1.5 • EXTRA PROGRAMS - SETTINGS - CONNECTIONS by selecting “CONNECTIONS”, you enter the screen for Wi-Fi connections. To turn the WIFI connection on and off, select the WIFI icon (indicated by an arrow in the image) which will show WIFI ON when it is active or WIFI OFF when it is disabled. -
Page 55: Extra Programs - Haccp
19.3 • EXTRA PROGRAMS - HACCP Entering the HACCP menu, you can download the HACCP data into the USb drive. To download the HACCP data you need to insert a USb stick into the socket and confirm the download. If the USb stick is not inserted, a message warns of the lack thereof. -
Page 56: Extra Programs - Locks - Recipes Lock
19.4.1 • EXTRA PROGRAMS - LOCKS - RECIPES LOCK RECIPES LOCK To set the recipes lock, press SET LOCKING RECIPES PASSWORD, and enter a password (it must be a 3-digit number). Confirm by pressing OK. by default, the recipes lock password is 000 (mea- ning that the recipes lock password is not set). -
Page 57: Extra Programs - Locks - Door Lock (Optional)
19.4.2 • EXTRA PROGRAMS - LOCKS - DOOR LOCK (OPTIONAL) DOOR LOCK (optional) The door lock can be enabled with and without a password. by default, the door lock (if present) is enabled with no password: • To enable the door lock WITH password, press SET LOCKING DOOR PASSWORD and enter the desired password (it must be a 3-digit number);... -
Page 58: Extra Programs - Locks - Keyboard Lock
19.4.3 • EXTRA PROGRAMS - LOCKS - KEYBOARD LOCK KEYBOARD LOCK The keyboard lock can be enabled with and without a password: • To enable the keyboard lock WITH password, press SET KEYbOARD LOCKING PASSWORD and enter the desired password (it must be a 3-digit number). -
Page 59: Extra Programs - Upload / Download Recipes
19.5 • EXTRA PROGRAMS - UPLOAD / DOWNLOAD RECIPES DOWNLOAD RECIPES ON A USB KEY This allows you to copy the programs saved in me- nus F (Favorites) onto a USb key to be imported onto other machines. To download the programs, insert the USb key into the USb port of the machine, and press the icon DOWNLOAD PROGRAMS ON A USb KEY. -
Page 60: Service Area - For Authorised Technicians Only
20 • SERVICE AREA - FOR AUTHORISED TECHNICIANS ONLY To access the service area, click on the icon select the option “Service Area”. The SERVICE AREA is protected by a password that will be requested to the technical support service. 21 •... -
Page 61: Temperatures - Save Probe Temperatures
21.2 • TEMPERATURES - SAVE PROBE TEMPERATURES At the end of a program, you can measure the tem- perature of a product, i.e. to check that the cooking is uniform throughout the product, or on the various pieces of food present. From the temperatures screen, enter the option SAVE PRObE TEMPERATURES. -
Page 62: Self Cleaning (Optional)
22 • SELF CLEANING (OPTIONAL) Entering the washing menu from the home screen, you have 4 types of washing to clean the oven. • SOFT • HARD • RINSE AID PROGRAM • QUICK RINSING For each type of washing, it is reported the time required to run it. - Page 63 22.1 • SOFT WASHING After entering the detergent and closing the door, a screen will appear where you can select START to start the program. During washing, they are shown on the display: • The type of washing in progress •...
-
Page 64: Hard Washing
22.2 • HARD WASHING Selecting HARD WASHING the device asks you to insert the proper detergent and close the door. NOTE - To handle the detergent, use protective clothing and gloves; protect eyes and face. NOTE - We recommend using no. 2 cleaning “OVENCLEAN”... -
Page 65: Rinse Aid Procedure
22.3 • RINSE AID PROCEDURE Selecting RINSE AID PROCEDURE the device asks you to insert the proper rinse aid and close the door. NOTE - To handle the rinse aid, use protective clothing and gloves; protect eyes and face. NOTE - Use no. 1 water-soluble “OVENBRITE” bag to be placed in the cooking cavity above the filter, as shown in the figure. -
Page 66: Quick Rinse
22.4 • QUICK RINSE The QUICK RINSE provides for the input of a jet of hot water in the cooking cavity. NOTE - The quick rinse is recommended to eliminate odours in the cavity between one cooking cycle and the other. NOTE - The rinse involves only the use of hot water;... -
Page 67: Manual Rinse
22.5 • MANUAL RINSE by means of the hand shower (optional), you can perform a manual rinsing. 22.6 • OVENCLEAN DETERGENT For the soft and hard washings, it is mandatory the use of OVENCLEAN tablets, made properly for degreasing and cleaning self-cleaning ovens. The Ovenclean tablets dissolve and easily remove all types of organic fouling, also burned. -
Page 68: Ovenbrite Rinse Aid
22.7 • OVENBRITE RINSE AID For the rinse aid procedure, it is mandatory the use of the “OVENBRITE” rinse aid, packed in water- soluble envelopes (they dissolve in water), for self-cleaning ovens. This is a rinse aid concentrate with high efficiency which provides a perfect finish, eliminating the resi- dues left after the washing process. -
Page 69: Warnings And Alarms
23 • WARNINGS AND ALARMS 23.1 • WARNING LIGHTS AND ALARMS The Led close to the display changes colour depending on the status of the machine and specific events. A table is given below summarising the different meanings of the Led colours. LED COLOUR MEANING fixed... -
Page 70: Warnings
23.2 • WARNINGS 23.2.1 • ATTENTION NO WATER In the event that, during execution of a program with humidity other than 0%, there is a lack of water (or an Attention insufficient pressure less than 150 KPa), the “ATTEN- No water TION NO WATER”... -
Page 71: Alarm Core Probe
23.3 • ALARM 23.3.1 • ALARM CORE PROBE If the core probe is defective, the message “ALARM CORE PRObE” will appear and the relevant led indica- Alarm tors and alarms will be activated. Core probe The alarm will be temporarily switched off when con- firmation is given that the warning message has been read. -
Page 72: Alarm Cavity Probe
23.3.4 • ALARM CAVITY PROBE If a problem with the cell probe is detected, the mes- sage “ALARM CAVITY PRObE” will appear and the relevant led indicators and alarms will be activated. Alarm Put the machine in standby by pressing the Led aside the display and then reactivate it. -
Page 73: Alarm Drain Probe
23.3.7 • ALARM DRAIN PROBE If a problem with the discharge probe is detected, the message “ALARM DRAIN PRObE” will appear and Alarm the relevant led indicators and alarms will be activa- Drain probe ted. Put the machine in standby by pressing the Led aside the display and then reactivate it. -
Page 74: No Washing Water Alarm
23.3.10 • NO WASHING WATER ALARM If, during a wash, the water does not come from the Alarm water mains or its pressure is less than 150 KPa, the Self cleaning - No water message “ALARM SELF-CLEANING NO WATER” will appear. - Page 75 EN Ed. 0117...
Need help?
Do you have a question about the GCE106T and is the answer not in the manual?
Questions and answers