Table of Contents
Advertisement
Available languages
Available languages
Quick Links
IB520031EN
697916
Installation Instructions – LSR2B / LSSQ2B Commercial LED
Rough-In
Instructions d'installation – DEL commerciale LSR2B / LSSQ2B
brute
Instrucciones de instalación de las luminarias LED de uso comercial
LSR2B y LSSQ2B en áreas ocultas
IMPORTANT: Read carefully before installing fixture.
Retain for future reference.
WARNING
Risk of Electrical Shock! Disconnect power at fuse or
circuit breaker before installing or servicing.
WARNING
Risk of Fire! Do not install insulation within 3 inches
(76 mm) of any part of the luminaire fixture or in a
way that may entrap heat.
WARNING
Installation and servicing to be performed only
by qualified personnel, If not qualified, consult an
electrician.
WARNING
Do not energize the LED Engine until the protective
covering has been removed and the lower trim
properly installed.
This fixture should be supported by main runners or
N
otee:
other structure that is capable of supporting fixture
weight of 7 Ibs.
SAFETY: When using electrical equipment, basic safety
precautions should always be followed, including the
following:
1.
This unit is for surface or pendant mounting only. Do
not use in hazardous locations nor near gas or electric
heaters.
2.
Do not use this equipment for other than the intended
use.
3.
Install only in accordance with National Electrical Code
and local regulatory agencies' requirements.
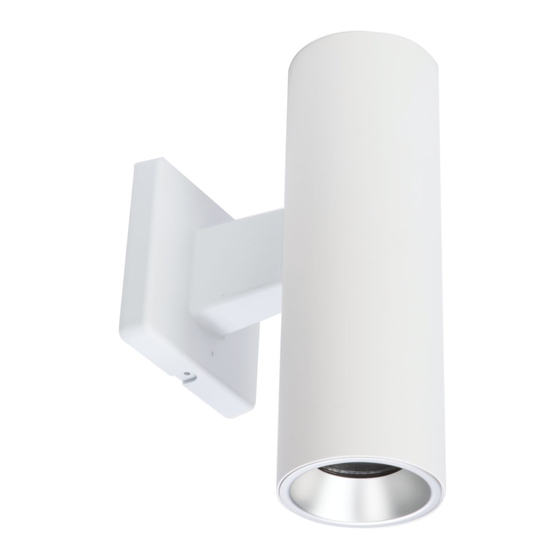
Aperture
Height
LSR2B
2.75"
10-1/8"
LSSQ2B
2.75"
10-3/16"
Brand Logo
reversed out of
black
T M
INS #
INS #
INS #
Advertisement
Table of Contents

Subscribe to Our Youtube Channel
Related Manuals for Eaton PORTFOLIO LSR2B


Summary of Contents for Eaton PORTFOLIO LSR2B
- Page 1 Brand Logo reversed out of black INS # INS # INS # 697916 IB520031EN Installation Instructions – LSR2B / LSSQ2B Commercial LED Rough-In Instructions d’installation – DEL commerciale LSR2B / LSSQ2B brute Instrucciones de instalación de las luminarias LED de uso comercial LSR2B y LSSQ2B en áreas ocultas IMPORTANT: Read carefully before installing fixture.
-
Page 2: Surface Mount Installation
To Ceiling And Twist Body For Clarity Clockwise Mount Plate Snap Cylinder Has Been Rotated Hooks Fit Hooks Through Into Locked Position This Opening Attach Tether To Mount Plate Or Junction Box Twist Until Locked Figure 3. EATON IB520031EN Installation Instructions... -
Page 3: Electrical Connection
(Figure 4). Connect white to white, black to black, and green (from electrical service) on the supply side to the bare copper wire in the cylinder housing assembly. EATON IB520031EN Installation Instructions... -
Page 4: Wiring Diagrams
GROUND Dimming The Portfolio LSR2B*D010/LSSQ2B*D010 Series can be dimmed with many standard 0-10V DC dimming controls. The Portfolio LSR2B*D010TR/LSSQ2B*D010TR Series can be dimmed with many standard phase dimmers and 0-10V DC dimming controls. To be assured of the latest information regarding luminaire and dimmer compatibility, please reference the Portfolio LED website: www. - Page 5 à un électricien. Installez l'appareil conformément aux exigences du Code national de l'électricité et des organismes de réglementation locaux. Ouverture Hauteur LSR2B 6,985 cm (2,75 po) 10 1/8 po LSSQ2B 6,985 cm (2,75 po) 10 3/16 po EATON IB520031EN Installation Instructions...
- Page 6 Le cylindre a été tourné en position verrouillée Insérez deux crochets à travers cette ouverture Attachez l’attache à la plaque de montage ou à la boîte de jonction Tournez jusqu’à l’enclenchement Figure 3. EATON IB520031EN Installation Instructions...
-
Page 7: Branchement Électrique
(Figure 4). Reliez le fil blanc au blanc, le noir au noir, et le vert (partant du service électrique) provenant de l'alimentation au fil de cuivre dénudé dans l'assemblage du boîtier du cylindre. EATON IB520031EN Installation Instructions... -
Page 8: Schémas De Câblage
0 - 10 V CC. Pour vous assurer de posséder les plus récents renseignements à propos de la compatibilité du gradateur et du luminaire, veuillez consulter le site Web des luminaires à DEL de Portfolio : www. www.portfolio-lighting.com EATON IB520031EN Installation Instructions... - Page 9 Si no está cualificado, Instale únicamente de conformidad con el Código consulte con un electricista. Eléctrico Nacional y los requerimientos de las agencias regulatorias locales. Abertura Altura LSR2B 2.75” 10-1/8” LSSQ2B 2.75” 10-3/16” EATON IB520031EN Installation Instructions...
-
Page 10: Instalación
Cilindro se ha girado en Ajuste los ganchos posición cerrada a través de esta apertura Sujete la correa a la placa de montaje o a la caja de derivación Gire hasta que quede cerrado Figura 4. EATON IB520031EN Installation Instructions... -
Page 11: Conexión Eléctrica
(Figura 4). Conecte el blanco con el blanco, el negro con el negro y el verde (del suministro eléctrico) del lado de la alimentación con el cable pelado de cobre en la unidad del alojamiento cilíndrico. EATON IB520031EN Installation Instructions... -
Page 12: Diagramas De Cableado
0-10 VCC estándar. Las luminarias Portfolio de las Series LSR2B*D010TR/LSSQ2B*D010TR se puede regular con varios controles reguladores de 0-10 V CC. Para asegurarse de que cuenta con información actualizada sobre la compatibilidad entre luminarias y reguladores, remítase al sitio web de las luminarias LED Portfolio: www.portfolio-lighting.com. EATON IB520031EN Installation Instructions... - Page 13 Warranties and Limitation of Liability Please refer to www.eaton.com/WarrantyTerms for our terms and conditions. Garantie et limitation de responsabilité Veuillez consulter le site www.eaton.com/WarrantyTerms pour obtenir les conditions générales. Garantías y Limitación de Responsabilidad Visite www.eaton.com/WarrantyTerms para conocer nuestros términos y condiciones.
Need help?
Do you have a question about the PORTFOLIO LSR2B and is the answer not in the manual?
Questions and answers