
Summary of Contents for THOMSON 500015
- Page 1 Motorised kit with articulated arm for shutters, single or double leaf ref. 500015 www.thomsonbox.eu...
-
Page 2: Table Of Contents
5 - REMOTE CONTROL 6 - CONNECTING A wIRED CONTROL SwITCH (OPTIONAL) E - CONFIGURATION 1 - PROGRAMMING 2 - PROGRAMMING wITH OTHER ACCESSORIES OF RANGE THOMSON MAISON CONNECTéE F - USE 1 - USE wITH A CONTROL DEvICE 2 - USE wITH THOMbOX... - Page 3 5 - CLEANING FUNCTION 6 - USE OF A GROUP SwITCH 7 - REPLACING REMOTE CONTROL bATTERY G - FAq h - LEGAL AND TEChNICAL INFORMATION 1 - TECHNICAL FEATURES 2 - GUARANTEE 3 - ASSISTANCE AND ADvICE 4 - PRODUCT RETURN 5 - DECLARATION OF CONFORMITY...
-
Page 5: A - Safety Instructions
MOTORISED KIT WITH ARTICULATED ARMS FOR SINGLE OR DOUBLE LEAF SHUTTERS A - SAFETY INSTRUCTIONS 1 - OPERATING PRECAUTIONS 3 - RECYCLING • Follow all instructions as improper installation Disposing of used batteries in the may cause serious injury. household waste is strictly forbidden. • The company Avidsen waives all responsibility Batteries/accumulators containing harmful for damage if the installation has not been... -
Page 6: B - Product Description
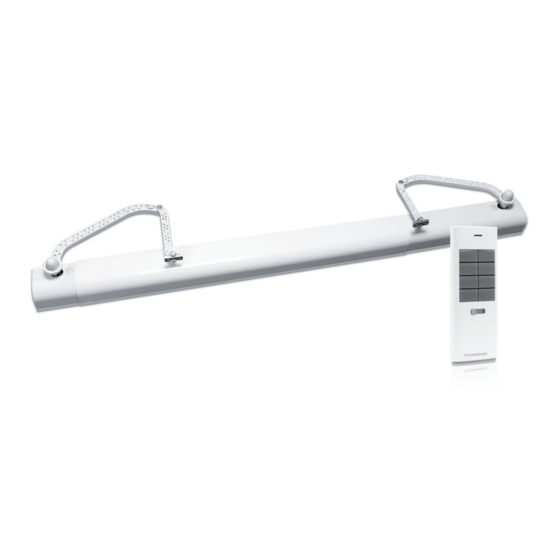
MOTORISED KIT WITH ARTICULATED ARMS FOR SINGLE OR DOUBLE LEAF SHUTTERS B - PRODUCT DESCRIPTION 1 - COMPOSITION OF THE KIT 1 Transmission axis 12 Bottom, right 2 Engine mount 13 Arm, left 3 Delay (slow) left 14 Bolt M12x20 4 Cable sleeve 15 Washer 5 Transmission frame 16 Screw 20x4 6 Delay (fast) left 17 Push-button cover 7 Anchors ø10mm... -
Page 7: Motor
2 Ignition keys channels 1, 2, 3. 3 Extinction keys channels 1, 2, 3. 4 Simultaneous ignition key 3 channels. 5 Simultaneous extinction key 3 channels.. Groupe selector (1, 2, 3 or 4). 7 Battery compartment. C - ABOUT ThE CONCEPT ThOMSON MAISON CONNECTéE The Thombox is a home automation box, connected to your ADSL modem (Freebox, Livebox ...), which allows you to control your security from your house or remotely. It also allows you to manage your comfort accessories (lights. ..), opening modules (motorised shutters, garage ...), power control... -
Page 8: D - Installation
MOTORISED KIT WITH ARTICULATED ARMS FOR SINGLE OR DOUBLE LEAF SHUTTERS D - INSTALLATION 1 - MOTORISED SHUTTER SPECIFICATION Length of window Length of window Length of window 2 leaves 1 left-hand shutter 1 right-hand shutter 68 cm to 110 cm 85 cm to 110 cm 85 cm to 140 cm Exterior Window Exterior In order to install the motorisation, combine side A and side B as shown in the grey boxes ( ) of table below. Side C : distance between window and closed shutter = 130mm minimum. Distance A in mm 20mm to 40mm 45mm 50mm 55mm 60mm 65mm 10mm 20mm... - Page 9 MOTORISED KIT WITH ARTICULATED ARMS FOR SINGLE OR DOUBLE LEAF SHUTTERS D - INSTALLATION 2 - INSTALLATION ON DOUBLE LEAF SHUTTER OR RIGHT SHUTTER ONLY* * Opening to the right seen from the outside If installation is made on right leaf only, follow steps 1 to 5 without mounting the left arm (element no.
- Page 10 MOTORISED KIT WITH ARTICULATED ARMS FOR SINGLE OR DOUBLE LEAF SHUTTERS D - INSTALLATION Step 2 distance D = lenght of lintel - 620mm view from below Cut and deburr the transmission axis [1] at dimension D.
- Page 11 MOTORISED KIT WITH ARTICULATED ARMS FOR SINGLE OR DOUBLE LEAF SHUTTERS D - INSTALLATION Fit the two rods in item [4] and insert it in the slot of the main tube as shown below.
- Page 12 MOTORISED KIT WITH ARTICULATED ARMS FOR SINGLE OR DOUBLE LEAF SHUTTERS D - INSTALLATION Step 3 Mark and drill the holes to fix the gear under the lintel according to the following diagram. interior view from below ø8 347mm ø10 ø10 ø8 ø10 ø10 46mm 46mm 46mm Wall Wall 49mm 49mm 32mm 32mm exterior...
- Page 13 MOTORISED KIT WITH ARTICULATED ARMS FOR SINGLE OR DOUBLE LEAF SHUTTERS D - INSTALLATION exterior...
- Page 14 MOTORISED KIT WITH ARTICULATED ARMS FOR SINGLE OR DOUBLE LEAF SHUTTERS D - INSTALLATION...
- Page 15 MOTORISED KIT WITH ARTICULATED ARMS FOR SINGLE OR DOUBLE LEAF SHUTTERS D - INSTALLATION Step 4 Screw [14] loosely in order to be able to pilot the arm. After installation of the right arm, repeat for the left arm.
- Page 16 MOTORISED KIT WITH ARTICULATED ARMS FOR SINGLE OR DOUBLE LEAF SHUTTERS D - INSTALLATION Wall A (mm) 20 to 40 B (mm) Measure A and B, then determine side X (in mm) as in the table above. Position the arm and check if it’s horizontal. 24mm...
- Page 17 MOTORISED KIT WITH ARTICULATED ARMS FOR SINGLE OR DOUBLE LEAF SHUTTERS D - INSTALLATION Repeat for the other arm. Open the 2 leaves entirely and screw [14]. Step 5...
-
Page 18: Installation On Left-Hand Shutter Only
MOTORISED KIT WITH ARTICULATED ARMS FOR SINGLE OR DOUBLE LEAF SHUTTERS D - INSTALLATION Route the power cable. Wires (power supply, antenna cables) must not be in contact with any mobile part. 3 - INSTALLATION ON LEFT-HAND SHUTTER* ONLY * Opening to the left opening seen from the outside Step 1 Mark a line at 3 mm from the closed shutter on the lintel. This line will determine the position of the gear. interior interior length of lintel Measure the length of lintel. - Page 19 MOTORISED KIT WITH ARTICULATED ARMS FOR SINGLE OR DOUBLE LEAF SHUTTERS D - INSTALLATION Step 2 Fit the two rods in item [4] and insert it in the slot of the main tube as shown below. Etape 3 Mark and drill the holes to fix the gear under the lintel according to the following diagram. interior view from below ø8 347mm ø10 ø10 46mm Wall Wall 49mm 32mm exterior...
- Page 20 MOTORISED KIT WITH ARTICULATED ARMS FOR SINGLE OR DOUBLE LEAF SHUTTERS D - INSTALLATION exterior...
- Page 21 MOTORISED KIT WITH ARTICULATED ARMS FOR SINGLE OR DOUBLE LEAF SHUTTERS D - INSTALLATION Step 4 Cut the PVC cover if it’s too long. Screw [14] loosely in order to be able to pilot the arm.
- Page 22 MOTORISED KIT WITH ARTICULATED ARMS FOR SINGLE OR DOUBLE LEAF SHUTTERS D - INSTALLATION Wall A (mm) 20 to 40 B (mm) Measure A and B, then determine side X (in mm) as in the table below. Position the arm and check if it’s horizontal. 24mm...
- Page 23 MOTORISED KIT WITH ARTICULATED ARMS FOR SINGLE OR DOUBLE LEAF SHUTTERS D - INSTALLATION Tighten the screw[14]. Step 5...
-
Page 24: Connecting The Motor
MOTORISED KIT WITH ARTICULATED ARMS FOR SINGLE OR DOUBLE LEAF SHUTTERS D - INSTALLATION Route the power cable. Wires (power supply, antenna cables) must not be in contact with any mobile part. 4 - CONNECTING THE MOTOR Safety instructions: Cut out electrical power (circuit breaker in OFF position) before performing any operations. The installation must be made by qualified personnel. Connect the power cable to the mains using a cable of 2x0,75mm² min. Important notes: The power line must be used exclusively to power your motorised shutters and must be protected by a fuse, circuit breaker or residual current device (30mA). Compliance with electricity safety regulations is required. to the neutral blue Conductor of electric power brown to the conductor Phase electric power... -
Page 25: Remote Control
MOTORISED KIT WITH ARTICULATED ARMS FOR SINGLE OR DOUBLE LEAF SHUTTERS D - INSTALLATION 5 - REMOTE CONTROL Remove tape to activate battery. 6 - CONNECTING A wIRED CONTROL SwITCH (OPTIONAL) To be operational, the white wire and the other two wires must be in contact depending on whether you want to open or close the door. - White and blue contact: closure - White and red contact: opening As soon as they are no longer in contact, the gear stops. If always in contact while the shutter is fully open or closed, the gear motor will stop but the radio control will be blocked. 2 pushbuttons CAUTION : Do not connect these three wires to 230V mains, as they carry very low voltage signals. -
Page 26: E - Configuration
• On the remote control, press simultaneously indicator on the remote control flashes red. for 3 secondes the off keys of channel you want to use (1 to 3). The indicator on the remote control flashes red. • Then place the device in pairing mode. Refer to the user manual. Note: You can pair up to 5 devices per channel. • While the indicator flashes on the remote control, press the pairing button for at least 3 To pair the gear motor with another device, refer to seconds. The pairing is complete. the user manual of the device you want to pair with your product. During the pairing, you will be prompted to place the gear in association mode: • When you are prompted to place the gear motor in pairing mode, press the pairing button for at least 3 seconds. 2 - PROGRAMMING wITH OTHER ACCESSORIES OF THE RANGE THOMSON MAISON CONNECTéE Each element can be paired with other devices of the range Thomson maison connectée: wall remote control, lamp socket with remote control, universal relay for motors, Thombox ... -
Page 27: Use With A Control Device
3- Unless you do otherwise, the shutter stops If you want to delete one remote controlled device, when it’s closed. repeat the programming phase described in this 4- If it’s closing, press key to stop shutter. guide with the channel concerned. If you programme 2 times a Thomson device on the same channel, With a wired 2 stage button this will be cancelled from channel. Change switch position to open the shutter when it’s closed, and to close it when it’s open. When using 4 - DELETING ALL ITEMS FROM REMOTE... -
Page 28: Cleaning Function
MOTORISED KIT WITH ARTICULATED ARMS FOR SINGLE OR DOUBLE LEAF SHUTTERS F - USE 5 - CLEANING FUNCTION 7 - REPLACING THE REMOTE CONTROL BATTERY The cleaning function deletes all inactive devices from a channel (eg a remote socket you don’t want If you notice a decrease in the range of your to use). remote control, it’s time to replace the battery. If • To clean the channel of the remote control, your remote control is paired to a Thombox, the press simultaneously for 3 seconds the on/off Thombox will be notified . keys of the relevant channel keys. Use a battery of 3V type CR2032. • Release the buttons, then hold for 3 seconds the power on key. If a device has not responded for 20 subsequent times to the keys of the selected channel, it is removed from memory. All other devices still used,... -
Page 29: G - Faq
MOTORISED KIT WITH ARTICULATED ARMS FOR SINGLE OR DOUBLE LEAF SHUTTERS G - FAq If your problem is not listed here under, please contact our technical service. Current problems and solutions Symptoms Possible causes Solutions • Wiring is not correct. • Check gear motor power. • Gear motor is not correctly • Check the installation. Shutter does not move or installed. moves slow • Gear motor is not suitable for shutters. The delay between the two Loosen the arm and fully open One of the sleeves does leaves is not correctly set. -
Page 30: H - Legal And Technical Information
MOTORISED KIT WITH ARTICULATED ARMS FOR SINGLE OR DOUBLE LEAF SHUTTERS h - LEGAL AND TEChNICAL INFORMATION 1 - TECHNICAL FEATURES Remote control ARW 868.3MHz protocol Radio frequency Radio rage Up to 150m in open field* Power supply 3Vdc per battery CR2032 4 groups of 3 channels Number of channels Number of devices per channel Operating temperature 0°C to 40°C, indoor use only *The radio range is the range in open field, ie without obstacles between the receiver and the transmitter. -
Page 31: Guarantee
Please visit our website to find out product itself, the technician will give you an RMA number so that you can return the unit more about the Thomson at to the shop. Without this number, the shop may refuse to exchange your product. www.thomsonbox.eu Tel : + 33 (0)899 700 750 (Audiotel :1.349€/call + 0.337€/min) Monday to Friday 9 am to 12 am - 2pm to 6pm. - Page 32 is a trademark of TECHNICOLOR S.A. used under licence by: Avidsen France S.A.S - 32, rue Augustin Fresnel 37170 Chambray les Tours - France...
Need help?
Do you have a question about the 500015 and is the answer not in the manual?
Questions and answers