
Related Manuals for E-Slide ES1410D

Summary of Contents for E-Slide ES1410D
- Page 1 USUER MANUAL Original Version BALANCE BIKE ELECTRICAL 14 INCH ESLIDE ES1410D Important: These instructions are for your safety. Read carefully before use and keep them for future reference.
- Page 2 Content of the manual 1. Warnings / Residual Hazards / Precautions for Use a. Warnings / Precautions for use b. Residual risks c. Handling / Transport / Storage / Battery i) Handling / Transport / Storage ii) Battery 2. Product description a.
- Page 3 v) Start / Driving vi) CRUISE CONTROL Mode vii) Braking 4. Cleaning / Maintenance / Repairs a. Cleaning b. Brakes: maintenance / adjustments i) Adjustment of brake cable tension ii) Brake Caliper Adjustments c. wheels i) Inflation ii) Wheel Alignment iii) Warnings on shocks 5.
- Page 4 Safety rules for the foldable electric Balance Bike ESLIDE ES1410D The foldable electric Balance Bike ESLIDE ES1410D can not be used by children. It can be used by people with physical, sensory or mental capabilities or reduced without experience...
- Page 5 Conditions to ensure good stability during use, transportation, Assembly or disassembly: users must not exceed the weight indicated in the specifications for the maximum weight, otherwise the driver might fall and be hurt, or even damage the service balance (stability) of the device. Raise the stand and put both feet on the ground for balance (stability) before starting.
- Page 6 While driving, you might be exposed to unexpected hazards or dangerous situations that can lead to serious injury, please adopt a prudent and careful driving. Equipment protection when you use the Balance Bike Please wear shoes and an outfit suited, together with all the necessary protection: a helmet, knee pads, elbow pads and other protections.
- Page 7 The hobby is not intended for aerobatic use. Do not lend your Balance Bike to someone being unfamiliar with the device. Do not drive after consuming alcohol or drugs. You need to subscribe to an insurance policy for this kind of device in the case of a damage or injury caused to a third party but also in the case of an injury of the user.
- Page 8 Avoid irregular objects like roll on a branch, waste, pebbles, Cobbles streets. Use on rough passages or too long could lead to many vibrations of the body that can trigger some pain, use the Balance Bike in a reasonable manner in order to limit these risks.
- Page 9 The HTL-180-42015000 charger is intended only for charging the battery GB/T18287-2000 of the foldable electric Balance Bike ESLIDE ES1410D it delivers 42V with a maximum current of 1.5 A output voltage If the power cable is damaged, it must be replaced by the manufacturer, its after-sales service or people of similar qualification to avoid a danger.
- Page 10 Never charge a frozen battery. If fluid content in the (acid) battery is frozen, the battery must be thawed. Then, the battery can be charged. Store the charger in a dry place (to protect from moisture). The charger is only suitable for indoor use. Protect from liquids, rain and snow.
- Page 11 Training or imprisonment (caused by hair, clothing, etc. caught by a moving parts) Crushing Risks of friction or abrasion Loss of stability Collision explosions thermal Harmful to health due to hot or cold surfaces vibrations Strong vibrations can be harmful to your health in case of prolonged use, or if the product is not used and maintained in accordance with the instructions...
- Page 12 i) Handling, Transport, storage, battery Handling, Transport, storage During handling and transport of the Balance Bike, avoid all physical or electrical shocks. During handling, the balance of the bike must be in position 'parking' (crutch in position open, on a flat surface or on a slope or hilly), that the charger is unplugged and the balance bike is off (off).
- Page 13 Storage without use may not exceed 2 months, it will fully recharge the Balance Bike every 2 months to ensure that the battery of the Balance Bike damaged. To ensure that your electric Balance Bike always works optimally, you must keep the wheel bearings and those of the lubricated continuously steering column.
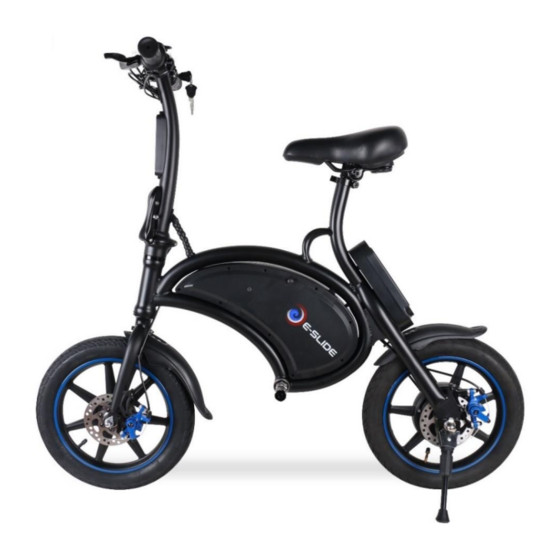
- Page 14 2) Product description a) Description/Presentation You have to purchase an electric brand model ESLIDE ES1410D Balance Bike . This new type of all-electric and nonpolluting mobility allows you to make recreational activities smoothly and without fatigue.
- Page 15 Its 14-inch wheels fitted with disc brakes allow you to enjoy your leisure time comfortably and safely. This product must be used on private road. Prohibition of traffic on roads open to the public. The power of its engine will take of gentle slopes without effort, the battery capacity will allow you to enjoy your hobby throughout the day.
- Page 16 List products elements Page...
- Page 17 Pièces détachées * N° Réf. Left brake handle ES1401 Right brake handle ES1402 Start button ES1403 Handlebar folding ring ES1404 Front lighting ES1405 Tire ES1406 Front & rear brake disc ES1407 Front mudguard ES1408 Frame ES1409 Footrest ES1410 Inner tube ES1411 Crutch ES1412...
- Page 18 Accessories mudguard Saddle Footrests Front Back Manual CHARGE CABLE WARNING accessories it is prohibited to use/install the Balance Bike to the accessories and additional items not approved by the manufacturer. Page...
- Page 19 b) Mounting accessories WARNING assembly/disassembly the Assembly of the elements when you must follow the directions below and the precautions to be taken, if you do not comply with these instructions could cause a malfunction of the unit and cause a loss of balance (stability), a fall or accident.
- Page 20 ii) Mounting saddle WARNING assembly/disassembly of the saddle make sure the Balance Bike in "parking position" (stand in the open position, on a flat surface or slope or hilly), that the charger is unplugged and that the balance of the bike is off (off ).
- Page 21 WARNING assembly/disassembly of mud guards make sure the Balance Bike in "parking position" (stand in the open position, on a flat surface or slope or hilly), that the charger is unplugged and that the balance of the bike is off) off). Unpack the mudguards, the smallest attaches to the front with the screw and nut provided, the largest attaches to the rear with the screw and nut provided.
- Page 22 Technical characteristics PARAMETERS STANDARD DATA Materials Aluminum Alloy / Steel Size (folded) 1110*235*705mm Size (unfolded) 1110*475*980mm Height and Height of shims 230mm weight wheels size 14 inch Frame color Black Delivery weight 20 Kg Product weight 15.5 kg Maximum load 120kg ≈...
- Page 23 Functions Folding/unfolding system may differ according to the product. There are 2 systems of folding/unfolding: - pin system - loop system below are the detailed steps for each system. a) Pin System: Folding / Unfolding the Handlebar i) Pin System: Unfolding the Handlebar After unpacking the product, raise the steering column (photo n °...
- Page 24 Pin System: Unfolding Detail Photo n°1 Photo n°2 Photo n°3 Photo n°4 Photo n°6 Photo n°5 Page...
- Page 25 i) Pin System: Handlebar Folding Unlock the loop of locking the handlebar (photo n ° 4/p23). Position the handlebar so that the brake handles are vertical. Re-block loop of locking the handlebar (photo n ° 6/p23). Unlock the safety pin to the top in the open position and at the same time unlock the folding loop: Then fold the steering column.
- Page 26 a) Buckle System: Folding / Unfolding the Handlebar WARNING folding/UNFOLDING the HANDLEBAR make sure the Balance Bike in "parking position" (stand in the open position, on a flat surface or slope or hilly), that the charger is unplugged and that the balance bike is off (off). i) Buckle System: Unfolding the Handlebar After unpacking the product, raise the steering column (photo n °...
- Page 27 Unfolding detail Photo n°1 Photo n°2 Photo n°4 Photo n°5 Photo n°3 Photo n°7 Photo n°5 Page...
- Page 28 i) Buckle System: Handlebar Folding Unlock the locking of the handle loop (photo n°5/p26). Position the handlebar so that the brake handles are vertical. Re-block loop of locking the handlebars (photo n°7/p26). Unlock the safety pin by turning to the left, lower the folding loop: Then fold the steering column.
- Page 29 WARNING folding/UNFOLDING the HANDLEBAR be sure to follow the above steps so that the key and the display do not collide in the bolt located on the central side of the front wheel. b) Charge the battery of the balance bike To prevent an unauthorized use of the product, please use the lock located on the handlebars.
- Page 30 WARNING of putting in CHARGE make sure the Balance Bike in "parking position" (stand in position open, on a flat surface or on a slope or hilly), that the balance of the bike is off (off). It must not put the BALANCE BIKE under voltage during the CHARGE CYCLE, the balance of the bike is in a dry place, sheltered from the Sun, of rain, only the Balance Bike and the charging port are completely dry, use only a power outlet standard 230 Volt.
- Page 31 Once the connection is made, check the load levels on the digital display battery & VOLTAGE indication: 1 – Press the M function of the digital display the balance bike should be 5 bar for a full charge. Check that the load bars are complete, and that the light turns green to be sure that it is charged to 100%...
- Page 32 feeding the Balance Bike and the socket after a complete charge cycle to avoid the risk of overheating and not to alter the life of the battery, do not leave the charger and the balance bike plugged in continues (full day), this could increase the risk of fire or explosion.
- Page 33 d) Functions i) Parking Position WARNING POSITION PARKING the Balance Bike must be put in the 'parking' position on a flat surface or on a slope or hilly. To put the Balance Bike in Park, you must make sure that the balance bike is off (no lights/witnesses on load), then you must open the stand in order to maintain the balance bike upright without help human.
- Page 34 ii) Turning On / On the Balance Bike WARNING start-up make sure the balance bike is in "Park" (stand in the open position, on a flat surface or slope or hilly), ring of folding, safety, closed/tightly clamping ring, than the charger pin is unplugged and that the balance bike is off (off).
- Page 35 T turn the key to the left to turn off the Balance Bike (Mode OFF). The LED display will turn off WARNING remember to remove the key once the off mode, in order to block it and it may be unusable by others.
- Page 36 - The digital display starts function. *** End of the boot safety *** - Possibility of operating the accelerator - It is impossible to operate the accelerator until the ignition process is completed, i.e. before the end of the electronic security of anti boot.
- Page 37 Rear light: Please press the red button to the left of the handle for 3 seconds to turn on the headlights. A second press on the push button 3 seconds will turn off the headlights and rear. NB: If you put the Balance Bike turned off, the headlights will turn off automatically.
- Page 38 3 Raise the stand and put both feet on the ground for balance (stability) before starting. 4 Gently turn the handle of throttle on the right handlebar. 5 The Balance Bike get movement, you can accelerate to gain speed. 6 After a few metres, you can put your feet on the footrests, the balance of the bike will be in a position of balance (stability).
- Page 39 v) CRUISE CONTROL Mode Mode Cruise control allows you to block the Balance Bike at maximum speed without the need to speed up. To activate it, keep the throttle up for 5 seconds. To deactivate the Cruise control, simply press on the accelerator or the brake.
- Page 40 The balance bike is equipped with two disc brakes for safe use experience. The located to the right of the handlebar brake lever operates the front brake. The brake lever located on the left handlebar operates the rear brake. When the action of one of the brake handles it cuts the electric motor preventing the effect of skating and allowing faster and gentler braking.
- Page 41 Cleaning / Maintenance / Repairs a) Cleaning AVERTISSEMENT NETTOYAGE Make sure that the Balance Bike "parking position" (stand in position open, on a flat surface or on a slope or hilly), that the charger is unplugged and that the balance bike is off (off).
- Page 42 To tighten or loosen brakes using the wrench provided, unscrew the NUTS level cables placed on the jaws of the brake and pull lightly on the cable to shorten it or lengthen depending on the desired action: Shorten the cable let go of the tension of the brake: Extend the cable tighter the tension of the brake: Tighten the screws with the key in now the cable to length: Page...
- Page 43 Test the tension of the cable with the corresponding brake lever: Right brake handle-online front brake. Rear left brake-online brake handle. The tension in the handle must be neither too strong nor too loose. CAUTION THE BALANCE BIKE MUST ALWAYS STAY OFF DURING THE SETTINGS OF BRAKE Page...
- Page 44 BRAKING TEST Raise the Balance Bike , done manually, the corresponding wheel to the brake you have just set. As the wheel rotates, press the brake lever, stop the rotation of the wheel must be instant. If the judgment is not immediate, braking is not optimal. Repeat the procedure.
- Page 45 Photo n°1 To adjust: loosen screws (photo n ° 2 and 3 p39). The caliper should be able to move transversally when handled. Photo n°2 Photo n°3 Align the disc and pads so that the space is parallel and the same from left to right the disk. You will need to move the Calliper from left to right and up and down to find the proper position.
- Page 46 If the setting is correct, tighten gently so as not to lose the position. Tighten the corresponding brake lever to the brake caliper that you have just set, and then release. Visually check the alignment (photo n ° 1/p39) if it is not optimal, repeat the procedure.
- Page 47 If the wheel seems to force or because of friction noise, repeat the procedure. CAUTION THE BALANCE BIKE MUST ALWAYS STAY OFF DURING THE SETTINGS OF BRAKE CAUTION THE BIKE BALANCE MUST ALWAYS REMAIN OFF DURING BRAKE ADJUSTMENTS. b) Wheels WARNING wheels make sure the Balance Bike in "parking position"...
- Page 48 i) Inflation The manipulations are identical for the inflation of the front and rear wheels. Make sure that the spout of the air Chamber is perpendicular to the rim (see photo below) to avoid pinching the inner tube and/or premature wear. Use a suitable inflator, type inflator to car to check the tire pressure and if necessary inflate the air Chamber.
- Page 49 ii) Wheel Alignment Both wheels must be perfectly aligned with the framework, if this is not the case, do not use the balance bike, the wheels may be veiled, the frame, the fork or the Steering axis making the use of the dangerous Balance Bike twisted.
- Page 50 ii) Warnings on shocks If you suffer a shock on one of the wheels of your hobby, this could result in: ▪ Damaging the inner tube ▪ Damaging the wheel rim ▪ To sail the wheel ▪ Twist the fork ▪...
- Page 51 5) Garantie E - SLIDE provides a one year warranty (the balance bike should be used normally). Situations below is not part of the guarantee: (1) the shell of the battery is open. (2) the connection plug was broken by human reason. (3) the appearance of the Balance Bike is broken.
- Page 52 6) Informations logotypes utilisés Wearing personal protective equipment User Manual DEEE The product is not disposable in a conventional bin. This must be brought to a specific collection point. Product Class II - Product with reinforced insulation without accessible metal parts. Product Class III - Product supplied with very low voltage Safety CE Standard - Limitation of Certain Hazardous Substances in...
- Page 53 Balance Bike Electric ES1410D Declarations and applicable standards: We, the undersigned DPA Europe, declare that ESLIDE Electric Balance Bike, Reference: ES1410D or FW-H14B complies with the essential requirements of the directives: EMC 2014/30/EU, LVD 2014/35/EU, ROHS 2011/65/EU, MD 2006/42/EC en application des normes suivantes :...
Need help?
Do you have a question about the ES1410D and is the answer not in the manual?
Questions and answers