
Related Manuals for Tysso BLP-410

Summary of Contents for Tysso BLP-410
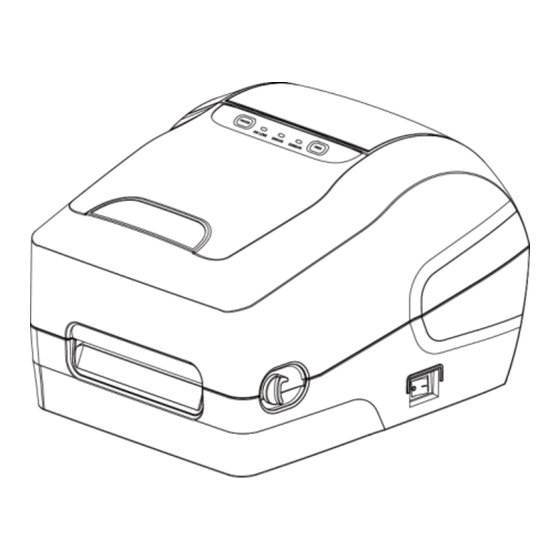
- Page 1 BLP-410 Thermal Transfer / Thermal Direct 1D & 2D Barcode Label Printer Installation Guide Keep the user manual for future reference.
-
Page 2: Table Of Contents
Index A. IMPORTANT SAFETY NOTIFICATION ....1 B. PRODUCT OVERVIEW ......... 3 Features ..............3 Packing..............4 Specification ............5 Product Description ..........8 Product Overview .......... 8 Control Buttons ..........12 LED & Audio Indicators ....... 13 I/O Ports ............16 C. - Page 3 APPENDIX ..............31 Self Test ............... 31 Print Test ..........31 DIP Switch & Baud Rate Settings .... 32 Debugging Mode ........35 Reset Your Printer ..........37 Maintenance – Cleaning Your Printer ....38 The cleaning process....... 39 Tips: Cleaning the Inner of Printer ....40...
-
Page 4: Important Safety Notification
A. Important Safety Notification Read the instruction manual carefully before use. Keep the manual in the near location for further reference. Use only parts or accessories, especially power adapter, recommended by the manufacturer; unapproved parts may be hazardous and cause injures to the product or human. - Page 5 Important Safety Notification Do not expose the product to water or moisture, such as a bathtub, a washbowl, a kitchen sink, a laundry tub, and a swimming pool. Do not expose the machine under direct sunlight, and keep it away from any heat source. ...
-
Page 6: Product Overview
B. Product Overview Features Thermal Transfer/Thermal Direct Printing Technology Front-Dispensing Label Printing Durable Housing Suitable for Industrial Applications Print Speed: 2~6 inches/sec Large Paper Roll Capacity Audio Alert Notification 1D & 2D (QR Code) Barcode Printing Support ... -
Page 7: Packing
Packing Printer Unit *Power Cord **Printer Cable Thermal Ribbon Label Roll Power Adaptor Holder Holder Set Quick Thermal Ribbon Installation Guide * Power Cord is selectable depending on the types of electrical plug. ** Printer cable is selectable depending on the interface required (RS-232, Parallel or USB B-Type). -
Page 8: Specification
Specification Model BLP-410 Print Capabilities Print Method Thermal Transfer/Thermal Direct Print Speed 2 ~ 6 inches/sec Print Head Lifecycle 50 km Print Resolution 203 dots/inch (8dots/mm) Maximum Print Width 108 mm (4.25 inches) Maximum Print Length 2286 mm (90 inches) - Page 9 General +24VDC/2.0A Power Input (with External Adapter 100 ~ 240VAC, 50/60Hz) Color Black Material Compliance FCC, CE, WEEE, RoHS Weight 2.09 kg Dimension (mm) 222.94 (W) x 190 (H) x 284.83 (D) Operating Temperature 5°C ~ 45°C Operating Humidity 25% ~ 85% RH, non-condensing Storage Temperature -10°C ~ 50°C Storage Humidity...
- Page 10 Print Ribbon 110 mm (max.) The Ribbon Width 30 mm (min.) Ribbon Diameter 67 mm (max.) Ribbon Axis Diameter 25.4 mm (1 inch) Print Label/Print Paper Continuous Paper, Gap Of Paper, Paper Type Paper Folding, Punched Paper 120 mm (4.72 inches, max.) Paper Width 20 mm (0.78 inch, min.) Paper Roll Diameter...
-
Page 11: Product Description
Product Description 4.1 Product Overview Bottom View Top View Front View Rear View - 8 -... - Page 12 Right View Left View - 9 -...
- Page 13 External Overview Control Buttons & LED Indicators Printer Cover Power Switch Label/Paper Cover Release Levers Outlet (Left & Right) Cover Release Levers: Press the two levers backward to open the printer cover. - 10 -...
- Page 14 Internal Overview Printer Cover Label Roll Holder Set Print Head Module Ribbon Adjusting Gears Print Head Module Thermal Ribbon Release Lever Holder - 11 -...
-
Page 15: Control Buttons
4.2 Control Buttons Pause Feed Button Button LED Status Indicators (ON LINE / ERROR / RIBBON) Feed Button: This function is to advance the paper or label. When the printer is ready (ON LINE), press the key and the paper advances. Press the button several times to adjust the label paper to move the specified label to the proper position. -
Page 16: Led & Audio Indicators
4.3 LED & Audio Indicators Thermal Direct Printing Mode: Descriptions Indicator Status Power-ON / On-Line Printer is powered on and in normal printing status Printer Paused Power indicator flashes every 640ms Printer Cover Is Opened Power indicator is off Error indicator goes on for 80ms, then goes off for 160ms... - Page 17 Descriptions Indicator Status Paper Out Power indicator is off, Error indicator flashes every 160ms; after two times flashing, error indicator goes off for 320ms Printer starts beeping ※ Black Mark Detection Error Power indicator is off Error indicator flashes every 160ms;...
- Page 18 Thermal Transfer Printing Mode: Descriptions LED Indicator Status Ribbon ON Ribbon is installed successfully Ribbon ERROR Ribbon is not properly installed No Ribbon Ribbon end Ribbon broken The Ribbon indicator flashes every 300ms The Audio Alarm (beeper) sounds every 2.4s ※ ※...
-
Page 19: I/O Ports
4.4 I/O Ports Rear View - 16 -... - Page 20 LAN USB RS-232 Parallel Power (※) *Printer Cable ※ The LAN Port is optional for custom model and is sealed generally. Please contact the local representative for further information. Note: When plug the printer cable to the printer, make sure the printer cable is properly secured.
-
Page 21: Printer Installation
C. Printer Installation Connecting Your Printer Please check the printer and the supplied accessories before installation. It’s recommended to read the entire instruction manual prior to the installation. Printer Cable Power Power Adaptor Outlet Power Host PC Cord Printer Place the printer on the designate location. Use the supplied Printer Cable and connect to the Host PC. -
Page 22: Install/Replace The Label Roll And Ribbon
Install/Replace the Label Roll and Ribbon 2.1 Install the Ribbon Roll Pull the left and right Cover Release Levers backward to open the Cover. Cover Release Lever Cover Release Lever - 19 -... - Page 23 Push the release lever to lift up the Print Head Module. Remove the two Thermal Ribbon Holders in the Print Head Module. Print Head Module Release Lever - 20 -...
- Page 24 Pass the two Ribbon Holders through the Ribbon Rolls. For New Ribbon Roll: To install a new ribbon roll, pass the two ribbon holders to the ribbon roll and the empty ribbon roll. Ribbon Roll Thermal Ribbon Empty Holder Ribbon Roll Thermal Ribbon Holder...
- Page 25 Re-Install a Ribbon Roll: To re-install a using ribbon roll, pass the ribbon holders to the ribbon roll and printed ribbon roll. Ribbon Roll Thermal Ribbon Printed Holder Ribbon Roll Thermal Ribbon Holder Tips: Arrange the ribbon with care and keep the ribbon in flat position.
- Page 26 Put the two ribbon rolls (with holders) into the slot of Print Head Module. Adjusting Gears Tips: Arrange the ribbon with care and keep the ribbon in flat position. Adjust the two Adjusting Gears of ribbon holders and make sure the ribbon is flat without wrinkle. - 23 -...
- Page 27 Press the Print Head Module with force so as to make sure the module is secured. - 24 -...
-
Page 28: Install The Label Paper Roll
2.2 Install the Label Paper Roll Pull the left and right Cover Release Levers backward to open the Cover. Cover Release Lever Cover Release Lever - 25 -... - Page 29 Take out the Label Roll Holder Set from the printer. Paper Roll Holder Set Install the Label Roll to the Holder Set. - 26 -...
- Page 30 Install the Label Roller Holder Set with label roll to the printer. Tips: Roll out the label roll to proper length so as to pass through the printer outlet. - 27 -...
- Page 31 Push the Printer Head Module Release Lever to lift up the Print Head Module Place the paper over the edge of printer. Print Head Module - 28 -...
- Page 32 Press the Print Head Module with force so as to make sure the module is secured. Close the Printer Cover back to the printer and the printer is ready for printing. Printer Cover Print Head Module Note: Check the LED Indicators of the printer and make sure the printer is in On-Line and Ready status.
- Page 33 Tips: Installation Check Please check the ribbon and label roll are properly installed onto the printer slots. Print Head Module Ribbon Roll Label Roll - 30 -...
-
Page 34: Appendix
Appendix Self Test 1.1 Print Test This function allows user to test the printing function. Before perform the test, make sure the test paper or ribbon roll is properly installed. Close the Printer Cover. Turn off the printer. Press and hold the Feed Button. Turn on the Power Switch of the printer. -
Page 35: Dip Switch & Baud Rate Settings
1.2 DIP Switch & Baud Rate Settings Examine DIP Switch Settings This function allows user to examine and print the DIP Switch configuration settings. Before perform the test, make sure the test paper or ribbon roll is properly installed. Close the Printer Cover. - Page 36 Configuration DIP Switches DIP Switch Cover To change the settings of the printer manually: Turn off the printer. Remove the DIP Switch Cover. Adjust the DIP switches to configure the printer. Re-install the DIP Switch Cover. - 33 -...
- Page 37 DIP Switch ON DIP Switch OFF Function Audio Alarm Disable Enable Reserved Ribbon End Detection Disable Enable Label Gap Sensibility High Power-On Test Paper Disable Enable Find Mark Max Value Disable Enable 7 & 8 Baud Rate Setting Baud-Rate Settings 9600 19200 38400...
-
Page 38: Debugging Mode
1.3 Debugging Mode This function allows user to test the printing function and examine the print data in code formats (ASCII / HEX). This function is for user or engineer to debug the program. Before perform the test, make sure the test paper or ribbon roll is properly installed. - Page 39 The printer starts printing out the print data in ASCII and HEX codes. Restore the Normal Print Mode: Turn off the printer to interrupt the Debugging Mode, then turn on the printer again. The printer will restore to normal printing mode. - 36 -...
-
Page 40: Reset Your Printer
Reset Your Printer * Factory default settings do not include ribbon setting. Close the Printer Cover. Turn off the printer. Press and hold the Feed and Pause Buttons. Turn on the Power Switch of the printer. As the POWER LED indicator (ON LINE) is on and ERROR LED indicator is OFF, release the two buttons. -
Page 41: Maintenance - Cleaning Your Printer
Maintenance – Cleaning Your Printer To ensure the printing quality, it is recommended to clean the print head and keep your printer in good conditions and extend its life as well. The materials listed as below can be used to clean the printer ... -
Page 42: The Cleaning Process
3.1 The cleaning process Print Head 1. Turn off the printer. 2. Allow the print head to cool down for at least one minute. 3. Use a cotton swap and 100% ethanol to clean the print head surface. Note: It’s recommended to clean when change new label paper. -
Page 43: Tips: Cleaning The Inner Of Printer
Sensor Use air brush or vacuum to clean dust of sensor. Note: It’s recommended to clean by month. Tips: Cleaning the Inner of Printer The dust or tiny paper fragment may also cause mal-function of printer. Use air brush or vacuum to clean the dust and keep the printer in clean status.
Need help?
Do you have a question about the BLP-410 and is the answer not in the manual?
Questions and answers