Table of Contents
Advertisement
Quick Links
Advertisement
Table of Contents

Subscribe to Our Youtube Channel
Related Manuals for Bartscher ST3000 3-E360


Summary of Contents for Bartscher ST3000 3-E360
- Page 1 ST3000 3-E360 825223 Original-Gebrauchsanleitung V1/0618...
-
Page 2: Table Of Contents
4.2 Technical specification ..................32 5. Installation and operation ..................33 5.1 Installation ......................33 5.2 Operation ......................36 6. Cleaning ........................39 7. Waste disposal ......................40 Bartscher GmbH phone: +49 5258 971-0 Franz-Kleine-Str. 28 fax: +49 5258 971-120 33154 Salzkotten... -
Page 3: Safety
Read this instruction manual before using and keep them available at all times! This instruction manual contains information about the installation, operation and maintenance of the device and should be consulted as an important source of information and reference guide. Awareness of the safety instructions and instructions for use in this manual will ensure the safe and correct use of the device. -
Page 4: Safety Instructions
HOT SURFACE! This symbol is a warning that the device surface is hot when in use. Ignoring this warning may result in burns! CAUTION! This symbol highlights dangerous situations which could lead to light injuries, or damage, malfunction, and/or destruction of the device. NOTE! This symbol highlights recommendations and information aimed for effective and trouble-free device operation. - Page 5 Children under the age of 3 should stay away from the device unless they are under constant supervision. Children aged 3 to 8 years may switch the device on or off only when they are under somebody’s care and have been instructed on safe operation of the device and are aware of possible risks, assuming the device has been properly placed and installed.
- Page 6 Prevent access of children to the package materials like plastic bags and foamed polystyrene elements. Suffocation hazard! Only a qualified technician and using original spare parts and accessories should carry out repairs and maintenance of the device. Do not attempt to repair the device yourself. ...
- Page 7 Check the power cord regularly for damage. Do not use the device if the power cord is damaged. If this cable is damaged, it must be replaced by customer service or a qualified electrician in order to avoid dangers. ...
- Page 8 HOT SURFACE! Burn hazard! Follow the safety instructions listed in order to avoid the hazard: The body and protection grille of the device become very hot during operation! Never touch the device during operation or shortly after it has been switched off. Before you start cleaning or moving the device elsewhere, let it cool down completely.
-
Page 9: Proper Use
When a fire arises unplug the power cord from the socket before you initiate appropriate measures for fire-fighting. Caution: Never extinguish the fire with water when the power plug is connected to the socket. Electric shock hazard! Provide sufficient supply of fresh air. 1.3 Proper use The operational safety of the device is assured only in case of proper use, according to the operation manual. -
Page 10: General Information
2. General information 2.1 Liability and Warrantees All the information and instructions in this manual take into account standard safety regulations, current levels of technical engineering as well as the expertise and experience we have developed over the years. The instruction manual was translated with all due care and attention. However, we do not accept liability for any translation errors. -
Page 11: Transport, Packaging And Storage
3. Transport, packaging and storage 3.1 Delivery check Please check the delivery upon completeness and transport damage immediately after receipt. In case of visible damage do not accept or accept the delivery with reservation only. Note the extent of damage on the carrier’s bill of delivery. Trigger off the complaint. Hidden damages should be reclaimed immediately after notice, as claims for damages can only be asserted within the effective period for complaints. -
Page 12: Technical Data
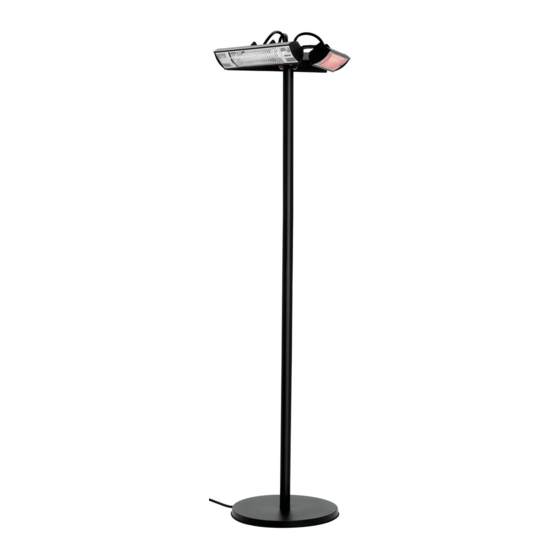
4. Technical data 4.1 Overview of parts 1 Heater (3) 2 Heaters holder 3 Control panel 4 Stand tube 5 Power cable 6 Base unit 7 Remote control - 31 -... -
Page 13: Technical Specification
4.2 Technical specification Description Heater ST3000 3-E360 825223 Code-No.: Material: Aluminium, steel, enamelled Power supply: electric Heat source - Infrared heating tubes: 3 x 1 kW Number of heating levels: 1 Heating radius: 12 m Standing device ... -
Page 14: Installation And Operation
5. Installation and operation 5.1 Installation Unpack the device and remove the packing material, according to the environmental regulations. Check completeness of delivery. CAUTION! Never remove the rating plate or any warning signs from the device. Installation CAUTION! Connect the heater to the power supply only when the assembly is complete. - Page 15 Step 3: Connect the middle tube with the lower tube by turning. Step 4: Connect the upper tube with the middle tube by turning in. Step 5: Connect the power cable plug with the holder box of the heaters. Step 6: Place the holder with the pre-assembled heaters on the upper tube and tighten it with the supplied 4x8 mm bolts.
- Page 16 Step 7: Mount the power cable with the supplied M4 nuts on the reverse side of the base. Preset When assembled, place the device on an even, stable surface that will support the weight of the device Never place the device on a flammable surface. ...
-
Page 17: Operation
NOTE! The device is provided with the protection that switches off the heaters automatically when the heater has been hit or tipped over (e.g. when it has been tipped over by a blow of wind). When lifted up, the device needs to be restarted. - Page 18 Start the device with control elements on the heaters holder. ON/OFF switch Button Press the ON/OFF switch (8) to “I“ position to switch on the device. The button (9) lights up in red signalling that the device is ready to use. ...
- Page 19 with the remote control There is one remote control supplied. Using the remote control buttons, you can switch the heaters on or off at any time according to needs. Top button to switch on the heaters Left button Right button to switch on to switch on the heaters...
-
Page 20: Cleaning
The angle of inclination of particular heaters may be changed (-40° bis 80°). Before changing of the angle of inclination, switch off the device and leave it to cool down completely (15 min). Move the required heater upwards or downwards, according to the needs. -
Page 21: Waste Disposal
Electric devices should be used and disposed of properly to prevent the impact on the environment. Disconnect the device from the power supply and remove the power cord from the device. Bartscher GmbH phone: +49 5258 971-0 Franz-Kleine-Str. 28 fax: +49 5258 971-120...
Need help?
Do you have a question about the ST3000 3-E360 and is the answer not in the manual?
Questions and answers