Advertisement
Available languages
Available languages
Quick Links
Advertisement

Related Manuals for Bell COCOON 300 Series


Summary of Contents for Bell COCOON 300 Series
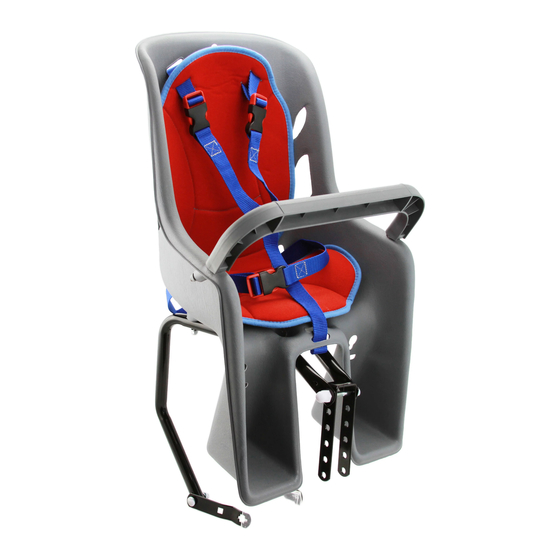
- Page 1 COCOON 300 AND SKIPPER ™ ™...
-
Page 2: Seat
COCOON 300 AND SKIPPER ™ ™ BICYCLE CHILD CARRIER INSTRUCTION MANUAL 3. In the event that the child carrier is involved in an accident, check to be sure that it functions properly before it is used again. Check for structural damage and replace the seat if it is damaged. - Page 3 PARTS LIST ITEM DESCRIPTION ITEM DESCRIPTION Seat Spacer Tube Right Seat Support 6mm x 58mm Hex Bolt Left Seat Support Metal Spacer Foot Guard 6mm (1)/8mm (2) Plastic Thread Protector Spring Guard 6mm x 35mm Round Head Square Neck Bolt Foot Guard Fasteners 6mm Nylock Nut Seat Pad...
- Page 4 STEP 1 STEP 2 Place the seat on its side. Insert (2) 6mm by 35mm While holding the bolts firmly in place fasten the round head square neck bolts into the (2) holes in the left seat supports to the bottom of the plastic seat left side of the bottom of the seat.
-
Page 5: Right Seat Support 1
STEP 3 STEP 5 Insert (2) 6mm by 35mm round head square neck Attach the long lower bracket to the bottom of the bolts into the right (2) holes in the bottom of the seat. seat support using an 8mm by 30mm round head square neck bolt, an 8mm split lock washer and an 8mm Nylock nut. -
Page 6: Left Seat Support 1
STEP 7 STEP 9 This step is for the 6mm hex bolt. Insert the Remove the seat post clamp from your bicycle. spacers on the inside of the U-bracket. Attach the U-bracket using a 6mm hex bolt, a 6mm split lock washer, and a 6mm Nylock nut. - Page 7 STEP 12 STEP 14 Insert the spacer tube and secure using an 8mm by Repeat on other side of wheel by inserting the 58mm hex bolt, an 8mm split lock washer and an short lower bracket into the slotted end of the long 8mm Nylock nut.
-
Page 8: Foot Guard,
STEP 16 STEP 18 Place the plastic thread protectors onto the ends of Install the foot guard by wrapping it over the top of the hex bolts. the right and left seat supports and tucking it under the front edge of the seat. Secure foot guard to the Note: If you are using the 6mm bolt, use the thread bicycle frame by inserting the fasteners through protector with the number 6 on the inside. - Page 9 STEP 20 STEP 23 Remove the male end of the quick-release buckle. Pass each of the two top butterfly ends of the 3-point harness through the holes in the seat and through the holes in the seat pad. STEP 21 Thread the lap belt through the holes in the seat.
-
Page 10: Grab Bar
STEP 25 STEP 27 Grab the straps and pull on them to confirm that the Peel the backing off the adhesive tape and adhere harness is properly anchored to the seat in both the the reflector to the untextured area of the back of the upper locations as well as the center lower location. - Page 12 COCOON 300 AND SKIPPER ™ ™ SIÈGE DE VELO POUR ENFANTS MANUEL D’INSTRUCTION 3. Dans le cas où le siège pour enfant est impliqué dans un accident, assurez-vous qu’il fonctionne correctement avant d’etre utilisé de nouveau. Vérifiez les dommages structurels et remplacez le siège s’il est endommagé.
- Page 13 PARTS LIST ARTICLE DESCRIPTION QTÉ ARTICLE DESCRIPTION QTÉ Siége Tube d’espacement Supportdroit de siége Boulon rond hexagonale de 6mm x 58mm Support gauche de siége Entretoise métalique Repose-pied 6mm (1)/8mm (2) Fil protecteur en plastique Protecteur de ressort Boulon rond à tête hexagonale de 6mm x 35mm Attache de repose-pied Écrou Nylock de 6 mm...
- Page 14 ÉTAPE 1 ÉTAPE 2 ARTICLE #18 ARTICLE # 20 ARTICLE # 19 6mm x 35mm Rondelle fendue Écrou Nylock de de 6 mm 6 mm...
- Page 15 ÉTAPE 3 ÉTAPE 5 ARTICLE #18 6mm x 35mm ARTICLE #21 ARTICLE #24 ARTICLE #23 8mm x 30mm Round Rondelle flexible Écrou Nylock Hd. Sq. Neck Bolt de 8mm de 8mm ÉTAPE 4 ÉTAPE 6 ARTICLE #20 ARTICLE #19 ARTICLE #21 Boulon ARTICLE # 24 ARTICLE #23 Rondelle fendue...
- Page 16 ÉTAPE 7 ÉTAPE 9 Retirez la pince du montant du siege de votre velo. Cette étape concerne le boulon hexagonal de 6 mm. Insérez les entretoises à l’intérieur du support en U. Fixez le support en U à l’aide d’un boulon hexagonal de 6 mm sur 6 mm, d’une rondelle-frein fendue de 6 mm et d’un écrou Nylock de 6 mm.
- Page 17 ÉTAPE 12 ÉTAPE 14 lnserez le tube d’ecartement et fixez-le a l’aide d’un Repetez de l’autre côté de la roue en insérant le boulon hexagonal de 8 mm par 58 mm, d’une ron- court support inférieur dans l’extrémité fendue delle flexible de 8 mm et d’un ecrou Nylock de 8mm. du long support inférieur.
- Page 18 ÉTAPE 16 ÉTAPE 18 Placez les protecteurs de filetage en plastique aux lnstallez le repose-pied en le faisant rouler sur extrémités des boulons hexagonaux. le dessus des supports de siege de droite et de gauche, et en le plac;:ant sous le bord avant du Remarque : Si vous utilisez le boulon de 6 mm, siège.
- Page 19 ÉTAPE 20 ÉTAPE 23 Retirez l’extremité mâle de la boucle à Passez chacune des deux extremités papillons dégagement rapide. supérieures du harnais à trois points à travers les trous du siège et du coussin du siege. ÉTAPE 21 Enfilez la ceinture sous les trous du siège. ÉTAPE 24 Fixez l’extrémite inférieure du harnais à...
- Page 20 ÉTAPE 25 ÉTAPE 27 Prenez les sangles et tirez-les pour confirmer que le Decollez la protection du ruban adhésif et collez le harnais est correctement ancre dans le siège, aux réflecteur sur la zone non texturée du dossier du deux endroits supérieurs ainsi que dans l’endroit siege.
- Page 22 COCOON 300 AND SKIPPER ™ ™ PORTABEBÉS PARA BICICLETAS MANUAL DE INSTRUCCIONES 3. En caso de que el portabebés se vea involucrado en un accidente, compruebe que este funcione cor- rectamente antes de volver a utilizarlo. Compruebe que el asiento no tenga dañios estructurales y reemplacelo si esta dañiado.
- Page 23 LISTA DE PIEZAS ARTíCULO DESCRIPCIÓN CANT. ARTíCULO DESCRIPCIÓN CANT Asiento Tuba separador Perno hexagonal de 6mm x 58mm Soporte del asiento derecho Soporte del asiento izquierdo Espaciador Metálico Protector para pies 6mm (1)/8mm (2) Protector de rosca de plástico Pernos de cabeza redonda Philips 4 Protector de resorte de 6mm x 35mm Sujetadores del protector para pies 3...
- Page 24 PAS0 1 PAS0 2 Coloque el asiento de lado. lnserte (2) tornillos de Mientras sujeta los pernos firmemente en su lugar, cabeza redonda de 6 mm x 35 mm en los (2) orificios sujete los soportes del asiento izquierdo en la parte en el lado izquierdo de la parte inferior del asiento.
- Page 25 PAS0 3 PAS0 5 lnserte (2) tornillos de cabeza Philips redonda de 6 Sujete el soporte inferior largo en la parte inferior mm x 35 mm en los (2) orificios en el lado derecho del soporte del asiento usando un perno de cabeza de la parte inferior del asiento.
-
Page 26: Metal Spacer
STEP 7 PAS0 9 Quite la abrazadera del poste del asiento Este paso es para el perno hexagonal de 6 mm. de su bicicleta. Inserte los espaciadores dentro del soporte en forma de "U". Fije el soporte en forma de "U" usando un perno hexagonal de 6 mm, una arandela de seguridad dividida de 6 mm y una tuerca de seguridad de 6 mm. - Page 27 PAS0 12 PAS0 14 11 lnserte el tubo espaciador y asegurelo con un Repita en el otro lado de la rueda insertando el tornillo hexagonal de 8 mm por 58 mm, una arandela soporte inferior corto en el extremo ranurado del de bloqueo de 8 mm y una tuerca Nylock de 8 mm.
- Page 28 PAS0 16 PAS0 18 Coloque los protectores de rosca de plástico en los lnstale el protector para pies enrollándolo sobre la extremos de los pernos hexagonales. parte superior de los soportes del asiento derecho e izquierdo y colóquelo debajo del borde delantero Importante.
- Page 29 PAS0 20 PAS0 23 Quite el extremo macho de la hebilla de Pase cada uno de los dos extremos superiores liberación rapida. de mariposa del arnés de 3 puntos a través de los agujeros del asiento y a través de los agujeros en la almohadilla del asiento.
- Page 30 PAS0 25 PAS0 27 Agarre las correas y tire de ellas para confirmar que Pele la parte trasera del adhesivo y peque el reflector el arnés está debidamente anclado al asiento, tanto en el area no texturizada de la parte trasera del en las ubicaciones superiores como en la ubicación asiento.
- Page 32 11.12 INSTRUCTION MANUAL #1000034249 7016050 / 7016051 / 7084885 REV DATE: 03/19 WWW.THEBELLGARAGE.COM © 2019 BELL SPORTS, INC. / 1-800-456-BELL 1001 INNOVATION ROAD 3000 NORTH / RANTOUL, IL 61866 USA PRINTED IN CHINA / IMPRIMÉ EN CHINE / IMPRESO EN CHINA...
Need help?
Do you have a question about the COCOON 300 Series and is the answer not in the manual?
Questions and answers