
Related Manuals for UPM THM501


Summary of Contents for UPM THM501
- Page 1 ® PROGRAMMABLE THERMOSTAT THM501...
- Page 2 LEAVE BLANK...
- Page 3 Features: Extra-large LCD display with backlight — sets and displays house temperature (°C or °F), day, hour and minute (in 12- or 24-hour format) Temperature can be set in half degrees Interfaces with humidifier for automatic humidity control Interfaces with heating/air conditioning systems for automatic temperature control Automatic change-over for HEATING/COOLING programs Copy 1 day’s program to another day Automatic ventilation...
- Page 4 IMPORTANT - Getting Started This thermostat requires 2 “AA” size batteries (included) to operate. Ensure the batteries are installed correctly. (REFER TO PAGE 31). Once the batteries are installed for the first time, we recommend that you perform a HARD RESET to set the thermostat to its default settings. To do so, First, press and hold the LOCK key.
- Page 5 IMPORTANT - Getting Started It is VERY IMPORTANT you choose your desired choice of Celsius (°C) or Fahrenheit (°F) before you proceed with the clock and program setting, as this is a one-time setup process. The temperature scale (°C or °F) CANNOT be changed afterwards unless you perform another HARD RESET on the thermostat.
-
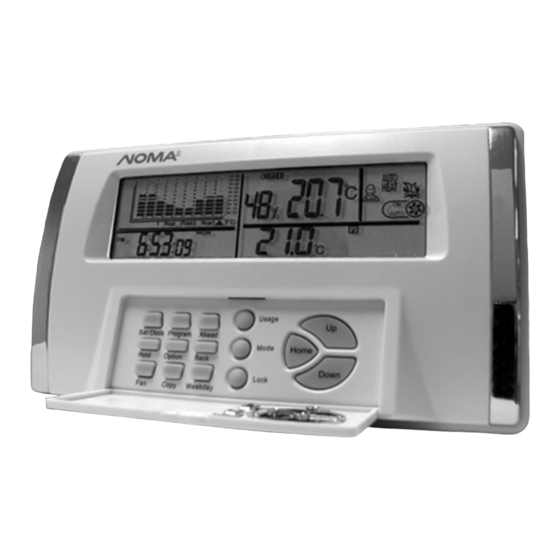
Page 6: Function Key Descriptions
Function Key Descriptions AHEAD USAGE PROGRAM MODE SET CLOCK HOME OPTION HOLD DOWN BACK LOCK COPY WEEKDAY... -
Page 7: Lcd Display
OVERRIDE INDICATION LCD Display HOLD FUNCTION FILTER CHANGE INDICATION RELATIVE HUMIDITY CURRENT (ROOM) TEMPERATURE KEY LOCK COMFORT ICONS OPERATION MODES SYSTEM “ON” TEMPERATURE INDICATION TREND GRAPH AUTOMATIC VENTILATION COPY PROGRAM CLOCK SET OPTIONS BATTERY LOW WEEKDAY USAGE SET / PROGRAM PROGRAM INDICATION MONITOR... - Page 8 Programs This thermostat is equipped with 7 DAY PROGRAMMING. Monday + Tuesday + Wednesday + Thursday + Friday + Saturday + Sunday programming with 4 settings per day. This thermostat is pre-programmed for your convenience or you can set your own programs as desired. This is typically for the morning when you may prefer a warmer temperature.
-
Page 9: Heating Program
Heating Program Press MODE until the HEAT symbol appears and press PROGRAM once . The P1 and SET PROGRAM symbols will appear on the display. To select the day that you want to program first, press WEEKDAY until the desired day appears. (MON, TUE, WED, THU, FRI, SAT, SUN). -
Page 10: Cooling Program
Cooling Program Press MODE until the COOL symbol appears and repeat the programming procedure as you would for the heating program. - Note: The same program times are used for heating and cooling. Therefore, any changes made to the times here will affect the program times for the heating program. - The setpoint temperature range is 8°C to 35°C (48°F to 95°F) for cooling. -
Page 11: Temporary Override
Temporary Override To change the temperature temporarily, press UP or DOWN to set the desired temperature. The OVERRIDE symbol will appear. The thermostat will return to the regular program at the next scheduled program time. Note: The thermostat has an automatic delay function to protect the heating and cooling systems from undesired on/off sequences. -
Page 12: Check Programs
Check Programs The current program is displayed on the lower right-hand section of the LCD screen. Press PROGRAM at any time to scroll through and check all other programs. current program Press HOME to return to the normal display. current (room) Room Temperature temperature Current (room) temperature is displayed on the... -
Page 13: Humidifier Control
Humidifier Control The humidifier control only works if the humidifier is connected to the thermostat. Please refer to the installation guide on page 30 for connection details. To set the humidity level, first ensure that the thermostat is in the HEAT mode. Press SET CLOCK three times to enter the humidity setting mode. - Page 14 Temperature T rend Graph: How to change the scale? To change the scale, press USAGE. (USAGE TODAY will appear). Press UP or DOWN to change the scale of the graph. The scale will toggle between: 1 Hour (Total 8 Hour) – 1-hour intervals showing past 8 hours, or 3 Hour (Total 24 Hour) –...
-
Page 15: Pre-Comfort Recovery
Pre-comfort Recovery This thermostat is equipped with a ‘Pre-comfort Recovery’ system that will activate the heating or cooling in advance of the actual set program time so that the room will be at the desired temperature at the start of the comfort program time. - Page 16 Fan Control / Automatic Ventilation For automatic control of the fan, press FAN until the AUTO symbol appears. In cooling, the fan starts/stops with the cooling equipment. In heating, the fan is controlled by the heating equipment and usually starts a few minutes after the heating equipment turns on. For the fan to run continuously, press FAN until the ON symbol appears.
-
Page 17: Optional Settings
Optional Settings Below is the list of optional settings: - 12/24 hour display format - Heat Cycle Rate (select cycle rate to match the heating equipment) - HE/HG setting - Backlighting ON or OFF - Pre-comfort Recovery ON or OFF - LCD Contrast Selection To begin, press OPTION. - Page 18 Press OPTION to move on to the HE/HG setting. Factory default is HG setting. - Select the proper HE or HG setting by pressing UP or DOWN. - Depending on your home’s heating system, you may need to change the HE/HG setting for the fan operation.
- Page 19 Changing Batteries When the battery symbol on the LCD screen flashes, it indicates that the batteries are running low and have to be replaced. However, it is recommended for the batteries to be replaced every year even if the indicator is not flashing yet. To replace batteries: Press MODE until the thermostat is turned to the OFF mode and have the new batteries ready on-hand.
-
Page 20: Specifications
Specifications: Number of programs: 7 Day with 4 settings per day Temperature display range: 0 – 55°C (34 – 99.5°F) Humidity display range: 20 to 95% Temperature setting range: 5 – 35°C (41 – 95°F) Humidity setting range: 20 to 70% Storage temperature range: -20 –... - Page 21 PROBLEM SOLUTION 1) Check if the furnace switch and/or pilot flame is turned on, as it may have been turned off. Heat will not come on but the 2) Allow several minutes for the heating system to heat up and the fan to activate. Most heaters will heat symbol is animated.
- Page 22 PROBLEM SOLUTION - The thermostat has a built-in safeguard time delay of 30 minutes to prevent undesirable change-over Thermostat is set on AUTO mode, sequences from HEAT to COOL or COOL to HEAT . For example, if the thermostat was just running the but the thermostat does not seem cooling system, it will take at least 30 minutes before it changes to heating.
- Page 23 Installation Guide...
- Page 24 Installation Guide Introduction This thermostat can replace common residential thermostats and it is designed for use with most gas, oil or electric heating and air conditioning systems that use low voltage control. Please see compatibility chart for more details. Monday + Tuesday + Wednesday + Thursday + Friday + Saturday + Sunday programming with 4 settings per day Display temperature with 0.1°...
- Page 25 Compatibility Generally, equipment with low voltage control is compatible with the Heating/Cooling Programmable Thermostat (52-2570-6). For details on compatibility of your particular equipment, please call our technical assistance line at 1-888-468-6876. System Type Compatible with Thermostat Gas - Standing Pilot Gas - Electronic Ignition Gas - Fire Boiler Some models...
-
Page 26: Installation
Installation The following tools may be required for installation: Power drill with a 3/16” bit ) screwdriver ( If necessary, to drill holes on the wall ) Masking Tape (To wrap the exposed wires temporarily and labeling Level the disconnected wires) (If necessary, to level the thermostat) Wire Stripper/Cutter 2 “AA ”... - Page 27 Choosing location for new thermostat Thermostat should be mounted: Approximately 5’ (1.5 m) from floor. Near or in a frequently used room, preferably on an inside partitioning wall. On a section of wall without pipes or duct-work Thermostat should NOT be mounted: Near a window, on an outside wall, or next to a door leading outside.
-
Page 28: Replacing Old Thermostat
Replacing old thermostat Note: Do not operate the cooling system when outside temperature is below 10 °C (50 ) to avoid °F damaging the compressor. Test the system to make sure that your heating and cooling systems are working properly before installation. - Page 29 Mounting the thermostat back cover The back cover should be mounted horizontally with the terminals on the top. Thread the existing wiring through the big center hole from the back and set the back cover horizontally on the wall. Select two appropriate mounting holes and mark the locations with a pencil. If necessary, use a level to make sure the thermostat is leveled.
-
Page 30: Connecting The Wires To The Terminals
Connecting the wires to the terminals Wall Connect the previously labeled wires to the corresponding Through Hole terminals, matching the designations. Use a screwdriver to Back cover securely fasten the wires onto the terminals. Make sure the wires do not short-circuit with other terminals. Wall Depending on your heating/cooling equipment, you may need to connect 2 to 8 wires to the thermostat. -
Page 31: Wiring Diagram
Wiring Diagram 2-WIRE HEATING 4-WIRE HEATING/COOLING 3-WIRE HEATING 5-WIRE HEATING/COOLING... - Page 32 Installing control wires for humidifier control If control of the humidifier is desired, the 2 wires connecting the original humidistat needs to be connected to the 2 terminals marked 'H1' and 'H2' on the thermostat. The original humidistat should be removed or set to 'OFF' position. Noted: The 2 humidifier control terminals 'H1' and 'H2' are electrically isolated from the Heat/Cool terminals.
- Page 33 INSTALLING THE BATTERIES AND SELECTING THE DISPLAY IN C or F ° ° Install the 2 “AA ” size batteries (included) into the thermostat following the polarity as marked. The LCD screen will immediately show the room temperature. You should now perform a HARD RESET to set the thermostat to its default settings.
- Page 34 This product carries a five (5) year repair warranty against defects in workmanship and materials. At its discretion, UPM agrees to have any defective part(s) repaired or replaced free of charge, within the stated warranty period, when returned by the original purchaser with proof of purchase. This product is not guaranteed against wear or breakage due to misuse and/or abuse.
Need help?
Do you have a question about the THM501 and is the answer not in the manual?
Questions and answers