
Related Manuals for TOUGH-WORKS MM491G


Summary of Contents for TOUGH-WORKS MM491G
- Page 1 MM491G 4" X 36" BELT AND 6" DISC SANDER IMPORTANT: INSTRUCTION For your own safety, read and follow all of the Safety MANUAL Guidelines and Operating Instructions before operating this product.
- Page 3 MM491G BD4603 TABLE OF CONTENTS TABLE OF CONTENTS ....................SPECIFICATIONS ....................... SAFETY GUIDELINES ....................ELECTRICAL SAFETY ....................PACKAGE CONTENTS ....................KEY PARTS DIAGRAN....................A S S E M B L Y / M O U N T I N G ..................
- Page 4 MM491G BD4603 IMPORTANT! Safety is the single most NEVER OPERATE A TOOL important consideration in the operation of WHILE UNDER THE INFLUENCE this equipment. The following instructions OF DRUGS, MEDICATION, OR must be followed at all times. ALCOHOL. There are certain applications for which this tool ALWAYS WEAR PROPER was designed.
- Page 5 MM491G 21.Keep these instructions for future reference. Special Safety Rules For Belt & Disc Sanders 1. Do not operate this machine until you have read all of the following instructions. 2. Do not attempt to operate this machine until it is completely assembled.
- Page 6 MM491G BD4603 In the event of a malfunction or breakdown, grounding provides a path of least resistance for electric current to reduce the risk of ele- ctric shock. This tool is equipped with an electric cord having an equipment-grounding conductor and a grounding plug.
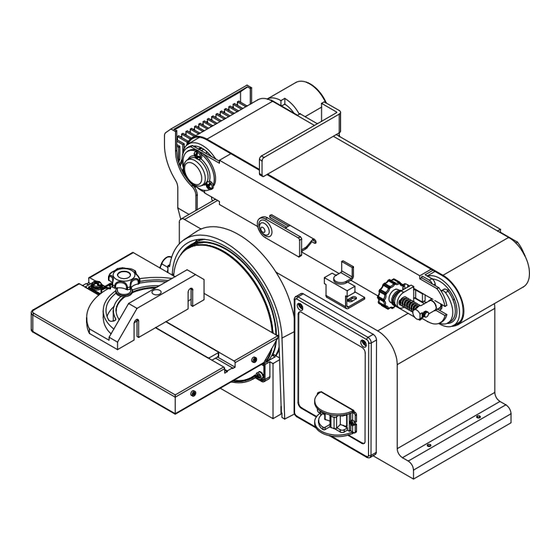
- Page 7 MM491G No. Description Qty. Sander Body Miter Gauge Work Table Miter Gauge Knob Big Flat Washer Hex Socket Round Head Screw Limited plate Figure D...
- Page 8 MM491G BD4603 Limited plate Sander Belt Sander Disc Belt Tension Knob Miter Gauge Work Table Belt Adjustable Knob Switch...
- Page 9 MM491G Securing Sander Base Assembly 1. Locate sanding disc (7) and peel backing off disc. to Workbench 2. Align perimeter of sanding disc over plate. Belt and disc sander must be fastened securely When aligned, press sandpaper disc firmly to a firm supporting surface such as a wo- onto backing disc.
- Page 10 MM491G BD4603 5. Place washer (3 2 ) on knob (3 4 ) shaft and insert through slot into threaded holes in base. 6. Loosen the three hex. screws (31) and adjust table so that there is a maximum of 1.5mm (1/16”) space between the sanding disc and...
- Page 11 MM491G Remounting Table for Installing and Adjusting the Vertical Sanding Sanding Belt 1. Remove backstop lock bolt and remove work 1. Turn power switch to the OFF position and support. disconnect power cord from the main elec tricity supply. 2. Unscrew knob (34) and remove.
- Page 12 MM491G BD4603...
- Page 13 MM491G BD4603 6. Tighten the three screws again. 1. Apply a light coat of wax paste to the worktable 7. Squeeze the drive belt between two fingers to make feeding stock easier. in the centre of the belt. If the belt has been 2.
- Page 14 MM491G BD4603 PROBLEM PROBLEM CAUSE SUGGESTED CORRECTIVE ACTION Not plugged in to power Plug into power outlet. outlet. Replace switch. Sander does Power switch defective. Have qualified electrician carry not operate Motor or wiring problem. out repair. Timing belt too tight Decrease tension.
- Page 15 MM491G...
- Page 16 MM491G BD4603 Description Size Q’ty Phillips Screw M4X6 +Flat Washer M4X6 Base Cover Phillips Screw M4X8 +Flat Washer+Spring Washer M4X8 Toothed Lock Washer D4 φ4 Phillips Screw ST4.2X10 ST4.2X10 Disc Cover Disc Paper 80# 150mm-80# Hex Socet Round Head Screw M6X16+Toothed...
- Page 17 MM491G Description Size Q’ty Phillips Screw M4X12 M4x12 Hex Bolt M6X14 M6*14 Big Flat Washer D6 φ6 Work Table Support Angle Plate Miter Gauge Knob Work Table Miter Gauge Bar Point of Miter Gauge Miter Gauge of Work Table Sw itch...
- Page 18 MM491G BD4603 Description Size Q’ty Limited plate Driving Pulley Hex Flat Lock Washer M8X12 M8X12 Driving Pulley Bearing Cap Washer Phillips Screw M5X10 M5x10 Cog Belt Guard Cover Phillips Screw M5X16I+Special Locked Washer M5x16 左丝 Driving Pulley Cog Belt 150XL...
- Page 19 MM491G ONE-YEAR LIMITED WARRANTY Having Problems ? Give us a chance to help you before returning this product Email : info@toolots.com After the phone:(844) 866-5687...
Need help?
Do you have a question about the MM491G and is the answer not in the manual?
Questions and answers