Table of Contents

Related Manuals for Seagate FireCuda Gaming Dock


Summary of Contents for Seagate FireCuda Gaming Dock
- Page 1 Seagate FireCuda Gaming Dock User Manual Model: Click here to access an up-to-date online version of this document. You will also find the most recent content as well as expandable illustrations, easier navigation, and search capability.
-
Page 2: Table Of Contents
......................... . Set up Seagate FireCuda Gam ing Dock . - Page 3 6 Safely Remove Seagate FireCuda Gaming Dock From Your Computer ...................
-
Page 4: Box Content
Introduc on ® ® Game harder with Seagate FireCuda Gaming Dock, an elite storage hub that connects an entire desktop ® battlestation—keyboard, mouse, USB headset, webcam, display monitor, and more—via one Thunderbolt 3 cable. For common questions and answers about your hard drive, see... -
Page 5: Minimum Free Disk Space
6. Status LED— Indicates that the device is powered on and provides status signals. Color Status Blue FireCuda Gaming Dock's Host Thunderbolt 3 port is connected to host computer's Thunderbolt 3 port. Green FireCuda Gaming Dock's Host Thunderbolt 3 port is connected to host computer's USB port. -
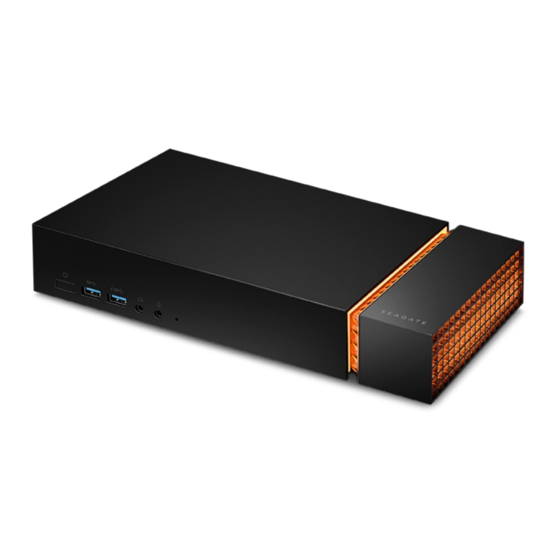
Page 6: Back View
LED has been disabled in Toolkit or the device is powered off. Back view 1. Power input—Use this port to connect the power cable. Only use the power cable included with Seagate FireCuda Gaming Dock. Attaching third-party or other Seagate power cables with incorrect voltage can damage the device. -
Page 7: Getting Started
Connect the power cable Connect the included power supply in the following order: A. Connect the power supply to FireCuda Gaming Dock's power input. B. Connect the power cord to the power supply. C. Connect the power cord to a live power outlet. -
Page 8: Windows Prompt: Approve Thunderbolt Device
Windows Prompt: Approve Thunderbolt Device When you first connect Seagate FireCuda Gaming Dock to a Windows PC that supports Thunderbolt 3, you may see a prompt requesting to authenticate the recently connected device. Follow the onscreen prompts to approve the Thunderbolt connection to FireCuda Gaming Dock. -
Page 9: Set Up Seagate Firecuda Gaming Dock
FireCuda Gaming Dock is a Thunderbolt 3 powered hub. Connecting FireCuda Gaming Dock's host port to a computer's USB port will result in limited functionality: Lower performance. No support for the NVMe SSD expansion drive. Computer's USB port may not support FireCuda Gaming Dock's DisplayPort function. -
Page 10: Register Your Device
Using File Explorer, open FireCuda Gaming Dock and launch Start Here Win. Register your device Enter your information and click Register. Download Toolkit Click the button. Download Install Toolkit Seagate FireCuda Gaming Do ck 11/8/19... - Page 11 Using File Explorer, go to the folder where you receive downloads. Click on the SeagateToolkit.exe file to launch the application. Your computer must be connected to the internet to install and run Toolkit. Seagate FireCuda Gaming Do ck 11/8/19...
-
Page 12: Use Toolkit To Manage Led Color, Set Up Backups, And More
Toolkit helps you easily manage LED color settings for FireCuda Gaming Dock, create and manage backup plans, and more. Manage LED color se ngs For leveled-up illumination, use Toolkit to customize FireCuda Gaming Dock's LED with a range of RGB colors and light patterns. Click here for details on managing LED color settings. -
Page 13: Installing An Nvme Ssd Expansion Drive
Installing an NVMe SSD Expansion Drive Upgrade your FireCuda Gaming Dock with premium performance flash storage. Seagate recommends the FireCuda NVMe SSD. FireCuda Gaming Dock supports 2280 sized M.2 NVMe SSDs. Note that M.2 SATA SSDs with a 2280 size are not supported. -
Page 14: Rem Ove The Protective Plate
Remove the protec ve plate Remove the two screws fastening the protective plate to the tray. Remove the protective plate. Remove the moun ng screw Remove the mounting screw from the tray. Seagate FireCuda Gaming Do ck 11/8/19... -
Page 15: Insert The Nvme Ssd Card
NVMe SSD into the slot until it's firmly seated. Replace the moun ng screw Hold down the NVMe SSD while you replace the mounting screw. Make sure the SSD is secured in place. Seagate FireCuda Gaming Do ck 11/8/19... -
Page 16: Replace The Protective Plate
The plate protects the SSD from dust and dissipates heat. Not covering the SSD with the protective plate could lower performance and possibly damage your drive. Replace the end cap Gently push the end cap into the enclosure to return it to its original position. Seagate FireCuda Gaming Do ck 11/8/19... -
Page 17: Check Form Atting
Formatting erases all data on a storage device. If you have data on the NVMe SSD, make certain to back it up before the format. Seagate is not responsible for data lost to formatting, partitioning, or using a Seagate storage device. -
Page 18: Optional Formatting And Partitioning
Seagate highly recommends that you back up all data on your storage device before performing the steps below. Seagate is not responsible for any data lost due to formatting, partitioning, or using a Seagate storage device. 1. Make sure the storage device is connected to and mounted on the computer. - Page 19 Safely Remove Seagate FireCuda Gaming Dock From Your Computer Always eject a storage drive from your computer before physically disconnecting it. Your computer must perform filing and housekeeping operations on the drive before it is removed. Therefore, if you unplug the drive without using the operating system’s software, your files can become corrupt or damaged.
- Page 20 Marking for the Restricted Use of Hazardous Substances in Electronic and Electrical Products, SJT 11364-2014. 中国 RoHS 2 是指 2016 年 7 月 1 日起施行的工业和信息化部令第 32 号“电力电子产品限制使用有害物质管理办 法”。为了符合中国 RoHS 2 的要求,我们根据“电子电气产品有害物质限制使用标识”(SJT 11364-2014) 确定本产品 的环保使用期 (EPUP) 为 20 年。 Seagate FireCuda Gaming Do ck 11/8/19...
- Page 21 CNS 15663, Guidance to reduction of the restricted chemical substances in electrical and electronic equipment. Beginning on January 1, 2018, Seagate products must comply with the “Marking of presence” requirements in Section 5 of CNS 15663. This product is Taiwan RoHS compliant. The following table meets the Section 5 “Marking of presence”...
- Page 22 Seagate FireCuda Gaming Do ck 11/8/19...
Need help?
Do you have a question about the FireCuda Gaming Dock and is the answer not in the manual?
Questions and answers