Table of Contents
Advertisement
Available languages
Available languages
L
N
CSB-BR / SP
(3.3)
Centrale di comando
Control unit
Centrale de commande
Steuerzentrale
Central de mando
UNAC
ASSOCIAZIONE COSTRUTTORI
DI INFISSI MOTORIZZATI E AUTOMATISMI
PER SERRAMENTI IN GENERE
E
24
Vac
Manuale d'installazione ed uso
IT
Installation and operation manual
EN
Manuel d' installation et d' utilisation
FR
Installations und Bedienungs
DE
Manual d' instalacion y uso
ES
2nd
CH
RX
CSB-XT
(4.0)
p.3
p.15
p.27
p.39
p.51
Advertisement
Chapters
Table of Contents

Related Manuals for O&O CSB-XT

Summary of Contents for O&O CSB-XT
- Page 1 CSB-BR / SP CSB-XT (3.3) (4.0) Centrale di comando Manuale d’installazione ed uso Control unit Installation and operation manual p.15 Centrale de commande Manuel d’ installation et d’ utilisation p.27 Steuerzentrale Installations und Bedienungs p.39 Central de mando Manual d’ instalacion y uso p.51...
- Page 2 O&O S.r.l. Via Europa, 2 - 42015 Correggio (R.E.) Italy Tel. +39 0522 740111 - Fax +39 0522 631290 Internet: www.oeo.it - E-mail: oeo@oeo.it - AZIENDA CERTIFICATA UNI EN ISO 9001:2008 COMPANY WITH QUALITY SYSTEM CERTIFIED UNI EN ISO 9001:2008 Società...
-
Page 3: Table Of Contents
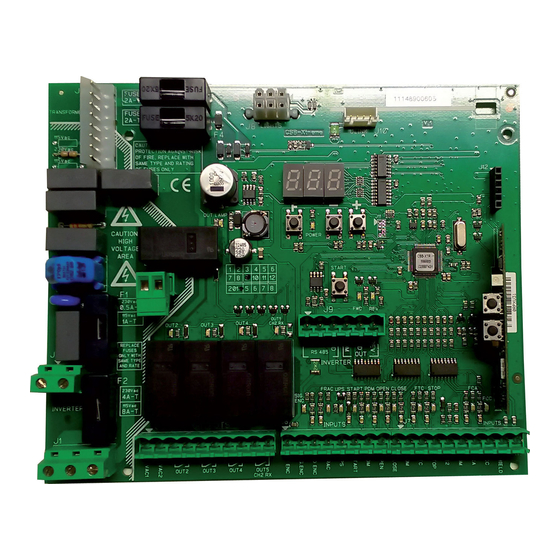
1. INTRODUZIONE 2. CARATTERISTICHE PRINCIPALI 3. CARATTERISTICHE TECNICHE 4. SICUREZZA DELL’INSTALLAZIONE 5. COLLEGAMENTI E FUNZIONALITA’ DI INGRESSI E USCITE 5.1 J1 MORSETTIERA DI POTENZA 5.2 J2 MORSETTIERA DI POTENZA 5.3 J4 MORSETTIERA ACCESSORI/USCITA 5.4 J6 MORSETTIERA INGRESSI /ANTENNA 5.5 J7 MORSETTIERA REVERSER 5.6 J10 CONNETTORE PROGRAMMATORE UNIVERSALE 6. -
Page 4: Introduzione
Istruzioni per installazione ed uso 1. INTRODUZIONE La centrale di comando CSB è stata sviluppata per gestire barriere automatiche monofase. 2. CARATTERISTICHE PRINCIPALI - Logica a microprocessore - Led che visualizzazione lo stato degli ingressi - Ricevente radio 433MHz 2 canali, 2048 codici - Connettore radio ad innesto (non montato) - Display 2 digit - Uscite confi... -
Page 5: Sicurezza Dell'installazione
4. SICUREZZA DELL’INSTALLAZIONE Affi nché si raggiunga il grado di sicurezza richiesto dalla normativa vigente, leggere attentamente le seguenti prescrizioni. 1) Realizzare tutti i collegamenti in morsettiera leggendo attentamente le indicazioni riportate in questo manuale ed osservando le norme generali e di buona tecnica che regolano l’esecuzione degli impianti elettrici. 2) Predisporre a monte dell’installazione un interruttore magnetotermico omnipolare con distanza di apertura dei contatti di min. -
Page 6: J6 Morsettiera Ingressi/Antenna
MORSETTIERA INGRESSI/ANTENNA START Ingresso N.O. che consente di comandare l'automazione secondo la logica apre, stop, chiude, apre. INGRESSO PDM Ingresso programmabile-3°liv.. E’ possibile replicare il segnale su un’uscita confi gurata in modo da avere un contatto di potenza. OPEN Ingresso N.O. di sola apertura. Mantenendo comandato questo ingresso l’automazione effettuerà... -
Page 7: Programmazione
6. PROGRAMMAZIONE 6.1 FUNZIONALITÁ DI BASE Per accedere alla programmazione premere il pulsante F per 2 secondi. La programmazione è divisa in 3 livelli. Per passare al livello successivo mantenere premuto il tasto F e agire sul tasto + (Sequenza 1-2-3-1..). Selezionato il livello desiderato, premendo il pulsante F vengono visualizzate sul display le funzioni disponibili in ordine successivo;... -
Page 8: Programmazione Di 1° Livello
6.2 PROGRAMMAZIONE DI 1° LIVELLO Nella tabella seguente vengono presentate le funzioni di 1° livello e i singoli parametri impostabili. = valore di DEFAULT impostato in azienda. = valore del parametro impostato in fase di installazione: da indicare nel caso si modifi chi il valore di DEFAULT. Funzione Valori impostabili : Uomo presente... -
Page 9: Programmazione Di 2° Livello
· : Default - Per ripristinare i parametri di default occorre impostare ad 1 il parametro ed uscire dal menu’. · :Visualizzazione stati automazione - Durante il funzionamento la centralina mostra lo stato dell’automazione in corsa in modo da consentire all’installatore di segui- re il fl... -
Page 10: Programmazione Di 3° Livello
Funzione Valori impostabili : richiesta manutenzione : intervento fotocellula : intervento reverser : contatto PDM attivato Uscita 4 : barra chiusa : barra aperta : contatto stop attivato : prelampeggio : blocco barra Uscita dalla programmazione e visualizzazione degli stati macchina (vedi ... -
Page 11: Ricevente Radio
Descrizione parametri livello 3 , , · Polarità uscita E’ possibile confi gurare le uscite come N.O. o N.C., ma in caso di blackout i contatti si apriranno comunque. : · Ingresso selezione velocità Abilitando questo parametro è possibile regolare la velocità della barriera tramite l’ingresso PDM. Se il PDM è... -
Page 12: Programmazione Modalitá Autoapprendimento
7.5 PROGRAMMAZIONE MODALITÁ AUTOAPPRENDIMENTO Questo modalità serve per eseguire una copia dei tasti di un trasmettitore già memorizzato nella ricevente senza accedere alla ricevente. Il primo trasmettitore deve essere memorizzato in modo manuale (vedi paragrafo 7.4). a) Premere il tasto nascosto del trasmettitore già memorizzato. b) Premere il tasto T del trasmettitore già... -
Page 13: Tabella A
- 13 -... -
Page 14: Entrata Controllata Ed Uscita Automatica
9. ENTRATA CONTROLLATA ED USCITA AUTOMATICA Questa soluzione è consigliata quando si desidera accedere ad un’area riservata in entrambi i sensi di marcia. In entrata il transito è consentito mediante un comando di riconoscimento, mentre l’uscita è automatica. ENTRATA Il dispositivo di riconoscimento abi- lita l’apertura della barriera. - Page 15 Contents 1. INTRODUCTION 2. MAIN CHARACTERISTICS 3. TECHNICAL SPECIFICATIONS 4. INSTALLATION SAFETY 5. INPUT AND OUTPUT FUNCTIONALITY AND CONNECTIONS 5.1 J1 POWER TERMINAL BLOCK 5.2 J2 POWER TERMINAL BLOCK 5.3 J4 OUTPUT/ACCESSORIES TERMINAL BLOCK 5.4 J6 ANTENNA/INPUTS TERMINAL BLOCK 5.5 J7 REVERSER TERMINAL BLOCK 5.6 J10 UNIVERSAL PROGRAMMER CONNECTOR 6.
-
Page 16: Introduction
Instructions for installation and use 1. INTRODUCTION The CSB control unit has been developed to control automatic single-phase barriers. 2. MAIN CHARACTERISTICS - Microprocessor logic - LEDs displaying input status - Integrated radio receiver 433Mhz 2 channels, 2048 codes - Plug-in radio connector (not installed) - 2-digit display - Confi... -
Page 17: Installation Safety
4. INSTALLATION SAFETY In order to reach the level of safety required by current regulations, read the following prescriptions carefully. 1) Make all the connections in the terminal block after carefully reading the instructions given in this manual and observing the general rules and technical standards governing electrical systems. -
Page 18: J6 Antenna/Inputs Terminal Block
ANTENNA/INPUTS TERMINAL BLOCK START N.O. input for controlling the automation according to the open, stop, close, open logic. PDM INPUT Programmable input-level 3. The signal can be repeated on an output confi gured to have a power contact OPEN N.O. input - opening only. By keeping this input controlled, the automation performs the opening manoeuvre and will close automatically only when the input is freed. -
Page 19: Programming
6. PROGRAMMING 6.1 BASIC FUNCTIONS To access programming, press button F for 2 seconds. Programming is divided into 3 levels. To go to the next level keep key F pressed and press the + key (Sequence 1-2-3-1..). After selecting the level wanted, press push button F to display the functions available in consecutive order. Each time F is pressed it corresponds to a function (... -
Page 20: 1St Level Programming
LEVEL PROGRAMMING The following table gives the 1st level functions and the single settable parameters. = DEFAULT value set in factory. = parameter value set during installation: must be indicated if DEFAULT value is modifi ed. Function Settable data : Hold-to-run Selects the functioning logic. -
Page 21: 2Nd Level Programming
· :Default - To reset the default parameters, set parameter on 1 and exit the menu’. · :Automation statuses display - During operation, the control unit displays automation status so the installer is able to follow the logical fl ow of the board. The statuses are: : Idle : Opening... -
Page 22: 3Rd Level Programming
Function Settable data : request for maintenance : photocell triggering : reverser triggering : PDM contact actuated Output 4 : arm closed : arm open : stop contact actuated : warning fl ash : Arm locking device Exit programming and view machine Statuses (see notes ... -
Page 23: Radio Receiver
Description of level 3 parameters , , · :Output polarity · Output polarity: The outputs can be confi gured as N.O. or N.C. but, in the event of a blackout the contacts open anyway. · :Velocity selection input By enabling this parameter bar speed can be adjusted via the PDM input. -
Page 24: Self-Learning Mode Programming
7.5 SELF-LEARNING MODE PROGRAMMING This mode is used to copy the keys of a transmitter already stored in the receiver memory, without acces- sing the receiver. The fi rst transmitter is to be memorised in manual mode (see paragraph 7.4). a) Press hidden key on the transmitter already memorised. - Page 25 - 25 -...
-
Page 26: Controlled Entry And Automatic Exit
9. CONTROLLED ENTRY AND AUTOMATIC EXIT This solution is recommended when you want to enter a reserved area in both directions. To enter, transit is allowed by means of a recognition command while exiting is automatic. ENTRY The recognition system enables barrier opening. - Page 27 Sommaire 1. AVANT-PROPOS 2. CARACTERISTIQUES PRINCIPALES 3. CARACTERISTIQUES TECHNIQUES 4. SECURITE DE L’INSTALLATION 5. CONNEXIONS ET DESCRIPTION DES ENTRÉES ET DES SORTIES 5.1 J1 BORNIER DE PUISSANCE 5.2 J2 BORNIER DE PUISSANCE 5.3 J4 BORNIER ACCESSOIRES/SORTIE 5.4 J6 BORNIER ENTRÉES/ANTENNE 5.5 J7 BORNIER INVERSEUR 5.6 J10 CONNECTEUR PROGRAMMATEUR UNIVERSEL 6.
-
Page 28: Avant-Propos
Mode d’emploi 1. AVANT-PROPOS La centrale de commande CSB a été développée pour le contrôle de barrières automatiques monophasées. 2. CARACTERISTIQUES PRINCIPALES - Logique à microprocesseur - Diodes qui affi chent l’état des entrées - Récepteur radio 433MHz; 2 canaux, 2048 codes - Connecteur radio enfi... -
Page 29: Securite De L'installation
4. SECURITE DE L’INSTALLATION Pour atteindre le degré de sécurité requis par la législation en vigueur, lisez attentivement et suivez les prescriptions suivantes. 1) Tous les branchements dans le bornier doivent être effectués après avoir lu attentivement les indications reportées dans ce mode d’emploi et en suivant les règles générales et de bonne technique qui règlent la réalisation des installations électriques. -
Page 30: J6 Bornier Entrées/Antenne
BORNIER ENTRÉES/ANTENNE START Entrée N.O. permettant de commander l'automation selon la logique Ouverture, Stop, Fermeture, Ouverture. ENTRÉE PDM Entrée programmable-3°niveau. Il est possible de dupliquer le signal sur une sortie confi gurée de façon à disposer d’un contact de puissance. OPEN Entrée N.O. -
Page 31: Programmation
6. PROGRAMMATION 6.1 FONCTIONS DE BASE Pour accéder à la programmation, appuyer sur le bouton F pendant 2 secondes. La programmation est subdivisée sur 3 niveaux. Pour passer au niveau suivant, maintenir enfoncée la touche F et intervenir sur la touche + (Séquence 1-2-3-1 …….). Une fois le niveau voulu sélectionné, en appuyant sur le bouton F, les fonctions disponibles s’affi... -
Page 32: Programmation De 1Er Niveau
6.2 PROGRAMMATION DE 1er NIVEAU Dans le tableau ci-dessous, fi gurent les fonctions de 1er niveau et les différents paramètres programmables. = valeur DEFAULT défi nie en usine. = valeur du paramètre défi nie en phase d’installation : à indi- quer en cas de modifi... -
Page 33: Programmation De 2Me Niveau
La présence du véhicule à hauteur du détecteur ou devant la cellule photoélectrique empêche la fermeture immédiate pui- squ’il est nécessaire d’attendre le relâchement du signal correspondant. - : La commande Fermer fonctionne comme fermeture à relâchement et sécurité. Durant la phase de fermeture, l’activation de la commande Fermer arrête l’automation. Après désactivation, la fermeture de la barriè- re est réactivée. -
Page 34: Programmation De 3Me Niveau
Fonction Valeurs programmable : demande entretien : intervention cellule photoélectrique : intervention inverseur : contact PDM activé Output 4 : barrière fermée : barrière ouverte : contact stop activé : pré-clignotement : blocage lisse Sortie de la programmation et affi chage des états de la machi- ... -
Page 35: Recepteur Radio
Description paramètres niveau 3 , , · : Polarité sortie · Polarité sortie : Il est possible de confi gurer les sorties comme N.O. ou N.C., néanmoins en cas de coupure de courant, les contacts s’ouvrent dans tous les cas. ... -
Page 36: Programmation Modalité Auto-Apprentissage
7.5 PROGRAMMATION MODALITÉ AUTO-APPRENTISSAGE Cette modalité sert à effectuer une copie des touches d’un émetteur déjà mémorisé dans le récepteur sans accéder au récepteur. Le premier émetteur doit être mémorisé en mode manuel (voir paragraphe 7.4). a) Appuyer sur la touche cachée de l’émetteur déjà mémorisé. b) Appuyer sur la touche T de l’émetteur déjà... -
Page 37: Tableau A
- 37 -... -
Page 38: Entree Controlee Et Sortie Automatique
9. ENTREE CONTROLEE ET SORTIE AUTOMATIQUE Cette solution est conseillée lorsque l’on souhaite accéder à une aire réservée dans les deux sens de marche. En entrée, le transit est permis en activant une commande de reconnaissance, tandis que la sortie est automatique. ENTREE Le dispositif de reconnaissance va- lide l’ouverture de la barrière. - Page 39 1. EINLEITUNG 2. HAUPTEIGENSCHAFTEN 3. TECHNISCHE EIGENSCHAFTEN 4. SICHERHEIT DER INSTALLATION 5. ANSCHLUSS UND FUNKTION DER EIN- UND AUSGÄNGE 5.1 J1 LEISTUNGSKLEMMBRETT 5.2 J2 LEISTUNGSKLEMMBRETT 5.3 J4 KLEMMBRETT ZUBEHÖR/AUSGANG 5.4 J6 KLEMMBRETT EINGÄNGE /ANTENNE 5.5 J7 KLEMMBRETT REVERSER 5.6 J10 UNIVERSAL- PROGRAMMIERANSCHLUSS 6.
-
Page 40: Einleitung
Installations- und Bedienungsanleitungen 1. EINLEITUNG Die Steuerzentrale CSB wurde für die Steuerung automatischer Einphasenschranken entwickelt. 2. HAUPTEIGENSCHAFTEN - Mikroprozessorgesteuerte Logik - Led zur Anzeige des Status der Eingänge - Steckfunkempfänger 433MHz 2 Kanäle, 2048 codes - Radiosteckanschluss (nicht montiert) - Display 2 digit - Konfi... -
Page 41: Sicherheit Der Installation
4. SICHERHEIT DER INSTALLATION Die nachstehenden Vorschriften sind aufmerksam zu lesen, damit der gesetzlich vorgeschriebene Schutzgrad erhalten wird. Alle Anschlüsse am Klemmenbrett sind unter Beachtung der in dem vorliegenden Handbuch enthaltenen Anleitungen und unter Anwendung der für die kunstgerechte Ausführung von elektrischen Anlagen erforderlichen Techniken zu realisieren. Oberhalb der Installation ist ein mehrpoliger thermomagnetischer Schutzschalter mit einem Öffnungsabstand der Kontakte von mindestens 3 mm zu installieren. -
Page 42: J6 Klemmbrett Eingänge/Antenne
KLEMMBRETT EINGÄNGE/ANTENNE START Eingang N.O., der die Steuerung der Automatisierung gemäß der Logik Öffnen- Stop-Schließen-Öffnen ermöglicht. EINGANG PDM Programmierbarer Eingang-3. Ebene. Es besteht die Möglichkeit das Signal in einem konfi gurierten Ausgang zu wiederholen, damit ein Leistungskontakt vorliegt. OPEN N.O.-Eingang nur Öffnen. Bei der Steuerung dieses Eingangs führt die Automation das Öffnungsmanöver und eventuell auch das automatische Schließen durch, sobald der Eingang frei ist. -
Page 43: Programmierung
6. PROGRAMMIERUNG 6.1 BASISBETRIEB Für den Zugang zur Programmierung die Taste F 2 Sekunden lang drücken. Die Programmierung ist in 3 Stufen unterteilt. Für den Übergang zur nächsten Stufe die Taste F gedrückt halten und die Taste + betätigen (Sequenz 1-2-3-1 ……) Nach Wahl der gewünschten Stufe werden nach Drücken der Taste F auf dem Display die verfügbaren Funktionen der Reihenfolge nach angezeigt;... -
Page 44: Programmierung 1. Stufe
6.2 PROGRAMMIERUNG 1. STUFE In der nachfolgenden Tabelle sind die Funktionen der 1. Stufe und die einzelnen einstellbaren Parameter aufgeführt. = im Werk eingestellter STANDARD-Wert. = bei der Installation eingestellter Parameterwert: muss an- gegeben werden, falls der STANDARD-Wert geändert wird. Aufgabe Einstellbare Parameter : Person anwesend... -
Page 45: Programmierung 2. Stufe
- : Der Steuerbefehl Schließen funktioniert als Verschließen beim Loslassen und als Sicherheit. Während des Schließvorgangs hält das Ansprechen des Steuerbefehls die Automation an. Bei der Freigabe setzt die Schran- ke den Schließvorgang fort. · : Default - Um die Default-Parameter widerherzustellen den Parameter auf 1 einstellen und das Menü verlassen. ... -
Page 46: Programmierung 3. Stufe
Aufgabe Einstellbare Parameter : Wartungsanforderung : Eingriff Photozelle : Eingriff reverser : PDM-Kontakt aktiviert Output 4 : Schranke geschlossen : Schranke geöffnet : Kontakt–Stop aktiviert : Vorblinklicht : Schrankensperre Verlassen der Programmierung und Anzeige der Maschinenzustände Menü... -
Page 47: Steckfunkempfänger
Beschreibung der Parameter Stufe 3 , , · : Polarität Ausgang: Die Ausgänge können als NA oder NC konfi guriert werden; sie öffnen sich jedoch in jedem Fall bei Blackout. · : Eingang Geschwindigkeitswahl Durch Freischalten dieses Parameters kann die Schrankengeschwindigkeit mittels des PDM-Eingangs reguliert werden. Wenn PDM aktiviert und der Parameter freigeschaltet ist, bewegt sich die Schranke sowohl beim Öffnen als beim Schließen mit einer 60% der Höchstgeschwindigkeit entsprechenden Geschwindigkeit. -
Page 48: Selbsterlernung Programmierung
7.5 SELBSTERLERNUNG PROGRAMMIERUNG Auf diese Art wird im Empfänger die Tastenkopie eines bereits gespeicherten Senders erstellt, ohne dabei auf das im Kasten abgeschlossene Empfangsteil zugreifen zu müssen. Der erste Handsender muß von Hand gespeichert werden (siehe Abschnitt 7.4). a) Den Geheimcode des bereits gespeicherten Handsenders erneut übertragen. b) Die gewünschte Taste T des bereits gespeicherten Handsenders drücken, die dem neuen Handsender zugeordnet werden soll. -
Page 49: Tabelle A
- 49 -... -
Page 50: Kontrollierte Einfahrt Und Automatische Ausfahrt
9. KONTROLLIERTE EINFAHRT UND AUTOMATISCHE AUSFAHRT Diese Lösung wird empfohlen, wenn die Zufahrt zu einem reservierten Bereich oder das Verlassen desselben, d.h. Einfahrt oder Au- sfahrt, ermöglicht werden soll. Die Einfahrt wird durch ein Erkennungssignal zugelassen, während die Ausfahrt automatisch erfolgt. EINFAHRT Die Erkennungsvorrichtung gibt das Öffnen der Schranke frei. - Page 51 1. INTRODUCCIÓN 2. CARACTERÍSTICAS PRINCIPALES 3. CARACTERÍSTICAS TÉCNICAS 4. SEGURIDAD DE LA INSTALACIÓN 5. CONEXIONES Y FUNCIONES DE ENTRADAS Y SALIDAS 5.1 J1 BORNERO DE POTENCIA 5.2 J2 BORNERO DE POTENCIA 5.3 J4 BORNERO ACCESORIOS/SALIDA 5.4 J6 BORNERO ENTRADAS/ANTENA 5.5 J7 BORNERO REVERSER 5.6 J10 CONECTOR PROGRAMADOR UNIVERSAL 6.
-
Page 52: Introducción
Instrucciones para instalación y uso 1. INTRODUCCIÓN La central de control CSB ha sido desarrollada para gestionar barreras automáticas monofásicas 2. CARACTERÍSTICAS PRINCIPALES - Lógica de control por microprocesador - Pilotos que muestran el estado de las entradas - Receptora radio 433MHz; 2 canales, 2048 códigos - Conector radio enchufable (no montado) - Display 2 dígitos - Salidas confi... -
Page 53: Seguridad De La Instalación
4. SEGURIDAD DE LA INSTALACIÓN Para que se alcance el grado de seguridad requerido por la normativa vigente, lean atentamente las siguientes prescripciones. 1) Realicen todas las conexiones en el tablero de bornes leyendo atentamente las indicaciones incluidas en este manual y respetando las normas generales y de buena técnica que regulan la ejecución de las instalaciones eléctricas. -
Page 54: J6 Bornero Entradas/Antena
BORNERO ENTRADAS/ANTENA START Entrada N.O. que permite mandar la automatización según la lógica abre, stop, cierra, abre. ENTRADA PDM Entrada programable-3er nivel. Es posible replicar la señal en una salida confi gurada a fi n de tener un contacto de potencia OPEN Entrada N.O. -
Page 55: Programación
6. PROGRAMACIÓN 6.1 FUNCIONALIDADES BÁSICAS Para acceder a la programación apretar el botón F por 2 segundos. La programación está dividida en 3 niveles. Para pasar al nivel siguiente mantener apretado el botón F y actuar sobre el botón + (Secuencia 1-2-3-1..). Seleccionado el nivel que se desea, al apretar el botón F en el display se muestran las funciones disponibles por orden sucesivo;... -
Page 56: Programación De 1° Nivel
6.2 PROGRAMACIÓN DE 1° NIVEL En el cuadro siguiente se presentan las funciones de 1° nivel y los parámetros individuales confi gurables. = valor por DEFECTO confi gurado en fábrica. = valor del parámetro confi gurado en la fase de instalación: se debe indicar en caso de que se modifi... -
Page 57: Programación De 2° Nivel
· : default - Para restablecer los parámetros por defecto hay que confi gurar en 1 el parámetro y salir del menú. · : Visualización estados automatización - Durante el funcionamiento la centralita muestra el estado de la automatización en curso para permitir al instalador seguir el fl... -
Page 58: Programación De 3° Nivel
Función Rango de valores a establecer : solicitud de mantenimiento : actuación fotocélula : actuación reverser : contacto PDM activado Output 4 : barra cerrada : barra abierta : contacto stop activado : parpadeo previo : bloqueo barra Salida de la programación y visualización de los estados de máqui- ... -
Page 59: Receptora Radio
Descripción parámetros nivel 3 , , · : Polaridad salida: Es posible confi gurar las salidas como N.O. o N.C., pero en caso de apagón los contactos se abrirán de todas maneras · : Entrada selección velocidad Habilitando este parámetro se puede ajustar la velocidad de la barrera por medio de la entrada PDM. Si la PDM está... -
Page 60: Programacion Modalidad De Autoaprendizaje
7.5 PROGRAMACION MODALIDAD DE AUTOAPRENDIZAJE Esta modalidad sirve para efectuar una copia de las teclas de un transmisor ya memorizado en el receptor sin acceder a éste último. El primer transmisor debe memorizarse de forma manual (véase el apartado 7.4). Hay que realizar lo siguiente: a) Presionar la tecla oculta del transmisor ya memorizado. -
Page 61: Tabla A
- 61 -... -
Page 62: Entrada Controlada Y Salida Automática
9. ENTRADA CONTROLADA Y SALIDA AUTOMÁTICA Esta solución se aconseja cuando se desea acceder a un área reservada en ambas direcciones de marcha. En entrada el tránsito se permite mediante un mando de reconocimiento, mientras que la salida es automática. ENTRADA El dispositivo de reconocimiento habilita la apertura de la barrera. - Page 63 NOTE • NOTES • REMARQUES ANMERKUNGEN • NOTAS - 63 -...
- Page 64 INSTALLATORE INSTALLER INSTALLATEUR INSTALLATEUR INSTALATOR O&O s.r.l. - Via Europa, 2 - 42015 CORREGGIO (R.E.) Italy tel. +39 (0)522 740111 - fax +39 (0)522 631290 http://www.oeo.it - email: oeo@oeo.it Società soggetta ad attività di direzione e coordinamento di BFT S.p.A. Company subject to management and coordination activities by BFT S.p.A.
Need help?
Do you have a question about the CSB-XT and is the answer not in the manual?
Questions and answers