Advertisement
Test Equipment Depot - 800.517.8431 - 99 Washington Street Melrose, MA 02176 - TestEquipmentDepot.com
TRISTAND
460-6/460-12/40-A Instructions
Read these instructions and the warnings and instruc-
tions for all equipment being used before using
RIDGID
®
stands to reduce the risk of serious person-
al injury.
• Always wear eye protection to reduce the risk of eye
injury.
• Support pipe with pipe stands. Failure to properly sup-
port the pipe can cause vise tipping, falling pipe, chain
breakage and serious injury.
Use of equipment for both carbon and stainless
NOTICE
steel pipe can lead to contamination of the stainless steel
material. This contamination could cause corrosion and pre-
mature pipe failure. To prevent ferrous contamination of stain-
less steel pipe, use dedicated equipment. Alternately, a stain-
less steel wire brush may be used to thoroughly clean the
equipment when switching between materials.
Description
RIDGID
®
TRISTAND
®
pipe with either a chain or yoke vise. All are equipped with tool
hangers and a tray for equipment storage during use, pipe ben-
ders for bending and adjusting pipe, and a jackscrew to help
stabilize the vise. The TRISTAND pipe vises easily fold for stor-
age and transportation and allow adjustment of stand stiffness.
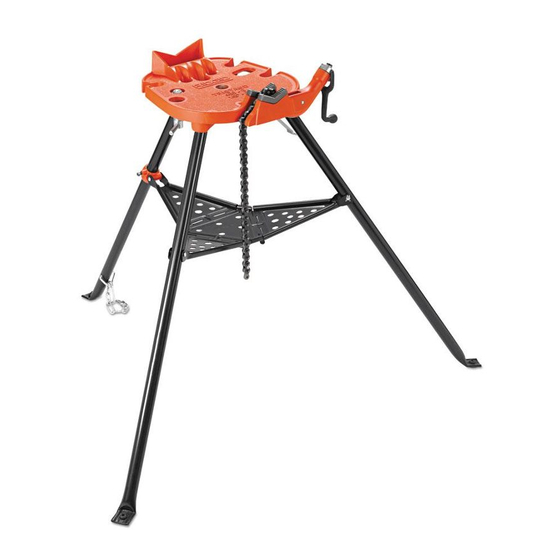
460-6
Figure 1 – RIDGID TRISTAND Pipe Vises
40-A TRISTAND Yoke Vise
460-6 TRISTAND Chain Vise
460-12 TRISTAND Chain Vise
Printed in U.S.A.
EC37400
®
Pipe Vise Instruction Sheet
WARNING
Pipe Vises are used to hold and work
460-12
40-A
Pipe Size
Capacity:
Capacity
1/8" to 2
1
/
"
2
1/8" to 6"
1/8" to 12"
1500 lbs
Assembly
The yoke for the 40-A can be assembled to the base to open
to either side. Attach with supplied bolt and nut.
Inspection/Maintenance
TRISTAND Pipe Vises should be inspected before each use for
wear or damage that could affect the safe use of the vise.
Clean the vise to aid inspection and help prevent handles, etc.
from slipping from your grip. Make sure the vise is complete
and properly assembled. Clean the teeth of the jaw with a wire
brush to remove dirt. Replace jaw if teeth are worn to prevent
pipe slippage. Inspect chain for any separation of links or
other damage. Link separation indicates the chain has been
overloaded and should be replaced. If any problems are
found, do not use the vise until the problems are corrected.
Lubricate all moving parts/joints as needed with a light lubricant
oil and wipe any excess oil from the stand.
TRISTAND Pipe Vise Set Up
and Operatio n
1. Locate a clean, level, stable location to set up the vise.
2. Place vise stand with feet on floor and open legs. Care -
fully push down on the center of the tray and lock into
position. Keep fingers and hands away from pinch points
to prevent injury.
3. A properly adjusted stand in good condition should sit
solidly with no significant looseness. To adjust:
a. Remove all objects (pipe, tools, etc.) from stand.
Care fully push up on the tray to unlock. Stay clear of
moving legs.
Jack Screw
Stand Stiffness
Decrease
Jack
Handle
Figure 2 – Adjusting Tray Support (460-12)
b. Loosen the set screw on the rear tray support.
c. Move the rear tray support towards the vise to in -
crease stiffness, and away from the vise to decrease
stiffness.
d. Firmly tighten the set screw on the rear tray support.
Repeat above steps until properly adjusted. On worn
out stands, adjustment may not be possible.
4. The stand can be anchored for greater stability.
Jackscrew – Cut a length of 1" sch. 40 steel pipe to fit
between the jackscrew and a suitable overhead sup-
port (such as a structural beam or concrete floor). Firmly
tighten the jackscrew to hold the vise in place. As larger
loads are placed on the vise, the jackscrew may require
further tightening.
Anchoring the feet – Holes are provided in the leg feet to
Weight
fasten the stand to the floor. Always use this method
when using the stands with geared threaders and for
N/A
large, heavy pipe to prevent tipping.
N/A
5. Place pipe into vise. Tighten the vise to hold the pipe in
place. Do not drop the pipe on the vise or use handle ex -
RIDGID
®
6/11
Increase
Set Screw
Weld Ground
Connection
999-998-462.10
REV. A
Advertisement
Table of Contents

Related Manuals for RIDGID TRISTAND 460-6


Summary of Contents for RIDGID TRISTAND 460-6
- Page 1 As larger loads are placed on the vise, the jackscrew may require further tightening. Figure 1 – RIDGID TRISTAND Pipe Vises Anchoring the feet – Holes are provided in the leg feet to Pipe Size Weight fasten the stand to the floor.
- Page 2 tensions when tightening the vise, this can damage the vise. Make sure the pipe and stand are stable for the work to be done. For best stability during use, keep the pipe end as close to the vise as possible. Use appropriate pipe sup- ports if the pipe extends past the base of the stand.
Need help?
Do you have a question about the TRISTAND 460-6 and is the answer not in the manual?
Questions and answers