Table of Contents
Advertisement
Advertisement
Table of Contents

Related Manuals for Zopu SL122M

Summary of Contents for Zopu SL122M
- Page 1 Zopu Trail Camera Model: SL122M INSTRUCTION MANUAL V3.2...
- Page 2 Congratulations on your purchase of one of the best trail cameras on the market! We appreciate your business and want to earn your trust. Please refer to the notes below and the instructions in this manual to ensure that you are completely satisfied with this product.
-
Page 3: Table Of Contents
TABLE OF CONTENT 1. IMPORTANT NOTE ............1 2. INTRODUCTION ............2 2.1. ABOUT THE CAMERA ........2 2.2. APPLICATIONS ..........3 3. PARTS AND CONTROLS ..........3 4. INSTALLING THE BATTERIES AND SD CARD ..6 4.1. LOADING BATTERIES ........6 4.2. -
Page 4: Important Note
1. IMPORTANT NOTE Require eight (8) 1.5V AA Alkaline or Lithium batteries (not included). We recommend the use of Energizer AA Lithium batteries in this camera to obtain maximum battery life. Do not mix old and new batteries. Do not mix battery type. Rechargeable AA batteries are NOT recommended as the lower voltage they produce can cause operational issues. -
Page 5: Introduction
2. INTRODUCTION 2.1. ABOUT THE CAMERA The camera is a digital scouting camera, it can be triggered by any movement of game in a location, detected by a highly sensitive Passive Infra-Red (PIR) motion sensor, and then take high quality pictures (up to 20MP still photos), or video clips with sound. -
Page 6: Applications
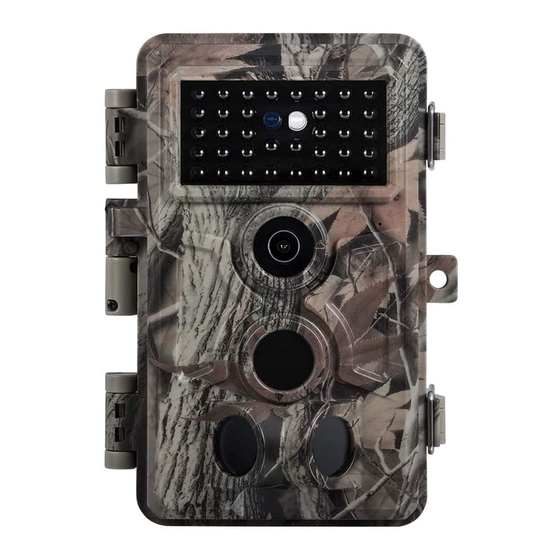
Easy to use/program with unique well-designed keypad and built-in 2.4-inch LCD color screen, easy to review pictures and videos on the screen 3 optional live working modes - Camera only, Video Only, Camera + Video Fast trigger time approx. 0.2~0.6 second, Long trigger ... - Page 7 in front view (Figure 1). Indicators IR LEDs Lens Lock Hole Center PIR Motion Sensor Side PIR Side PIR Motion Sensor Motion Sensor Figure 1: Front View The camera provides the following connections for external devices: Mini USB port and regular SD card Holder (Figure 2). Tripod Base SD Card 1/4"...
- Page 8 Lock Strap Hole Buckle Figure 3: Back View The camera has a 2.4inch built-in LCD color screen, which can be used for reviewing pictures or videos and menu displaying, and unique keypad design for easy program and operation, 8 AA batteries compartment supported (Figure 4).
-
Page 9: Installing The Batteries And Sd Card
A 3-way power switch is used to select the main operating modes: OFF, ON, and SET (Figure 5). A control key interface with six keys is primarily used in SET mode to select operational functions and parameters. As shown in Figure.5, these keys are: UP, DOWN, LEFT, RIGHT, OK and MENU. -
Page 10: Inserting The Sd Card
also be used, but they might have a shorter life span due to their reduced efficiency over time and at low temperature. On SET mode when battery power level gets low, the message "Low Battery" will show on the screen, please replace the batteries. -
Page 11: Using The Camera
Figure 7: Inserting the SD Card Please make sure that the write-protect switch on the side of the card is "OFF" (NOT in the "Lock" position). The following describes how to insert and remove the SD card: Insert the SD card into the card slot with its label side ... -
Page 12: The Off, On, And Set Modes
to a tree (or not-according to your application scenario), switch it ON and leave-and you might get some great photos that are exactly what you wanted. However, we highly recommend that you first spend some additional time indoors with this manual and your camera until you know a bit more about what the 3-way switch and those control keys do. -
Page 13: Set Mode
the middle position, the camera will enter into the ON (Live) mode. The motion indicator LED will blink blue for about 15 seconds. This interval allows time for you to close the camera's front cover, lock it, and leave the monitored area. Once in the ON mode, no manual controls are needed or possible (the control keys have no effect). -
Page 14: Advanced Settings
As mentioned earlier in "Parts & Controls", the keypads have secondary, "shortcut" functions when the camera is switched to SET mode (but the key has not been pressed): Press the UP key to quickly set the camera to shoot video ... - Page 15 key to change the setting, and press the OK key to confirm the change. Always remember to press the OK to save the change. Otherwise you will lose your new setting. Settings Parameter (Bold = Description default) Select whether still photos or video Camera, clips are taken.
- Page 16 only) the batteries. Select the shortest length of time that the camera will wait until it responds to any subsequent triggers from the PIR sensor after a game is first 10 seconds, detected. During the selected interval, optional the camera will not take Interval from 0s to pictures/videos.
- Page 17 parameter settings accordingly. dd/mm/yyyy Date Select date format which will be yyyy/mm/dd Format shown on the screen and each capture. mm/dd/yyyy Select time format which will be Time shown on the screen and each capture. Format 12h - AM/PM Select Date/Time if you want the date &...
- Page 18 enable taking more pictures, and can consume more battery power and then reduce battery life. Password Set up a password to protect your camera from unauthorized users. Select On to assign a serial number to each camera you have. You can use the combination of 4 digits to record the Serial No.
-
Page 19: Mounting And Positioning The Camera
files on the SD card have been backed up first! Press OK to return all your previous Default settings back to the manufacturer Setting default. Version Defined Display the version of the camera. POSITIONING 8. MOUNTING AND THE CAMERA 8.1. MOUNTING After you've set up the camera's parameters to your personal preferences at home or in your trunk, you're ready to take it... -
Page 20: Sensing Angle And Distance Test
same time. Using the tripod socket: The camera is equipped with a socket at the bottom end to enable mounting on a tripod or other mounting accessories with a standard UNC 1/4-20 thread screw (user supplied). Figure 8: Mounting the Camera 8.2. -
Page 21: Switching On The Camera
detects motions. In these sensing test, no pictures are taken. The results of your testing will help you find the best placement when mounting and aiming the camera. The height away from the ground for placing the device should vary with the animal size appropriately. -
Page 22: Review Photos Or Videos
write-protection (lock) switch off? Is the Power switch in the ON position? (Do not leave it in SET). 9. REVIEW PHOTOS OR VIDEOS After you have setup, mounted and activated your CAMERA, you will of course be eager to return later and review the images it has captured for you. - Page 23 4. Make sure that you are using a good quality SD card in your camera. We recommend SD/SDHC Class10 brand memory card (up to 32GB), such as SanDisk, Toshiba, Samsung, etc. 5. IMPORTANT: If you have used an SD card in another device before inserting it in your camera, you might want to try formatting the card using the "Format"...
- Page 24 2. Move the power switch to “SET” position. 3. The camera turns on and password cleared. (Notes: the camera would be reset to default settings.) Q: Is it okay to use rechargeable NiMH batteries or lithium batteries? Yes. Lithium batteries are better used in cold weather. We recommend using new eight 1.5V Lithium AA batteries (Energizer brand) to get maximum batteries lifetime.
- Page 25 flash range, no closer than 10'(3m) from the camera. Subjects may appear too light at closer distances. b. Adjust the camera installation position to make sure the orientation of the camera view angle is as parallel as possible to the ground. c.
- Page 26 placing the camera in an environment where there is motion associated with tree branches creating motion in front of the camera or an area where there is high heat in the foreground and any motion from wind could set off the camera. Setting a camera up over water is also a potential cause for this issue.
- Page 27 Our experience indicates sometimes SD card might be in damaged or unstable condition, please replace SD card and try again. Or using SD card reader or computer slot, try to access it and check if the SD card does work. Q: Photos Do Not Capture Subject of Interest 1.
-
Page 28: Technical Specifications
11. TECHNICAL SPECIFICATIONS Element Description Max. Pixel Size 5200 x 3900 Lens F=1.8; FOV=90°; Auto IR-Cut IR Flash 65ft/20m with 38pcs 940nm IR LEDs LCD Screen 2.4" color screen Keypad 6 Keys, 1 Power-Switch SD or SDHC Memory Card Memory (Maximum capacity 32GB, NOT INCLUDED) Picture Size 20MP;... - Page 29 Time Stamp On /Off Timer On /Off; Timer Set Password 4-Digit Numbers Device Serial 4-Digit Numbers Time Lapse 1 Second ~ 24 Hours English/Chinese/French/Deutsch/Spanish/Portug Language uese/Japanese/Russian/Italian Power Supply 8 x AA 1.5V Batteries (NOT INCLUDED) Stand-by 0.15mA Current Stand-by Time 6 Months (8 x AA 1.5V Batteries) Auto Power Auto power off in 5 minutes while no keypad...
-
Page 30: Warranty
12. WARRANTY ONE YEAR LIMITED WARRANTY Your trail camera warranty covers your trail camera for one year after the original purchase date. We warrant that your camera will be free from defects in materials and workmanship when operated in normal use and conditions. This warranty does not cover consumer caused damages such as misuse, abuse, improper handling or installation, damaged caused by wild animals, or repairs attempted by someone other than our... -
Page 31: Fcc Compliance Statement
13. FCC COMPLIANCE STATEMENT This equipment has been tested and found to comply with the limits for a Class B digital device, pursuant to part 15 of the FCC Rules. These limits are designed to provide reasonable protection against harmful interference in a residential installation.
Need help?
Do you have a question about the SL122M and is the answer not in the manual?
Questions and answers