
Related Manuals for Bilberry Stoves 5kW Stove


Summary of Contents for Bilberry Stoves 5kW Stove
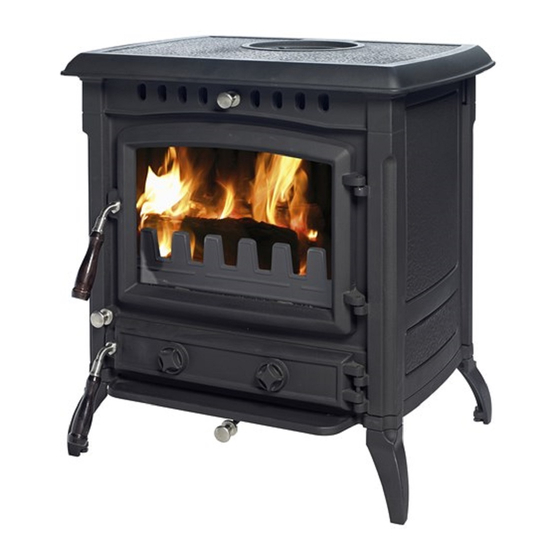
- Page 1 BILBERRY STOVES 5kW / 8kW / 10kW 10kW Installation & Operating Instructions...
-
Page 2: Table Of Contents
Clearance to Combustibles - 5kW Stove ........ -
Page 3: Installation Instructions
Installation of a stove must be done according to local codes and regulations. National and European standards must be observed when installing this product. Please read the Installation & Operation manual enclosed with this product before use. TECHNICAL DATA 5kW Stove 8kW Stove 10kW Stove Material:... -
Page 4: Clearance To Combustibles - 10Kw Stove
CLEARANCES TO COMBUSTIBLES - 10kW STOVE Combustible wall Non Combustible wall... -
Page 5: Clearance To Combustibles - 8Kw Stove
CLEARANCES TO COMBUSTIBLES - 8kW STOVE... -
Page 6: Clearance To Combustibles - 5Kw Stove
CLEARANCES TO COMBUSTIBLES - 5kW STOVE... -
Page 7: Stove Dimensions
STOVE DIMENSIONS Bilberry 10kW Bilberry 8kW Bilberry 5kW Note: Dimensions stated are in millimetres unless otherwise stated and may be subject to a slight +/- variation. -
Page 8: Mantle Clearances
MANTLE CLEARANCES Fig.2 Fig.1 Fig.3 The minimum mantle clearance to combustibles required are:- 5kW - 550mm to the top 500mm to the sides 8kW - 550mm to the top 500mm to the sides 10kW - 550mm to the top 550mm to the sides 10kW CEILING PROTECTION There must be a minimum distance of 1200mm to a combustible ceiling above the fireplace. -
Page 9: Flues
FLUES Flues should be vertical wherever possible and where a bend is necessary, it should not make an angle of more than 45 with the vertical. Horizontal flue runs should be avoided except in the case of a back outlet from the appliance, when the length of the horizontal section should not exceed 150mm. -
Page 10: Connecting To A Steel Chimney
Flue pipes with spigot and socket joints should be fitted with the socket uppermost and all joints should be sealed with fire cement. Clearance to combustibles must be adhered to when fitting the flue pipe. The flue outlet spigot for this appliance is inside the burn chamber during transportation. You can choose between top or rear outlet from the flue pipe. -
Page 11: Draught Conditions
DRAUGHT CONDITIONS If smoke spillage occurs when the firedoor is opened, it is probably due to poor chimney draught. This type of stove requires at least 0.06” w.g. of chimney draught to achieve satisfactory combustion and smoke spillage prevention. However, in cases where the stove door is opened too vigorously you could expect that slight smoke spillage may occur. -
Page 12: Use With Wood
USE WITH WOOD Lighting: * Slide the top air control to open and open the spin valve. * Lay firelighters or rolled up newspapers on the grate with a reasonable quantity, if necessary, of dry kindling, place 2 or 3 small logs on top. * Light the newspaper or firelighters using a long taper and close the door. -
Page 13: Disposal Of Ashes
Fig 7 Close Open Air Regulation * If the stove is lit using wet wood, a lot of the fuel’s thermal energy will be spent forcing the water out of the wood, without releasing any heat to the stove. This incomplete combustion results in a layer of soot being left in the stove, pipe and chimney. -
Page 14: Safety Notes
SAFETY NOTES Clean the flue-ways of the stove every week and ensure that there are no blockages. Please refer to manual for instructions. Never allow a build up of ashes in the ash pan, as this will cause the grate to burn out prematurely. -
Page 15: Maintenance
MAINTENANCE Cleaning The Glass: This product is equipped with an air wash for the glass. Air is sucked in through the air vent above the door and down along the inside of the glass. However, some soot will always stick to the glass, but the quantity will depend on the draught conditions and adjustment of the air wash vent. -
Page 16: Trouble Shooting
TROUBLE SHOOTING PROBLEM POSSIBLE CAUSE ACTION Fire difficult to start - Unseasoned wood, too damp or Use recommended fuel only. poor quality. Logs too big To light fire use small, very dry twigs. To maintain fire use split logs. Fire Goes Out Air Starvation Open lower spin wheel and top air control lever. -
Page 17: Exploded View 10Kw
10kW EXPLODED VIEW BASE SM08601WF 22. LEG SM08623 SM08602WF 23. ASHPAN LIFTER CA0105 FRONT SM08603 24. BACK AIR DAMPER CA0904 BACK SM08604 25. SPIN VALVE CAF0145 LH SIDE PANEL SM08605WF 26. SPIGOT I150 RH SIDEPANEL SM08606WF 27. BLANKING PLATE C150 FIRE DOOR SM08607 28. -
Page 18: Exploded View 8Kw
8kW EXPLODED VIEW BASE SM08101 19. ASHPAN LIFTER CA0105 20. BACK AIR DAMPER CA0903 SM08102 FRONT SM08103 21. SPIGOT I125 BACK SM08104 22. BLANKING PLATE C125 RH & LH SIDE PANEL SM08105 23. BLANKING PLATE LOCKING BAR C125Y FIRE DOOR SM08106 24. -
Page 19: Exploded View 5Kw
5kW EXPLODED VIEW 22. SPIGOT I125 BASE SM08201WF 23. FLUE COVER BLANKING PLATE C125 SM08202WF 24. BLANKING PLATE LOCKING BAR C125Y FRONT SM08203 25. DOOR HANDLE AXLE CA0101 BACK SM08204 26. WOODEN HANDLE CA0102 LH SIDE PANEL SM08205WF 27. PULL ROD KNOB CA0104 RH SIDE PANEL SM08206WF... -
Page 20: Sales & Service
SALES & SERVICE There are two Sales & Service Agents located in Ireland, please see map for Sales / Service Agent in your area. Contact Details: Noel Gallagher - 087-8327826 PJ O’Connor - 087-9050860 BILBERRY STOVES Made In China...
Need help?
Do you have a question about the 5kW Stove and is the answer not in the manual?
Questions and answers