Table of Contents
Advertisement
User's Manual
Model No. : MR-250
MSIP-REM-ESO-MR-250
Design and accessories can be changed without prior notice to improve the quality of product.
We appreciate your purchasing of this product.
* Please read the manual before use, understand all functions, and use it.
* Please write purchasing date and purchasing place, etc. in warranty card and keep it.
* Without warranty card, free after-sale service is not possible.
P/No:6311-250-01B
Advertisement
Table of Contents

Subscribe to Our Youtube Channel
Related Manuals for Esonic memoQ MR-250


Summary of Contents for Esonic memoQ MR-250
- Page 1 User's Manual Model No. : MR-250 MSIP-REM-ESO-MR-250 Design and accessories can be changed without prior notice to improve the quality of product. We appreciate your purchasing of this product. * Please read the manual before use, understand all functions, and use it. * Please write purchasing date and purchasing place, etc.
-
Page 2: Table Of Contents
>> Contents << 1. Caution for safety ..............3 2. Name of each part ..............4 3. Composition ................4 4. LCD explanation ..............5 5. Preparation before use ............5 6. Power on/off ................6 7. Using external power ............6 8. -
Page 3: Caution For Safety
1. Caution for safety * This manual is about contents for user's safety and for the prevention of property loss and be sure to read it before use and to keep for safety. * We are not responsible for the damage caused by the use of this product and for the third party's claim for compensation. -
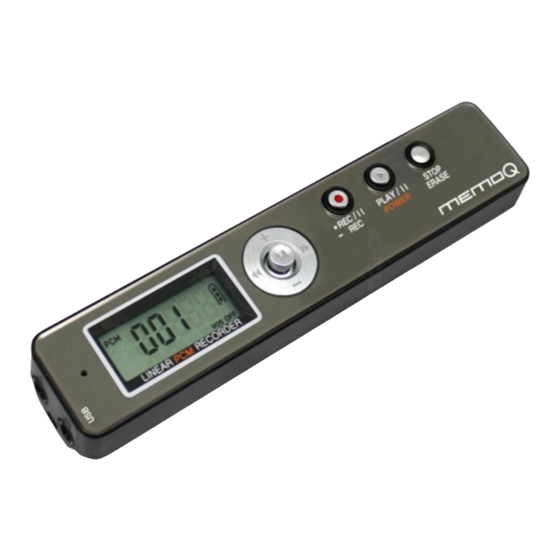
Page 4: Name Of Each Part
2. Name of each part ③ ④ ⑤ ⑥ ⑦ ..REC / II PLAY / II STOP POWER ERASE ⑧ ⑨ ④Jog button details ① Mic terminal ⑤ Record/Pause ② Earphone/USB terminal ⑥ Play/Pause - Power ③ LCD ⑦ Stop - Erase ④... -
Page 5: Lcd Explanation
4. LCD explanation ② ③ ① ④ ① Voice recording mode/play mode ② Music play mode ③ Time and file no. mark ④ Battery remains mark ⑤ Recording mark ⑨ ⑥ Play mark ⑦ Erase mark ⑧ Voice operated recording system mark ⑤... -
Page 6: Power On/Off
6. Power on/off ■ Turning on power ● When you press and hold the button of play more than 3 seconds, power is turned on. ● When you press and hold the button of record more than 3 seconds, power is turned on and recording starts right away. ■... -
Page 7: Connecting To Pc(File Copy/Save/Delete)
8. Connecting to PC (file copy/save/delete) ● Connect USB cable to the earphone/USB terminal of product and then connect it to the USB port of PC. ● You can use the function of "copy, delete, play, format' in PC in the same way as general USB memory. -
Page 8: Changing Voice/Music
10. Changing VOICE/MUSIC ● When you push and hold jog button to the direction of volume(+) more than 3 second in standby status, it is changed from VOICE mode to MUSIC mode, from MUSIC mode to VOICE mode. → ← ●... -
Page 9: Playing
12. Playing ● Select the wanted file number by pushing jog button to the direction of previous(<<), next(>>) shortly in the screen of standby. ● When you press the button of play shortly at the selected file number, the file indicated on screen is played back. <Screen indication during playback>... -
Page 10: Checking Recording Remains
15. Checking recording remains ● When you push and hold jog button to the direction of volume(-) more than 3 seconds in the screen of standby, recording remains time is calculated and indicated automatically according to the set recording sound quality. ●... -
Page 11: Setting Mode
17. Setting mode You can set recording sound quality(MODE), noise cancellation(LCF), microphone sensitivity(MIC), recording saving folder(FOLD), voice operated recording system(VOS), VOS level(VL), repeat(REP), LCD, equalizer(EQ), file deletion(CLEAN) in mode. ● When you press and hold mode button(M) more than 3 seconds in standby screen, it is moved to setting screen. ●... -
Page 12: Setting Recording Mode(Mode)
17-1. Setting recording mode(MODE) You can select recording mode among PCM , HQ (super high quality sound) (high quality sound) , LP (middle quality sound) (low quality sound) ● When you press and hold mode button(M) more than 3 seconds in standby screen, it is moved to setting screen. -
Page 13: Setting Mic Sensitivity(Mic)
17-3. Setting mic sensitivity(MIC) You can set mic sensitivity according to the distance of sound source and size of sound. ● You can move to setting screen by pressing and holding mode button(M) more than 3 seconds in standby screen. ●... -
Page 14: Setting Voice Operated Recording System(Vos)
17-5. Setting voice operated recording system(VOS) VOS is a function to record when sound more than certain size is detected and to save memory. ● You can move to setting screen by pressing and holding mode button(M) more than 3 seconds in standby screen. ●... -
Page 15: Setting Repetition(Rep)
17-7. Setting repetition(REP) You can set repetition to no repeat(NO), file(1), current folder(F). ● You can move to setting screen by pressing and holding mode button(M) more than 3 seconds in standby screen. ● You can move to REP mode by pushing jog button to the direction of volume(+), volume(-) shortly. -
Page 16: Setting Eq
17-9. Setting Equalizer(EQ) In playing back music file saved in the folder of MUSIC, it makes sound effect. ● You can move to setting screen by pressing and holding mode button(M) more than 3 seconds in standby screen. ● You can move to EQ mode by pushing jog button to the direction of volume(+), volume(-) shortly. -
Page 17: Deleting All Files/Files In Folder(Clean)
17-10. Deleting all files/files in folder(CLEAN) You can delete all data and set back to initial value or delete files in the selected folder(A,B,MUSIC) at a time. ● You can move to setting screen by pressing and holding mode button(M) more than 3 seconds in standby screen. -
Page 18: Recording By Connecting To External Device
18. Recording by connecting to external device ● It is a function to record by using external device like external mic, wired telephone, etc. ■ Recording phone call by using ear mic(option) ● After putting ear mic in ear and connecting its plug to the mic terminal of product, when you hold the receiver or cellphone to ear next to ear mic and talk, press recording button, and phone conversation is... - Page 19 MEMO...
- Page 20 - Defect caused by the infection of computer virus. - Without warranty card or purchase receipt. - Defect out of warranty period. Manufacturer : ESONIC Co., Ltd Country of origin : Made in Korea Website : http://www.esonic.co.kr...
Need help?
Do you have a question about the memoQ MR-250 and is the answer not in the manual?
Questions and answers
I have a memoq MR-150 and it is not accurately capturing the date and time. I reformatted the device and now there is no file to reset the recording options or the date and time. Is there a way to download the file that let me change dates and time and recording options?