Celestron FOCUS 94155-A Setup Manual
For sct & edgehd
Hide thumbs
Also See for FOCUS 94155-A:
- Setup manual (12 pages) ,
- Setup manual (2 pages) ,
- Instruction manual (38 pages)
Table of Contents
Advertisement
Available languages
Available languages
Quick Links
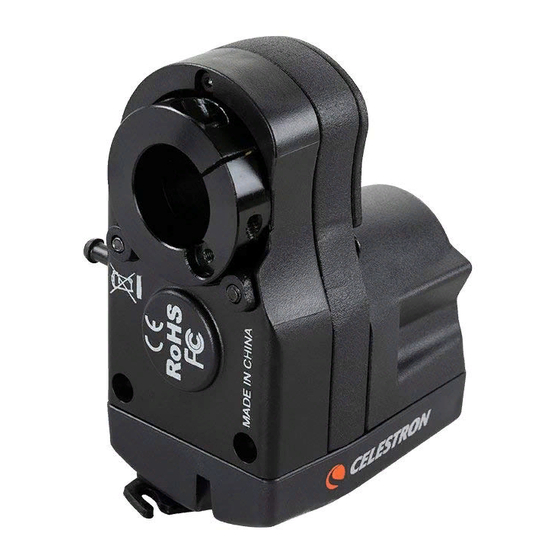
FOCUS MOTOR
For SCT & EDGEHD
#94155-A - Setup Guide
The focus motor is compatible with all Celestron SCTs from
6" to 14" in aperture that have been produced since the year
2006; it is not compatible with 5" SCTs or older models. It
is compatible with all EdgeHD telescopes. It is compatible
with the 8" and 36cm Rowe-Ackermann Schmidt Astrograph
(RASA) models, and the Celestron 7" Maksutov-Cassegrain.
The focus motor can also be used with the 11" RASA, but
requires the Focuser Retrofit Kit for the RASA 11 (#94255).
For 6" Schmidt-Cassegrain telescopes only, the Off-Axis
Guider (#93648) cannot be used when the focus motor is
installed due to mechanical interferences.
This setup guide will guide you through installation and basic
operation of the focus motor. The full instruction manual
can be downloaded from the focus motor webpage at
celestron.com. For the 36cm RASA, refer to the "Focus
Motor Installation for the RASA 36cm" instructions found on
the focus motor webpage at celestron.com.
PARTS LIST
1. Focus Motor Assembly
2. Cover Plate, 6" through 9.25" Fig.1
3. Cover Plate, 11" & 14" Fig.2
4. Adapter Sleeve
5. Adapter Sleeve Screw
6. Set Screw
7. AUX Cable
8. Hex Key
9. Wrench
10. Screwdriver
INSTALLATION
1. Remove the rubber cover from the telescope's focuser
knob. If you cannot simply pull it off, use a flat head
screwdriver or other tool to pry off the rubber cover.
2. Loosen and remove the 3x screws on the cover plate of
the focuser.
3. Carefully remove the cover plate.
4. Identify which one of the two supplied cover plates is for
your size optical tube as indicated in the parts list.
5. Orient the new orange cover plate for your size optical tube
as shown below.
6. Reuse the 3 screws previously removed to install the
new orange cover plate in place of the old one.
7. Check to see if the arrow indicator on the motor housing is
pointing within the "range" marking on the rear of the motor
coupling. If it isn't, rotate the motor coupling using the
supplied wrench as shown until the arrow points within the
range. This allows access to the motor coupling's clamping
screw after the motor is installed on the focuser.
Arrow Indicator
8. Loosen the focus motor's clamping screw a few turns
Fig.1
using the supplied hex key.
9. FOR 6" THROUGH 9.25" TELESCOPES ONLY:
Install the adapter sleeve into the focus motor. Use
the supplied adapter sleeve screw to secure the
sleeve.
Fig.2
10. FOR 6" THROUGH 9.25" TELESCOPES ONLY:
Install the set screw into the threaded hole in the focus
motor's clamping collar using the supplied hex key. Do
not tighten the set screw yet, only thread it in a few
turns.
6" and 7"
8" and 9.25"
11. Place the focus motor onto the brass focuser knob.
Orient the motor as shown below. Make sure the two
captive screws in the focus motor line up with the two
holes in the orange cover plate as shown.
11" and 14"
Range Marking
Clamping
Screw
Adapter
Sleeve
Adapter Sleeve Screw
Set Screw
Captive
Screws
Hex Key
12. Use the provided hex key to tighten the 2 captive screws.
Alternate between tightening each of the screws until
they are fully engaged with the cover plate.
13. FOR 6" THROUGH 9.25" TELESCOPES ONLY::
Tighten the set screw that was installed in step 10. If you
need to rotate the motor coupling to gain better access
to the set screw, use the wrench as indicated in step 7.
14. Tighten the focus motor's clamping screw using the hex
key until fully tightened. If you need to rotate the motor
coupling to gain better access to the clamping screw,
use the wrench as indicated in step 7.
Clamping Screw
NOTE: If the focus motor interferes with camera installation, the motor
mounting orientation can be rotated. This can be done by using the other
mounting holes in the cover plate's perimeter (step 11), or by rotating the
entire cover plate (step 5).
POWERING THE FOCUS MOTOR
There are three ways to power the focus motor:
1. Use a Celestron computerized mount. Connect the AUX
port on the focus motor to an AUX port on the mount using
the supplied cable.
2. Use a USB3 port or a USB2 port that provides at least
900 mA. Connect the focus motor with a USB A-to-B
cable (not included). Use a high quality cable, or the
motor may not receive enough power.
3. Use a DC power source able to supply at least 1A. Connect
the power source to the 12V DC jack on the focus motor
using a 5.5mm/2.1mm cable that is tip positive.
CONTROLLING THE FOCUS MOTOR WITH A
CELESTRON HAND CONTROLLER
If using a Celestron mount and plugged into an AUX port,
the focus motor can be controlled from the mount's
hand controller. Either the NexStar+ hand controller
(requires firmware version 5.30+) or the StarSense
hand controller (requires firmware version 1.19+) can
be used. If your firmware is not up to date, use the
Celestron Firmware Manager (CFM) program available at
celestron.com/CFM to update it. The link will
download the program automatically. The focus motor
controls can be found in the hand controller by pressing
the MENU button and selecting "Focuser. "
Holes in
Cover Plate
Hex
Key
Advertisement
Table of Contents

Related Manuals for Celestron FOCUS 94155-A


Summary of Contents for Celestron FOCUS 94155-A
- Page 1 5.5mm/2.1mm cable that is tip positive. CONTROLLING THE FOCUS MOTOR WITH A CELESTRON HAND CONTROLLER If using a Celestron mount and plugged into an AUX port, the focus motor can be controlled from the mount’s hand controller. Either the NexStar+ hand controller (requires firmware version 5.30+) or the StarSense...
- Page 2 Le moteur de mise au point est compatible avec tous les SCT ascom-standards.org). de Celestron d’une ouverture de 6” à 14” qui ont été produits entre 2006 et aujourd’hui. Il n’est pas compatible avec les If connected directly to a computer through the focus SCT de 5”...
- Page 3 Vis de fixation CONTRÔLE À MAIN DE CELESTRON Si vous utilisez un monture Celestron et que vous avez 0219 11. Placez le moteur de mise au point sur la molette de mise branché le dispositif à un port AUX, alors le moteur de Imprimé...
- Page 4 #94155-A Einrichtungsanleitung 8” und 9,25” Einstellschraube Der Fokussiermotor ist mit allen Celestron SCTs ab 15,2 cm (6”) bis 35,5 cm (14”) Blendenöffnung kompatibel, die seit 11. Setzen Sie den Fokussiermotor auf den Fokussierknopf dem Jahr 2006 hergestellt wurden. Er ist mit 12,7 cm (5”) aus Messing.
- Page 5 „Fokussierer“ auswählen. STEUERUNG DES FOKUSSIERMOTORS MIT EINEM Il motore di messa a fuoco è compatibile con tutti i telescopi SCT Celestron da 6” a 14” di apertura prodotti a partire COMPUTER dall’anno 2006; non è compatibile con modelli SCT da Wenn Sie eine Halterung von Celestron verwenden und 5”...
- Page 6 CONTROLLER MANUALE CELESTRON del dispositivo di messa a fuoco. Orientare il motore Se si usa un supporto Celestron e si collega una porta come mostrato di seguito. Assicurarsi che le due viti AUX, il motore per fuoco può essere controllato dal nel motore per fuco siano allineate con i due fori nella controller manuale del supporto.
- Page 7 #94155-A - Guía de instalación El motor de enfoque es compatible con todos los SCT de Celestron de 6» a 14» de apertura que se hayan fabricado desde el año 2006; no es compatible con SCT de 5» o modelos más antiguos. Es compatible con todos los telescopios EsgeHD.
- Page 8 5,5mm/2,1mm con punta positiva. CONTROLAR EL MOTOR DE ENFOQUE CON UN CONTROLADOR MANUAL CELESTRON Si usa un soporte Celestron conectado a un puerto AUX, el motor de enfoque puede controlarse con el controlador manual del soporte. Puede usar el controlador manual NexStar+ (precisa de firmware versión 5.30+) o el...
Need help?
Do you have a question about the FOCUS 94155-A and is the answer not in the manual?
Questions and answers