Table of Contents
Advertisement
Available languages
Available languages
Quick Links
F E A T U R I N G
MODELS/ MODELOS/ MODÈLES :
36HF320FGT, 48HF320FGT
Español P.23
Français P.44
www.tsicustomerservice.com
1-866-661-1218
Twin-Star International, Inc; Delray Beach, FL 33445
Made in China • Printed in China • Fabricado en China • Impreso en China • Fabriqué en China • Imprimé en Chine
www.tsicustomerservice.com
A474
1
Advertisement
Chapters
Table of Contents

Related Manuals for Bell'O ClassicFlame 48HF320FGT

Summary of Contents for Bell'O ClassicFlame 48HF320FGT
- Page 1 F E A T U R I N G MODELS/ MODELOS/ MODÈLES : 36HF320FGT, 48HF320FGT Español P.23 Français P.44 www.tsicustomerservice.com 1-866-661-1218 Twin-Star International, Inc; Delray Beach, FL 33445 Made in China • Printed in China • Fabricado en China • Impreso en China • Fabriqué en China • Imprimé en Chine www.tsicustomerservice.com A474...
-
Page 2: Table Of Contents
Table of Contents Installation ............... 8 Important Instructions ............3 Wall Mouting..............9 Warranty ................ 4 Built In Construction..........12 Getting Started .............. 5 Fuel Bed Setup Instructions........16 Pre-Assembly ..............6 Operation................17 Hardware Included ..........6 FCC/IC Information............20 Product Specifications ..........6 Care &... -
Page 3: Important Instructions
IMPORTANT INSTRUCTIONS When using electrical appliances, basic precautions should always be followed to reduce the risk of fire, electrical shock, and injury to persons including the following: 1. Read all instructions before using this appliance. 2. This appliance is hot when in use. To avoid burns, do not let bare skin touch hot surfaces. If provided, use handles when moving this appliance. -
Page 4: Warranty
1-Year Limited Warranty The manufacturer warrants that your new Electric Fireplace is free from manufacturing and material defects for a period of one year from date of purchase, subject to the following conditions and limitations. Install and operate this appliance in accordance with the installation and operating instructions furnished with the product at all times. -
Page 5: Getting Started
Getting Started 1. Remove the product identification sticker from the front of the fireplace. Product Identification Sticker 2. Attach the Product Identification Sticker to this Manual below for future reference. This information is used for product registration and also is necessary for customer service. Attach Product Identification Sticker Here 3. -
Page 6: Pre-Assembly
Pre-Assembly HARDWARE INCLUDED Part Description Part Number Quantity Quantity 36HF320 48HF320 Anchor Screw 3647HF-AA Wall Anchor 3647HF-BB Screw 4mm x 12mm (2 Pre-Attached) 3647HF-CC Screw 4mm x 6mm (3 Pre-Attached) 3647HF-DD NOTE: Hardware not shown to actual size. PRODUCT SPECIFICATIONS Voltage 120 VAC, 60 Hz Amps... -
Page 7: Package Contents
Pre-Assembly (continued) PACKAGE CONTENTS Part Description Quantity Part Number Part Number (36HF320) (48HF320) Mounting Bracket Y17-S214-MB Y17-S214-MB Upper Baffle Y17-S214-BAFFU Y17-S234-BAFFU Fireplace Y17-S214-FB Y17-S234-FB Lower Baffle Y17-S214-BAFFL Y17-S234-BAFFL Glass Panel Y17-S214-P27 Y17-S234-P27 Logset Y17-S214-P02 Y17-S234-P02 Remote Control P122 P122 Rocks Varies Y17-S214-ROCK Y17-S234-ROCK... -
Page 8: Installation
Operation Installation The fireplace can be installed with 2 options: 1. Wall hanging with provided mounting bracket. 2. Built in construction. Follow installation instructions below based on installation preference. Option 1 Wall Hanging..page 9 Option 2 Built In Construction...page 12 www.tsicustomerservice.com A474... -
Page 9: Wall Mouting
Operation Installation - Wall Hanging WALL HANGING TO THE WALL WITH PROVIDED MOUNTING BRACKET Your new electric fireplace may be installed virtually anywhere in your home. However, when choosing a location be sure to follow the general instructions included. For best results install out of direct sunlight. Power supply service must be either completed or placed within the electric fireplace prior to finishing to avoid reconstruction. - Page 10 Operation Installation - Wall Hanging Choosing a Wall Location Removing the Mounting Bracket Choose a wall location to attach the Mounting Remove the Mounting Bracket (A) from the back of the Bracket (A). Position the Mounting Bracket (A) Fireplace (C) by removing the two pre-attached Screws in the desired location.
- Page 11 Operation Installation - Wall Hanging (continued) Operation Hanging the Fireplace Attaching the Mounting Bracket Hang the Fireplace (C) on the hooks at the bottom of Attach the Mounting Bracket (A) to the wall by fastening the Mounting Bracket (A) and push the Fireplace (C) the six Anchor Screws (AA) into the wall anchors.
-
Page 12: Built In Construction
Installation - Built In Construction Operation This fireplace is a zero clearance design. No combustibles can be placed on the top surface of the fireplace. Combustibles may be installed to the edge of the unit. Insulation and vapor barrier should be placed a minimum of 2 in. from the unit. Build the framing according to the specifications shown in the below table &... - Page 13 Installation - Built In Construction Operation Fastening the Upper Baffle & Lower Baffle Use 10 Screws (DD) to fasten the Upper Baffle (B) & Lower Baffle (D) to the Fireplace (C). Steps 2 to 5 describe optional installation for removing the power cord and changing to hard wired Remove the pre-attached Screw holding the junction box cover.
- Page 14 Operation Installation - Built In Construction Loosening the Strain Relief Bracket Removing the power cord Assembly Remove the power cord and strain relief assembly. Remove the two pre-attached Screws holding the power cord strain relief bracket. Strain Relief Power Cord Assembly Connecting the Power Supply Wire Connect the power supply wire.
- Page 15 Operation Installation - Built In Construction Securing the Fireplace Installing the Fireplace Put the fireplace (C) into the wall . Drill six 1/4 in. (7 mm) holes in the wall. Insert Secure the fireplace with the 4 Screws (AA). the Wall Anchors (BB) into the holes using a hammer.
-
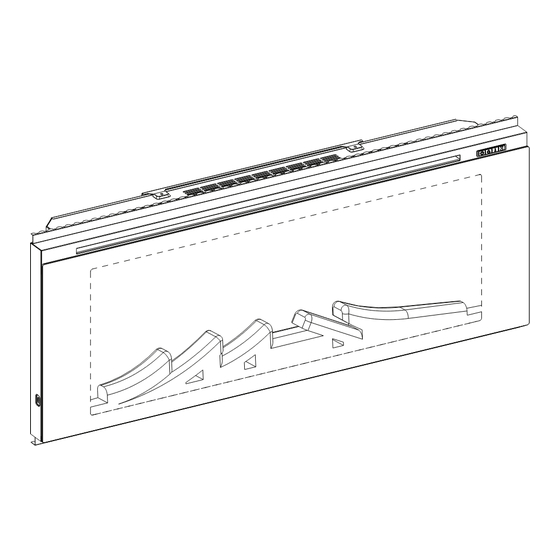
Page 16: Fuel Bed Setup Instructions
Operation Fuel Bed Setup Instructions Placing Plastic Crystals, Rocks or Logset Place the crystals , Rocks, Logset as desired. Install Glass Panel Attached the Glass Panel Secure Glass Panel Secure the Glass Panel from side of the fireplace with 2 Scrwes. www.tsicustomerservice.com A474... -
Page 17: Operation
Operation Operation The fireplace can be operated by either the remote control or the control panel. www.tsicustomerservice.com A474... - Page 18 Operation Operation (continued) FUNCTION ICON DESCRIPTION The POWER button supplies power to all the functions of the fireplace. POWER Pressing the POWER button again the fireplace will be put in standby mode. This will turn off all functions at once but will hold the settings in the memory.
- Page 19 Operation (continued) Replacing the Remote Control Battery Disposing of Used Batteries When the remote control stops operating or its range The battery may contain hazardous substances that seems reduced, it is time to replace the battery with could endanger the enviroment and human health. new ones.
-
Page 20: Fcc/Ic Information
FCC/IC Information This equipment has been tested and found to comply with the limits for Class B digital device, pursuant to part 15 of the FCC Rules. These limits are designed to provide reasonable protection against harmful interference in a residential installation. This equipment generates, uses, and can radiate radio frequency energy and, if not installed and used in accordance with the instructions, may cause harmful interfer- ence to radio or television reception, which can be determined by turning the equipment off and on. -
Page 21: Troubleshooting
Troubleshooting PROBLEM POSSIBLE CAUSE CORRECTIVE ACTION Unplug the fireplace, remove the back panel of the fireplace and check Display shows “ ”. The thermostat sensor is broken that the thermostat is plugged into the main circuit board. If this does not or disconnected. -
Page 22: Replacement Parts
Replacement Parts Part Description Part Number 36HF320(QTY) 48HF320(QTY) Remote Control P122 Uplight PCBA Y16-S214-P50 Flame Circuit Board Y15-S158-P40 Blue Flame PCBA Y16-S214-P40B LCD Display Y15-S158-P79 Main Circuit Board Y15-S158-P15 Terminals Connector Y16-S214-TERMINAL Flame Generator Drive Motor P10-6 Control Panel Circuit Board Y16-S214-P32 Thermostat Sensor NS-NTC... - Page 23 Índice Instrucciones importante ..........24 Opciones de instalación ..........29 Garantía................. 25 Guindar en pared .............30 Para empezar ..............26 Empotrado..............33 Preensamblaje............... 27 Configuración - cama de combustible.......37 Tornillería incluida............27 Funcionamiento..............38 Especificaciones del producto ......... 27 Información de FCC/IC ..........41 Herramientas necesarias ........27 Cuidado y limpieza ............41 Contenido del paquete ..........
-
Page 24: Instrucciones Importante
INSTRUCCIONES IMPORTANTE Cuando utilice electrodomésticos, siempre tome medidas de precaución básicas para evitar incendios, descargas eléctricas y lesiones personales. Entre ellas: 1. Lea todas las instrucciones antes de usar este electrodoméstico. 2. Este calentador se calienta cuando está en uso. Para evitar quemaduras, no permita que la piel sin protección entre en contacto con superficies calientes. -
Page 25: Garantía
Garantía Limitada de 1 Año El fabricante garantiza que su nueva estufa eléctrica no presentará defectos de fabricación ni materiales durante un período de un año a partir de la fecha de compra, siempre y cuando se cumplan las siguientes condiciones y limitaciones. 1. -
Page 26: Para Empezar
Para empezar 1. Remover la etiqueta de identidad del frente de la chimenea. Etiqueta de identidad Pegar la etiqueta de identidad en este manual como futura referencia. La información es necesaria para registrar el producto, y también para servicio al consumidor. Pegar la etiqueta de identificación aquí... -
Page 27: Preensamblaje
Preensamblaje TORNILLERÍA INCLUIDA Pieza Descripción Descripción Cantidad Cantidad 36HF320 48HF320 Tornillo de anclaje 3647HF-AA Taco fisher de pared 3647HF-BB Tornillo 4mm x 12mm (2 preinstalados) 3647HF-CC Tornillo 4mm x 6mm (3 preinstalados) 3647HF-DD NOTA: La tornillería no se muestra en su tamaño real. ESPECIFICACIONES DEL PRODUCTO Voltaje 120 VAC, 60 Hz... -
Page 28: Contenido Del Paquete
Ensamblaje previo (continuación) CONTENIDO DEL PAQUETE Pieza Descripción Cantidad Número de Pieza Número de Pieza (36HF320) (48HF320) Soporte de montaje Y17-S214-MB Y17-S214-MB Deflector superior Y17-S214-BAFFU Y17-S234-BAFFU Chimenea Y17-S214-FB Y17-S234-FB Deflector inferior Y17-S214-BAFFL Y17-S234-BAFFL Panel de vidrio Y17-S214-P27 Y17-S234-P27 Ajuste de registro Y17-S214-P02 Y17-S234-P02 Control remoto... -
Page 29: Opciones De Instalación
Operation Opciones de instalación La chimenea se puede instalar con 2 opciones: 1. Colgada en la pared con soporte de montaje incluido. 2. Construcción incorporada. Siga las instrucciones de instalación a continuación según la preferencia de instalación. Opción 1 Colgar en la pared..página 30 Opción 2 Construcción incorporada..página 33 www.tsicustomerservice.com... -
Page 30: Guindar En Pared
Operation Instalación: Colgar en la pared COLGAR EN LA PARED CON SOPORTE DE MONTAJE INCLUIDO Su nueva chimenea eléctrica se puede instalar prácticamente en cualquier parte de su casa. Sin embargo, cuando elija un lugar, asegúrese de seguir las instrucciones generales incluidas. Para obtener mejores resultados, instale lejos de la exposición de la luz solar. - Page 31 Instalación: Colgar en la pared Operation Selección de una ubicación en la pared Retiración del soporte de montaje Elija una ubicación en la pared para fijar el Soporte de Retire el Soporte de Montaje (A) de la parte posterior de Montaje (A).
- Page 32 Instalación: Colgar en la pared (continuación) Operation Colgar la chimenea Colocación del soporte de montaje Cuelga la Chimenea (C) en los ganchos en la parte in- Coloque el Soporte de Montaje (A) a la pared fijando los ferior del Soporte de Montaje (A) y empuje la Chimenea seis tornillos (AA) en los anclajes de pared.
-
Page 33: Empotrado
Installation - Built In Construction Operation This fireplace is a zero clearance design. No combustibles can be placed on the top surface of the fireplace. Combustibles may be installed to the edge of the unit. Insulation and vapor barrier should be placed a minimum of 2 in. from the unit. Build the framing according to the specifications shown in the below table &... - Page 34 Instalación: Construcción incorporada OPERACIÓN Fijar el deflector superior &deflector inferior Utilice los 10 tornillos (DD) para fijar el deflector superior (B) y el deflector inferior (D) a la Chimenea (C). Los pasos 2 a 5 han descrito la instalación opcional para ex- traer el cable de alimentación y cambiar el cableado Retire el tornillo preadjuntado sosteniendo la tapa de la caja de conexiones.
- Page 35 Instalación: Construcción incorporada Operation Retiración del conjunto de cables de Aflojar el soporte de alivio de tensión alimentación Retire los dos Tornillos preajustados sosteniendo el Retire el cable de alimentación y el conjunto de alivio de soporte de alivio de tensión del cable de alimentación. tensión Strain Relief Cable de Alimentación...
- Page 36 Instalación: Construcción incorporada Operation Asegurar la chimenea Instalación de la chimenea Perfore seis agujeros de 1/4 pulg. (7 mm) en la pared. Coloque la chimenea (C) en la pared.Fije la chimenea Inserte los anclajes de pared (BB) en los orificios con un con los 4 tornillos (AA).
-
Page 37: Configuración - Cama De Combustible
Instrucciones de instalación de la base de combustible Operation Colocación de cristales de plástico, rocas o ajustes de registro Coloque los cristales, rocas y los ajustes de registro como desee. Instalación del panel de vidrio Coloque el panel de vidrio Asegurar el panel de vidrio Asegure el panel de vidrio en los lados de la chimenea con 2 tormillos. -
Page 38: Funcionamiento
Funcionamiento Operation La chimenea puede ser operada tanto por el mando a distancia como el panel de control. www.tsicustomerservice.com A474... - Page 39 Operation Funcionamiento (Continuación) FUNCIÓN ICONO DESCRIPCIÓN El botón ENCENDIDO suministra energía a todas las funciones del calenta- dor. Al pulsar el botón ENCENDIDO de nuevo el calentador se pone en modo ENCENDIDO de espera.Cela désactivera toutes les fonctions à la fois, mais conservera les réglages dans la mémoire.
- Page 40 Funcionamiento (Continuación) Sustitución de la batería del control Desecho de baterías usadas remoto Cuando el control remoto no funciona o su gama de La batería puede contener sustancias peligrosas que podrían funcionamiento parece disminuir, es tiempo de sustituir la poner en peligro el medio ambiente y la salud humana. batería por una nueva.
-
Page 41: Información De Fcc/Ic
Información de FCC/IC Este equipo ha sido probado y se ha determinado que cumple con los límites de dispositivos digitales Clase B, según la parte 15 del Reglamento de la FCC. Estos límites están diseñados para proporcionar una protección razonable contra la interferencia dañina en una instalación residencial. -
Page 42: Solución De Problemas
Solución de problemas PROBLEMA CAUSA POSIBLE ACCIÓN CORRECTIVA Desenchufe la chimenea, retire el panel trasero de la chimenea y verifique que el termostato esté enchufado en la placa de circuito La pantalla muestra “E1”. El sensor del termostato está principal. Si esto no soluciona el problema, comuníquese con servi- roto o desconectado. -
Page 43: Repuestos
Repuestos Pieza Descripción 36HF320(QTY) 48HF320(QTY) Número de Pieza Control remoto P122 Luz de arriba de PCBA Y16-S214-P50 Placa de circuito de llama Y15-S158-P40 Llama azul de PCBA Y16-S214-P40B Pantalla LCD Y15-S158-P79 Placa de circuito principa Y15-S158-P15 Conector de terminales Y16-S214-TERMINAL Motor de encendido del generador de llama P10-6 Placa de circuito de Panel de control... - Page 44 Table des matières Instructions Importantes ..........45 Options d’installation ............. 50 Garantie ................. 46 Montage mural............. 51 Préparation ..............47 Construction intégrée ..........54 Pré-assemblage............48 Instructions de réglage de la couche de combustible .. 58 Quincaillerie fournie...........48 Utilisation ............... 59 Caractéristiques du produit........
-
Page 45: Instructions Importantes
INSTRUCTIONS IMPORTANTES Pour réduire le risque d’incendie, de décharge électrique et de blessure lors de l’utilisation d’appareils électriques, veiller à toujours respecter les précautions de sécurité de base suivantes : 1. Lire toutes les instructions avant d’utiliser cet appareil. 2. Cet appareil est chaud pendant son utilisation. Pour éviter les brûlures, ne touchez pas les surfaces chaudes sans protection. Si l’appareil est muni de poignées, utilisez-les pour le déplacer. -
Page 46: Garantie
GARANTIE LIMITÉE DE 1 AN Le fabricant garantit que ce produit est exempt de défauts de matériau et de fabrication durant une période d’un an à compter de la date d’achat, sous réserve des conditions et restrictions suivantes : 1. Ce foyer électrique doit être installé et utilisé conformément aux instructions d’installation et de fonctionnement qui accompagnent le produit en tout temps. -
Page 47: Préparation
PRÉPARATION 1. Retirez la vignette d’identification du produit de l’avant de la cheminée. Vignette d’identification du produit 2. Collez l’autocollant d’identification du produit au bas de ce guide pour référence future. Ces information sont utilisées pour l’enregis trement du produit et sont également nécessaires lorsque vous contactez le service à la clientèle. Collez l’autocollant d’identification du produit ici 3. -
Page 48: Préassemblage
Préassemblage QUINCAILLERIE FOURNIE Pièce Description Référence Quantité Quantité 36HF320 48HF320 Vis d’ancrage 3647HF-AA Ancrage au mur 3647HF-BB Vis 4mm x 12mm (2 déjà attachées) 3647HF-CC Vis 4mm x 6mm (3 déjà attachées) 3647HF-DD REMARQUE : La quincaillerie n’est pas illustrée dans ses dimensions réelles. CARACTÉRISTIQUES DU PRODUIT Tension 120 c.a., 60 Hz... -
Page 49: Contenu De L'emballage
Préassemblage (suite) CONTENU DE L’EMBALLAGE Numéro de pièce Numéro de pièce Pièce Description Quantité (36HF320) (48HF320) Support de montage Y17-S214-MB Y17-S214-MB Plaque supérieure Y17-S214-BAFFU Y17-S234-BAFFU Cheminée Y17-S214-FB Y17-S234-FB Plaque inférieure Y17-S214-BAFFL Y17-S234-BAFFL Panneau en verre Y17-S214-P27 Y17-S234-P27 Tas de bois Y17-S214-P02 Y17-S234-P02 Télécommande... -
Page 50: Options D'installation
Operation Options d’installation Le foyer peut être installé de 2 manières: 1. Montage mural grâce au support de montage fourni. 3. Construction intégrée Suivez les instructions d’installation selon la méthode que vous choisissez. Option 1 Montage mural..page 51 Option 2 Construction intégrée...page 54 www.tsicustomerservice.com A474... -
Page 51: Montage Mural
Operation Installation – Montage mural FIXATION MURALE AU MUER AVEC SUPPORT DE MONTAGE FOURNI Votre nouveau foyer électrique peut pratiquement être installé n’importe où dans votre maison. Cependant, lorsque vous décidez de son em- placement, assurez-vous de suivre les lignes directrices générales. Pour de meilleurs résultats, installez le foyer hors d’atteinte des rayons du soleil. - Page 52 Installation – Montage mural Operation Enlèvement du support de montage Choix d’un emplacement sur mur Choisissez un emplacement sur mur pour fixer le sup- Retirez le support de montage (A) depuis l’arrière de la port de montage (A). Positionnez le support de montage cheminée (C) en dévissant les deux vis pré-attachées en (A) dans l’emplacement souhaité.
- Page 53 Installation – Montage mural (suite) Operation Operation Suspension la cheminée Fixation du support de montage Accrochez la cheminée (C) sur les crochets au bas du Fixez le support de montage (A) sur le mur en fixant les support de montage (A) et poussez la cheminée (C) dans six vis d’ancrage (AA) dans les écrous d’ancrage de mur.
-
Page 54: Construction Intégrée
Installation - Construction intégrée Operation INTEGRE A UNE INSTRUCTION MURALE Cette cheminée est une conception zéro-dégagement. Aucun combustible ne peut être placé sur la surface supérieure de la cheminée. Les combustibles peuvent être installés sur le bord de l’unité. La barrière d’isolement et de vapeur doit être placée au moins à 2 in. de l’unité. - Page 55 Installation - Construction intégrée Opération Fixation des plaques supérieures et inférieures Utilisez les 10 vis (DD) pour fixer la plaque supérieure (B) et la plaque inférieure (D) dans la cheminée (C) Les étapes 2 à 5 décrivent une installation en option d’où pour retirer le cordon d’alimentation et le remplacer en câblé...
- Page 56 Operation Installation - Construction intégrée Desserrement du support de décharge Enlèvement de l’unité de cordon de contrainte d’alimentation Retirez le cordon d’alimentation et l’unité de décharge Retirez les deux vis pré-attachées qui tiennent de contrainte. le support de décharge de contrainte du cordon d’alimentation.
- Page 57 Installation - Construction intégrée Operation Fixation de la cheminée Installation de la cheminée Percez six trous de 1/4 po (7 mm) dans le mur. Poussez la cheminée (C) dans le mur. Insérez les écrous d’ancrage de mur (BB) dans Fixez la cheminée avec les 4 vis (AA). les trous à...
-
Page 58: Instructions De Réglage De La Couche De Combustible
Instructions de réglage de la couche de combustible Operation Placement des cristaux en plastique, des roches ou des bois Placez les cristaux, roches, ou tas de bois comme vous désirez. Installer le panneau en verre Attachez le panneau en verre Fixation du panneau en verre Fixez le panneau en verre au côté... - Page 59 Operation Utilisation Le foyer peut être contrôlé avec la télécommande ou depuis le panneau de commande. www.tsicustomerservice.com A474...
- Page 60 Operation Fonctionnement (suite) DESCRIPTION FONCTION ICÔNE Le bouton d’alimentation (POWER) alimente toutes les fonctions du radia- teur. Appuyer à nouveau sur bouton d’alimentation (POWER) mettra le radia- PUISSANCE teur en mode de veille.Este deshabilitar todas las funciones a la vez, pero conservará...
-
Page 61: Utilisation
Utilisation (suite) Remplacement de la pile de la Mise au rebut des piles télécommande Les piles peuvent contenir des matières dangereuses qui Lorsque la télécommande ne fonctionne plus ou que sa por- pourraient mettre en danger l’environnement et la santé. tée diminue, remplacez la pile. -
Page 62: Informations Relatives Aux Normes Fcc/Ic
Information relative aux normes FCC/IC REMARQUE : Cet équipement a été testé et déclaré conforme aux limites imposées aux appareils numériques de classe B, en vertu de l’alinéa 15 du règlement de la FCC (Commission fédérale des communications des États-Unis). Ces limites sont destinées à... -
Page 63: Dépannage
Dépannage PROBLÈME CAUSE POSSIBLE MESURE CORRECTIVE Débranchez le foyer, retirez le panneau de fond du foyer et vérifiez que L’affichage montre “ ”. Le capteur du thermostat est le thermostat est branché à la carte de circuits imprimés principale. cassé ou débranché. Si cela ne résout pas le problème, communiquez avec le service à... -
Page 64: Pièces De Rechange
Replacement Parts Piece Description Numéro de pièce 36HF320(Qté.) 48HF320(Qté.) Télécommande P122 Éclairage vers le haut de PCBA Y16-S214-P50 Carte de circuit de flamme Y15-S158-P40 Flamme bleue de PCBA Y16-S214-P40B Écran LCD Y15-S158-P79 Carte de circuit principale Y15-S158-P15 Connecteur de terminal Y16-S214-TERMINAL Moteur à...
Need help?
Do you have a question about the ClassicFlame 48HF320FGT and is the answer not in the manual?
Questions and answers
Model 48HF320FGT E3 warning? location of: thermostat & air inlets/oulets so i can check them please