Table of Contents
Advertisement
Available languages
Available languages
Quick Links
Advertisement
Chapters
Table of Contents

Related Manuals for Wamsler PRIMO 108 71 00


Summary of Contents for Wamsler PRIMO 108 71 00
- Page 1 Bedienungs- und Aufstellanleitung Fireplace user instruction Cheminée, mode d’emploi Istruzioni per uso e installazione Kandalló használati útmutató PRIMO PRIMO PRIMO 108 71 00 108 70 00 108 70 10 MONTAFON 108 70 05...
-
Page 2: Table Of Contents
Vorwort Sehr verehrter Kunde, wir beglückwünschen Sie zum Erwerb unseres Kaminofens. Sie haben die richtige Wahl getroffen. Mit dem Kauf dieses Produktes haben Sie die Garantie für • Hohe Qualität durch Verwendung bester und bewährter Materialien • Funktionssicherheit durch ausgereifte Technik, die streng nach der europäischen Norm EN 13240 geprüft ist (Geräte sind für die Mehrfachbelegung geeignet) •... -
Page 3: Sicherheitshinweise
SICHERHEITSHINWEISE Die Geräte sind nach DIN EN 13240 geprüft (Typenschild). Bei der Aufstellung und dem abgasseitigen Anschluss sind die anwendbaren nationa- len und europäischen Normen, örtliche und baurechtliche Vorschriften/Normen (z.B. DIN 18896, DIN 4705, DIN EN 13384, DIN 18160, DIN EN 1856-2, DIN EN 15287 u.a.) sowie feuerpolizeiliche Bestimmungen (z.B. - Page 4 19. Wenn Ausbesserungen oder Erneuerungen vorgenommen werden müssen, wenden sie sich bitte rechzeitig unter Angabe der genauen Art.Nr. und Fert.Nr. an Ihren Fach- händler. Es sind nur Original Wamsler - Ersatzteile zu verwenden. 20. Arbeiten, wie insbesondere Installation, Montage, Erstinbetriebnahme und Servicear- beiten sowie Reparaturen, dürfen nur durch einen ausgebildeten Fachbetrieb (Hei-...
-
Page 5: Bedienung
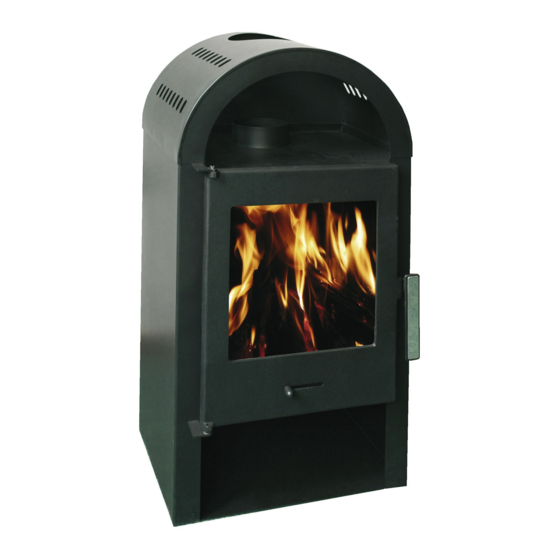
1. Bedienung 1.1 Geräteaufbau Bild 1 1. Fülltür 6. Ausmauerung 2. Abgasstutzen 120mm 7. Rost 3. Lagerfach f. Brennmaterial 8. Aschenkasten 4. Primärluftschieber 9. Typenschild (Rückseite) 5. Türgriff 10. Feder... -
Page 6: Inbetriebnahme
1.2 Inbetriebnahme Das Gerät wird mit demontiertem Heiztürgriff ausgeliefert. Vor Inbetriebnahme muss der Griff wie in Bild 4 abgebildet montiert werden. Brennstoffe Das Gerät ist für den Betrieb mit nachfolgend aufgeführten Brennstoffen geeignet. Nur damit ist ein raucharmer und störungsfreier Betrieb gewährleistet. Verwenden Sie nur natur belassenes, trockenes Scheitholz mit einer Restfeuchte von max. -
Page 7: Außerbetriebnahme
Füllmengen / Anzünden: 7 kW NWL Scheitholz max. 1,7 kg, ca. 2-3 kleine Scheite pro Füllung, bei Anzündvorgang Holz kreuzschlichten, Scheitholzlänge max. 33cm, Durchmesser Ø 5 - 12 cm, Rundlinge spalten, Holzbrikett nach DIN 51731 max. 1,3 kg, evtl. zerkleinern Erstes Anheizen •... -
Page 8: Reinigung Und Pflege
Eine abgestimmt zugeführte Sekundärluft sorgt für die Nachverbrennung der im Ab- gas enthaltenen brennbaren Bestandteile. Ein Verschmutzen der Scheibe kann aber bei Festbrennstoffen nicht ausgeschlossen werden und stellt keinen Mangel dar. Dies bedeutet eine rauch- und russarme Verbrennung zur Schonung der Umwelt. Sollten Sie Ihren Ofen in der Übergangszeit in Betrieb nehmen, dann prüfen Sie vorher den Schornsteinzug, da dieser bei hohen Außentemperaturen sehr gering sein kann. - Page 9 sich bitte rechtzeitig unter Angabe der Artikel-Nr. und der F.-Nr. (siehe Typschild) an Ihren Fachhändler. Reinigen Sie Ihre Sichtscheibe vor der ersten Benutzung mit einem feuchten saube- ren Tuch. Verreiben Sie danach einige Tropfen eines Pflegemittels für Glaskeramik Scheiben mit einem Küchenpapier auf beiden Seiten der Scheibe. Nach dem Nachwischen und Trockenpolieren ist die hochwertige Oberfläche mit ei- nem unsichtbaren Film überzogen, dieser hilft die Scheibe sauber zu halten und er- leichtert bei regelmäßiger Wiederholung die Reinigung.
- Page 10 Bild 3 Bild 2 Bild 5 Bild 4 Bild 7 Bild 6...
-
Page 11: Störungsursachen, Behebung
1.6 Störungsursachen, Behebung Art der Störung mögliche Ursache Behebung Geruchbildung: Austrocknung der ange- Den Ofen entsprechend der wendeten Schutzfarbe. Bedienungsanleitung mehre- Verdampfung von Ölres- re Stunden in Kleinstellung betreiben. Danach für mehre- re Stunden auf maximale Leistung heizen. • Geräteleistung zu klein •... -
Page 12: Aufstellung
2. Aufstellung 2.1 Vorschriften Bei der Aufstellung und dem abgasseitigen Anschluss sind die anwendbaren nationalen und europäischen Normen, örtliche und baurechtliche Vorschrif- ten/Normen (z.B. DIN 18896, DIN 4705, DIN EN 13384, DIN 18160, DIN EN 1856-2, DIN EN 15287 u.a.) sowie feuerpolizeiliche Bestimmungen (z.B. FeuVO) zu beachten. -
Page 13: Schornsteinanschluss
Boden unter und vor dem Ofen Fußböden aus brennbarem Material, wie Teppich, Parkett oder Kork, müssen unter dem Ofen sowie von der Feuerraumöffnung 50 cm nach Vorne und 30 cm seitlich durch einen Belag aus nicht brennbaren Baustoffen, z.B. Keramik, Stein, Glas oder einer Bodenplatte aus Stahl, ersetzt oder geschützt werden. - Page 14 Richtig Falsch mind. 50 cm Querschnittverengung im Kamin durch zu weit eingeschobene Abgasrohre Stau durch sich ge- mind. 30 cm genseitig behin- dernde Abgasströ- Falschluft durch offene Türen an nicht benutzten Feuerstätten Falschluft durch of- fenen Rohranschluß Falschluft durch undichten Rohr- anschluß...
-
Page 15: Technische Daten
3. Technische Daten 3.1 Maßzeichnungen Typ 108 70 00 Typ 108 71 00 Typ 108 70 05 Typ 108 70 10... -
Page 16: Maße Und Gewichte
3.2 Maße und Gewichte Breite Tiefe Höhe Gewicht Gewicht (mm) (mm) (mm) Art.Nr. netto brutto (kg) (kg) W20001087000 W20001087005 W20001087010 W20001087100 Die angeführten Abmessungs- und Gewichtangaben sind nur zur Information! Wir behalten uns das Recht von Konstruktionsänderungen vor, falls diese das technische Niveau erhöhen, oder die Qualität verbessern! 3.3 Technische Daten 108 70 / 71... -
Page 17: Eg Konformitätserklärung
3.4 EG Konformitätserklärung Wamsler Haus- und Küchentechnik GmbH EG-Konformitätserklärung Wamsler Haus- und Küchentechnik GmbH, Hersteller: Gutenbergstr. 25, D-85748 Garching Kaminofen Produktbezeichnung: TYP 108 70 / 71 Typ: Die bezeichneten Produkte stimmen mit den Vorschriften folgender Europäischer Richtlinien überein: 89/106/EWG: Bauprodukten- Richtlinie Der Nachweis erfolgt nach EN 13240:2001/A2:2004/AC:2007 gemäß... -
Page 18: Foreword
Foreword Dear Customer! Thank you for choosing our product! By purchasing this product you receive guarantee for • good quality originating from the usage of the finest and proven materials, • operating security which is controlled according to German and European norms (Corresponds to the standards EN 13240) •... -
Page 19: Safety Instructions
SAFETY INSTRUCTIONS The stoves are tested to EN 13240 (see identification plate). For installation and for flue gas connections, the requirements of the Fire Regula- tions (FeuVO in Germany) apply, as well as local building regulations such as the following technical standards DIN 18896, DIN 4705, EN 13384, DIN 18160, EN 1856-2 and EN 15287. - Page 20 15. Make sure that the ash pan is always fully pushed in, until it touches the back. Never remove ashes while still hot (fire risk). 16. In spring and autumn the chimney may no longer draw correctly, so that gases produced by combustion are not completely removed.
-
Page 21: Usage
1. Usage 1.1 Structure of the equipment Pic. 1 1. furnace chamber door 2. smoke tube end 120mm 3. fuel storage 4. primary air regulator 5. door knob 6. furnace chamber walling 7. grate 8. ash bin 9. model plate on the rear wall 10. -
Page 22: Installation
1.2 Installation The device comes with door knob dismantled. Be mapped before putting into the handle as in Figure 4 mounted. Fuels The equipment can be used with fuels detailed in the followings. This way the “low-smoke” and trouble-free operation can be secured. Use only dry wood with a moisture of maximum 20%. -
Page 23: Putting Out Of Operation
Open the door by raising the handle (Picture 2). If the equipment is hot, you can use insulated gloves. Adjust the primary air regulator and the fuel switch (Picture 3) according to the Table 1. Put coal lighter or wood wool onto the fire grate, followed by wood chips. -
Page 24: Cleaning And Maintenance
Warning! In order to keep the air clean and safeguard the fireplace, do not exceed the specified maximum fuel quantity, otherwise overheating may oc- cur, which potentially damage the equipment. Such damage is not covered with any guarantee. Only a single layer of fuel is allowable to be prepared in the fireplace. - Page 25 Pic. 3 Pic. 2 Pic. 5 Pic. 4 Pic. 7 Pic. 6...
-
Page 26: Potential Problems And How To Tackle Them
1.6 Potential problems and how to tackle them Kind of operating Possible reasons Solution problem Odour formation Curing of the applied pre- Operate the fire-place on a ventive lacquer. low heating level according Steaming oil remains. to the instructions manual for a few hours. -
Page 27: Placing
2. Placing 2.1 Prescriptions For installation and for connection of flue, the requirements of the Fire Regula- tions (FeuVO in Germany) apply, as well as local building regulations such as the following technical standards DIN 18896, DIN 4705, EN 13384, DIN 18160, EN 1856-2 and EN 15287. -
Page 28: Connection Of The Fireplace
Floor in front of and under the fireplace Floors made from combustible materials, such as carpets, parquet floors or cork is to be protected by a shield of non-combustible material – for example ceramics, stone, glass or steel – placed under the fireplace so that it should reach out to 50 cm in front and 30 cm besides. - Page 29 Incorrect Correct Right Not right min.50cm min.50cm Tightening cross section of the chimney because Tightening cross section the smoke tube is of the chimney because pushed into the chimney the smoke tube is pushed too much into the chimney too much Obstruction , because the min.30cm...
-
Page 30: Technical Specification
3. Technical specification 3.1 Dimensional drawings Typ 108 70 00 Typ 108 71 00 Typ 108 70 05 Typ 108 70 10... -
Page 31: Dimension
3.2 Dimension width draught height weight weight Art.No. (mm) (mm) (mm) netto brutto (kg) (kg) W20001087000 W20001087005 W20001087010 W20001087100 The dimension information shown is only for information! We reserve the right to make changes to the construction if these improve the technical level or the quality! 3.3 Datas 108 70 / 71 Nominal performance... -
Page 32: Ec Declaration Of Conformity
3.4 EC Declaration of Conformity WAMSLER Haus- und Küchentechnik GmbH EC-Declaration of Conformity Wamsler Haus- und Küchentechnik GmbH, Gutenbergstr. 25, Manufacturer: D-85748 GARCHING, Germany Product description: Fireplace TYP 108 70 / 71 Model no: The products listed above conform to the requirements of the following European Directive:... -
Page 33: Préambule
Préambule Cher Client, Nous vous félicitons d’avoir acheté un poêle Wamsler. Vous avez fait le bon choix car ce produit est pour vous une garantie d e grande qualité, grâce à l’emploi de matériaux excellents et éprouvés d e sécurité de fonctionnement, grâce à une technique parfaitement au point et sévèrement contrôlée selon la norme européenne EN 13240. -
Page 34: Sommaire
Ainsi vous pourrez profiter de votre poêle plusieurs saisons sans les remplacer. La pierre ollaire est un produit naturel avec des nuances de couleur et des veines, en aucun cas l'aspect de la pierre est un motif de réclamation. Attention Pour toute commande de pièces de rechange indiquer le №... -
Page 35: Consignes De Securite
CONSIGNES DE SECURITE 1. Les appareils ont été contrôlés selon les normes EN 13240 (Plaque signalétique). 2. Pour la mise en place des appareils et le raccordement aux cheminées d’évacuation des gaz, on devra observer les exigences énoncées par les directives concernant les appareils de chauffage (FeuVO en Allemagne) ainsi que les normes DIN 18896, DIN 4705, EN 13384, DIN 18160, EN 1856-2 et EN 15287. - Page 36 à temps à votre commerçant spécialisé en lui indiquant exactement le numéro de référence et le numéro de fabrication. On ne peut utiliser que des pièces originales WAMSLER. 19. Les travaux, tels que, en particulier, l’installation, le montage, la première mise en ser- vice, les travaux de maintenance ainsi que les réparations ne pourront être effectués...
-
Page 37: Utilisation
1. Utilisation 1.1 Description de l’appareil Fig. 1 1. Porte foyère 2. Buse d’évacuation des fumées 120mm 3. Bûcher 4. Réglage d’air primaire 5. Poignée d’ouverture 6. Garniture intérieure - brique réfractaire 7. Grille 8. Cendrier 9. Plaque signalétique (sur l'arrière du poêle) 10. -
Page 38: Mise En Service
1.2 Mise en service Combustible Ce poêle à bois convient aux combustibles suivants : Bois bûches de longueur au maximum 35cm TOUT COMBUSTIBLE AUTRE QUE LE BOIS EN BUCHEs EST INTERDIT. Les feuillus durs (chêne, hêtre, frêne, châtaignier, charme, noyer, fruitiers, etc.) four- nissent un bois de chauffage de meilleure qualité, qui dégage plus de chaleur en brû- lant plus longtemps que les résineux. -
Page 39: Extinction
Avant le premier allumage: L'appareil Cheminée est livré avec Poignée d’ouverture démantelé. Étre mappée avant de mettre dans la poignée de la figure 4 montées. Avant le premier allumage retirez les éléments de protection pour le transport. Le premier allumage : ATTENTION : Il est normal que lors des premières utilisations de votre appareil, il y ait un dégagement d'odeurs et de fumées dues à... - Page 40 Avant de commencer le nettoyage assurez-vous que le poêle soit bien froid. L’intervalle entre les nettoyages dépend du temps d'utilisation et de la qualité des combustibles utilisés. Aspiration des cendres Dans l’âtre le bois brûle et laisse des cendres. Attention : il peut rester des tisons chauds dans les cendres.
- Page 41 Fig. 3 Fig. 2 Fig. 5 Fig. 4 Fig. 7 Fig. 6...
-
Page 42: Anomalies
1.6 Anomalies Probleme Cause Solution Dégagement Durcissement de la peinture et Chauffez le poêle comme décrit d’odeur évaporation des résidus d’ pendant quelques heures sur la huile. position minimum. Ensuite le faire chauffer au maximum pendant quelques heures. Dégagement de Capacité... -
Page 43: Installation
2. Installation 2.1 Prescriptions d’installation Le bon fonctionnement de votre poêle est fortement lié à la qualité de son instal- lation. L'installation doit être effectuée par un professionnel ou une personne qua- lifiée. Cette notice comprend des recommandations propres à votre poêle. Il est impéra- tif de suivre ces recommandations pour bénéficier des meilleures performances mais aussi de la garantie sur cet appareil. -
Page 44: Raccordement Au Conduit De Cheminée
Distance de sécurité hors de la zone de rayonnement (fig 9). Une distance minimum de 30 cm doit être respectée entre les matériaux com- bustibles, et la paroi arrière du poêle. Une distance minimum de 55 cm doit être respectée entre les matériaux com- bustibles, et les parois latérales du poêle. - Page 45 Raccordement au conduit de cheminée : Ces travaux doivent être réalisés par un professionnel. Attention : les tuyaux de poêles et toutes les pièces de raccordement doivent être adapté aux com- bustibles solides. Si les éléments de conduit de raccordement mènent vers des éléments inflam- mables, ils doivent impérativement être à...
-
Page 46: Données Technipues
3. Données technipues 3.1 Plans avec les dimensions Typ 108 71 00 Typ 108 70 00 108 70 / 71 La taille apparaitre et les donnée informer de caractéres! Notre firmée la structure modification entretenir doit, en tant qu’ils levent technique niveau ou ils améliorent le qualité! Typ 108 70 05 Typ 108 70 10... -
Page 47: Dimensions
- Type 108 70 / 71 - Puissance nominale 7 kW Gaz de combustion: Combustible: Bois - Débit massique des fumées 6,9 g/s - Température moyenne de fumées 270˚C - Tirage minimum 12 Pa - Rendement > 80% - CO à 13% O2 1218 mg/m³... -
Page 48: Déclaration De Conformité Ce
3.3 Déclaration de conformité CE WAMSLER Haus- und Küchentechnik GmbH Déclaration de conformité CE WAMSLER Haus- und Küchentechnik GmbH, Fabricant : Gutenbergstr. 25, D-85748 Garching, Allemagne Désignation du produit : Cheminée TYP 108 70 / 71 Type : Les produits désignés sont conformes aux règlements énoncés par les directives euro- péennes suivantes :... -
Page 49: Gentilissimo Cliente
Gentilissimo Cliente, ci complimentiamo con Lei per aver acquistato questa stufa da riscaldamento e per l’ottima scelta effettuata! Questo prodotto Le garantisce • qualità elevata grazie all’utilizzo di ottimi materiali testati • funzionamento sicuro grazie alle avanzate tecnologie verificate in modo rigoroso in base alla norma europea DIN EN 13240 •... -
Page 50: Avvertenze Di Sicurezza
AVVERTENZE DI SICUREZZA L’ apparecchio e i suoi dispositivi sono stati testati sulla base della norma EN 13240 o secondo EN 12815 (vedi targa di identificazione). Per un funzionamento ottimale della Sua stufa è fondamentale che la canna fumaria alla quale volete effettuare il collegamento sia in condizioni perfette. •... - Page 51 Tutti i componenti dovranno essere sostituiti esclusiva- mente con pezzi originali Wamsler. Eventuali lavori, in particolare l’installazione, il montaggio, la prima accen- sione, nonché i servizi di assistenza e di riparazione possono essere ese- guiti solo da una ditta specializzata (in impianti di riscaldamento o riscal- damento ad aria).
- Page 52 È importante che vengano rispettate le distanze di sicurezza ai lati e sul re- tro per tutti i componenti e materiali infiammabili. Le distanze sono riporta- te nelle istruzioni per l’uso o sulla targa dell’apparecchio. È vietato apportare qualsiasi tipo di modifica all’apparecchio. Non è...
-
Page 53: Istruzioni Per L'uso
1. Istruzioni per l’uso 1.1 Struttura stufa Fig. 1 1. Sportello 2. Uscita fumi 120mm 7. Griglia 3. Deposito per combustibile 8. Cassetto cenere 4. Leva aria primaria 9. Targa sul lato posteriore 5. Maniglia 10. Molla d'acciaio 6. Muratura... -
Page 54: Accensione
1.2 Accensione Il dispositivo è fornito con maniglia smantellati. essere mappato prima di mettere nella maniglia montata nella Figura 4. Combustibili Per garantire un corretto funzionamento della stufa e una formazione minima di fumo devono essere utilizzati esclusivamente i combustibili elencati di seguito: legna secca allo stato naturale con umidità... - Page 55 Impostazione aria di combustione: Le leve devono sempre trovarsi al centro dei simboli. Posizione Combustibile leva aria primaria Accensione Ceppi di legna Potenza termica nominale Spegnimento Tabella 1 Quantità di carico orario: Per il legno non superare una quantità di due ceppi (lunghezza max. 33 cm) per un carico di circa 1,7 kg.
-
Page 56: Spegnimento
Attenzione! Aprendo lo sportello del focolare potrebbe verificarsi un’uscita di fumo dovuta ad un utilizzo improprio o ad uno scarso tiraggio della canna fumaria. Si rac- comanda pertanto di aprire lo sportello lentamente, e solo di qualche centime- tro, prima di aprirlo completamente. Prima di aprire lo sportello per la ricarica di combustibile, assicurarsi che nel focolare vi sia solo il letto di brace e che le fiamme siano tutte spente. -
Page 57: Pulizia E Manutenzione
1.5 Pulizia e manutenzione Un buon utilizzo dell’apparecchio associato ad un’accurata pulizia e manutenzio- ne garantiscono la stabilità dei valori e una lunga durata nel tempo dell’ apparec- chio. Ciò consente di risparmiare preziose risorse, rispettare l’ambiente ed evita- re ulte-riori spese. In questo modo è possibile pulire il giro fumi dall’interno o, rimuovendo il tubo di scarico, dall’alto (Fig. - Page 58 Fig. 3 Fig. 2 Fig. 5 Fig. 4 Fig. 7 Fig. 6...
-
Page 59: Cause E Risoluzione Anomalie
1.6 Cause e risoluzione anomalie Tipo di anomalia Cause possibili Rimedi Formazione di odori: Asciugatura della vernice Lasciare la stufa in funzione per utilizzata ed evaporazione diverse ore sulla posizione mi- dei residui di olio. nima così come indicato nelle istruzioni per l’uso. -
Page 60: Installazione
2. Installazione 2.1 Prescrizioni e norme • Leggere attentamente il contenuto del presente manuale, in quanto fornisce importanti indicazioni ed istruzioni riguardanti l’installazione, l’uso, la manuten- zione e soprattutto la sicurezza del prodotto. • L’installazione e l’uso delle apparecchiature, deve avvenire esclusivamente in ambiente giudicato idoneo dagli enti preposti e soprattutto in conformità... -
Page 61: Distanze Di Sicurezza
2.2 Distanze di sicurezza Proteggere dall’effetto del calore tutti gli elementi costruttivi, mobili o tessuti di arredamento infiammabili situati nelle vicinanze della stufa. Oggetti all’interno della zona di irraggiamento Per gli elementi costruttivi, i mobili e i tessuti di arredamento infiammabili situati nella zona di irraggiamento della stufa è... -
Page 62: Collegamento Alla Canna Fumaria
2.3 Collegamento alla canna fumaria ATTENZIONE! Prima di procedere al collegamento dell’apparecchio consultare un tecnico specializzato di zona! I tratti di collegamento della stufa devono essere ben saldati e sigillati e non de- vono essere inseriti in profondità nella sezione trasversale libera della canna fumaria. - Page 63 CAMINO O CANNA FUMARIA • Il camino o canna fumaria deve rispondere ai seguenti requisiti: − Essere a tenuta dei prodotti della combustione, impermeabile ed adeguata- mente isolato e coibentato alla stregua delle condizioni di impiego (UNI 9615); − Essere realizzato in materiali adatti a resistere alle normali sollecitazioni meccaniche, al calore, all’azione dei prodotti della combustione e alle eventuali condense;...
- Page 64 COMIGNOLO • Il comignolo deve rispondere ai seguenti requisiti: − Avere sezione interna equivalente a quella del camino; − Avere sezione utile di uscita non inferiore al doppio di quella interna del ca- mino; − Essere costruito in modo da impedire la penetrazione nel camino di pioggia, neve, corpi estranei e in modo che anche in caso di venti di ogni direzione e inclinazione sia comunque assicurato lo scarico dei prodotti della combustione;...
- Page 65 REALIZZAZIONE DELL’ALLACCIAMENTO ALLA CANNA FUMARIA • Eseguire il collegamento dell’apparecchio alla canna fumaria del camino esistente, assicurandosi che il tubo di uscita fumi non occupi la sezione libera della canna fumaria. • Utilizzare esclusivamente tubi adatti allo smaltimento dei fumi della combu- stione.
- Page 66 c) Essere protette con griglia, rete metallica o idonea protezione purché non riduca la sezione minima di cui al punto a) e posizionate in modo da evitare che possano essere ostruite. • L’afflusso dell’aria può essere ottenuto anche da un locale adiacente a quello di installazione, purché...
-
Page 67: Schede Tecniche
3. Schede tecniche 3.1 Disegni dimensionali e dati Typ 108 70 00 Typ 108 71 00 108 70 / 71 Typ 108 70 05 Typ 108 70 10... -
Page 68: Dimensioni
3.2 Dimensioni Lar- Pro- Peso Peso Altezza N° art. ghezza fondità netto brutto (mm) (mm) (mm) (kg) (kg) W20001087000 W20001087005 W20001087010 W20001087100 Questi dati relativi alle dimensioni sono indicati a solo scopo informativo! Ci riserviamo il diritto di apportare eventuali modifiche strutturali a vantaggio del progresso tecnologico o del miglioramento qualitativo! 3.3 Informazioni sul peso e dati tecnici Tipo... -
Page 69: Dichiarazione Di Conformità Ce
3.4 Dichiarazione di conformità CE WAMSLER Haus- und Küchentechnik GmbH Dichiarazione di conformità CE WAMSLER Haus- und Küchentechnik GmbH, Gutenbergstr. 25, Produttore: D-85748 Garching, Germania Stufa camino Prodotto: TYP 108 70 / 71 Modello: Si dichiara che i prodotti di cui sopra risultano in conformità a quanto previsto dalle se-... - Page 70 D – 85748 Garching bei München Telefon +49 (0)89 32084-0 Telefax +49 (0)89 32084-294 www.wamsler.eu Änderungen, die dem technischen Fortschritt dienen und / oder einer Qualitätsverbesserung bewir- ken, behalten wir uns vor. Für Druckfehler und Änderungen nach Drucklegung können wir keine...
Need help?
Do you have a question about the PRIMO 108 71 00 and is the answer not in the manual?
Questions and answers