Table of Contents

Subscribe to Our Youtube Channel
Related Manuals for icetro ISI-322ST


Summary of Contents for icetro ISI-322ST
- Page 1 SOFT & SpagheTTi iCe CReaM FReeZeR User's Manual iSi-322ST * This product is designed for indoor use. * Make sure to install it indoors. * The appearance, design, color, and parts of the product are subject to change without prior notice.
- Page 2 Soft ice cream Self machine ofers the following advantages 1. Minimum noise and refreshing cooling system With a high efficiency and low noise motor, we can achieve minimal noise from the refreshing cooling system 2. MICOM control method Use of an artificial intelligence control type achieves an opti mal cooling system. 3.
-
Page 3: Table Of Contents
Dear customers Thank you very much for purchasing a soft ice cream maker made by ICETRO. For correct use of the product and its maintenance, please read this manual carefully. If a problem occurs while using the product, you can refer to this manual for troubleshooting. -
Page 4: Cautions For Your Safety
Cautions for your safety The caution/warning details for safety are intended to prevent accident or danger through safe and proper use. Therefore please follow the details accordingly. The precaution details are categorized into warning and caution, and the respective meanings are as follows. If you neglect this symbol and wrongly use the product, Danger it may cause a fire, serious injury or death. - Page 5 Warning For relocation of the product, call an expert. Incorrect installation may cause damage Contact a professional service due to electric conduction. supplier to repair the product. Installation requires construction work in accordance with Incomplete repair may cause related standards or laws including, but not limited to, KS, electric shock, fire, or injury.
- Page 6 Warning Do not put anything on Do not turn the power ON/ the power cable. OFF with the circuit breaker Make sure that the power cable continuously. is not twisted or knotted. It can cause electrical Fire or electric shock shocks or fire.
- Page 7 Warning To replace or repair the Do not apply excessive force power cord, contact a orimpact to the product. professional technician It can cause damages to or our customer service the product. center. Do not place water containers, Turn off the circuit breaker if medicine, foods, small metal strange noise, smell, or smoke parts or inflammable material...
-
Page 8: Unpacking Method
Unpacking method The Ice Cream Dispenser has been fully inspected and tested at the factory prior to shipping. If you detect damage to the wooden package or apparent distortion of the shape of the system after unpacking the product, immediately inform your distributor or manufacturer. Find the serial number marked on the packing and the machine before starting installation. -
Page 9: Installation Method
Installation method 【 Electrical connection 】 Consult with the engineers of the company for the details of installation of the system to ensure optimal ● performance of the system (change of the installation site of the system also requires consultation with the engineer of the company). -
Page 10: Name Of Each Part
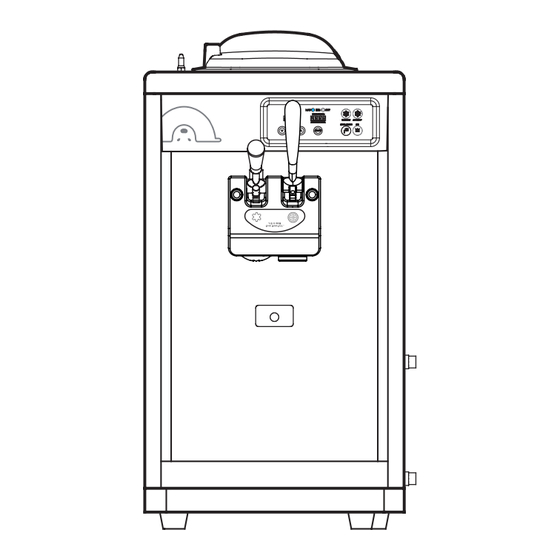
Name of each part FRONT RIGHT SIDE COVER FOOD FAN BUTTON DISPLAY SPAGHETTI LEVER LEVER POWER SWITCH SOTF ICE CREAM LEVER DASHER COVER BOLT DRAIN SLUG FRONT PANEL FILTER COVER DRAIN BOX BACK LEF T SIDE B A C K PANEL SIDE COVER SIDE PANEL... -
Page 11: Name Of Each Part
Name of each part ACCESSORY ISI-322ST MANUAL DRAIN BOX UP DRAIN BOX BRUSH 3 BRUSH DRUM 1 EA 1 EA 1 EA 1 EA WHITE- 1 EA BLACK- 1 EA DASHER BEARING ORIFFICE 1 EA 1 EA PACKING JAVARA 1 EA... -
Page 12: Check Prior To Use
Check prior to use 【 】 Make sure to check them prior to use! This product is for 1PH / 230V, 50Hz Install it independently in an earth leakage circuit breaker with more than 20A and provide an external grounding. (Ask a qualified electrical technician for the installation.) The power cable should be connected before the product can be operated normally. -
Page 13: Button Display Names And Functions
Button display names and functions ‘ insufficient ingredients’ lamp It blinks when there are insufficient ● ‘ Left Status Display Window’ ingredients. AUTO: Displays the operational status. ● Defrost: Display the defrost condition. ● ‘ No ingredient’ lamp Revive: Displays the revival condition. ●... -
Page 14: Functional Description Of The Buttons
Functional description of the buttons 【 Change the setting 】 If you press the "Set" button lightly, you can enter the mode to check the setting as below. Use the "▼" and "▲" buttons to see the settings. 1-1 : Check ice cream level settings You can check the current setting for the ice cream. - Page 15 【 Check the temperature and the record 】 Press the "Select" button to check the different temperature settings mentioned below. The item number and the temperature will be displayed in turns 2-1: Temperature of the mixing tank 2-2: Temperature of the mixing tank sensor 2-3: Condenser suction temperature (neighboring temperature) 2-1: Temperature of the mixing tank The sensor located at the bottom of the mixing tank to measure...
- Page 16 【 Change the setting 】 Press the "Set" button for three seconds to enter the setting change mode as follows. Use the“▼”and“▲”to enter the password and use the "Set" button to move to each item. When the display blinks, use“▼”and“▲”to change the value and use the "Set"...
-
Page 17: Making Soft & Spaghetti Ice Cream
Making Soft & Spaghetti ice cream 1. Pour 2.0ℓof ingredients in the mixing tank. The raw material must has been stored in a cooler at a temperature 10℃ or below. 2. Plug in the caburator and block the hole. 3. Pour 2.0ℓof ingredients in the mixing tank. lever sensor open the caburator hole of the caburator tube. -
Page 18: Controlling The Speed Of Making Ice Cream
Controlling the speed of making ice cream 1. Control the bolt below the outlet lever to control the speed of making ice cream. As shown in the figure, loosen the bolt by turning it counterclockwise to speed up the making of ice cream. Screw Adjust 2. -
Page 19: Caburator Control
Caburator control The caburator is made up of two parts. The part that is inserted into the hole of the mixing tank is called the Caburator tube body body and a tube is inserted into this. The tube has a hole at the top and at the bottom. -
Page 20: Cleaning Method
Cleaning method 1. Press the wash button on the control panel. (Wait until the soft cream in the cylinder is melted, About 10 minutes.) 2. Remove the mixing tank cover and Take out the caburator tube and caburator body. 3. Remove the soft cream liquid in the mixing tank and pour faucet water into it. - Page 21 Cleaning method 8. Brush the drain hole of the mixing tank thoroughly. 9. Use faucet water to clean off the inner area of the tank. 10. Press the wash button and finally discharge the water from the mixing tank. Use faucet water to rinse off the cleaning agent residuals.
- Page 22 Cleaning method 13. Separate the dasher from the cylinder. 14. Brush off the inner area of the cylinder and wipe it off with a soft cloth. Insert a brush into the dead end of the cylinder and turn the brush left and right to clean up the cylinder.
- Page 23 Cleaning method 18. Take out the piston of the dasher cover and clean the edge of the piston with a soft towel. 19. Disassemble dasher assay first from dasher bearing and then from mixing shaft, then clean the assay. BEARING DASHER MIXING SHAFT...
- Page 24 【 Condenser and filter cleaning method 】 1 . Pull out the condenser filter located on the right side of the machine. 2 . Remove dust from the filter element or use a vacuum cleaner, and wash it clean with water. 3 .
-
Page 25: Dasher And Dasher Cover Assembly Method
Dasher and dasher cover assembly method 1. Apply edible vegetable oil to the ring inserted into the piston. 2. Insert the piston in the middle of the dasher cover. 3. Insert the discharge lever into the piston and then insert the lever in line with the dasher cover and the discharge lever. -
Page 26: Before Requesting Service
Before requesting service The soft ice cream machine can operate abnormally because you are not familiar with the method for use or due to another insignificant reason. It does not necessarily mean a malfunction. In this case, check the following items to resolve a simple problem on your own without the help from the service center. -
Page 27: Replacement Cycle Of Consumable Parts
Replacement cycle of consumable parts Replacement cycle Quantity SIZE PART NAME DASHER COVER PACKING 6months 1 EA PACKING DASHER SHAFT 6months 4 EA PACKING PISTON TOP Once a year 6 EA PACKING JAVARA Once a year 1 EA... -
Page 28: Product Specification
Product specification CLaSSiFiCaTiON SPECIFICATION Product name Soft & Spaghetti ice Cream Freezer Model name ISI-322ST Rated voltage and frequency 1PH, 230V, 50Hz Power consumption 2.38 KW WIDTH 460mm (Filter and coolant supply pipe excluded) Product DEPTH 760mm size (cover excluded) -
Page 29: Error Codes And Corrective Actions
Error Codes and Corrective Actions The soft ice cream machine may malfunction due to incorrect operation procedure or a trivial cause other than machine defect or failure. If the following corrective actions fail to correct the problem, or the error code is not presented below, or the same error persists, contact the nearest After Service Center. -
Page 30: Circuit Diagram
Circuit diagram... -
Page 31: Part List
Part list... - Page 32 Part list...
- Page 33 Part list...
- Page 34 Part list 【 DASHER ASSY 】...
- Page 35 Part list 【 REFRIGERANT 】...
- Page 36 Part list 【 ASSY CONTROL BOX 】...
- Page 37 MEMO...
- Page 38 Online internet Service http://www.icetro.com 3 2 4 0 3 1 2 - 0 0...
Need help?
Do you have a question about the ISI-322ST and is the answer not in the manual?
Questions and answers