
Related Manuals for Todd English TEAO12BR


Summary of Contents for Todd English TEAO12BR
- Page 1 1600W 12.7QT MULTI FUNCTIONAL DIGITAL AIR FRYER OVEN INSTRUCTIONS MODEL TEAO12BR...
- Page 2 MEET CHEF ENGLISH Todd English is a celebrated chef, restaurateur, author, and television personality. He has opened innovative and award-winning restaurants around the globe. Among his numerous accolades from the culinary world, Chef English is a four-time James Beard Foundation Award winner and was named Bon Appetit’s Restaurateur of the Year.
-
Page 3: Important Safeguards
IMPORTANT SAFEGUARDS When using electrical appliances, basic safety precautions should be followed as follows: • Read all instructions before first use. • This appliance is designed for household use only. • Do not place the appliance against a wall or against another appliance. - Page 4 • Do not use the appliance if there is any damage to the plug, cord or other parts. • Check that the voltage indicated on the appliance fits the voltage for your outlet. • Do not connect appliance to an external timer switch. • Immediately unplug the appliance if you see dark smoke coming out of the appliance.
-
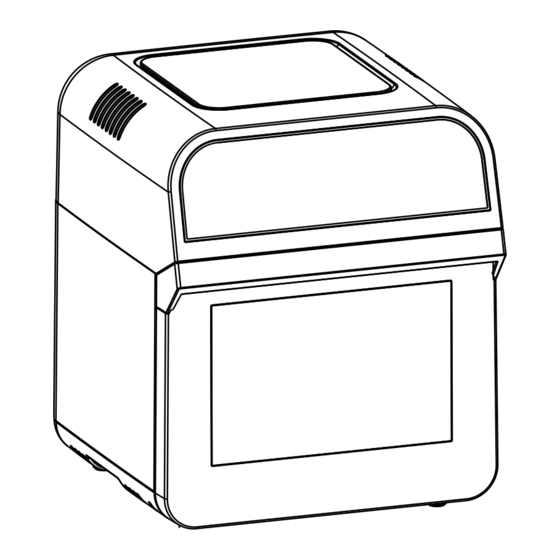
Page 5: Parts Description
PARTS DESCRIPTION 1. Top 11.Wire Rack 2. Control Panel 12.Fry Basket 3. Upper Cover 13.Fry Basket 4. Unit 14.Basket with Handle 5. Power Cord 15.Drip Tray 6. Inner Housing 7. Door 8. Rotisserie Handle 9. Rotisserie Fork 10.Wire Rack... -
Page 6: Control Panel
CONTROL PANEL Turns the light on during cooking process. Press TEMP to adjust temperature. Press TIME to adjust time. Press to use the rotisserie function of the unit. Press to turn the unit On or Off. Can also Use the Menu Use + or - to adjust time and be pressed to start or button to select... -
Page 7: Before First Use
BEFORE FIRST USE 1. Remove all packaging materials, stickers and labels. 2. Clean the basket and all other accessories with hot water, dishwashing liquid, and a non-abrasive sponge. 3. Wipe the inside and outside of the appliance with a cloth. USING THE APPLIANCE Handle: The handle should always be used when taking the basket in and out of the unit. - Page 8 Air Fryer: 1. Place the appliance on a stable, horizontal and even surface. Place the tray inside the unit, on the bottom position. See figure below. Plug the unit into a 3-prong grounded wall socket. 4. Place the ingredients in the basket, if desired spritz with cooking oil for a crispier finish.
- Page 9 8. To change the temperature, press the TEMP icon on the left and it will illuminate in the center. Toggle up and down with the arrows on the right until desired temperature is selected. The temperature can be adjusted from 120°F to 430°F. 9.
- Page 10 Wire Racks: The wire racks should be placed in the unit after the drip tray has been installed. Please see figure below. The wire racks can be used to place food on. The wire racks are perfect for more delicate items such as vegetables. Fry Baskets: The fry baskets should be placed in the unit after the drip tray has been installed.
- Page 11 How to Prepare Your Rotisserie for Proteins The protein needs to be placed on a spit so that it is centered and evenly balanced. It must also be held in place so it does not move around as it is cooking. Detach the fork on one side by unscrewing.
- Page 12 CLEANING • Remove the main plug from the wall outlet and let the appliance cool down for at least 30 minutes. NOTE: Remove the accessories to let the air fryer cool before cleaning. • Clean the appliance after every use. Do not clean the basket, tray, or accessories and the inside of the appliance with any metal kitchen utensils or abrasive cleaning materials, as this may damage the coating...
-
Page 13: Limited One-Year Warranty
Also include a brief description of the problem you are experiencing and a copy of your sales receipt or other proof of purchase in order to validate warranty status. MODEL TEAO12BR...
Need help?
Do you have a question about the TEAO12BR and is the answer not in the manual?
Questions and answers
Where to buy replacement parts like racks, etc?