
Subscribe to Our Youtube Channel
Related Manuals for Moduline GCE060D

Summary of Contents for Moduline GCE060D
- Page 1 COOKING VERSION D Cod. 92001790 SYSTEMS Ed. 1116 Warning: read the instructions before using the appliance...
-
Page 2: Table Of Contents
original instructions CONTENTS 1 • GENERAL RECOMMENDATIONS FOR THE INSTALLER 1.1 • RECOMMENDATIONS 1.2 • SPECIAL INSTRUCTIONS 1.3 • LAWS, TECHNICAL REGULATIONS AND STANDARDS 2 • INSTALLATION INSTRUCTIONS 2.1 • TECHNICAL DATA 2.2 • INSTRUCTIONS FOR POSITIONING 2.3 • INSTRUCTIONS FOR ELECTRICAL CONNECTION AND UNIPOTENTIAL SYSTEM 2.4 •... - Page 3 CONTENTS 17 • OVEN RECIPES 18 • WASHING PROGRAMS (OPTIONAL) 18.1 • WASHING PROGRAMS: QUICK RINSE 18.2 • WASHING PROGRAMS: SOFT WASHING 18.3 • WASHING PROGRAMS: HARD WASHING 18.4 • WASHING PROGRAMS: RINSE AID PROCEDURE 18.5 • MANUAL RINSE 18.6 • OVENCLEAN DETERGENT 18.7 •...
-
Page 4: General Recommendations For The Installer
installation 1 • GENERAL RECOMMENDATIONS FOR THE INSTALLER 1.1 • RECOMMENDATIONS • Installation, start-up and maintenance of the appliance should be carried out by qualified engineers, licensed fitters or personnel authorised by the manufacturer. • Carefully read the recommendations in this instruction booklet, as they provide important advice for safe installation, operation and maintenance. -
Page 5: Installation Instructions
60245-57 (H05RN-F or Consumption pressure Model Type consumption HO7RN-F). Minimum voltage [kW] cross section of con- [Vac] [Psi] nection cable (AWG) GCE060D GCE060D 14,5 4 x 15 GCE061D GCE061D 3AC 208V 21,5 4 x 13 150 ÷ 500 GCE106D GCE106D 21,5 4 x 13 [21,7 ÷... -
Page 6: Instructions For Water Connection
2 • INSTALLATION INSTRUCTIONS 2.4 • INSTRUCTIONS FOR WATER CONNECTION Water connection (excluding models with the optional water reservoir tank) At the back of the machine, there are 2 inputs for hydraulic connection with ¾ male thread. They are indicated with a label of 2 different colours: •... - Page 7 2 • INSTALLATION INSTRUCTIONS 2.4 • INSTRUCTIONS FOR WATER CONNECTION Models with the optional water reservoir tank (machines not provided with the cooling of exhaust fumes, hand shower, automatic washing) No water in the tank is signaled directly on the electronic board as on the bottom of the compartment that houses the tank, it is placed a sensor.
-
Page 8: Control And Safety System
2 • INSTALLATION INSTRUCTIONS 2.4 • INSTRUCTIONS FOR WATER CONNECTION Discharge On the back of the machine, there is an outlet tube (diameter 40mm / 1.6") for the connection of the cavity discharge pipe and a tube (diameter 14mm / 0.6") for the tray drain connection under the device door. -
Page 9: General Recommendations For The User
3 • GENERAL RECOMMENDATIONS FOR THE USER WARNING! Read the instructions in the following chapter very carefully. It contains important advice concerning the safe use and maintenance of your appliance. Failure to observe these fundamental rules may compromise your own safety and that of the appliance. The manufacturer declines all re- sponsibility if the original functions of the appliance are altered through mishandling, the installation instructions are not followed, modifications take place or other devices are added. -
Page 10: Cleaning And Maintenance
3 • GENERAL RECOMMENDATIONS FOR THE USER • Do not store explosives in the appliance, such as aerosol cans with flammable propellant. • boiling hazard: to avoid reaching boiling point, do not use containers filled with liquids that liquefy with heat that exceeds that which can be easily kept under control. -
Page 11: Description Of Controls
5 • DESCRIPTION OF CONTROLS Knob to set PROGRAMS and ENTER* to select and bACK CYCLE General switch (*pressing the knob) buttons button ON/OFF Display COOKING CAVITY HUMIDITY LIGHT START / STOP MODE TEMPERATURE button button buttone buttons button PRObE* / TIME FAN SPEED button button... -
Page 12: The Core Probe (Optional)
5 • DESCRIPTION OF CONTROLS 5.1 • THE CORE PROBE (OPTIONAL) The core probe enables cooking regulated by the core temperature of the product. The appliance stops cooking when the core of the product reaches the set temperature, regardless of the time setting. -
Page 13: Switching On
6 • SWITCHING ON To switch on the machine, press the ON/OFF button. The switch is turned on and the status indicator led turns a steady green. The display swicht on and takes a few seconds to bring up the main screen (HOME). 7 •... -
Page 14: Scheduled Preheating
8 • SCHEDULED PREHEATING To set one or more programmed preheating simulta- neously, press P and PRObE / TIME buttons for about 5 seconds, until a new screen is displayed. Turn the knob to display PrHE (programmed prehe- ating) and the number 1 flashing to the right of the clock symbol and select it using ENTER. -
Page 15: Cooling
9 • COOLING For cooling the cooking cavity, open the equipment door and press START / STOP. The cooling starts automatically and brings the cavity temperature to 50°C (122°F). NOTE - 50°C (122°F) is the temperature set by default and cannot be changed. During cooling, the display shows the current cavity temperature and the COL item. -
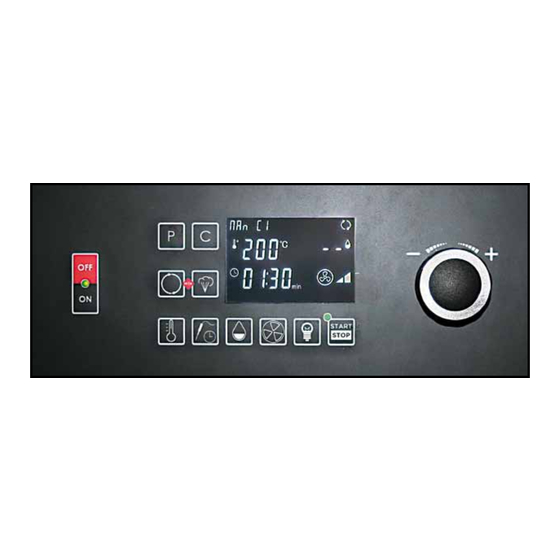
Page 16: Manual - Cooking Cycle: Timed Convention
11.1 • MANUAL - COOKING CYCLE: TIMED CONVENTION Upon the equipment startup, it’s displayed a screen as shown in the figure. by default, it is set a convection manual program with single timed cycle. To change the temperature in the cavity, press the CA- VITY TEMPERATURE button and change the value by turning the knob (to the right to increase, to the left to decrease). - Page 17 11.1 • MANUAL - COOKING CYCLE: TIMED CONVENTION NOTE - “Flash Dry” option is provided only in the convection cooking mode. NOTE - The new humidity percentage that you want to set continues to flash until it is confirmed; if this does not occur within a few seconds, the program will keep the old value.
-
Page 18: Manual - Cooking Cycle: Convection With Core Probe (Optional)
11.2 • MANUAL - COOKING CYCLE: CONVECTION WITH CORE PROBE (OPTIONAL) Upon the equipment startup, it’s displayed a screen as shown in the figure. by default, it is set a convection manual program with single timed cycle. To change the temperature in the cavity, press the CA- VITY TEMPERATURE button and change the value by turning the knob (to the right to increase, to the left to decrease). - Page 19 11.2 • MANUAL - COOKING CYCLE: CONVECTION WITH CORE PROBE (OPTIONAL) NOTE - “Flash Dry” option is provided only in the convection cooking mode. NOTE - The new humidity percentage that you want to set continues to flash until it is confirmed; if this does not occur within a few seconds, the program will keep the old value.
-
Page 20: Manual - Cooking Cycle: Timed Steam
11.3 • MANUAL - COOKING CYCLE: TIMED STEAM Upon the equipment startup, it’s displayed a screen as shown in the figure. by default, it is set a convection manual program with single timed cycle. To set the steam mode, press the STEAM button (shown by the arrow in the figure). - Page 21 11.3 • MANUAL - COOKING CYCLE: TIMED STEAM Then set the fan speed (if any), using the FAN SPEED button; by default, it is set to the maximum level, so to decrease press the switch. The change is immediate and it is not necessary to press any other key to confirm the change.
-
Page 22: Manual - Cooking Cycle: Steam With Core Probe (Optional)
11.4 • MANUAL - COOKING CYCLE: STEAM WITH CORE PROBE (OPTIONAL) Upon the equipment startup, it’s displayed a screen as shown in the figure. by default, it is set a convection manual program with single timed cycle. To set the steam mode, press the STEAM button (shown by the arrow in the figure). - Page 23 11.4 • MANUAL - COOKING CYCLE: STEAM WITH CORE PROBE (OPTIONAL) Then set the fan speed (if any), using the FAN SPEED button; by default, it is set to the maximum level, so to decrease press the switch. The change is immediate and it is not necessary to press any other key to confirm the change.
-
Page 24: Manual - Cooking Cycle: Timed Mix
11.5 • MANUAL - COOKING CYCLE: TIMED MIX Upon the equipment startup, it’s displayed a screen as shown in the figure. by default, it is set a convection manual program with single timed cycle. To switch to the mix cooking mode, press simulta- neously the CONVECTION and STEAM buttons. - Page 25 11.5 • MANUAL - COOKING CYCLE: TIMED MIX NOTE - While running a program, you can manually inject humidification water: when a program is run- ning, press the HUMIDITY button. The humidity value displayed flashes, so press the HUMIDITY button again and hold it down.
-
Page 26: Manual - Cooking Cycle: Mix With Core Probe (Optional)
11.6 • MANUAL - COOKING CYCLE: MIX WITH CORE PROBE (OPTIONAL) Upon the equipment startup, it’s displayed a screen as shown in the figure. by default, it is set a convection manual program with single timed cycle. To switch to the mix cooking mode, press simulta- neously the CONVECTION and STEAM buttons. - Page 27 11.6 • MANUAL - COOKING CYCLE: MIX WITH CORE PROBE (OPTIONAL) NOTE - While running a program, you can manually inject humidification water: when a program is run- ning, press the HUMIDITY button. The humidity value displayed flashes, so press the HUMIDITY button again and hold it down.
-
Page 28: Manual - More Cycles Cooking - Timed Or Probe Maintenance
11.7 • MANUAL - MORE CYCLES COOKING - TIMED OR PROBE MAINTENANCE Set a first cooking cycle from a manual program. Once you have set all the values for the first cycle (as shown in the previous chapters), press the C button (the C1 button flashes). -
Page 29: Delayed Startup
11.7 • MANUAL - MORE CYCLES COOKING - TIMED OR PROBE MAINTENANCE NOTE - With the program running, you cannot change the cooking mode or switch between the time mode to the core probe mode (and vice versa), but you can do it for the next cycles still not enabled. -
Page 30: Displaying Temperatures
13 • DISPLAYING TEMPERATURES Simultaneously pressing the CAVITY TEMPERATURE and PRObE / TIME keys for 5 seconds will allow you accessing the screen that displays the current tempe- ratures. Turning the knob, you can view the temperatures relating to: • Pt1 - Cavity temperature •... -
Page 31: Clearing Programs
15 • CLEARING PROGRAMS Press the P button for about 5 seconds. It’s displayed the screen that allows the management of programs. Turn the knob until the CAn (delete) item is displayed and press ENTER to select it. Enter the program number to be deleted by turning the knob and press ENTER. -
Page 32: Oven Recipes
17 • OVEN RECIPES CORE PROBE CAVITY COOKING TIME HUMIDITY TEMPERATURE TEMPERATURE PROGRAM RECIPE CYCLES FAN SPEED TYPE (minutes) °C °F °C °F Steamed Steam Normal octupus Savoury flan Convection Normal Convection Normal Vol au vent Convection Normal Steamed rice Steam Normal Convection... - Page 33 17 • OVEN RECIPES CORE PROBE CAVITY COOKING TIME HUMIDITY TEMPERATURE TEMPERATURE PROGRAM RECIPE CYCLES FAN SPEED TYPE (minutes) °C °F °C °F Steamed cauliflower Steam Normal (fresh or frozen) Chips (frozen) Convection Normal Mixed Normal Croissants Convection Normal Convection Normal Puff Pastry Tarts...
- Page 34 17 • OVEN RECIPES CORE PROBE CAVITY COOKING TIME HUMIDITY TEMPERATURE TEMPERATURE PROGRAM RECIPE CYCLES FAN SPEED TYPE (minutes) °C °F °C °F Mixed Normal Roast Duck Convection Normal Convection Normal Roast pork Mixed Normal loin Convection Normal Roast chicken Mixed Normal (1,2kg each -...
-
Page 35: Washing Programs (Optional)
18 • WASHING PROGRAMS (OPTIONAL) To access the washing programs, press the P button and turn the knob to the left. Programs available: • q ri - quick rinse (about 15 minutes) • SCS - soft washing (about 1 hour and 30 minutes) •... -
Page 36: Washing Programs: Quick Rinse
18.1 • WASHING PROGRAMS: QUICK RINSE The QUICK RINSE provides for the input of a jet of hot water in the cooking cavity. NOTE - The quick rinse is recommended to eliminate odours in the cavity between one cooking cycle and the other. -
Page 37: Washing Programs: Soft Washing
18.2 • WASHING PROGRAMS: SOFT WASHING To operate a soft washing, select the SCS item inside the programs (P) and press the START / STOP but- ton. It may be displayed the WAIT message while the equipment checks the calibration of the drain valve (the time required for the operation is approximately 5 minutes). -
Page 38: Washing Programs: Hard Washing
18.3 • WASHING PROGRAMS: HARD WASHING To operate a hard washing, select the SCH item inside the programs (P) and press the START / STOP button. It may be displayed the WAIT message while the equipment checks the calibration of the drain valve (the time required for the operation is approximately 5 minutes). -
Page 39: Washing Programs: Rinse Aid Procedure
18.4 • WASHING PROGRAMS: RINSE AID PROCEDURE To operate a rinse aid, select the riA item inside the programs (P) and press the START / STOP button. It may be displayed the WAIT message while the equipment checks the calibration of the drain valve (the time required for the operation is approximately 5 minutes). -
Page 40: Manual Rinse
18.5 • MANUAL RINSE by means of the hand shower (optional), you can perform a manual rinsing. 18.6 • OVENCLEAN DETERGENT For the soft and hard washings, it is mandatory the use of OVENCLEAN tablets, made properly for degreasing and cleaning self-cleaning ovens. The Ovenclean tablets dissolve and easily remove all types of organic fouling, also burned. -
Page 41: Ovenbrite Rinse Aid
18.7 • OVENBRITE RINSE AID For the rinse aid procedure, it is mandatory the use of the OVENBRITE rinse aid, packed in water- soluble envelopes (they dissolve in water), for self-cleaning ovens. This is a rinse aid concentrate with high efficiency which provides a perfect finish, eliminating the resi- dues left after the washing process. -
Page 42: Service Area
19 • SERVICE AREA To access the service area, simultaneously press the P and C buttons for 5 seconds. The equipment requires the entry of the user pas- sword “11” and then confirm with ENTER. In this area you can enter the submenus: •... -
Page 43: Service Area - Parameters - Keyboard Block And Recipes Lock
19.2 • SERVICE AREA - PARAMETERS - KEYBOARD BLOCK AND RECIPES LOCK From the service area, enter the PAr (parameters) submenu using the knob and pressing ENTER. Entering the PAr menu, you can set the keyboard lock and/or recipes lock. kEYBOARD LOCk Use the knob to select the parameter 99. - Page 44 19.2 • SERVICE AREA - PARAMETERS - KEYBOARD BLOCK AND RECIPES LOCK RECEIPES LOCk Use the knob to select the parameter 111 and enter a password other than 0. NOTE - The recipes block is automatically activated when the password is entered. NOTE - With the recipes block on, you cannot use the equipment in manual mode;...
-
Page 45: Service Area - Parameters - Door Lock (Optional)
19.3 • SERVICE AREA - PARAMETERS - DOOR LOCK (OPTIONAL) Enter the PAR menu and select the parameter 178 to manage the automatic door lock. by default, the parameter value (that is the password) is set to -1. NOTE - by setting the value -1 as the password of the parameter 178, the equipment require NO password to disable the door lock. -
Page 46: Service Area - Import / Export And Delete Recipes
19.4 • SERVICE AREA - IMPORT / EXPORT AND DELETE RECIPES Insert the USb stick into the port. From the service area, enter the USb submenu using the knob and pressing ENTER. DOWNLOAD RECIPES TO USB (also available without entering the user password) Turn the knob until the Pro dolo (download program) item and select it using ENTER. -
Page 47: Service Area - Save Haccp
19.4 • SERVICE AREA - IMPORT / EXPORT AND DELETE RECIPES DELETE RECIPES Turn the knob until the Pro CAn (delete programs) item is displayed and press ENTER to select it. Confirm the operation by pressing ENTER again. After the operation, the YES message is displayed. Press P (back) to return to the main menu. -
Page 48: Alarms
20 • ALARMS 20.1 • THERMAL SAFETY ALARM If you detect a fault to the safety thermostat, the “Err 01” message appears and the required acoustic signals turn on. Any cooking in progress will be interrupted until the problem is resolved. To silence the buzzer, press any key. -
Page 49: Vent Probe Alarm
20.5 • VENT PROBE ALARM In case failures occur in the vent probe, the “ALL 01” (which are alternated to the main screen) message is displayed. Any cooking in progress IS NOT interrupted, but the steam injection adjustment will be only timed. If the alarm persists, contact the technical assistance. -
Page 50: No Water Alarm
20.9 • NO WATER ALARM If there is no water during a cooking cycle, it’s displa- yed “H2O” and the expected acoustic signals turn on. Any cooking in progress IS NOT discontinued, but you disable the water injection. To silence the buzzer, press any key. NOTE - If the problem is not resolved, or the humidi- ty is reduced to 0, the alarm repeats after 30 secon- 20.10 •... -
Page 51: Anti-Flooding Alarm
20.12 • ANTI-FLOODING ALARM When a washing program is running, if you do not load a certain amount of water in the specified time, the flashing message “_F” is displayed and the required acoustic signals turn on. Press any button to silence the buzzer. Check that the equipment water inlet valves are open and that the water pressure is greater than 150 kPa (21,7 Psi). -
Page 52: Door Lock Alarm
20.14 • DOOR LOCK ALARM In case an anomaly occurs to the “Door Lock” the flashing padlock symbol appears. Any cooking in progress is NOT interrupted, but the door lock will no longer be operating. If the alarm persists even after switching the appliance off and on, contact the technical support. - Page 53 USA Ed. 1116...
Need help?
Do you have a question about the GCE060D and is the answer not in the manual?
Questions and answers