Table of Contents
Advertisement
Quick Links
OPERATION
OPERATION
5.
5.
STARTING THE ENGINE:
STARTING THE ENGINE:
a.
a.
Move the fuel valve lever to ON position.
Move the fuel valve lever to ON position.
1) Remove the garden tiller
1) Remove the garden tiller
b.
b.
To start a cold engine, move the choke
To start a cold engine, move the choke
1) Remove the garden tiller
from its trailer/carrier. Use caution.
lever or choke rod (applicable types) to
lever or choke rod (applicable types) to
from its trailer/carrier. Use caution.
from its trailer/carrier. Use caution.
aution.
the CLOSED position. To restart a warm
the CLOSED position. To restart a warm
2) Familiarize yourself with the machine and its
2) Familiarize yourself with the machine and its
engine,leave the choke lever or choke
engine,leave the choke lever or choke
2) Familiarize yourself with the machine and its
controls.
machine and its
rod in the OPEN position.
rod in the OPEN position.
controls.
controls.
3) Ensure the safety clutch control lever is in the
3) Ensure the safety clutch control lever is in the
c.
c.
Move the throttle lever away from
Move the throttle lever away from
3) Ensure the safety clutch control lever is in the
disengaged position. The safety clutch
the MIN position,about 1/3 of the
the MIN position,about 1/3 of the
disengaged position. The safety clutch
disengaged position. The safety clutch
trol lever is in the
control lever is located on the left handle bar.
way toward the MAX position.
way toward the MAX position.
control lever is located on the left handle bar.
control lever is located on the left handle bar.
The disengaged position of the lever is down.
e safety clutch
The disengaged position of the lever is down.
The disengaged position of the lever is down.
d.
d.
Turning the engine switch
Turning the engine switch
to the ON position.
to the ON position.
e left handle bar.
4) Remove the shaft locking pin located behind
4) Remove the shaft locking pin located behind
4) Remove the shaft locking pin located behind
the wheel axle. Store pin in hole provided on
the wheel axle. Store pin in hole provided on
he lever is down.
the wheel axle. Store pin in hole provided on
RECOIL STARTER
RECOIL STARTER
left hand side of handle bar.
left hand side of handle bar.
Pull the starter grip lightly until you
Pull the starter grip lightly until you
left hand side of handle bar.
feel resistance, then pull briskly.
feel resistance, then pull briskly.
n located behind
5) The wheel axle will now pivot. Lift up on the
5) The wheel axle will now pivot. Lift up on the
Return the starter grip gently.
Return the starter grip gently.
5) The wheel axle will now pivot. Lift up on the
handle to allow wheel axle to pivot. For
hole provided on
handle to allow wheel axle to pivot. For
handle to allow wheel axle to pivot. For
6.
6.
GETTING STARTED:
GETTING STARTED:
transport, keep the wheel axle forward. When
Push machine to the
Push machine to the
transport, keep the wheel axle forward. When
transport, keep the wheel axle forward. When
location of the first hole. Start engine and allow to
location of the first hole. Start engine and allow to
cultivating, keep the wheel axle rearward for
cultivating, keep the wheel axle rearward for
cultivating, keep the wheel axle rearward for
reach operating temperature. Standing at the rear
reach operating temperature. Standing at the rear
added stability and control.
added stability and control.
ot. Lift up on the
added stability and control.
of the machine at the control handle. To begin
of the machine at the control handle. To begin
DO NOT transport the tiller with the wheel
DO NOT transport the tiller with the wheel
DO NOT transport the tiller with the wheel
le to pivot. For
digging a hole, pull the right hand side of the
digging a hole, pull the right hand side of the
axle in the rear position.
axle in the rear position.
axle in the rear position.
control lever. This will cause the auger to turn in a
control lever. This will cause the auger to turn in a
le forward. When
6) Adjust depth shoe (if equipped) by removing
clockwise direction. Apply downward pressure to
clockwise direction. Apply downward pressure to
6) Adjust depth shoe (if equipped) by removing
6) Adjust depth shoe (if equipped) by removing
axle rearward for
shaft locking collar and sliding depth shoe to
begin digging the hole. If dirt remains in the hole
begin digging the hole. If dirt remains in the hole
shaft locking collar and sliding depth shoe to
shaft locking collar and sliding depth shoe to
use an up and down motion to clear excess dirt.
use an up and down motion to clear excess dirt.
desired position. Replace shaft locking collar.
desired position. Replace shaft locking collar.
desired position. Replace shaft locking collar.
Release the control lever to stop auger. To
Release the control lever to stop auger. To
r with the wheel
7)
Open fuel shut-off valve. Set choke
7)
Open fuel shut-off valve. Set choke
reverse the auger rotation (counter-clockwise),
reverse the auger rotation (counter-clockwise),
7)
Open fuel shut-off valve. Set choke
control to Choke or Start position.
control to Choke or Start position.
pull the left hand side of the control lever.
pull the left hand side of the control lever.
control to Choke or Start position.
Set throttle control to Run or Fast
Set throttle control to Run or Fast
7.
7.
The amount of force exerted will depend on
The amount of force exerted will depend on
Set throttle control to Run or Fast
position. Set engine
the hardness and type of ground conditions.
the hardness and type of ground conditions.
position. Set engine
ped) by removing
position. Set engine
stop switch to On or
stop switch to On or
8.
8.
Remember, the DHS is a single person operation,
Remember, the DHS is a single person operation,
stop switch to On or
ng depth shoe to
Run position. Pull
designed for earth drilling. There may be holes that
designed for earth drilling. There may be holes that
Run position. Pull
Run position. Pull
starter cord rapidly.
aft locking collar.
will be extremely difficult,if not impossible, to drill.
will be extremely difficult,if not impossible, to drill.
starter cord rapidly.
starter cord rapidly.
Repeat (if necessary)
9.
9.
If ground is too hard to drill or the auger is jamming
If ground is too hard to drill or the auger is jamming
Repeat (if necessary)
Repeat (if necessary)
with choke off.
alve. Set choke
on ground conditions or foreign objects (eg. wire,
on ground conditions or foreign objects (eg. wire,
with choke off.
with choke off.
tree roots, etc.), the pressure relief will function,
tree roots, etc.), the pressure relief will function,
Start position.
8) When in position to begin garden tilling,
8) When in position to begin garden tilling,
8) When in position to begin garden tilling,
stalling the auger rotation. Clear auger and start
stalling the auger rotation. Clear auger and start
engage the safety clutch control lever. The
o Run or Fast
engage the safety clutch control lever. The
again. The operator presence control will ensure
again. The operator presence control will ensure
engage the safety clutch control lever. The
tynes will begin rotating. Wheel axle must be in
tynes will begin rotating. Wheel axle must be in
quick stop if hand is removed from control lever.
quick stop if hand is removed from control lever.
tynes will begin rotating. Wheel axle must be in
the rear position while tilling. Release the
the rear position while tilling. Release the
the rear position while tilling. Release the
NEVER TIE OR JAM LEVER INTO THE ON
NEVER TIE OR JAM LEVER INTO THE ON
safety clutch control lever to stop the tynes
safety clutch control lever to stop the tynes
safety clutch control lever to stop the tynes
POSITION (FORWARD OR REVERSE).
POSITION (FORWARD OR REVERSE).
rotating. Tyne speed is governed by engine
rotating. Tyne speed is governed by engine
rotating. Tyne speed is governed by engine
REVERSE (COUNTER CLOCKWISE) MAY
REVERSE (COUNTER CLOCKWISE) MAY
throttle setting.
throttle setting.
BE REQUIRED TO UNSCREW JAMMED AUGERS.
BE REQUIRED TO UNSCREW JAMMED AUGERS.
throttle setting.
10. Do not attempt to drill auger to full depth in one
10. Do not attempt to drill auger to full depth in one
WARNING! – KEEP HANDS AND
WARNING! – KEEP HANDS AND
WARNING! – KEEP HANDS AND
operation. Continually clearing the hole in an up
operation. Continually clearing the hole in an up
FEET CLEAR OF TYNES AT ALL
FEET CLEAR OF TYNES AT ALL
and down motion will facilitate a much easier
and down motion will facilitate a much easier
FEET CLEAR OF TYNES AT ALL
TIMES!
TIMES!
drilling operation. It may be necessary to clear
drilling operation. It may be necessary to clear
TIMES!
n garden tilling,
cutters and auger flighting from time to time to
cutters and auger flighting from time to time to
ensure quicker and easier cutting.
ensure quicker and easier cutting.
ontrol lever. The
9) Do not hurry the job. Proceed slowly and allow
11. Remember, as in drilling a hole in steel, one needs a
11. Remember, as in drilling a hole in steel, one needs a
9) Do not hurry the job. Proceed slowly and allow
9) Do not hurry the job. Proceed slowly and allow
9) Do not hurry the job. Proceed slowly and allow
the machine time to do the job. When ground
sharp drill. Auger, teeth and pilot MUST be in good
sharp drill. Auger, teeth and pilot MUST be in good
the machine time to do the job. When ground
the machine time to do the job. When ground
the machine time to do the job. When ground
condition if the auger is to work correctly. See wear
condition if the auger is to work correctly. See wear
is extremely hard, reduce engine speed.
is extremely hard, reduce engine speed.
is extremely hard, reduce engine speed.
is extremely hard, reduce engine speed.
parts section for more information.
parts section for more information.
12.
12.
WARNING! – IN CASE OF DIFFICULTY,
DISENGAGE THE SAFETY CLUTCH
position during drilling. DO NOT operate on a
position during drilling. DO NOT operate on a
CONTROL LEVER. ALL TILLING ACTION
slope that exceeds 15˚
slope that exceeds 15˚
STOPS. Press the engine "STOP" button
13. DO NOT over reach. Ensure proper footing and
13. DO NOT over reach. Ensure proper footing and
10) Stop Engine: Release the safety clutch control
balance when working with this machine.
balance when working with this machine.
located on the engine.
10) Stop Engine: Release the safety clutch control
10) Stop Engine: Release the safety clutch control
lever. Move throttle to Slow position. Set engine
lever. Move throttle to Slow position. Set engine
lever. Move throttle to Slow position. Set engine
stop switch to Stop or Off position. DO NOT move
stop switch to Stop or Off position. DO NOT move
stop switch to Stop or Off position. DO NOT move
10) Stop Engine: Release the safety clutch control
choke control to Choke
choke control to Choke
choke control to Choke
or Start position to stop
lever. Move throttle to Slow position. Set engine
or Start position to stop
or Start position to stop
engine. Backfire or
engine. Backfire or
stop switch to Stop or Off position. DO NOT move
engine. Backfire or
engine damage may
14.
14.
engine damage may
engine damage may
choke control to Choke
occur.
occur.
occur.
or Start position to stop
AFTER USE
Press the engine "STOP" button located on
Press the engine "STOP" button located on
AFTER USE
engine. Backfire or
AFTER USE
the engine. (See illustration)
the engine. (See illustration)
engine damage may
1)
15.
15.
1)
1)
occur.
2) Allow machine to cool down.
2) Allow machine to cool down.
CHECK FOR ELECTRICAL AND GAS LINES
CHECK FOR ELECTRICAL AND GAS LINES
2) Allow machine to cool down.
AFTER USE
BEFORE DIGGING
BEFORE DIGGING
3) Wash mud and dirt off of the garden tiller.
3) Wash mud and dirt off of the garden tiller.
3) Wash mud and dirt off of the garden tiller.
STOPPING THE ENGINE:
STOPPING THE ENGINE:
Ensure no water enters the carburettor.
16.
16.
Ensure no water enters the carburettor.
Ensure no water enters the carburettor.
Shut off switch on
Shut off switch on
1)
Turn fuel shut off valve to the "OFF"
4) Remove any weeds, wire, rope or other
4) Remove any weeds, wire, rope or other
console should be
console should be
4) Remove any weeds, wire, rope or other
position.
material that may have wrapped around the
used, not shut off
material that may have wrapped around the
used, not shut off
material that may have wrapped around the
switch on engine.
tynes and rotor assembly.
switch on engine.
tynes and rotor assembly.
tynes and rotor assembly.
2) Allow machine to cool down.
a.
a.
Move the throttle lever
Move the throttle lever
5) Return wheel axle to forward position for
5) Return wheel axle to forward position for
to the MIN position.
to the MIN position.
5) Return wheel axle to forward position for
transport. Replace shaft locking collar.
Some engine applications use a
Some engine applications use a
transport. Replace shaft locking collar.
3) Wash mud and dirt off of the garden tiller.
transport. Replace shaft locking collar.
remote-mounted throttle control
remote-mounted throttle control
6) Return depth shoe (if equipped) to full Up
6) Return depth shoe (if equipped) to full Up
rather than the engine-
rather than the engine-
Ensure no water enters the carburettor.
6) Return depth shoe (if equipped) to full Up
mounted lever shown here
position.
mounted lever shown here
position.
position.
b.
b.
Turn the engine switch
Turn the engine switch
4) Remove any weeds, wire, rope or other
to the OFF position.
to the OFF position.
material that may have wrapped around the
c.
c.
Turn the fuel
Turn the fuel
valve lever to the
valve lever to the
tynes and rotor assembly.
OFF position.
OFF position.
AFTER USE
AFTER USE
5) Return wheel axle to forward position for
1)
1)
transport. Replace shaft locking collar.
2)
2)
and dirt off of the hydraulic post hole digger.
and dirt off of the hydraulic post hole digger.
6) Return depth shoe (if equipped) to full Up
Ensure no water enters the carburettor.
Ensure no water enters the carburettor.
position.
3) Remove any objects that may have wrapped
3) Remove any objects that may have wrapped
around the auger.
around the auger.
© Copyright 2001, Red Roo Sales & Service Company Pty. Ltd.
© Copyright 2001, Red Roo Sales & Service Company Pty. Ltd.
© Copyright 2001, Red Roo Sales & Service Company Pty. Ltd.
© Copyright 2012, Red Roo Sales & Service Company Pty. Ltd.
© Copyright 2012, Red Roo Sales & Service Company Pty. Ltd.
WARNING! – IN CASE OF DIFFICULTY,
Auger motor head assembly may be
Auger motor head assembly may be
WARNING! – IN CASE OF DIFFICULTY,
WARNING! – IN CASE OF DIFFICULTY,
DISENGAGE THE SAFETY CLUTCH
tilted as per incline when drilling on
tilted as per incline when drilling on
DISENGAGE THE SAFETY CLUTCH
DISENGAGE THE SAFETY CLUTCH
CONTROL LEVER. ALL TILLING ACTION
slopes. DO NOT change the digger
slopes. DO NOT change the digger
CONTROL LEVER. ALL TILLING ACTION
CONTROL LEVER. ALL TILLING ACTION
STOPS. Press the engine "STOP" button
STOPS. Press the engine "STOP" button
STOPS. Press the engine "STOP" button
located on the engine.
located on the engine.
located on the engine.
WARNING! – Keep hands and feet
WARNING! – Keep hands and feet
clear of all moving parts at all times!
clear of all moving parts at all times!
WARNING! – Keep hands and
WARNING! – Keep hands and
feet clear of exhaust muffler during
feet clear of exhaust muffler during
or soon after operation.
or soon after operation.
WARNING! – in case of difficulty,
WARNING! – in case of difficulty,
release the control lever to stop
release the control lever to stop
the auger. All digging action stops.
the auger. All digging action stops.
Turn fuel shut off valve to the "OFF"
DO
DO
NOT OPERATE
NOT OPERATE
Turn fuel shut off valve to the "OFF"
Turn fuel shut off valve to the "OFF"
position.
EDGES
EDGES
CLOSE TO
CLOSE TO
position.
position.
OR
OR
EXCAVATIONS ETC.
EXCAVATIONS ETC.
Turn fuel tap to "OFF" position.
Turn fuel tap to "OFF" position.
Allow machine to cool down. Wash mud
Allow machine to cool down. Wash mud
1301-0018
1301-0018
1301-0018
1301-0025-A
1301-0025-A
SAFETY PRECAUTIONS
SAFETY PRECAUTIONS
SAFETY PRECAUTIONS
SAFETY PRECAUTIONS
SAFETY PRECAUTIONS
SAFETY PRECAUTIONS
AND OPERATING
AND OPERATING
AND OPERATING
AND OPERATING
AND OPERATING
AND OPERATING
INSTRUCTIONS
INSTRUCTIONS
INSTRUCTIONS
INSTRUCTIONS
INSTRUCTIONS
INSTRUCTIONS
GT622
GT622
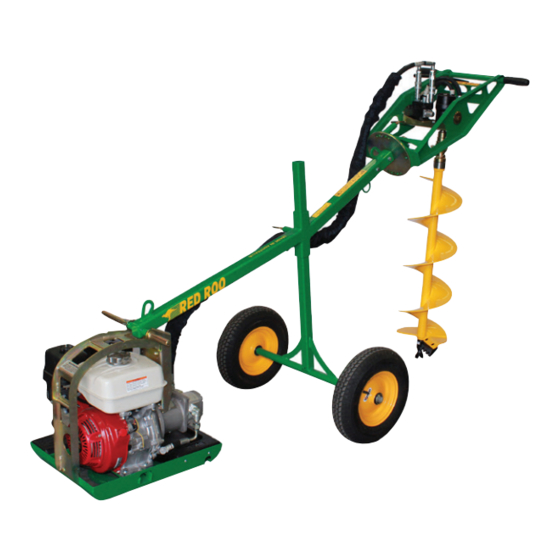
DHS9-5
DHS
DHS
GARDEN
HYDRAULIC POST
HYDRAULIC POST
GARDEN
HYDRAULIC POST
TILLER
TILLER
HOLE DIGGER
HOLE DIGGER
HOLE DIGGER
GT622
Commercial Environmental Equipment
GARDEN
Commercial Environmental Equipment
Commercial Environmental Equipment
Commercial Outdoor Power Equipment
Commercial Outdoor Power Equipment
Online Demonstration Available at:
www.redroo.com/products/postholediggers
™
™
™
™
™
™
Advertisement
Table of Contents

Related Manuals for red roo DHS9-5


Summary of Contents for red roo DHS9-5
- Page 1 Online Demonstration Available at: © Copyright 2001, Red Roo Sales & Service Company Pty. Ltd. 1301-0018 © Copyright 2001, Red Roo Sales & Service Company Pty. Ltd.
-
Page 2: Operating Instructions
SAFETY PRECAUTIONS FOR DHS 9-5 USERS SAFETY PRECAUTIONS FOR DHS 9-5 USER “STAY ALERT – DON’T GET HURT” USE COMMON SENSE 9) NEVER operate the hydraulic post hole digger when fatigued. ALWAYS BE ALERT! If you get Foward/Reverse Handle AND PLENTY OF IT tired while operating the hydraulic post hole digger, Operator Presence Control take a break.
Need help?
Do you have a question about the DHS9-5 and is the answer not in the manual?
Questions and answers