Advertisement
Advertisement
Table of Contents

Related Manuals for Rombouts Xpress Office


Summary of Contents for Rombouts Xpress Office
- Page 1 INSTRUCTIONS FOR USE ®...
- Page 2 DEscrIPtIon of tHE macHInE ®...
-
Page 3: Safety Instructions
safEty InstructIons The machine is designed to prepare drinks according to these instructions. – Do not use the machine for any purpose other than those intended. – Do not switch the machine on without a dose. – Do not use the machine without water. –... - Page 4 – Unplug the machine from the power socket when it is not going to be used for a prolonged period. – Unplug the machine by pulling from the plug rather than the power cable so that you do not damage it. –...
-
Page 5: Machine Technical Specifications
contents 1 – machine technical specifications 5.4 - Trouble Shot – Pod Jamming 2 – Machine description 6 - machine programming – Volumes 3 – unpacking and commissioning the 6.1 - Coffee volume setting machine 6.1.1 - E xpresso volume ( Factory setting 3.1 - Unpacking 3.2 - Commissioning 40ml ) 4 –... -
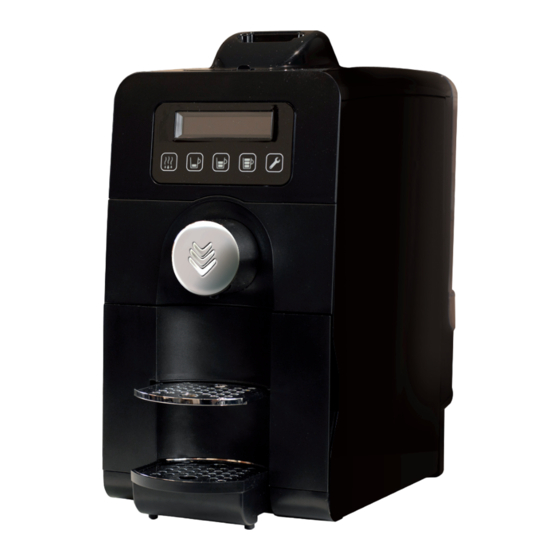
Page 6: Machine Description
This appliance disposal should not be done in the common trash, but on the Electronic/Electrical trash for recycling proper locations. 2 – Machine description 1 – Top cover 5 – Waste Pod Bin 8 – Drip tray 2 – Water Tank 6 – C offee exit spout / Hot 9 – On/off switch water 3 – Digital screen 10 – Electrical socket 7 –... -
Page 7: Close Top Cover
4.2 – makIng a coffEE: 3 PrEDEfInED VolumEs aVaIlablE Place a cup on the cup support. Open the coffee pod packaging ( remove the foil ) and take the pod out. Insert the pod into the machine ( Top cover [1] ) Press a coffee button: expresso, coffee or long coffee [4]. The coffee cycle stops automatically at the end of the cycle or may be stopped manually by pressing the selected button. Once the coffee pod is infused, it is ejected automatically and drops into the Waste Pod Bin [5]. The machine is then ready to make a new coffee. 4.3 – hot Water Place a cup on the cup support then press the hot water button. The hot water cycle stops automatically at the end of the cycle or may be stopped manually by pressing the hot water button. 4.4 – eco Mode After 15 minutes of inactivity, the machine turns automatically into Eco Mode ( “Eco Mode” message displayed ). If user wants to brew a new coffee, he has to press one of the buttons, machine will then display “heating” as long as normal temperature for coffee infusion won’t be reached. Once machine is hot, “Select your drink” message is displayed. 5 – Machine alarMs – trouBle shots The machine has various sensors to provide a maximum level of safety and to make the machine as easy as possible to use. The following messages are likely to appear. -
Page 8: Language Choice
5.2.3 – replace Brita filter ( displayed until Brita filter is replaced ) Depending on machine’s configuration, this message may be displayed after a preset value of water volume used by the machine. 5.3 – lEVEl 3 ( contact tHE maIntEnancE DEPartmEnt ) 5.3.1 – breWing unit error No intensity detected on the brewing unit. Brewing Unit must be replaced. 5.3.2 – WAter FloW rAte probleM Defective Pump or blocked brewing unit. Pump or brewing unit must be replaced. 5.3.3 – heAting If “Heating” remains displayed for more than 2 minutes, it may come from a heater problem ( it must be replaced ). 5.4 – trouble shot – pod jAMMing In case of pod jamming, machine must be turned OFF, and unplugged. Then, user must open Top Cover N°1, and with care, extract the jammed pod. Once this is done, close Top Cover N°1, switch machine ON again, and wait till “Select your drink” message is displayed. Do not use previously... -
Page 9: Coffee Temperature
7.3 – coffEE tEmPEraturE To set coffee temperature, use the control pad to scroll, validate selection and record the desired values. Values are settable between 65°C and 80°C. 7.4 – hot Water teMperature To set hot water temperature, use the control pad to scroll, validate selection and record the desired values. Values are settable between 75°C and 90°C. 7.5 – brIta fIltEr - Volume display: if selected, machine indicates water volume used till last filter change. - Filter change confirmation: if YES is selected, water volume counter for Brita Filter is RESET to zero. 7.6 – cleaning If YES is selected, cleaning cycle starts.
Need help?
Do you have a question about the Xpress Office and is the answer not in the manual?
Questions and answers