
Related Manuals for Sure Sweep STR1100E with TRS

Summary of Contents for Sure Sweep STR1100E with TRS
- Page 1 Operating manual Alphaline PO Box 228 Salisbury QLD 4107 Australia Phone: 1300 655 598 Fax: 1300 733 398 www.suresweep.com.au...
-
Page 3: Table Of Contents
Table of contents Table of contents Introduction............................4 Usage conformant with intended purpose ................4 Safety information ..........................5 Device Description ........................... 7 Initial Startup ........................8 Operation............................10 Driving ..........................10 4.1.1 Forward motion: ....................11 4.1.2 Reverse motion: ....................11 Sweeping .......................... - Page 4 Table of contents 5.8.1 Removal......................21 5.8.2 Reinsertion ......................22 Sweeping Rollers Replacement ..................22 5.9.1 Dismounting the Sweeping Rollers ..............22 5.9.2 Installing the Sweeping Rollers ................. 23 5.10 Setting the Sweeping Rollers .................... 24 5.10.1 Sweeping Contour Adjustment ................24 5.10.2 Adjusting the Sweeping Contour ...............
- Page 5 Table of contents 18/11/2014...
-
Page 6: Introduction
Introduction This operating manual contains instructions for using the hand-operated sweeper. Our products are subject to continuous improvement. Therefore, design changes that were made after this manual went to print could not be incorporated. If you have any questions, please contact our Service department. -
Page 7: Safety Information
Safety information The machine should only be used in a flawless state, as well as in keeping with its intended purpose, in a safety- conscious and risk-conscious manner and in compliance with these operating instructions. In addition to the operating manual, please heed general le- gal and other binding regulations for accident prevention and environmental protection. - Page 8 Charge flat batteries directly after use and only in well- ventilated rooms. Keep naked flames and electrical sparks away from the charging area, since a highly-explosive electrolytic gas mix- ture is generated when batteries are being charged. Note that the accumulator batteries are filled with battery ac- Batteries should always be kept clean and dry to avoid leakage currents! Never short-circuit battery poles! Smoking, eating and drinking should be avoided in the vicin-...
-
Page 9: Device Description
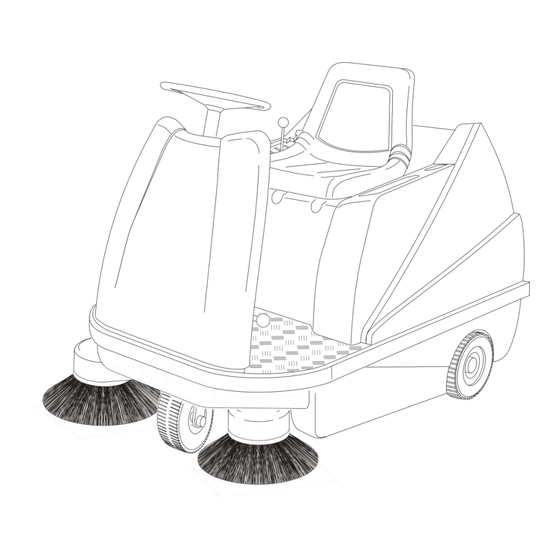
Device Description The Sweeping & Suction Machine is driven by electric motors. Model STR1100E TRS is equipped with two pivotable side brushes. If nec- with essary, the dust stirred up by the sweeping rollers is caught by the dust suction unit in a lamellar filter inside the machine. The lamellar filter is cleaned by an electrically controlled filter cleaning device. -
Page 10: Initial Startup
Initial Startup The Sweeping & Suction Machine standard delivery is without batteries or charging device. Optional: The Sweeping & Suction Machine is supplied with batteries Standard: Open the transport packaging. Take off the complete hood. Lift up hood at back and lift the front spigots of the hood out of the retaining. - Page 11 Optional: The Sweeping & Suction Machine is equipped with batteries. Open the transport packaging. Open the hood Lock hood securely using the hood arrester. The hood is equipped with drill holes at the bottom Fit the hood arrester into the corresponding drill hole. ...
-
Page 12: Operation
Operation Driving Starting the Sweeping & Suction Machine Sit down in the driver`s seat The Sweeping & Suction Machine cannot be started if the driver's seat is not weighed down. Check position of direction of motion switch. The direction of motion switch is a toggle switch with two positions. -
Page 13: Forward Motion
4.1.1 Forward motion: Push the direction of motion switch forward. Optical signal: Green pilot lamp on the switch 4.1.2 Reverse motion: Push the direction of motion switch backward. Optical signal: Red pilot lamp on the switch, Acoustical signal: Beeper (optional) Parking brake Brake pedal Accelerator... -
Page 14: Sweeping
Sweeping Do not switch on suction when sweepings are wet. This will cause dam- age to the suction device and the filter. Provide good aeration when using the machine in closed rooms or buildings. Do not sweep up materials that may cause health impairment. 1 switch for the sweeping rollers 2 switch for the side brushes 3 switch for the suction... -
Page 15: Operating The Side Brushes
Operating the Side Brushes The side brushes are fixed to swingers. Whenever the side brushes hit an obstacle they swing back under the vehicle to avoid damages. Start the Sweeping & Suction Machine. Unlatch the lowering lever of the side brushes. ... -
Page 16: Adjustment Of Driver`s Seat
Please observe! Do not switch on suction when sweepings are wet. This will cause damage to the suction device! To turn off suction operation switch the toggle switch for the suction to OFF position. Adjustment of Driver`s Seat Loosen the seat arresting device and shift the driver's seat on the seat support to a position that feels comfortable to you. -
Page 17: Emptying The Dust Container
Emptying the Dust Container The dust container is the place where the sweepings are collected. It is positioned at the back of the Sweeping & Suction Machine. The dust container must be emptied regularly and especially after each use. 4.9.1 Removing the Dust Container Turn the dust container locking upward. -
Page 18: Reinserting The Dust Container
4.9.2 Reinserting the Dust Container Place the dust container before the dust container retaining. Bring the dust container's front guides up to the same level as the guide rails. Slide the dust container into the Sweeping & Suction Machine. ... -
Page 19: Maintenance
Maintenance Safety Information Only complete the type of maintenance work described in the following chapter. All other maintenance and upkeep work may only be carried out by the manufacturer or by companies and persons authorised by the manufacturer, who are familiar with the relevant safety specifications, because portable devices in industrial use are subject to the safety test according to VDE 0701. -
Page 20: Charging The Batteries
Charging the Batteries Turn off the Sweeping & Suction Machine. Open the hood. Secure the hood position by the hood arresting device. Guide the hood arresting into the holes at the bottom of the hood. Connect the charging device to the charging plug of the Sweeping &... -
Page 21: Battery
Battery Four batteries supply the Sweeping & Suction Machine with electrical power. The charging condition of the batteries is indicated by the battery condition display on the control panel. 1 Batteriezustands-Armatur When the Sweeping & Suction Machine is switched on, the red LED lights flash five times. -
Page 22: Brake Check
1 Bowden pull wire guiding 2 Bowden pull wire 3 adjustment nut 4 back nut 5 brake pulley 6 brake lever 7 brake pulley arresting Now conduct a brake check. Brake Check Free Movement of Rear Wheal You must be able to move the Sweeping & Suction Machine by pushing when the brake is released. -
Page 23: Steering
Carry out the above described brake check. Steering The steering transferral to the rear wheel is man aged by a chain and two chain sprockets. Grease the chain sprockets at regular intervals. Cf. Maintenance Chart. Replacement of Filter The filter removes fine dust. The filter is cleaned by an electrical vibrating device. -
Page 24: Reinsertion
5.8.2 Reinsertion Place the filter into the lower angular bracket. Swing the upper bracket over the filter.. Tighten the top star handles slightly. Tighten star handles evenly crosswise so that the filter snugly fits all around the seal. ... -
Page 25: Installing The Sweeping Rollers
Remove the side panel. The roller swing is held in place by three star handles. Loosen the star handles. Remove the roller swing. 1 open star handle 2 star handle with marking 3 roller swing 4 star handle 5 turning lever ... -
Page 26: Setting The Sweeping Rollers
Each turning lever end is equipped with one pick-up pin. 1 threaded rods 2 sweeping roller keyway 3 pick-up pin Turn the turning lever until the pick-up pin fits into the keyway of the sweeping rollers. Push the roller swing over the threaded rods. ... -
Page 27: Adjusting The Sweeping Contour
5.10.2 Adjusting the Sweeping Contour Switch off the Sweeping & Suction Machine. Pull lowering lever of the sweeping rollers. Arrest the lowering lever. Open the hood. Secure the hood position by the hood arresting device. ... -
Page 28: Replacing The Side Brush
Original roller diameter: 285 mm. When diameter has decreased to 245 mm, the roller needs to be re- placed. 5.11 Replacing the Side Brush 5.11.1 Dismounting the Side Brush Turn off the Sweeping & Suction Machine. Pull up the lowering lever for the side brushes. ... -
Page 29: Adjustment Of The Side Brush
5.12 Adjustment of the Side Brush Operational wear necessitates additional adjustment of the side brush- Turn off the Sweeping & Suction Machine. Unlatch the lowering lever of the side brushes. Push down the lowering lever. Loosen the bolts of the front panel. ... -
Page 30: Wheels
5.13 Wheels The Sweeping & Suction Machine is equipped with three wheels. The standard rear wheel tire is made of solid rubber. The two drive wheels are standard equipped with pneumatic tires. Optionally the drive wheels are delivered sith solid rubber tires. Defective tires must be repaired or replaced by expert shops only. -
Page 31: After Each 100 Operating Hours Also
Search brush - roller tunnel for jammed particles and seized up dirt that may narrow the brush tunnel and obstruct free roller brush movement. 5.15.3 After each 100 operating hours also Check cable isolation, replace cables if required. ... -
Page 32: Disturbances, Disturbance Display, Remedy
5.16 Disturbances, Disturbance Display, Remedy Disturbance Possible Cause Remedy No operating display at control EMERGENCY OFF not switched Turn EMERGENCY OFF switch panel: on Key switch not switched on into socket Seat contactor or hood contactor Turn key switch and check cor- not actuated rect load Fault in electrical wiring... -
Page 33: Technical Data
Disturbance Possible Cause Remedy Fuse of ator does not remain set Ator does not move freely Check ventilator wheel and re- move any obstruction Fuse of propelling drive does not Drive wheels obstructed Jack up the Sweeping & Suction remain set Machine check differential opera- tion of wheels and free running 5.17... -
Page 34: Product Marking
Electrical Installation Side brushes: 24 V 20A Sweeping rollers: 24 V 40A Driving switch: 24 V 45A Maximum Airborne Sound Level: 71 dB (A) Weighted Effective Acceleration <2,5m/s² Value upper extremities are sub- jected to Tires Front: 1 solid rubber tire Back : 2 pneumatic tires Optional: 2 solid rubber tires Tire size: 260 x 85... -
Page 35: Accessories And Spare Parts
5.20 Accessories and spare parts Accessories and spare parts must conform to the requirements of the manufacturer. This is ensured by using genuine replacement parts. 5.21 Service Alphaline PO Box 228 Salisbury QLD 4107 Australia Phone: 1300 655 598 Fax: 1300 733 398 www.suresweep.com.au 5.22 Transport... -
Page 36: Ec Declaration Of Conformity (Translation Of The Original Version)
EC Declaration of conformity (Translation of the original version) According to the EC Machine Directive 2006/42/EC, Appendix II, No. 1A Mr. Kai Stolzenberg – Management of the Stolzenberg GmbH & Co. KG, Hamburger Straße 15-17, D-49124 Georgsmarienhütte - is authorized to arrange technical information. We hereby declare that the machine described below corresponds, in its conception and construction, as well as the model brought into use by us, to the basic safety and health requirements of the EC Machine Directive...
Need help?
Do you have a question about the STR1100E with TRS and is the answer not in the manual?
Questions and answers