Table of Contents
Advertisement
Doc. No.
OSA037U-03
INSTRUCTION
ELECTRIC GREASE LUBRICATOR
( AC-100V 50/60Hz )
EPL-100
MODEL No.880899
WARNING
Prior to operating this pump, be sure to read this operation manual for safety. After reading the manual, please
keep it at hand any time for your quick reference.
The power supply cannot be used other than AC100V.
Advertisement
Table of Contents

Subscribe to Our Youtube Channel
Related Manuals for YAMADA EPL-100


Summary of Contents for YAMADA EPL-100
- Page 1 OSA037U-03 INSTRUCTION ELECTRIC GREASE LUBRICATOR ( AC-100V 50/60Hz ) EPL-100 MODEL No.880899 WARNING Prior to operating this pump, be sure to read this operation manual for safety. After reading the manual, please keep it at hand any time for your quick reference.
-
Page 2: Preface
- Preface Thank you very much for purchasing Yamada Pump. This machine is a portable type lubricator that is indispensable for grease lubrication for machines and vehicles. The pump is driven by AC-100V ( 50/60Hz ). This lubricator cannot be used for oil lubrication. The applicable grease is limited to a type of NLGI No.2 or less in the normal operating conditions. -
Page 3: Precautions On Use
- Precautions on Use The following warnings and cautions are very important. Be sure to observe them. WARNING - Gasoline is a high-volatility material. Do not use gasoline to clean the pump in any case, otherwise it may cause ignition or explosion. - Remodeling this machine may result in a bodily accident or failure. -
Page 4: Table Of Contents
4.1 Troubleshooting and Corrective Measures ................4.2 Maintenance and Inspection ....................Disassembly and Assembly ....................6. Parts Disassembly Drawing and Parts List 6.1 880899 EPL-100........................6.2 851985 Grease gun ......................6.3 852902 Pump assembly ...................... Specification 7.1 Specification ........................7.2 Dimensions.......................... -
Page 5: Names And Materials Of Parts
1. Names and Materials of Parts 1.1 Names and Materials of Parts 1.2 Contents of Package This machine is packaged in a corrugated fiberboard case. Open the top lid of the corrugated fiberboard case and check the machine for damage. -
Page 6: Preparations Before Operation
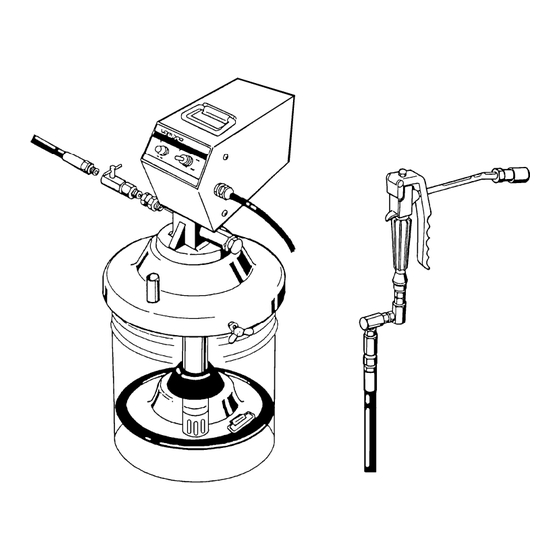
2. Preparations before Operation [Assembling the unit] (Fig. 1) 1) Insert the pump assembly in the center hole from the front side of the lid. 2) Fix the pump assembly and the lid with 3 pan-head screws from the rear side of the lid. 3) Connect the high-pressure hose for grease (separately available) to the valve kit at the pump discharge port and connect a high-pressure grease gun to the other end of the... -
Page 7: How To Operate The Machine
3. How to Operate the Machine CAUTION - Do not operate the gun lever with the discharge port facing to another person during machine operation. A direct hit against the human body may result in an accident such as skin damage. - Regarding a secondary accident such as hose damage that may be caused without shutting off of the air supplied to the hose or installation contamination due to a leak from the valve or gun after completion of the work or at night, the responsibility rests with the user side. -
Page 8: Maintenance And Inspection
4. Maintenance and Inspection 4.1 Troubleshooting and Corrective Measures Symptom Contents of inspection Corrective measure ♦ The pump fails to start. - Check if the power cable is cut. - Change to the new cable. - Check if the fuse is blown. - Change to new fuse (7A). -
Page 9: Disassembly And Assembly
5. Disassembly and Assembly CAUTION - Gasoline is a high volatile fuel. Do not use it to clean the pump in any case, otherwise ignition or explosion may be caused. - When washing parts, do not use such a liquid as corrodes aluminum, copper alloy, iron, etc. - Before disassembling and inspecting the machine, be sure to shut off the power supply and open the outlet valve to release the internal pressure of the pump. -
Page 10: Valve Kit
[Assembling the lower pump] - Assembling the intake valve 11) Insert the ball into the piston. Insert the spring into the union. Put the washer between the piston and the union, and then connect each other. This time keep the both edge of the washer right-angled position against the side of the hexagon part of the union. -
Page 11: Parts Disassembly Drawing And Parts List 6.1 880899 Epl-100
6. Parts Disassembly Drawing and Parts List 6.1 880899 EPL-100 REF.No. Parts No. Description Q'ty 851985 Grease gun assembly 680080 Union adapter 803903 Valve kit 710915 683347 Screw with washer 803662 Cover assembly 852902 Grease pump assembly 602296 Pan-head screw... -
Page 12: 852902 Pump Assembly
6.3 852902 Pump assembly Parts No. Parts No. REF.No. Description Q'ty REF.No. Description Q'ty 682262 Bolt 702971 713239 Washer 706091 Union 832933 Cover assembly 709643 713231 702975 Union 713230 Stopper 702974 Washer 716029 702976 Spring 713240 Rink 630313 Ball 682995 Needle bearing 801051 Cylinder assembly... -
Page 13: Specification
7. Specification 7.1 Specification Type EPL-100 Model No. 880899 Rating Continuous rating Discharge volume 2~3.17g/sec Discharge pressure 0~28MPa Max discharge pressure 28MPa (30 minute rating) Rotational speed 90 ~ 145 RPM Power supply AC-100 V ( 50/60 Hz ) Vibration resistance 3.5 G... -
Page 14: Limited Warranty
8. Limited Warranty ● This product is shipped to customers only after meeting strict inspection standards. If an abnormality occurs during normal operation in accordance with the operating instructions and other operating cautions within the warranty period (12 months after date of purchase) that can be attributed to a manufacturing defect, the defective parts of this product will be serviced or the product will be replaced free of charge. - Page 15 Manufactured by YAMADA CORPORATION INTERNATIONAL DEPARTMENT No.1-3, 1-Chome, Minami-Magome, Ohta-ku, Tokyo, 143-8504, Japan PHONE : +81-(0)3-3777-0241 : +81-(0)3-3777-0584 201005 OSA037U...
Need help?
Do you have a question about the EPL-100 and is the answer not in the manual?
Questions and answers