
Related Manuals for GYS AUTOPULSE 220-M3


Summary of Contents for GYS AUTOPULSE 220-M3
- Page 1 AUTOPULSE 2-4 / 5-21 / 74-80 220-M3 2-4 / 22-38 / 74-80 2-4 / 39-56 / 74-80 2-4 / 57-73 / 74-80 www.gys.fr 73502_V6_16/09/2019...
- Page 2 AUTOPULSE 220-M3 FIG-1 FIG-2 - Acier / Steel / Stahl / Acero Gaine acier / Steel Tube capillaire / Capillary - Alu NO USE Pipe / Kapillarrohr / Staal / Aço sheath / Stahlseele - Inox - Stainless steel Gaine téflon / Teflon sheath /...
- Page 3 AUTOPULSE 220-M3 FR - Prémonter les vis manuellement sans les bloquer. UK - Put the screws manually without tightening them. DE - Montieren Sie die Schrauben ohne sie festzuziehen. ES - Premontar los tornillos manualmente sin bloquearlos. RU - установить винты вручную без блокировки.
- Page 4 AUTOPULSE 220-M3 M4x10 (x6) M6x12 (x3) M6x12 (x3) FR - Potence seule (ref. 059276) / Potence + Spool Gun (ref. 038554). EN - Balancing arm only (ref. 059276) / Balancing arm + Spool Gun (ref. 038554). DE - Ausleger (Art.-Nr. 059276) / Ausleger + Spool Gun (Art.-Nr. 038554).
- Page 5 AUTOPULSE 220-M3 AVERTISSEMENTS - RÈGLES DE SÉCURITÉ CONSIGNE GÉNÉRALE Ces instructions doivent être lues et bien comprises avant toute opération. Toute modification ou maintenance non indiquée dans le manuel ne doit pas être entreprise. Tout dommage corporel ou matériel dû à une utilisation non-conforme aux instructions de ce manuel ne pourra être retenu à la charge du fabricant.
- Page 6 AUTOPULSE 220-M3 RISQUE DE FEU ET D’EXPLOSION Protéger entièrement la zone de soudage, les matières inflammables doivent être éloignées d’au moins 11 mètres. Un équipement anti-feu doit être présent à proximité des opérations de soudage. Attention aux projections de matières chaudes ou d’étincelles et même à travers des fissures, elles peuvent être source d’incendie ou d’explosion.
- Page 7 AUTOPULSE 220-M3 • raccorder le câble de retour à la pièce mise en œuvre aussi proche que possible à la zone à souder; • ne pas travailler à côté de la source de courant de soudage, ne pas s’assoir dessus ou ne pas s’y adosser ;...
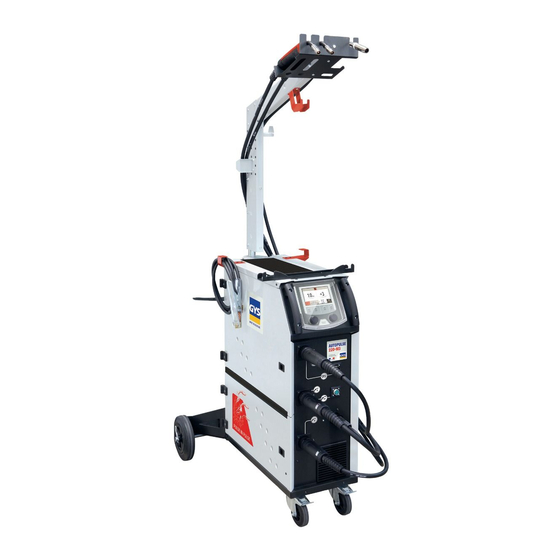
- Page 8 DESCRIPTION L’AUTOPULSE 220-M3 est un poste de soudure semi-automatique « synergique» ventilé pour le soudage (MIG ou MAG). Il est recommandé pour le soudage des aciers, des inox et des aluminiums et le brazing. Son réglage est simple et rapide grâce à son mode «synergique» intégral.
- Page 9 SOUDAGE SEMI-AUTOMATIQUE EN ACIER / INOX (MODE MAG) (FIG-2-A) L’AUTOPULSE 220-M3 peut souder avec du fil acier 0.6/0.8/1.0 et inox de 0.8/1.0. L’appareil est livré d’origine avec des galets Ø 0.6/0.8 et Ø 0.8/1.0 pour acier ou inox. La valeur lue sur le galet installé correspond au diamètre de fil à utiliser (FIG-3-B).
- Page 10 AUTOPULSE 220-M3 RACCORDEMENT GAZ L’AUTOPULSE 220-M3 est équipé de raccord. Utilisez les adaptateurs livrés d’origine avec votre poste. INTERFACE DE COMMANDE - La molette (1) permet d’ajuster ou de sélectionner les paramètres de la fenêtre de gauche. La molette (2) permet d’ajuster ou de sélectionner les paramètres de la fenêtre de droite.
- Page 11 AUTOPULSE 220-M3 DÉFINITION DES SYMBOLES DE L’INTERFACE Retour en arrière ou annulation. Permet la validation des réglages et d’afficher la fenêtre de soudage. Permet de choisir le mode d’affichage et le paramètre principal. Permet d’atteindre le menu job (gestion des programmes).
- Page 12 AUTOPULSE 220-M3 Ce menu permet de choisir le paramètre principal en mode boite (Epaisseur de la pièce à souder, vitesse du fil, courant moyen de soudage). 2/ Mode Manuel L’encodeur de gauche permet d’ajuster la vitesse, celui En mode Manuel, il n’y a qu’un paramètre secondaire : de droite la tension (indépendant du menu paramètre...
- Page 13 AUTOPULSE 220-M3 En Mode Standard - Delai - L’encodeur de gauche per- Le Mode Standard - 2T - Expert permet d’accéder au met d’ajuster la durée du point, celui de droite le délai Graph (PréGaz, HotStart, Crater Filler et PostGaz) entre chaque point.
- Page 14 AUTOPULSE 220-M3 Les modes Expert et avancé permettent l’accès au En mode 4T, le Hotstart, prégaz, crater filler et post gaz cycle de soudage. peuvent être gérés à la gâchette. Le mode avancé permet l’accès à la tension d’arc de chaque phase du cycle de soudage.
- Page 15 AUTOPULSE 220-M3 Le mode avancé permet l’accès à la tension d’arc de chaque phase du cycle de soudage. 6/ Menu job Menu de sauvegarde permettant de sauvegarder le Job Menu permettant de donner un nom au Job. (premier accès). Menu permettant d’ouvrir un Job ou d’enregistrer un Menu de gestion des Jobs (modification et suppression).
- Page 16 AUTOPULSE 220-M3 Le menu paramètre permet de régler la langue, Le menu Portabilité permet également d’exporter ou d’importer une l’horloge et les unités de mesures (internationales, configuration complète provenant de la même ou d’une autre machine. américaines) Le menu calibration permet d’accéder à la calibration de Ce menu permet d’afficher le choix du mode d’affichage (Simple : limité...
- Page 17 AUTOPULSE 220-M3 LES TORCHES EN OPTION - Torche Push-Pull (option ref. 046283) La torche Push Pull se monte sur le connecteur (FIG 1 - 15). L’utilisation d’une torche Push Pull permet l’utilisation de fil AlSi même en Ø 0.8 mm avec une torche de 4 m.
- Page 18 AUTOPULSE 220-M3 LES CYCLES DE SOUDAGE Procédé 2T Standard : T hotstart I blackout Dstart Gas post-Flow T burn-back T crater Filler I crater Filler Soft-start À l’appui de la gâchette, le pré-gaz démarre. Lorsque le fil touche la pièce, un pulse initialise l’arc, puis le cycle de soudage démarre. Au relâché de la gâchette, le dévidage s’arrête et un pulse de courant permet de couper le fil proprement suivi du post gaz.
- Page 19 AUTOPULSE 220-M3 Procédé 2T Pulsé : T hotstart T downslope T upslope I blackout Dstart Gas post-Flow T burn-back T crater Filler I crater Filler Soft-start À l’appui de la gâchette, le prégaz démarre. Lorsque le fil touche la pièce, un pulse initialise l’arc. Puis, la machine commence par le Hot-start, le upslope et enfin, le cycle de soudage démarre.
- Page 20 AUTOPULSE 220-M3 Procédé 2T Pulse In Pulse : Pulse Frequency - 1 / T pulse Duty cycle I cold (%) T hotstart T crater Filler T upslope T downslope Dstart Gas post-Flow T burn-back Même spécificité que le mode 2T pulse avec en plus un cycle d’alternance de courant chaud puis froid dont on peut régler la fréquence, le niveau du courant froid ainsi que la durée du cycle chaud en valeurs relatives.
- Page 21 AUTOPULSE 220-M3 Plage de réglage de 15 à 20 L / min. Le débit de gaz est insuffisant. Nettoyer le métal de base. Bouteille de gaz vide. La remplacer. Qualité du gaz non satisfaisante. Le remplacer. Empêcher les courants d’air, protéger la zone de Circulation d’air ou influence du vent.
-
Page 22: General Instructions
AUTOPULSE 220-M3 WARNING - SAFETY RULES GENERAL INSTRUCTIONS Read and understand the following safety recommendations before use. Any modification or maintenance not specified in the instructions manual should not be undertaken. The manufacturer is not liable for any injury or damage due to non-compliance with the instructions featured in this manual. -
Page 23: Gas Cylinders
AUTOPULSE 220-M3 FIRE AND EXPLOSION HAZARDS Protect the entire welding area. Flammable materials must be moved to a minimum safe distance of 11 meters. A fire extinguisher must be readily available near the welding operations. Be careful of spatter and sparks, even through cracks. It can be the source of fire or explosion. - Page 24 AUTOPULSE 220-M3 People wearing pacemakers are advised to consult a doctor before using this device. Exposure to electromagnetic fields while welding may have other health effects which are not yet identified. RECOMMENDATIONS FOR EVALUATING THE WELDING AREA AND INSTALLATION Overview The user is responsible for the installation and use of the arc welding equipment according to the manufacturer’s instructions.
-
Page 25: Power Switch
DESCRIPTION AUTOPULSE 220-M3 is a «synergic» semi-automatic welding machine, ventilated for welding (MIG or MAG). This machine is recommended for welding steel, stainless steel, aluminium and the brazing. Its adjustment is quick and easy with its «synergic» mode. -
Page 26: Gas Connection
SEMI AUTOMATIC WELDING WITH STEEL / STAINLESS STEEL (MAG MODE) (FIG-2, A) AUTOPULSE 220-M3 can weld with 0.6/0.8/1.0 steel wire and 0.8/1.0 stainless steel wire. The machine is supplied with Ø0.6/0.8 and 0.8/1.0 rollers for steel or stainless steel. The indication on the roller is the wire diameter to be used (FIG-3, B). - Page 27 - The default unlock code is: 0000 - To update the product or welding parameters, start the machine with a USB stick containing the latest version available (log on to the service section of the GYS website). Description of the different interface windows (see next page): 1 Choice of the display mode (Simple, Expert, Advanced).
- Page 28 AUTOPULSE 220-M3 DEFINITION OF THE INTERFACE SYMBOLS Step backwards or cancellation. To validate the settings and to display the welding window. To choose the display mode and the main parameter. To access the job menu (program management). To use the selected program.
- Page 29 AUTOPULSE 220-M3 This menu allows to choose the main parameter in box mode (thickness of the part to be welded, wire speed, average welding current). 2/ Manual mode The left control knob allows to adjust the speed and the In manual mode, there is only one secondary parameter, right one to adjust the voltage (not linked to the main the self.
- Page 30 AUTOPULSE 220-M3 In Standard Mode - Delay - The left control knob allows The Standard Mode - 2T - Expert allows to access the to adjust the duration of the point and the right knob Chart (Pre-gas, HotStart, Crater Filler and Post-gas)
- Page 31 AUTOPULSE 220-M3 The Expert and Advanced modes give access to the In 4T mode, the Hotstart, pre gas, crater filler and post welding cycle. gas can be controlled through the trigger. The advanced mode is used to set the arc voltage at each welding cycle.
- Page 32 AUTOPULSE 220-M3 The advanced mode allows to access the arc voltage of each phase of the welding cycle. 6/ Job menu Backup menu at first access, allowing to save the job. Menu to name the job. This menu is used to save or modify a job.
- Page 33 AUTOPULSE 220-M3 7/ System menu The system menu is used to set the clock, the language Use the left button to access the menus : sys- and the measurement units (international, american) tem, calibration, maintenance and information. The calibration menu gives access to wire feeding The maintenance menu also allows you to export or speed calibration.
- Page 34 AUTOPULSE 220-M3 Soft start Arc length Soft start arc length -40/+40 Upslope Arc length Upslope arc length -40/+40 Downslope arc length Downslope arc length -40/+40 Cold Arc length Cold arc length -40/+40 Cratter Arc length Crater arc length -40/+40 Speed...
- Page 35 AUTOPULSE 220-M3 WELDING CYCLES Standard 2T process: T hotstart I blackout Dstart Gas post-Flow T burn-back T crater Filler I crater Filler Soft-start When pressing the trigger, the pre-gas starts. When the wire comes into contact with the part, a pulse starts the arc, then the welding cycle starts.
- Page 36 AUTOPULSE 220-M3 2T Pulsed process: T hotstart T downslope T upslope I blackout Dstart Gas post-Flow T burn-back T crater Filler I crater Filler Soft-start When pressing the trigger, the pre-gas starts and when the wire comes into contact with the part a pulse starts the arc. Then, the machine starts with the Hot-start, the upslope and the welding cycle starts.
-
Page 37: Troubleshooting
AUTOPULSE 220-M3 2T Pulse In Pulse process: Pulse Frequency - 1 / T pulse Duty cycle I cold (%) T hotstart T crater Filler T upslope T downslope Dstart Gas post-Flow T burn-back Same feature as the 2T pulsed mode with, in addition, a warm-cold alternation whose the frequency, the level of the cold current and the duration of the warm cycle can be adjusted. - Page 38 AUTOPULSE 220-M3 Setting range from 15 to 20 L/min. The gas flow is insufficient. Clean the metal. Gas cylinder empty. Replace it. Unsatisfactory gas quality. Replace it. Air circulation or wind influence. Avoid draughts, protect the welding area. The weld bead is porous.
- Page 39 AUTOPULSE 220-M3 SICHERHEITSANWEISUNGEN ALLGEMEIN Die Missachtung dieser Anweisungen und Hinweise kann zu schweren Personen- und Sachschäden führen. Nehmen Sie keine Wartungarbeiten oder Veränderungen am Gerät vor, die nicht in der Anleitung gennant werden. Der Hersteller haftet nicht für Verletzungen oder Schäden, die durch unsachgemäße Handhabung dieses Gerätes entstanden sind.
- Page 40 AUTOPULSE 220-M3 Metalle entstehen giftige Dämpfe. Entfetten und reinigen Sie diese zuvor. Die zum Schweißen benötigten Gasflaschen müssen in gut belüfteter, gesicherter Umgebung aufbewahrt werden. Lagern Sie sie ausschließlich stehend und sichern Sie sie z.B. mithilfe eines entsprechenden Fahrwagens gegen Umkippen. Informationen zum richtigen Umgang mit Gasflaschen erhalten Sie von Ihrem Gaslieferanten.
- Page 41 AUTOPULSE 220-M3 Folgen Sie den folgenden Maßnahmen zur Reduktion elektromagnetischer Felder: • Elektrodenhalter und Massekabel bündeln, wenn möglich machen Sie sie mit Klebeband fest; • Achten Sie darauf, dass ihre Oberkörper und Kopf sich so weit web wie möglich von den Schweißarbeiten befinden;...
- Page 42 Zustand vorgenommen werden. BESCHREIBUNG Die AUTOPULSE 220-M3 ist ein halbautomatisches, synergisch geregeltes Schweißgerät zum MIG/-MAG Schweißen. Dieses Gerät ist zum Schweißen vom Stahl, Edelstahl, Aluminium und zum «MIG-Löten» geeignet. Einfach und schnelle Einstellung im «synergetischen» Modus. BESCHREIBUNG (ABB.1)
- Page 43 HALBAUTOMATISCHES SCHWEISSEN STAHL / EDELSTAHL (MAG-MODUS) (ABB. 2A) Die AUTOPULSE 220-M3 ist für das Schweißen mit Stahldraht 0,6/0,8/1,0 mm und Edelstahldraht 0,8/1,0 mm geeignet. Das Gerät ist mit Drahtfüh- rungsrollen Ø0,6/0,8 mm und Ø0,8/1,0 mm für Stahl und Edelstahl geliefert. Der angezeigte Wert auf den montierten Drahtführungsrollen entspricht dem Drahtdurchmesser (Abb.
- Page 44 - Der Freischaltcode ist standardmäßig : 0000. - Um das Produkt oder die Schweißparameter zu aktualisieren, starten Sie das Gerät mit einem USB-Stick, der die neueste verfügbare Version enthält (melden Sie sich im Servicebereich der GYS-Website an). Beschreibung der verschiedenen Fenster des Bedienfeldes (siehe nächste Seite): 1 Auswahl des Anzeigemodus (Einfach, Expert, Fortgeschritten).
- Page 45 AUTOPULSE 220-M3 Rechtsdrehung des Drehknopf. Schweißposition. Flache Schweißposition. Angewinkelte Schweißposition. Brennertastermodus (2T, 4T, Spot, Delay). Drahtdurchmesser. Einheit: Stoff-Material. Einstellung der Materialstärke. Einstellung der elektronischen Drossel. Einstellung der Lichtbogenlänge. Graphmodus (Niveau, Dauer, Lichtbogenlänge). BESCHREIBUNG DER VERSCHIEDENEN BEDIENFELD-NIVEAUS 1/ Menü und Einstellungen Ermöglicht die Auswahlt des Schweißmodus (Manuell, Standard, Pulse oder Pulse In...
- Page 46 AUTOPULSE 220-M3 2/ Manueller Modus Der linke Encoder ermöglicht die Einstellung der Ges- Im manuellen Modus gibt es einen einzigartigen, sekun- chwindigkeit. Der rechte Encoder ermöglicht die Einstel- dären Parameter: den Self-Parameter. lung der Spannung (unabhängig vom Hauptparameter). Die Anzeige des Expertmodus ermöglicht den Zugang...
- Page 47 AUTOPULSE 220-M3 Standardmodus - 2T - Expert - Zugang auf den Graph Standardmodus - 4T - Expert - Zugang auf den Graph (Gasvorströmung, HotStart, Crater Filler und Gasnachs- (Gasvorströmung, HotStart, Crater Filler und Gas- trömung) nachströmung) - In diesem Modus können diese Parameter über den Brennertaster geregelt ein (siehe...
- Page 48 AUTOPULSE 220-M3 Der Expertenmodus und der fortgeschrittene Modus ermöglichen die Einstellung der Lichtbogenspannung für jede Phase des Schweißzyklus. 5/ Pulse In Pulse Modus Im Pulse In Pulse Modus werden im linken Fenster die Das zweite Fenster des einfachen Modus ermöglicht den Hauptparameter und im rechten Fenster die Licht- Zugang auf die Schweißposition und die Drossel.
- Page 49 AUTOPULSE 220-M3 6/ JOB-Menü Menü Speichern, um den Auftrag zu speichern (erster Menü, um dem Job einen Namen zu geben. Zugriff). Menü, um einen Job zu öffnen oder einen neuen Job zu Menü Auftragsverwaltung (ändern und löschen). speichern.
- Page 50 AUTOPULSE 220-M3 7/ System Menü Das System Menü ermöglicht die Einstellung von Der linke Knopf ermöglicht den Zugang auf die Sprache, Uhrzeit und der Einheiten (international und Menüs: Steuerung, Kalibrierung, Wartung und Informa- amerikanisch) tion. Das Kalibrierungsmenü ermöglicht die Kalibrierung der Über das Wartungsmenü...
- Page 51 AUTOPULSE 220-M3 Soft start Arc length Lichtbogenlänge beim Soft Start -40/+40 Upslope Arc length Lichtbogenlänge beim Stromanstieg -40/+40 Downslope arc length Lichtbogenlänge beim Stromabstieg -40/+40 Cold Arc length Lichtbogenlänge beim Zweitstrom -40/+40 Cratter Arc length Lichtbogenlänge (Füllung) -40/+40 Speed Geschwindigkeit...
- Page 52 AUTOPULSE 220-M3 SCHWEISSZYKLUS 2T Standard: T hotstart I blackout Dstart Gas post-Flow T burn-back T crater Filler I crater Filler Soft-start Beim Druck auf den Brennertaster startet die Gasvorströmung. Berührt der Draht das Werkstück, zündet ein Puls den Lichtbogen und der Schweißzyklus startet.
- Page 53 AUTOPULSE 220-M3 2T Pulse: T hotstart T downslope T upslope I blackout Dstart Gas post-Flow T burn-back T crater Filler I crater Filler Soft-start Beim Druck auf den Brennertaster startet die Gasvorströmung. Berührt der Draht das Werkstück, zündet ein Puls den Lichtbogen. Dann folgen Hot- Start und Stromanstieg, der Schweißzyklus beginnt.
- Page 54 AUTOPULSE 220-M3 2T Pulse In Pulse: Pulse Frequency - 1 / T pulse Duty cycle I cold (%) T hotstart T crater Filler T upslope T downslope Dstart Gas post-Flow T burn-back Gleiches Verhalten wie im 2T-Pulsebetrieb. Hinzu kommt einen Wechselzyklus zwischen Erst- und Zweitstrom. Frequenz, Zweitstrom und Dauer des Erststrom sind einstellbar.
- Page 55 AUTOPULSE 220-M3 FEHLER, URSACHEN, LÖSUNGEN SYMPTOME MÖGLICHE URSACHEN LÖSUNGEN Partikel verstopfen die Öffnung Reinigen Sie das Kontaktrohr oder ersetzen Sie es. Der Draht rutscht in den Drahtführungsrollen. Fügen Sie Antihaftmittel hinzu. Der Schweißdrahtvorschub ist nicht konstant. Eine Drahtführungsrolle rutscht. Prüfen Sie den Sitz der Drahtführungsrollenschraube.
- Page 56 Kabel, Klemmen, Vorsatzscheiben usw.) sowie bei Gebrauchsspuren übernommen. Das betreffende Gerät bitte immer mit Kaufbeleg und kurzer Fehlerbeschreibung ausschließlich über den Fachhandel einschicken. Die Reparatur erfolgt erst nach Erhalt einer schriftlichen Akzeptanz (unter- schrift) des zuvor vorgelegten Kostenvoranschlags durch den Besteller. Im Fall einer Garantieleistung trägt GYS ausschließlich die Kosten für den Rückversand an den Fachhändler.
- Page 57 AUTOPULSE 220-M3 AVVERTENZE - NORME DI SICUREZZA ISTRUZIONI GENERALI Queste istruzioni devono essere lette e comprese prima dell’uso. Ogni modifica o manutenzione non indicata nel manuale non deve essere effettuata. Ogni danno fisico o materiale dovuto ad un uso non conforme alle istruzioni presenti in questo manuale non potrà essere considerata a carico del fabbricante.
- Page 58 AUTOPULSE 220-M3 RISCHIO DI INCENDIO E DI ESPLOSIONE Proteggere completamente la zona di saldatura, i materiali infiammabili devono essere allontanati di almeno 11 metri. Un’attrezzatura antincendio deve essere presente in prossimità delle operazioni di saldatura. Attenzione alle proiezioni di materia calda o di scintille anche attraverso le fessure, queste possono essere causa di incendio o di esplosione.
- Page 59 AUTOPULSE 220-M3 • collegare il cavo di ritorno al pezzo da lavorare il più vicino possibile alla zona da saldare; • non lavorare a fianco, né sedersi sopra, o addossarsi alla fonte di corrente di saldatura; • non saldare durante il trasporto della fonte di corrente di saldatura.
- Page 60 AUTOPULSE 220-M3 Le correnti di saldatura vagabonde possono distruggere i conduttori di terra, danneggiare il materiale e i dispositivi elettrici e causare riscaldamenti dei componenti potendo causare un incendio. • Tutte le connessioni di saldatura devono essere collegate fermamente, e verificate regolarmente! •...
- Page 61 SALDATURA SEMI-AUTOMATICA IN ACCIAIO / INOX (MODALITÀ MAG) (FIG-2-A) L’AUTOPULSE 220-M3 può essere saldato con filo di acciaio 0,6 / 0,8 / 1,0 e acciaio inossidabile 0,8 / 1,0. Il dispositivo viene fornito con rulli Ø 0,6 / 0,8 e Ø 0,8 / 1,0 per acciaio o acciaio inossidabile. Il valore letto sul rullo installato, corrisponde al diametro del filo da utilizzare (FIG-3-B).
- Page 62 - Per aggiornare il prodotto o i parametri di saldatura, avviare la macchina con una chiave USB contenente l’ultima versione disponibile (connettersi alla sezione di servizio del sito GYS). Descrizione delle varie finestre dell’interfaccia (vedi pagina seguente) : 1 Scelta della modalità di visualizzazione (Semplice, Esperto, Avanzato).
- Page 63 AUTOPULSE 220-M3 Permette di utilizzare il programma scelto. Distruzione del programma scelto Mode Indica la modalità di saldatura, la modalità del pulsante nonchè del materiale e del gas. Rotazione manopola sinistra. Rotazione manopola destra. Posizioni di saldatura Posizioni di saldatura piatta Posizioni di saldatura ad angolo modalità...
- Page 64 AUTOPULSE 220-M3 Questo menu permette di scegliere il parametro principale in modalità box (Spessore del pezzo da saldare, velocità del filo, corrente media di saldatura). 2/ Modalità Manuale Il codificatore di sinistra permette di regolare la velocità, In modalità manuale, c’è solo un parametro secondario quello di destra la tensione (indipendentemente dal self.
- Page 65 AUTOPULSE 220-M3 In modalità Standard - Delay - Il codificatore di sinistra La modalità Standard - 2T - Esperto permettono di acce- permette di aggiustare la durata del punto, quello di dere al grafico (Pregas, HotStart, Riempimento crateri e destra il ritardo entro ogni punto.
- Page 66 AUTOPULSE 220-M3 Le modalità Expert e avanzate permettono l’accesso al In modalità 4T, l’Hotstart, pregas, crater filler e post gas ciclo di saldatura. possono essere gestiti dal pulsante. Il modo avanzato permette l’accesso alla tensione dell’arco di ciascuna fase del ciclo di saldatura.
- Page 67 AUTOPULSE 220-M3 Il modo avanzato permette l’accesso alla tensione dell’arco di ciascuna fase del ciclo di saldatura. 6/ Menu job Menu di backup per salvare il processo (primo accesso). Menu che consente di assegnare un nome al lavoro. Menu per l’apertura di un lavoro o il salvataggio di un Menù...
- Page 68 AUTOPULSE 220-M3 Il menu Impostazioni consente di impostare la lingua, Il menu Portabilità permette anche di esportare o importare una configu- il tempo e le unità di misura (internazionali o statuni- razione completa dalla stessa o da un’altra macchina. tensi).
- Page 69 AUTOPULSE 220-M3 Speed range lock high Alta velocità bloccata Speed range lock low Bassa velocità bloccata Sì: Sì / N: No LE TORCE IN OPZIONE - Torcia Push Pull (opzione ref. 046283) La torcia Push Pull è montata sul connettore (FIG 1 - 15).
- Page 70 AUTOPULSE 220-M3 I CICLI DI SALDATURA Processo standard 2T: T hotstart I blackout Dstart Gas post-Flow T burn-back T crater Filler I crater Filler Soft-start Premendo il pulsante il pre-gas comincia. Quando il filo tocca il pezzo una pulsazione fa avviare l’arco, poi il ciclo di saldatura comincia. Al rilascio del pulsante il generatore si ferma e una pulsazione di corrente permette di tagliare il filo in modo appropriato seguito dal post gas.
- Page 71 AUTOPULSE 220-M3 Processo 2 Tempi pulsato: T hotstart T downslope T upslope I blackout Dstart Gas post-Flow T burn-back T crater Filler I crater Filler Soft-start Premendo il pulsante il pre-gas comincia. Quando il filo tocca il pezzo una pulsazione fa avviare l’arco, poi il ciclo di saldatura comincia. Poi, il dispo- sitivo comincia con l’Hot-start, l’upslope e infine inizia il ciclo di saldatura.
- Page 72 AUTOPULSE 220-M3 Processo 2 Tempi doppio pulsato: Pulse Frequency - 1 / T pulse Duty cycle I cold (%) T hotstart T crater Filler T upslope T downslope Dstart Gas post-Flow T burn-back Stesse specifiche della modalità 2Tempi con in aggiunta un ciclo di alternanza di corrente calda poi fredda dove si può regolare la frequenza, il livello di corrente fredde come la durata del ciclo caldo in valori relativi.
- Page 73 AUTOPULSE 220-M3 Guaina filo schiacciata. Verificare la guaina e il corpo della torcia. Bloccaggio del filo nella torcia. Sostituire o pulire. Il filo si arrotola dopo i rulli. Nessun tubo capillare. Verificare la presenza del tubo capillare. Velocità filo troppo elevata.
- Page 74 AUTOPULSE 220-M3 PIÈCES DE RECHANGE / SPARE PARTS / ERSATZTEILE / PIEZAS DE RECAMBIO / ERSATZTEILE / ЗАПЧАСТИ / RESERVE ONDERDELEN / PEZZI DI RICAMBIO...
- Page 75 AUTOPULSE 220-M3 Carter plastique / Plastic housing / Kunststoffgehäuse / Contenitore plastico 56199 Bouton noir 28mm / Button black 28mm / Knopf schwarz 28mm / Tasto nero 28mm 73016 Clavier / Keyboard / Tastatur / Tastiera 51973 Circuit IHM / MMI circuit / HMI-Schaltung / 97466C Poignée plastique / Plastic handle / Kunststoffgriff / Circuito IHM(interfaccia)
- Page 76 AUTOPULSE 220-M3 SCHÉMA ÉLECTRIQUE / CIRCUIT DIAGRAM / STROMLAUFPLAN / ESQUEMA ELÉCTRICO / ЭЛЕКТРИЧЕСКАЯ СХЕМА / ELEKTRISCH SCHEMA / SCHEMA ELETTRICO...
- Page 77 AUTOPULSE 220-M3 SPÉCIFICATIONS TECHNIQUES / TECHNICAL SPECIFICATIONS / TECHNISCHE DATEN / ESPECIFICACIONES TÉCNICAS / ТЕХНИЧЕСКИЕ СПЕЦИФИКАЦИИ / TECHNISCHE GEGEVENS / SPECIFICHE TECNICHE AUTOPULSE 220-M3 Primaire / Primary / Primär / Первичка / Primaire / Primario 230 V -20% +15% Tension d’alimentation / Power supply voltage / Stromversorgung / Напряжение питания / Voedingsspanning / Ten-...
- Page 78 AUTOPULSE 220-M3 ICÔNES / SYMBOLS / SYMBOLE / ICONOS / ZEICHENERKLÄRUNG / СИМВОЛЫ - Attention ! Lire le manuel d’instruction avant utilisation. - Warning ! Read the instructions manual before use. - Внимание! Прочтите инструкцию перед использованием - ¡Cuidado! Lea el manual de instrucciones antes de su uso.
- Page 79 AUTOPULSE 220-M3 - Tension assignée d’alimentation. - Rated power supply voltage. - Netzspannung - Tensión asignada de alimentación eléctrica. - Номинальное напряжение питания. - Nominale voedingsspanning. - Tensione nominale di alimentazione. - Courant d’alimentation assigné maximal (valeur efficace). - Maximum rated power supply current (effective value).
- Page 80 GYS SAS 1, rue de la Croix des Landes CS 54159 53941 SAINT-BERTHEVIN Cedex France...
Need help?
Do you have a question about the AUTOPULSE 220-M3 and is the answer not in the manual?
Questions and answers