Advertisement
Advertisement
Table of Contents

Subscribe to Our Youtube Channel
Related Manuals for Beldray BEL0747


Summary of Contents for Beldray BEL0747
- Page 1 TWO IN ONE CORDLESS IRON INSTRUCTION MANUAL www.beldray.com...
-
Page 2: Safety Instructions
Please read all of the instructions carefully and retain for future reference. Safety Instructions When using electrical appliances, basic safety precautions should always be followed. Check that the voltage indicated on the rating plate corresponds with that of the local network before connecting the appliance to the mains power supply. - Page 3 Do not leave the appliance unattended whilst connected to the mains power supply. Do not remove the appliance from the mains power supply by pulling the cord; switch it off and remove the plug by hand. Do not pull or carry the appliance by its power supply cord. Do not direct steam at people or animals.
-
Page 4: Care And Maintenance
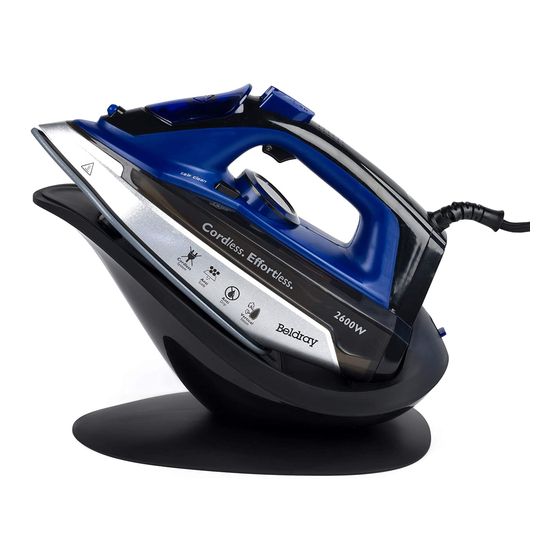
Warning: Danger of scalding. Keep the appliance away from flammable materials. Care and Maintenance Before attempting any cleaning or maintenance, always unplug the iron from the mains power supply and allow it to cool sufficiently. STEP 1: Drain the remaining water from the water tank to prevent it from leaking during cleaning. - Page 5 Description of Parts Two in One Cordless Iron 11. Water tank cap Temperature control dial 12. Max. fill mark Temperature indicator light 13. Easy-grip handle Steam control trigger 14. Ceramic soleplate 15. Cord guard Steam setting indicator Steam burst button 16.
- Page 6 Instructions for Use Before First Use STEP 1: Switch off and unplug the iron from the mains power supply. STEP 2: Wipe the exterior surface of the iron with a soft, damp cloth and dry thoroughly. STEP 3: To remove any impurities that may have occurred during the manufacturing process, it is best to use the iron on an old piece of cloth, making sure that it is on the highest temperature setting suitable for the material.
-
Page 7: Ironing With Steam
STEP 5: When the temperature indicator light switches off after approx. 25 seconds, remove the iron from the iron stand and use as a cordless iron. STEP 6: Put the iron back onto the iron stand to recharge any point. Recharge time is approx. - Page 8 The temperature indicator light will cycle on and off during use to regulate the temperature. Warning: Never leave the iron’s ceramic soleplate resting on fabric for any longer than 15 seconds. If ironing with steam for prolonged periods of time, it is advisable to use the iron as a corded unit.
- Page 9 STEP 4: Plug in and switch on the iron at the mains power supply. STEP 5: Rotate the temperature control dial until the 3-dot heat setting is selected; the higher the temperature, the more powerful the steam. STEP 6: Hold the iron approx. 15 cm away from the item and press the steam burst button to remove any creases, waiting approx.
-
Page 10: Troubleshooting
STEP 6: Set the temperature control dial to the highest heat setting and allow the iron to heat up until the temperature indicator light switches off. STEP 7: Switch off and unplug the iron from the mains power supply. STEP 8: Remove the iron from the iron stand and carefully hold it over a sink, making sure that the power supply cord and plug are kept away from the ceramic soleplate. -
Page 11: Specifications
Problem Possible Cause Possible Solution Reduced constant The steam holes Clear the steam holes of any blockages. steam or no are blocked. constant steam. The steam control is Select a steam setting using the steam set to ‘0’. control trigger. The fabric shows The temperature Reduce the temperature using the... - Page 12 Notes:...
- Page 13 Connection to the mains Please check that the voltage indicated on the product corresponds with your supply voltage. Important As the colours in the mains lead of this appliance may not correspond with the coloured markings identifying the terminals in your plug, please proceed as follows: The wires in the mains lead are coloured in accordance with the following code: Blue Neutral (N)
- Page 14 Where reasonable proof of purchase can be provided, Beldray will provide a standard 12 month guarantee with the retailer from the date of purchase. This is only applicable when products have been used as instructed for their intended, domestic use.
- Page 15 *To be eligible for the extended guarantee, go to www.beldray.com and register your product within 30 days of purchase. www.facebook.com/Beldray PRODUCT PRODUCT IMAGE IMAGE HERE HERE...
- Page 16 Manufactured by: UP Global Sourcing UK Ltd., Victoria Street, Manchester OL9 0DD. UK +44 (0)333 577 9820 customersupport@beldray.com ©Beldray Trademark. All rights reserved. Please retain instructions for future reference. Made in China. CD190219/MD000000/V1...
Need help?
Do you have a question about the BEL0747 and is the answer not in the manual?
Questions and answers
Cord will not separate when should.
The cord won't separate on the Beldray BEL0747 if the locking switch is in the corded position, which locks the power unit to the iron.
This answer is automatically generated
Cord will not separate from iron when should
The cord won't separate from the Beldray BEL0747 iron because the locking switch is in the corded position, which locks the power unit to the iron.
This answer is automatically generated