Table of Contents
Advertisement
Quick Links
Download this manual
See also:
Instruction Manual
Advertisement
Table of Contents

Related Manuals for TESTO 270


Summary of Contents for TESTO 270
- Page 1 270 · Deep-frying Oil Tester Instruction manual...
- Page 3 1 Contents Pos: 1 /TD/Produktbeschreibung/Grundlegende Eigenschaften/testo 270/Inbetriebnahmehinweise Kalibrierung testo 270 @ 4\mod_1247150776944_79.docx @ 46184 @ @ 1 Practical tips before commissioning your new testo 270 Dear customer, Congratulations on your purchase of the new testo 270 deep-frying oil tester. All of our measuring instruments are checked by us in the factory before the delivery and adjusted to their specific accuracy.
-
Page 4: Table Of Contents
1 Contents Contents Contents ....................4 Safety and the environment ..............5 2.1. About this document ............... 5 2.2. Ensure safety .................. 6 2.3. Protecting the environment ............. 6 Specifications ..................7 3.1. Use ....................7 3.2. Technical data ................. 8 Product description ................ -
Page 5: Safety And The Environment
2 Safety and the environment Pos: 4 /TD/Überschriften/2. Sicherheit und Umwelt @ 0\mod_1173774719351_79.docx @ 292 @ 1 @ 1 Safety and the environment Pos: 5 /TD/Überschriften/2.1 Zu diesem Dokument @ 0\mod_1173775252351_79.docx @ 346 @ 2 @ 1 2.1. About this document Pos: 6 /TD/Sicherheit und Umwelt/Zu diesem Dokument/VerwendungVerwendung (Standard) @ 0\mod_1173775068554_79.docx @ 337 @ 5 @ 1 >... -
Page 6: Ensure Safety
> Do not perform contact measurements on non-insulated, live parts. Pos: 22 /TD/Sicherheit und Umwelt/Sicherheit gewährleisten/testo 270/Transport und Lagerung @ 2\mod_1206696880578_79.docx @ 13401 @ @ 1 > Transport and store the instrument exclusively in the aluminium case provided in order to avoid damage to the sensor. -
Page 7: Specifications
Pos: 28 /TD/Überschriften/3.1 Verwendung @ 0\mod_1176211016437_79.docx @ 695 @ 2 @ 1 3.1. Pos: 29 /TD/Leistungsbeschreibung/Verwendung/testo 2xxVerwendung (testo270) @ 2\mod_1206698383468_79.docx @ 13438 @ @ 1 The testo 270 is a handy measuring instrument for the fast inspection of deep-frying oils and is designed in equal measure for left and right handers. -
Page 8: Technical Data
Power supply Batteries: 2x Micro (type AAA) Battery life at 20 °C approx. 25 h of continuous operation (corresponds to 500 measurements) Temperature sensor TPM sensor Capacitive sensor (testo) Operating 0 to 50 °C temperature Storage/transport -20 to 70 °C temperature... -
Page 9: Product Description
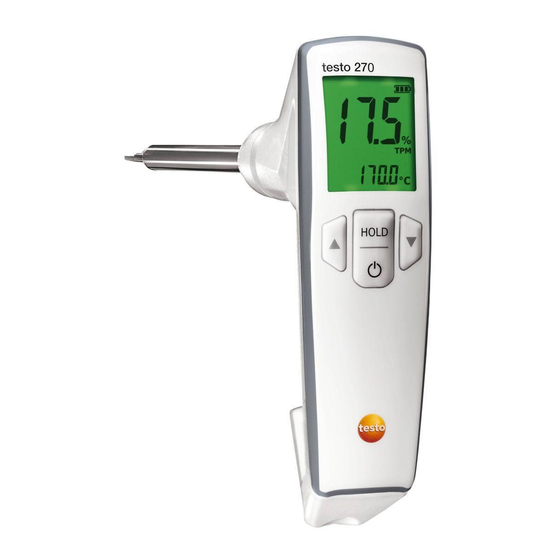
Pos: 32 /TD/Überschriften/4. Produktbeschreibung @ 0\mod_1173774846679_79.docx @ 310 @ 1 @ 1 Product description Pos: 33 /TD/Überschriften/4.1 Übersicht @ 0\mod_1176379946003_79.docx @ 733 @ 2 @ 1 4.1. Overview Pos: 34 /TD/Produktbeschreibung/Übersicht/testo 265i/Übersicht (testo270) @ 2\mod_1206720463062_79.docx @ 13636 @ @ 1 Alarm LED Display Control keys Battery compartment (on rear) Probe shaft Max. - Page 10 Hold Readings held (manual) Auto Hold Readings held (automatic) °C/°F Temperature in °C or °F Pos: 36 /TD/Produktbeschreibung/Übersicht/testo 265i/wichtige Displaymeldungen @ 2\mod_1206720503375_79.docx @ 13654 @ 5 @ 1 Important display messages Indications in the Explanation display lights up when Instrument is ready to measure, sensor is not...
-
Page 11: Basic Properties
Pos: 39 /TD/Überschriften/4.2 Grundlegende Eigenschaften @ 0\mod_1176380399692_79.docx @ 742 @ 2 @ 1 4.2. Basic properties Pos: 40 /TD/Produktbeschreibung/Grundlegende Eigenschaften/testo 270/Stromversorgung @ 2\mod_1206701354953_79.docx @ 13477 @ 5 @ 1 Power supply The power is supplied to the instrument via two micro batteries (type AAA). -
Page 12: First Steps
First steps Pos: 42 /TD/Überschriften/5.1 Inbetriebnahme @ 0\mod_1185342823812_79.docx @ 1885 @ 2 @ 1 5.1. Commissioning Pos: 43 /TD/Erste Schritte/testo 270/Batterien einlegen @ 2\mod_1206969408281_79.docx @ 13869 @ 5 @ 1 Inserting batteries CAUTION Incorrectly inserted batteries may damage the instrument! >... - Page 13 5 First steps • For storage of the instrument ✓ TopSafe is on the instrument. 1. Fasten the flap at the pin of the TopSafe. 2. Fasten the opening of the wrist strap to a suitable hook.
-
Page 14: Getting To Know The Product
Pos: 45 /TD/Überschriften/5.3 Produkt kennenlernen @ 0\mod_1185342901015_79.docx @ 1894 @ 2 @ 1 5.2. Getting to know the product Pos: 46 /TD/Erste Schritte/testo 270/Gerät ein-/ ausschalten @ 2\mod_1206951510671_79.docx @ 13727 @ 355 @ 1 5.2.1. Switching the instrument on/off To switch on >... -
Page 15: Battery Capacity
To activate/deactivate the Auto Hold function: See Configuring the instrument page 17. Pos: 51 /TD/Erste Schritte/testo 270/Auto off Funktion @ 2\mod_1207036969250_79.docx @ 13923 @ 3 @ 1 5.2.6. Auto off function With the Auto off function activated, the instrument automatically switches off after a certain time. -
Page 16: Setting The Tpm Limit Values
The new lower limit value is applied. Instrument changes to Measuring Mode and is ready for operation. Pos: 53 /TD/Erste Schritte/testo 270/TPM-Grenzwerte sperren/entsperren @ 2\mod_1206972507703_79.docx @ 13887 @ 3 @ 1 5.2.8. Locking/unlocking the TPM limit values You can lock/unlock the set TPM limit values. The instrument is delivered with the TPM limit values unlocked (switch 1 at position). -
Page 17: Configuring The Instrument
5 First steps Pos: 54 /TD/Erste Schritte/testo 270/Gerät konfigurieren @ 2\mod_1206718127609_79.docx @ 13607 @ 35 @ 1 5.2.9. Configuring the instrument Setting options in the configuration mode Configurations Setting options Set temperature unit °C °F on: Alarm LED activated Alarm LED... - Page 18 5 First steps Perform configuration Requirement: Instrument is switched off. 1. Switch on the instrument and during the display test, simultaneously hold down /Hold] for approx. 3 s. °C lights up in the display. 2. Using set temperature unit (°C/°F). 3.
-
Page 19: Locking/Unlocking The Configurations
5 First steps Pos: 57 /TD/Erste Schritte/testo 270/Konfigurationsmodus sperren/entsperren @ 2\mod_1206973210968_79.docx @ 13905 @ 3 @ 1 5.2.10. Locking/unlocking the configurations You can lock/unlock the set values from the configuration mode. The instrument is delivered with the configuration mode unlocked (switch 2 at position). -
Page 20: Using The Product
6 Using the product Using the product Pos: 59 /TD/Produkt verwenden/testo 270/Allgemeine Messhinweise @ 2\mod_1206712108453_79.docx @ 13588 @ 25555 @ 1 6.1. General measuring notes With the testo 270, several measurement can be performed immediately after each other and without waiting times. -
Page 21: Performing Measurements
The results of this method are in most cases comparable with the % TPM value. PTG ≈ % TPM/2 Pos: 60 /TD/Produkt verwenden/testo 270/Messungen durchführen @ 2\mod_1206949208796_79.docx @ 13709 @ 255 @ 1 6.2. Performing measurements... - Page 22 (< 1 s). Hold is shown on the display. Readings are held. 4. Read off readings. 5. To change to Measuring Mode: Briefly press /Hold] (< 1 s). Pos: 61 /TD/Produkt verwenden/testo 270/Funktionstest @ 4\mod_1248176181060_79.docx @ 46233 @ 2 @ 1...
-
Page 23: Function Test
When changing the type of oil or the oil supplier, the reference value must be determined anew. With implausible readings, we recommend the calibration or adjustment in the testo reference oil, see Calibrating/adjusting the instrument, page 25. Your specific reference value: ___________________________ Pos: 62 /TD/Überschriften/7. -
Page 24: Maintaining The Product
7 Maintaining the product Maintaining the product Pos: 63 /TD/Produkt instand halten/testo 270/Batterien wechseln @ 2\mod_1206629836781_79.docx @ 13313 @ 2 @ 1 7.1. Changing the batteries CAUTION Incorrectly inserted batteries may damage the instrument! > Note the polarity when inserting the batteries. -
Page 25: Cleaning The Housing/Topsafe/Wrist Strap
2. Allow sensor and probe shaft to cool until there is no longer a risk of burns. 3. Clean sensor before the oil residues cool down. Pos: 65 /TD/Produkt instand halten/testo 270/Gehäuse und TopSafe reinigen @ 2\mod_1206628405890_79.docx @ 13291 @ 2 @ 1 7.3. Cleaning the housing/TopSafe/wrist strap Requirement: Instrument is switched off and TopSafe/wrist strap is not on the instrument. - Page 26 For measurements as part of a quality-assurance concept (e.g. ISO 9001), we recommend the annual renewal of a calibration certificate (accuracy +/- 2 % TPM). Further information can be found under www.testo.com Prepare calibration/adjustment 1. Clean sensor before the calibration/adjustment, see Cleaning the sensor, page 24.
- Page 27 7 Maintaining the product The accuracy of the calibration/adjustment is negatively influenced when the reference oil bottle is held in your hand. 5. Immerse sensor in reference oil. Note immersion depth! If the Alarm LED is activated: Alarm LED lights up orange. 6.
-
Page 28: Tips And Assistance
> Unlock configuration mode, see flashes Locking/unlocking the configurations page 19. Err 1 lights up TPM sensor defective > Contact Testo-Customer Service or your dealer. Err 2 lights up Temperature sensor defective > Contact Testo-Customer Service or your dealer. -
Page 29: Accessories And Spare Parts
Testo-Customer Service. If we could not answer your question, please contact your dealer or Testo-Customer Service. For contact details see the rear side of this document or the web page www.testo.com/service-contact Pos: 70 /TD/Überschriften/8.3 Zubehör und Ersatzteile @ 0\mod_1177402058734_79.docx @ 1102 @ 2 @ 1 8.2. - Page 30 8 Tips and assistance...
- Page 31 8 Tips and assistance...
- Page 32 0970 2700 en 04 V01.02...
Need help?
Do you have a question about the 270 and is the answer not in the manual?
Questions and answers