
Related Manuals for Roto ZEL STG HS 1 II

Summary of Contents for Roto ZEL STG HS 1 II
- Page 1 Handsender 1-Kanal II Hand-held transmitter 1-channel II Télécommande à 1 canal II Pilot 1-kanał II...
-
Page 2: Table Of Contents
Inhaltsverzeichnis Allgemeines..................... 3 Gewährleistung.................. 3 Sicherheitshinweise ................. 4 Bestimmungsgemäße Verwendung ............ 5 Anzeigen- und Tastenerklärung.............. 6 Funktionserklärung .................. 6 Einlernen des Funks ................. 7 Montage Wandhalterung ................ 9 Batteriewechsel .................. 10 Reinigung.................... 10 Technische Daten ................... 10 Was tun wenn...?.................. 11 Allgemeine Konformitätserklärung ............ 11 2 - de... -
Page 3: Allgemeines
Allgemeines Mit diesem Sender können Sie einen oder mehrere Empfänger steuern. Eine einfache Bedienung zeichnet dieses Gerät aus. Beachten Sie bitte bei der Installation sowie bei der Einstellung des Gerätes die vorliegende Montage- und Betriebsanleitung. Erklärung Piktogramme VORSICHT VORSICHT kennzeichnet eine Gefahr, die zu Verletzungen führen kann, wenn sie nicht vermieden wird. -
Page 4: Sicherheitshinweise
Sicherheitshinweise Allgemeine Hinweise • Bitte bewahren Sie die Anleitung auf! • Nur in trockenen Räumen verwenden. • Verwenden Sie nur unveränderte Originalteile des Steuerungsherstellers. • Halten Sie Kinder von Steuerungen fern. • Beachten Sie Ihre landesspezifischen Bestimmungen. • Verbrauchte Batterie fachgerecht entsorgen. Batterie nur durch identi- schen Typ (siehe Technische Daten) ersetzen. -
Page 5: Bestimmungsgemäße Verwendung
Bestimmungsgemäße Verwendung Der Sender in der vorliegenden Anleitung darf ausschließlich im Innenbereich für die Ansteuerung von Centronic kompatiblen Funk-Antrieben und Funk- Steuerungen verwendet werden. • Bitte beachten Sie, dass Funkanlagen nicht in Bereichen mit erhöhtem Störungsrisiko betrieben werden dürfen (z. B. Krankenhäuser, Flughä- fen). -
Page 6: Anzeigen- Und Tastenerklärung
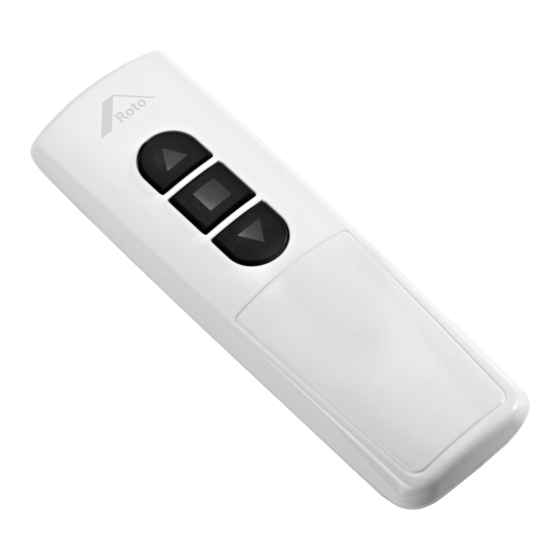
Anzeigen- und Tastenerklärung AUF-Taste STOPP-Taste AB-Taste Einlerntaste Beschriftungsfeld Typenschild Funktionserklärung Kanal Der Kanal eines Handsenders kann in einen oder mehrere Empfänger einge- lernt werden. Die Ansteuerung eines Empfängers ist ein Individualbefehl, die mehrerer Empfänger ein Gruppenbefehl. 6 - de... -
Page 7: Einlernen Des Funks
Einlernen des Funks Einlernen des Funks (Variante 1) Die Beschreibung gilt für die folgenden Produkte: • Rollladen ZRO EF • Markise ZMA EF • Funkempfänger FE 24 V • Funkempfänger FE 230 V • Funksteckdose FSD 1) Mastersender einlernen a) Empfänger in Lernbereitschaft bringen Bedienen Sie die Einlerntaste am Sender mit einem geeigne- ten zylindrischen Werkzeug (z. - Page 8 • WDT R4, R6 • WDT Solar R4, R6 • WDC i8 • Rollladen Solar ZRO SF (ab 01.05.2014) • Markise Solar ZMA SF (ab 01.05.2014) Das Wohndachfenster muss sich in Putzstellung befinden, sodass Sie die Einlerntasten des Empfängers erreichen kön- nen.
-
Page 9: Montage Wandhalterung
Drücken Sie die Einlerntaste des Mastersenders innerhalb der Lernbereit- schaft, bis der Empfänger das erfolgreiche Einlernen quittiert (Signalton, Ru- cken, LED, etc.). Programmierung des Empfängers löschen Drücken und halten Sie die Tasten M1 und M3 an der Steuerung bis die LED dauerhaft leuchtet. -
Page 10: Batteriewechsel
Batteriewechsel Den entsprechenden Batterietyp entnehmen Sie bitte aus dem Kapitel „Technische Daten“. Reinigung Reinigen Sie das Gerät nur mit einem geeigneten Tuch. Verwenden Sie keine Reinigungsmittel, die die Oberfläche angreifen können. Technische Daten Nennspannung 3 V DC Batterietyp CR 2430 Schutzart IP 20 Zulässige Umgebungstemperatur... -
Page 11: Was Tun Wenn
Was tun wenn...? Problem Abhilfe Antrieb läuft nicht. Neue Batterie einlegen. Batterie richtig einlegen. Entfernung zum Empfänger verrin- gern. Sender ist nicht im Empfänger einge- lernt. Sender einlernen. Allgemeine Konformitätserklärung Hiermit erklärt die Firma Becker-Antriebe GmbH, dass sich das Gerät Centronic EasyControl EC541-II in Übereinstimmung mit den grundlegenden Anforderungen und den anderen relevanten Vorschriften der Richtlinie R&TTE 1999/5/EG befindet. - Page 12 Table of contents General .................... 13 Warranty .................... 13 Safety instructions .................. 13 Intended use .................. 14 Explanation of displays and buttons ............ 15 Explanation of functions ................ 16 Programming the remote control.............. 16 Installing the wall bracket................. 18 Changing batteries.................. 19 Cleaning.................... 19 Technical data .................. 19 What to do if...?.................. 20 General Declaration of Conformity............ 20 12 - en...
-
Page 13: General
General You can control one or more receivers with this transmitter. This device is exceptionally easy to use. Please observe these Assembly and Operating Instructions when installing and setting up the equipment. Explanation of pictograms CAUTION CAUTION indicates a hazardous situation which, if not avoided, could result in in- jury. -
Page 14: Intended Use
• Only use in dry rooms. • Only use unmodified original parts from the control unit manufacturer. • Keep children away from control units. • Observe all pertinent country-specific regulations. • Dispose of used batteries properly. Only replace the battery with one of the same type (see Technical Data). -
Page 15: Explanation Of Displays And Buttons
• Ensure that the control unit is not installed or operated close to metal surfaces or magnetic fields. • Radio-controlled systems transmitting on the same fre- quency may cause reception interference. • Note that the range of the radio signal is limited by legis- lation as well as by design. -
Page 16: Explanation Of Functions
Explanation of functions Channel The channel of a hand-held transmitter can be programmed into one or more receivers. One receiver is operated through an individual command, several receivers through a group command. Programming the remote control Programming the remote control (variant 1) This description applies to the following products: •... - Page 17 Then press the programming button of the new transmitter until the re- ceiver confirms. Now press the programming button of the new transmitter again. The receiver confirms successful programming. Programming the remote control (variant 2) This description applies to the following products: •...
-
Page 18: Installing The Wall Bracket
▻ M3 for programming the exterior accessories (red) ► The receiver is now in Programming mode for three minutes. b. Programming the master transmitter Press the programming button on the master transmitter whilst in Program- ming mode until the receiver confirms that programming was successful (sig- nal tone, jerk, LED, etc.). -
Page 19: Changing Batteries
Changing batteries You will find the appropriate battery type in the "Technical data" chapter. Cleaning Only clean the device with a suitable cloth. Do not use aggressive cleaning agents that may damage the surface. Technical data Rated voltage 3 V DC Battery type CR 2430 Degree of protection... -
Page 20: What To Do If
What to do if...? Problem Remedy Drive is not functioning. Insert a new battery. Insert the battery correctly. Reduce the distance to the receiver. Transmitter is not programmed in the receiver. Program transmitter. General Declaration of Conformity Becker-Antriebe GmbH hereby declares that the Centronic EasyControl device EC541-II complies with the fundamental requirements and other relev- ant rules of Directive R&TTE 1999/5/EC. - Page 21 21 - en...
- Page 22 Sommaire Généralités..................... 23 Garantie .................... 23 Consignes de sécurité................ 24 Utilisation conforme ................ 24 Description des affichages et des touches .......... 25 Description du fonctionnement .............. 26 Programmation radio ................ 26 Montage du support mural............... 29 Remplacement des piles ................. 29 Nettoyage .................... 30 Caractéristiques techniques .............. 30 Que faire si..................... 30 Déclaration de conformité...
-
Page 23: Généralités
Généralités Cet émetteur permet de gérer un ou plusieurs récepteurs. Cet appareil se caractérise par une utilisation simple. Veuillez respecter la présente notice de montage et d’utilisation pour l’installa- tion ainsi que pour le réglage de l’appareil. Explication des pictogrammes PRUDENCE PRUDENCE signale un risque pouvant en- traîner des blessures s'il n'est pas évité. -
Page 24: Consignes De Sécurité
Consignes de sécurité Remarques générales • Veuillez conserver la présente notice ! • À utiliser uniquement dans des locaux secs. • Utilisez uniquement des pièces d’origine du fabricant de commandes n’ayant subi aucune modification. • Tenez les enfants à l’écart des commandes. •... -
Page 25: Description Des Affichages Et Des Touches
• L’exploitant n’est en aucun cas protégé contre les perturbations provo- quées par d’autres installations de télécommunication et de dispositifs terminaux (par ex. par des installations radio qui sont utilisées de ma- nière conforme dans la même plage de fréquence). •... -
Page 26: Description Du Fonctionnement
Touche MONTÉE Touche ARRÊT Touche DESCENTE Touche de programmation Champ d’identification Plaque signalétique Description du fonctionnement Canal Le canal d’une télécommande peut être programmé dans un ou plusieurs ré- cepteurs. La commande d’un récepteur est un ordre individuel, la commande de plusieurs récepteurs est un ordre groupé. - Page 27 Le récepteur se trouve maintenant en mode de programmation pendant 3 mi- nutes. b) Programmation de l’émetteur maître Appuyez sur la touche de programmation de l’émetteur maître en mode de programmation, jusqu’à acquittement par le récepteur de la réussite de la programmation.
- Page 28 Programmation de l’émetteur maître a. Mise en mode de programmation du récepteur Appuyez sur la touche de programmation souhaitée de la commande jusqu’à ce que la LED s’allume : ▻ M1 pour programmer la lucarne (vert) ▻ M2 pour programmer les accessoires intérieurs (orange) ▻...
-
Page 29: Montage Du Support Mural
Appuyez ensuite sur la touche de programmation du nouvel émetteur jusqu’à acquittement par le récepteur. Appuyez maintenant une nouvelle fois sur la touche de programmation du nouvel émetteur que vous souhaitez programmer. Le récepteur acquitte la programmation avec succès. Montage du support mural •... -
Page 30: Nettoyage
Nettoyage Nettoyez l’appareil uniquement avec un chiffon adapté. N’utilisez pas de pro- duits de nettoyage qui risqueraient d’attaquer la surface. Caractéristiques techniques Tension nominale 3 V CC Type de piles CR 2430 Type de protection IP 20 Température ambiante admissible -10 à +55 °C Fréquence radio 868,3 MHz La portée radio maximale peut aller jusqu’à... - Page 31 Sous réserve de modifications techniques. 31 - fr...
- Page 32 Spis treści Informacje ogólne ................... 33 Gwarancja .................... 33 Wskazówki bezpieczeństwa .............. 34 Zastosowanie zgodne z przeznaczeniem........... 34 Objaśnienie wskaźników i przycisków............ 35 Działanie .................... 36 Programowanie sygnału radiowego............ 36 Montaż uchwytu naściennego .............. 39 Wymiana baterii .................. 39 Czyszczenie ................... 39 Dane techniczne .................. 40 Co robić, gdy...? .................. 40 Ogólna deklaracja zgodności .............. 40 32 - pl...
-
Page 33: Informacje Ogólne
Informacje ogólne Pilot pozwala na sterowanie jedną bądź większą liczbą odbiorników. Urządzenie wyróżnia się łatwością obsługi. Podczas instalacji i ustawiania urządzenia należy przestrzegać niniejszej in- strukcji montażu i obsługi. Objaśnienie piktogramów ZACHOWAĆ ZACHOWAĆ OSTROŻNOŚĆ oznacza za- grożenie, którego zignorowanie może OSTROŻNOŚĆ... -
Page 34: Wskazówki Bezpieczeństwa
Wskazówki bezpieczeństwa Ogólne wskazówki • Należy zachować niniejszą instrukcję! • Użytkować urządzenie wyłącznie w suchych pomieszczeniach. • Stosować wyłącznie niezmodyfikowane, oryginalne części producenta sterownika. • Przechowywać sterowniki w miejscu niedostępnym dla dzieci. • Należy przestrzegać obowiązujących przepisów krajowych. • Zużyte baterie należy utylizować zgodnie z przepisami. Baterie można wymieniać... -
Page 35: Objaśnienie Wskaźników I Przycisków
• Użytkownik nie jest zabezpieczony przed jakimikolwiek zakłóceniami spowodowanymi przez inne przekaźniki oraz urządzenia końcowe (np. urządzenia radiowe pracujące zgodnie z przeznaczeniem w tym samym zakresie częstotliwości). • Odbiornik radiowy może być stosowany wyłącznie z urządzeniami i insta- lacjami dopuszczonymi przez producenta. •... -
Page 36: Działanie
Przycisk GÓRA Przycisk STOP Przycisk DÓŁ Przycisk programowania Pole opisu Tabliczka znamionowa Działanie Kanał Kanał pilota może zostać zaprogramowany w jednym lub większej ilości od- biorników. Sterowanie odbiornikiem odbywa się poprzez polecenie indywidu- alne, natomiast sterowanie kilkoma odbiornikami poprzez polecenie grupowe. Programowanie sygnału radiowego Programowanie sygnału radiowego (wariant 1) Opis obowiązuje dla następujących produktów:... - Page 37 W trybie programowania wcisnąć i przytrzymać przycisk programowania głów- nego pilota do czasu potwierdzenia czynności przez odbiornik. Kończy to procedurę programowania. 2) Programowanie kolejnych pilotów Wcisnąć przycisk programowania głównego pilota do czasu potwierdze- nia czynności przez odbiornik. Wcisnąć przycisk programowania nowego pilota do czasu potwierdzenia czynności przez odbiornik.
- Page 38 Programowanie głównego pilota a. Przełączenie odbiornika w tryb programowania Wcisnąć i przytrzymać przycisk programowania na sterowniku aż zapali się wskaźnik LED: ▻ M1 w celu zaprogramowania okna dachowego (zielony) ▻ M2 w celu zaprogramowania wewnętrznych akcesoriów (poma- rańczowy) ▻ M3 w celu zaprogramowania zewnętrznych akcesoriów (czerwony) ►...
-
Page 39: Montaż Uchwytu Naściennego
Montaż uchwytu naściennego • Przed montażem w wybranym Uchwyt naścienny miejscu należy upewnić się, że piloty i odbiorniki działają pra- widłowo. Wypustka Płytka mocująca odblokowująca do ściany • Zamocować uchwyt na ścianie za pomocą dwóch dołączonych śrub. Wymiana baterii Informacje o odpowiednim typie baterii znajdują się w roz- dziale „Dane techniczne“. -
Page 40: Dane Techniczne
Dane techniczne Napięcie sieciowe 3 V DC Typ baterii CR 2430 Stopień ochrony IP 20 Dopuszczalna temperatura otoczenia -10 do +55 °C Częstotliwość sygnału radiowego 868,3 MHz Maksymalny zasięg sygnału radiowego wynosi 25 m przy i wewnątrz budynku oraz 350 m na otwartej przestrzeni. Co robić, gdy...? Problem Środki zaradcze... - Page 41 41 - pl...
- Page 44 4034 630 244 0a 23.09.2015 ...
Need help?
Do you have a question about the ZEL STG HS 1 II and is the answer not in the manual?
Questions and answers