Table of Contents
Advertisement
Quick Links
Advertisement
Table of Contents

Subscribe to Our Youtube Channel
Related Manuals for Witschi ProofMaster

Summary of Contents for Witschi ProofMaster
- Page 1 ® ® ProofMaster Operating manual...
- Page 2 Copyright Reproduction of this document in whole or in part is not permitted. Without the prior written consent of Witschi Electronic AG, no section may be copied, edited or electronically reproduced, transmitted or recorded on magnetic media or in any other way.
-
Page 3: Table Of Contents
Requirements regarding the installation site ....................Working area of the operator........................... List of equipment..............................Initial operation ..............................3.8.1 Current..............................3.8.2 Compressed air ..........................3.8.3 Thermal printer........................... 3.8.4 Network ..............................Description ................................Proofmaster................................Included accessories ............................Required accessories ............................17.10.2019 3 / 96... - Page 4 Procedure of a tightness test ..........................Definitions ................................Reference to standard ISO 22810 ........................Use .................................... Safety during use ..............................Basic operation ..............................5.2.1 Switching on the Proofmaster ...................... 5.2.2 Enabling screen saver or standby ....................5.2.3 Switching off the device........................5.2.4 Determining test pressure values....................
- Page 5 Table of contents Quick settings menu............................. Settings..................................System ..................................7.3.1 Language selection........................... 7.3.2 Screen saver............................7.3.3 Display and audio settings ......................7.3.4 Date & time ............................Device..................................7.4.1 Opening speed of the bell cover....................7.4.2 Sensor lighting............................ 7.4.3 Quiet pressure release........................7.4.4 Unit of leak rate..........................
-
Page 6: General Information
Illustrations contained in this manual are intended for illustration purposes only and may deviate from the model sold. Technical support Rating plate The rating plate of the ProofMaster is located on the reverse of the device and contains the following information: • Manufacturer • Device name •... -
Page 7: Definitions
Contact the customer service of Witschi Electronic AG. The point of sale can provide you with technical information. Customer service The nearest point of sale can be found on the Witschi Electronic AG website www.witschi.com. Witschi Electronic AG would also be pleased to receive information and feedback, which can be helpful for the improvement of the products. -
Page 8: Safety
Safety Safety This section provides an overview of all the important safety aspects that ensure personal protection and safe and trouble-free operation. The relevant sections contain additional warnings on the various tasks. Mandatory All safety and protection regulations described here must be read and observed in order to avoid damage to equipment, persons and the environment. -
Page 9: Proper Use
You can also use the ProofMaster to build up positive pressure in the case of a leaky watch to then find the leak by testing it in water. -
Page 10: Labels On The Device
Safety 2.3.1 Labels on the device The stickers listed below are affixed to the ProofMaster. Calibration of the Proof- The calibration instruction on the underside of the device shows when the device needs to be recalibrated. For a reliable measurement result, Master the specified date for the next calibration must be observed. - Page 11 Safety Prohibition Never force the device cover to open when the device is under pressure! Otherwise parts could be ejected. Mandatory Follow the obligations set out below: Check the compressed air hose before each use! The integrity of the hose is crucial for safety. Make sure that the compressed air hose is not subjected to any external mechanical loads! The compressed air hose must therefore not come into contact with...
- Page 12 Caution - material Material damage due to short circuit! Damage to the insulation on the power cord or the power supply unit can result in a short circuit and damage the ProofMaster. Prohibition Never immerse the device in water! It is not designed for immersion.
- Page 13 • Observe the following list of prohibitions and obligations. Prohibition Never open the housing yourself! Opening the housing will void the warranty and Witschi Electronic AG will not be liable for any accident occurring after the housing has been opened by an unqualified person.
-
Page 14: Owner's Liability
The watch can only be safely immersed in water for as long as there is positive pressure in the housing. Witschi Electronic AG accepts no liability for watches that are penetrated by water. If the display is red, remove the watch from the water! The positive pressure in the watch is too low and water can penetrate. -
Page 15: Personnel Qualifications
Safety shoes protect the feet from falling objects. Safety shoes must be worn for the following activities, in particular: • When accepting theProofMaster. • When moving the ProofMaster. Mandatory Observe the instructions for wearing safety shoes in this Operating manual! If it is necessary to wear safety shoes, ensure that other people in the room also have safety shoes. -
Page 16: Spare Parts
Info For a list of spare parts, see Accessories and spare parts Page 66]. Noise emissions The noise emissions from the ProofMaster are below 80 dB and have been measured according to the guidelines EN ISO 3740:2001-03 and EN ISO 11200:2014-10. 16 / 96 17.10.2019... -
Page 17: Initial Operation
Follow the obligations set out below: Always transport the packages vertically and never throw them! Observe the markings on the packaging! Do not remove the ProofMaster from its packaging until shortly before commissioning! The packaging protects the ProofMaster from external damage. -
Page 18: Transport Inspection
Make a note of the extent of the damage on the transport company's delivery note. c) Write a complaint. Mandatory Report damage or missing parts to Witschi Electronic AG immediately! Claims for damages can only be made within the applicable claim periods. -
Page 19: Space Requirement
Space requirement 149 mm 305 mm Requirements regarding the installation site The ProofMaster is designed for use on a worktable in as dry and dust- free an environment as possible. The ProofMaster is not suitable for outdoor use. Caution - material... -
Page 20: Working Area Of The Operator
Initial operation Working area of the operator In order for the operator to work comfortably, we recommend leaving at least 50 cm space on each side of the ProofMaster in order to place the watch shop there. 50 cm 50 cm 20 / 96 17.10.2019... -
Page 21: List Of Equipment
2 WiCoTRACE 3 software Recording of test results and management of programs with a PC. Info To order accessories or spare parts, please contact the points of sale. Find your nearest point of sale on the website www.witschi.com. 17.10.2019 21 / 96... -
Page 22: Initial Operation
Initial operation Initial operation Initial operation of the ProofMaster includes connecting the power and compressed air supply and making all other connections for smooth operation (printer, network, etc.). 3.8.1 Current Caution - material Risk of material damage if an unsuitable power supply... -
Page 23: Compressed Air
Recommended compressor • ProofMaster Required equipment • Compressed air hose • Compressor (not included in the scope of delivery of ProofMaster) a) Put the compressor into operation as specified in the Connecting manufacturer's instructions. b) Make sure that the compressor is switched off and the outlet valve is closed. -
Page 24: Thermal Printer
• ProofMaster Required equipment • Thermal printer (not included in the scope of delivery of ProofMaster) • Standard USB cable type A–B or a Bluetooth set II (not included in the scope of delivery of the ProofMaster). See Accessories and spare parts [}Page 66]. -
Page 25: Network
The following steps are necessary when using a PC within a network. • ProofMaster Required equipment • Ethernet cable (not included in the scope of delivery of ProofMaster) • PC incl. network environment (not included in the scope of delivery of ProofMaster) a) Ensure that the ProofMaster is switched off. -
Page 26: Description
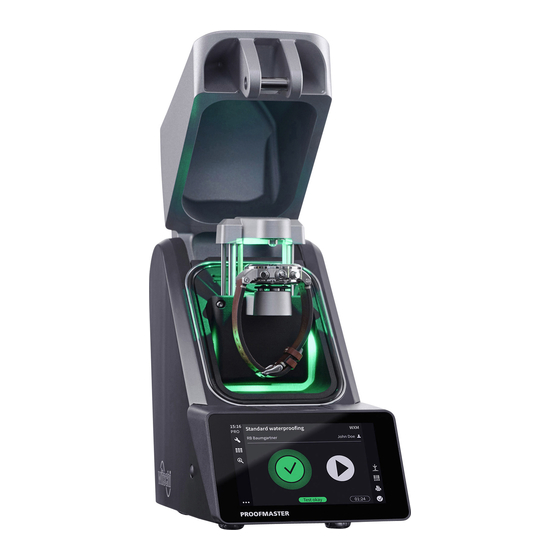
Description Description Proofmaster Front view Bell cover Deformation sensor Test chamber Compressed air inlet and outlet Flap over catch Touchscreen The bell cover covers the test chamber. During testing, the bell cover is closed and locked by the catch under flap 5. -
Page 27: Included Accessories
Included accessories Power supply unit Power cable (country-specific) Transformer Electrical connection (device side) Item no.: JA01-PSD40E120K3 The ProofMaster is connected to the mains via the power supply unit with the following characteristic data: Description Unit Value Input voltage 100 to 240... - Page 28 > 20 mm Scratch Protect Glass Protective cover Item no.: 31.24.04.30.001 The dust cover covers the ProofMaster when not in use to protect it from dust deposits. Mandatory When not in use, always cover the ProofMaster with the corresponding dust cover. This prevents the test chamber from leaking due to dust and dirt penetrating between the seal and bell cover.
-
Page 29: Required Accessories
Description Required accessories Compressor In order to use the ProofMaster, it must be connected to a compressor. The compressor must have the following characteristics: Description Unit Value ARO 210 coupling Maximum outlet pressure Nominal outlet pressure for full operation of... -
Page 30: Optional Accessories
Thermal printer The test results can be printed out on the thermal printer. The thermal printer can be connected directly to the ProofMaster via the USB cable type A–B or the USB Bluetooth adapter. See Thermal printer [}Page 24]. Witschi Electronic AG provides the following components: Thermal printer, item no. -
Page 31: Definitions
For best results in terms of precision and test duration, we recommend the use of the automatic measurement time. Definitions The measuring method of the ProofMaster is based on the principle of Deformation measurement deformation. The watch is subjected to positive pressure to compress the watch housing, or a vacuum to expand it. -
Page 32: Reference To Standard Iso 22810
Leak rate 50 µg/min as the limit value for leak tightness at a test pressure of 2 bar. The ProofMaster is configured by default according to these standard specifications. To calculate the leak rate, the measuring algorithm needs the exact air volume in the watch case. -
Page 33: Use
Safety during use Cracked glass CAUTION Risk of injury from cracked glass! The positive pressure can penetrate into leaking watches during the test. If this is the case, the interior of the watches will be under pressure after the test. The glass in the watch can then splinter or crack. It can cause serious eye injuries and even blindness. -
Page 34: Basic Operation
ð The home screen appears. ð The bell cover opens. Info When the ProofMaster is switched on for the first time, the display language can be selected on the displayed screen. The display language can be changed at any time, see Language selection [}Page 69]. -
Page 35: Enabling Screen Saver Or Standby
ProofMaster to standby. ð The bell cover closes and is locked. ð The ProofMaster is in standby or screen saver mode (standby screen is always black). ð The screen saver is displayed (date and time in this example). -
Page 36: Switching Off The Device
Enabling screen saver or standby Page 35]. ð The bell cover closes and is locked. d) Switch off the ProofMaster by pressing the switch in the direction of the arrow. e) Cover the ProofMaster with the corresponding dust cover. - Page 37 The ProofMaster can generate a maximum vacuum of 85% compared to the ambient pressure. The maximum vacuum that can be generated therefore varies depending on the height at which the ProofMaster is operated. The following table shows the maximum vacuum that can be generated...
-
Page 38: Programming A Quick Test
5.2.5 Programming a quick test ü The ProofMaster shows the home screen. Test pressure a) Press ð The Quick Select screen appears. b) Tap Pressure. ð The selection of the test pressure values appears. c) Press the desired test pressure or press Manual. - Page 39 The programmed values are displayed and the ProofMaster is ready Quick test programmed for a test. 17.10.2019 39 / 96...
-
Page 40: Selecting The Program
5.2.6 Selecting the program Quick select The Quick Select is used for single tests or for a single watch. Essentially, the Quick Select is intended for a watchmaker who, for example, wants to check a watch before or after a repair. a) Press ð... -
Page 41: Starting The Test
CAUTION Observe all safety regulations for the test pressures in order to avoid accidents and damage to the watch or the ProofMaster! See Safety regulations [}Page 13]. b) Positioning a watch on the support. ð See Positioning the watch [}Page 42]. -
Page 42: Cancelling The Test
Temperature fluctuations in the housing during testing may affect the test result. • Keep the watch next to the ProofMaster before testing. • If the watch has come directly from the user, wait until it has reached the ambient temperature. -
Page 43: 5.2.10 Manually Lowering/Lifting The Sensor
a) Position the watch strap so that the watch is lying securely on the watch underlay. If necessary, remove the watch strap. b) Make sure that the watch strap does not come into contact with any parts of the device. ð... -
Page 44: 5.2.11 Identifying The Tests
5.2.11 Identifying the tests All measurements are identified by the measured test specimen (model). It is possible to add further identification elements: • Prefix (for example, part number) • User • Comment (4 lines with maximum 32 characters) Enabling identification a) Press to open the identification window. -
Page 45: Measured Results
Measured results 5.3.1 Displaying test results Info As a result of a leak tightness test, only whether the test is good or bad is indicated. However, it is also possible to enable leak rate measurement. See Creating a program [}Page 57]. Test area When the bell cover is opened after a leak tightness test, the test area is illuminated green if the test result is good and red if the test result is... - Page 46 Measured deformations for each test Leak rate (only in Precise mode) End result of the test Total testing period The following examples show possible display phases. Test running Test OK Test rejected Test manually aborted Reduced display The numeric display provides the following information: Prefix.test specimen Name of the operator (only with enabled identification, in the example above Opera)
-
Page 47: Selecting The Results Display
In the examples below, the first test is running, the second test result is OK and the third test result is not OK. Test running Test OK Test rejected Test manually aborted 5.3.2 Selecting the results display The results can be displayed in numeric or reduced form. a) Press (at the bottom right of the screen) to open the display selection window. -
Page 48: Access To Results
In the Display result window, choose between Reduced or Numeric. 5.3.3 Access to results The ProofMaster keeps the last 100 test results in memory. a) Press to access old results. ð The window with the results appears 1. b) Press the desired result in the list. -
Page 49: Sorting The Results
5.3.4 Sorting the results ü Display in the Results menu. a) Press to select the sort type. ð The selection window for the sort type appears. b) Press the desired sort type in the list (in the above example, Title). ð... -
Page 50: Deleting Measured Results
ð The selection window for the deletion type appears. d) Press Yes to delete the selected result, No to cancel the deletion and Delete all to delete all results of the ProofMaster. 50 / 96 17.10.2019... -
Page 51: Leakfinder
LeakFinder To locate a leak, the ProofMaster uses the LeakFinder. This program creates a positive pressure inside the watch case. When the watch is then placed in a container filled with water, the rising bubbles indicate the point of leakage. - Page 52 ð When this message is displayed, the leak is very small. The ProofMaster asks whether it should continue with to build up pressure, which can take a long time, or cancel the process and resume it at a later time. Press Cancel to cancel pressure build-up or press Continue to continue.
- Page 53 The watch can only be safely immersed in water for as long as there is positive pressure in the housing. Witschi Electronic AG accepts no liability for watches that are penetrated by water. If the display is red, remove the watch from the water! The positive pressure in the watch is too low and water can penetrate.
- Page 54 Once the leak is located, the number of bubbles decreases or 30 seconds remain, remove the watch from the water and press to end the countdown on the ProofMaster. 54 / 96 17.10.2019...
-
Page 55: Programming
Programming Mandatory Programming is always done without running a test sequence. 5.5.1 Menus and operating buttons The various function menus can be accessed by pressing the corresponding button 1: Programs menu WiCo menu (appears only when WiCoTRACE is enabled) Measured results menu Quick Select menu Leak test menu Functions of the buttons... -
Page 56: Fixed Test Programs
Each newly created program is therefore a customer program Abbreviation Program name Info on program Calibrated Leak This program is for checking the ProofMaster using Calibrated Leak. This program displays the measured leak rate. Safe test Suitable for all watches, except watches with unstable housing. Standard Men For all types of men's watches (plastic, metal or ceramic housing). -
Page 57: Creating A Program
Abbreviation Program name Pressure values Limit values Watch size (bar) (µg/min) (mm) Calibrated Leak 20–40 Safe test -0.2/2.0 200/200/50 20–40 Standard Men -0.4/3.0 200/50 20–40 Ladies -0.4/2.0 200/50 < 20 Jewelery -0.2/1.0 200/50 < 20 Diver 100 m -0.7/1.0/10.0 200/200/50 20–40 Info The 50 µg/min limit is only applied at the highest test... - Page 58 To guarantee test results, the pressure of a test must always be greater than that of the previous test. When saving the program, the ProofMaster arranges the test sequence starting with the test with the lowest pressure value and ending with the test with the highest pressure value.
-
Page 59: Editing A Program
a) In test mode, select Precise to enable leak rate measurement. Advanced programming ð In addition to the result of the leak test (OK or not OK), the leak rate is displayed. ð Displaying a leak rate in "Precise" test mode requires more time for the measurement. -
Page 60: Deleting A Program
Press Yes to delete the selected program and press No to cancel the operation. ð The deleted program disappears from the program list of the ProofMaster. 60 / 96 17.10.2019... -
Page 61: Viewing A Program
5.5.6 Viewing a program Info The basic programs cannot be edited. The settings can only be viewed. a) Select the basic program. ð See Selecting the program [}Page 40]. b) Press to display the basic configuration settings of the program. c) Press Advanced parameters to display the advanced settings of the program. -
Page 62: Maintenance
Caution - material Danger of material damage due to short circuit! Damage to the insulation on the power cord or the power supply unit can result in a short circuit and damage the ProofMaster. Prohibition Never immerse the ProofMaster in water! This will destroy the device. -
Page 63: Maintenance Schedule
Make sure that the bell cover is closed at the end of the day. See Switching off the device [}Page 36]. Calibration as per the Have the ProofMaster recalibrated. To do so, contact the point of Customer service calibration sale. See Technical support [}Page 7]. -
Page 64: Cleaning The Seal (O Ring)
Maintenance Cleaning the seal (O ring) ü The ProofMaster is switched off and the bell cover is open. a) Clean the seal with a microfibre cloth. Replacing the seal (O ring) ü The ProofMaster is switched off and the bell cover is open. -
Page 65: Software Updates
If necessary, unzip the update files for ProofMaster. b) Save the unzipped files on a USB stick. c) Insert the USB stick with the update files for the ProofMaster. d) Switch on the ProofMaster. ð See Switching on the Proofmaster [}Page 34]. -
Page 66: Accessories And Spare Parts
Accessories and spare parts Ordering spare parts To order accessories or spare parts, please contact Technical support Page 7]. Find your nearest point of sale on our website www.witschi.com. Compressed air Accessories Item no. JunAir 6–10 compressor, 10 l with automatic 97.91.103 (230 V~) -
Page 67: Settings
Info All procedures in this section start with displaying the Settings menu. Quick settings menu ü The ProofMaster is switched on, see Switching on the Opening the quick settings Proofmaster [}Page 34]. a) Swipe the touchscreen with your finger in the direction of the arrow. -
Page 68: Settings
Settings Settings The settings of the ProofMaster can be changed in the settings. Proceed as follows to recall the settings: The ProofMaster offers quick access – see the Quick settings menu Page 67] – and conventional access to the configuration menu settings. -
Page 69: System
Settings System 7.3.1 Language selection a) Select System from the list. ð System is highlighted in blue and the right window displays the system options. b) Tap the display language to open the selection window. c) Select the desired display language from the list. 17.10.2019 69 / 96... -
Page 70: Screen Saver
7.3.2 Screen saver If the automatic screen saver function of the ProofMaster is activated, the bell cover closes after the "Enable after" time set on the ProofMaster and the screen saver is displayed. a) Select System from the list. ð System is highlighted in blue and the right window displays the system options. -
Page 71: Display And Audio Settings
Enable or disable the screen saver display. Enabling automatic ð The button is blue when the function is enabled and grey standby of the ProofMaster when it is not. a) Open the time selection for switching to standby by tapping the Setting the automatic current selection. -
Page 72: Date & Time
Mandatory The ProofMaster must have an Internet connection! a) Enable or disable the automatic setting of the date and time. ð The button is blue when the function is enabled and grey when it is not. - Page 73 Settings b) Select the desired date in the calendar. ü The automatic setting of the date and time is disabled. Setting the time manually a) Open the time selection by tapping the displayed time. b) Select the desired time. ü The automatic setting of the date and time is disabled. Setting the time zone manually a) Open the time zone selection by tapping the displayed time zone.
-
Page 74: Device
Settings Device 7.4.1 Opening speed of the bell cover a) Select Device from the list. ð Device is highlighted in blue and the right window displays the device options. b) Open the bell cover speed selection by tapping the current selection. -
Page 75: Quiet Pressure Release
Settings b) Enable or disable the sensor lighting. ð The button is blue when the function is enabled and grey when it is not. 7.4.3 Quiet pressure release This setting allows the test pressure to be released more slowly from the test chamber. -
Page 76: Import/Export
Settings Import/export 7.5.1 Importing/exporting settings The ProofMaster allows you to import and export these settings using a USB stick. Importing a) Insert a USB stick with the settings into the ProofMaster. Mandatory The settings to be imported must be combined in a file with the file name config.json. - Page 77 Settings ð The home page is shown. ð The settings of the ProofMaster have been replaced by the settings imported from the USB stick. ð The ProofMaster restarts. e) Remove the USB stick. Exporting a) Insert the USB stick on which the settings are to be stored in the ProofMaster.
-
Page 78: Importing/Exporting Programs
Press Export settings. ð A window appears confirming the successful completion of the settings export. ð The settings of the ProofMaster were exported to the USB stick in the config.json file. d) Remove the USB stick. 7.5.2 Importing/exporting programs The ProofMaster allows the import and export of programs within the network or using a USB stick. - Page 79 ð An information and confirmation window appears. d) Press OK to confirm. ð The home page is shown. ð The programs of the ProofMaster have been replaced by the programs imported from the USB stick. ð The ProofMaster restarts. e) Remove the USB stick from the ProofMaster.
- Page 80 Press Export programs. ð A window appears confirming the successful completion of the programs export. ð The programs of the ProofMaster were exported to the USB stick in the programs.json file. d) Remove the USB stick from the ProofMaster.
-
Page 81: Resetting The Device Settings
Settings 7.5.3 Resetting the device settings This process restores the factory settings of the ProofMaster. The programs and test results are retained. a) Select Import/export from the list. ð Import/export is highlighted in blue and the right window displays the import, export and recovery options. -
Page 82: Restoring Factory Settings
Settings 7.5.4 Restoring factory settings This process restores the factory settings of the ProofMaster and deletes all program data, measurement results, etc. on the device. a) Select Import/export from the list. ð Import/export is highlighted in blue and the right window displays the import, export and recovery options. -
Page 83: Printer
Printer 7.6.1 Configuring the printer The configuration of the thermal printer is carried out on the ProofMaster. a) Select Printer from the list. ð Printer is highlighted in blue and the right window displays the device options. b) Enable the printer. -
Page 84: Configuring The Label
Settings 7.6.2 Configuring the label Configurable areas Logo Header Results Footer The figure above shows the different configurable areas of the label. ü Printer configured. a) Select Printer from the list. ð Printer is highlighted in blue and the right window displays the printer options. - Page 85 ð The Witschi logo is printed on the label. a) Open the logo selection by tapping the name of the displayed logo. Importing the logo b) Insert a USB stick with the desired logo into the ProofMaster. c) Press Load new logo.
- Page 86 Settings The measurement result can be displayed in numeric or reduced form. Selecting the results dis- play See examples below. Numeric format Reduced format Not OK Not OK a) Open the results display by tapping the displayed selection. b) Select the desired display type. ð...
-
Page 87: Network
ð The button is blue when the function is enabled and grey when it is not. WiCoTRACE The ProofMaster must be configured for use with the WiCoTRACE software. a) Select WiCoTRACE from the list. ð WiCoTRACE is highlighted in blue and the right window displays the options for WiCoTRACE. -
Page 88: System Information
Enter the IP address of the server where WiCoTRACE is located. d) Enter the port of the server where WiCoTRACE is located. ð The ProofMaster is connected to the WiCoTRACE software. System information This menu displays the following information: •... -
Page 89: Troubleshooting
Troubleshooting Troubleshooting Error messages Info Error messages appear in the event of a malfunction in the device. The following table provides information about the possible causes of an error message and information on how to correct it. The most important faults are described below. Contact customer service if the fault persists after all possible repair options have been carried out. -
Page 90: Malfunctions
Troubleshooting Error message Cause Remedy USB cable defective or not correctly connected. WiCoTRACE (SMX service) error! Ethernet cable defective or not Check Ethernet cable. correctly connected. No connection to the SMX service could be established. WICoTRACE configuration not set up Check if the SMX service is started correctly. -
Page 91: Opening The Bell Cover In An Emergency
Switch off the compressor as specified in the manufacturer's documentation. b) Release the air from the compressed air hose of the compressor. c) Switch off the ProofMaster. ð The remaining pressure in the test chamber escapes. ð See Switching off the device [}Page 36]. -
Page 92: Decommissioning And Disposal
Never force the device cover to open when the device is under pressure! Otherwise parts could be ejected. ü The ProofMaster is switched off. a) Switch off the compressor as specified in the manufacturer's documentation. b) Disconnect the compressor from the compressed air hose as specified in the manufacturer's documentation. -
Page 93: Technical Data
Technical data Technical data Mass and weight Designation Value Unit Weight Width Height when bell cover is closed Height when bell cover is opened Depth Performance data Designation Value Unit Vacuum range -0.1 to -0.8 Pressure range 0.1 to 10 Accuracy of test pressure ±... - Page 94 Technical data Designation Value Unit Measurement resolution 0.01 µm Ambient conditions Designation Value Unit Temperature 15 to 35 °C Relative humidity (non-condensing) Max. 80 Emissions Designation Value Unit Noise emissions < 80 dB(A) Noise emission with "Quiet pressure release" < 70 dB(A) See Quiet pressure release [}Page 75].
- Page 95 Notes 17.10.2019 95 / 96...
- Page 96 Witschi Electronic AG Bahnhofstrasse 26 3294 Büren an der Aare Switzerland +41 32 352 05 00 www.witschi.com...
Need help?
Do you have a question about the ProofMaster and is the answer not in the manual?
Questions and answers