LockNet Sur-Lock I/O 2000L Series Installation Instructions Manual
Exit control alarm locks
Hide thumbs
Also See for Sur-Lock I/O 2000L Series:
Advertisement
Sur-Lock™
I/O 2000L Family of Exit Control Alarm Locks
IMPORTANT: Please read and follow these instructions carefully. If you are encountering
difficulty installing your new Sur-Lock™ or are having trouble understanding any part of these
instructions, please stop immediately and consult your dealer. Your satisfaction and your
safety are important to us and we have made every effort to see that these instructions are
clear and accurate.
©2019 LockNet, LLC
LockNet is a registered trademark of LockNet, LLC
Sur-Lock is a trademark of LockNet, LLC
305 Panic Hardware
U.S. Patent No. 5,410,900
Document Part # 1051-01 (Rev 021919)
Page 1 of 16
Advertisement

Related Manuals for LockNet Sur-Lock I/O 2000L Series

Summary of Contents for LockNet Sur-Lock I/O 2000L Series
- Page 1 ©2019 LockNet, LLC LockNet is a registered trademark of LockNet, LLC Sur-Lock is a trademark of LockNet, LLC 305 Panic Hardware U.S.
- Page 2 LockNet’s liability, if any, will be limited to the actual price paid by the customer for the product and will in no event include consequential, incidental, indirect, special or other damages of any kind, even if LockNet, LLC has been notified of the likelihood of such damages occurring.
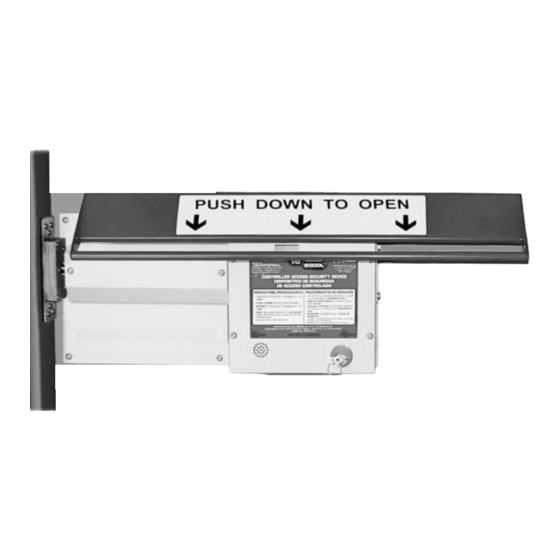
- Page 3 Sur-Lock™ Installation Instructions TOOLS NEEDED NOTE ON CHANGING THE HAND • Tape Measure • Level The Sur-Lock™ is designed to be • Pen/Marker used in both left-hand reverse and • 1/2” Electric Drill right-hand reverse applications. It is • 9/16” Drill Bit with 1/2” shank •...
- Page 4 Sur-Lock™ Installation Instructions For Solid-Core Wood Doors proceed to Step 5, otherwise for Hollow Metal Doors continue. 4. Attach the outside mounting plate by repeating steps 2 & 3. The outside mounting plate must align with the inside mounting plate - transfer your measurements from the inside mounting plate carefully (See Figure 2).
- Page 5 Sur-Lock™ Installation Instructions Left Hand Reverse Right Hand Reverse FIGURE 3 Do not use darkened holes. To change the hand of the device, see Appendix A 5. Using the square holes in the inside mounting plate as guides, drill five (5) holes into the door (See Figure 3): For Solid-Core Wood Doors DO NOT DRILL ENTIRELY THROUGH THE DOOR!
- Page 6 Sur-Lock™ Installation Instructions FIGURE 4 - HOLLOW METAL INSTALLATION SHOWN 6. Mount the Sur-Lock™ to the inside surface of the door (See Figure 4). For Solid-Core Wood Doors Discard the carriage bolts and use five (5) #14 1-1/2” lag screws to fasten the Sur- Lock™...
- Page 7 Sur-Lock™ Installation Instructions 7. Keeping the door closed, check the distance between the end of the lock bolt and the door jamb stop. To ensure the maximum extension into the latch (installed later), the end of the lock bolt should just clear the jamb stop - the clearance should be approximately 1/16”...
- Page 8 Sur-Lock™ Installation Instructions 8. With the door closed, slide the latch over the lock bolt rod, making sure it latches. Mark around the outside of the latch and open the door. Remove the paper backing from the adhesive tape on the back of the latch and temporarily affix it to the jamb stop - aligning with the marks.
- Page 9 Sur-Lock™ Installation Instructions 9. With the door closed, measure 39-1/2” from the finished floor up the inside of the door and make a mark. Using the mark, align the hinge-side deadbolt template by folding and placing the solid line against the inside hinge-side of the door. Using a center punch, make two (2) center marks on the face of the door, and one (1) on the door jamb stop.
- Page 10 Sur-Lock™ Installation Instructions 10. Remove the backing paper from the bolt plate and align with the 9/16” hole on the door jamb. Temporarily hold in place with tape and check the alignment of the bolt plate and the hinge-side deadbolt by closing the door. Make sure the hinge-side deadbolt moves in and out of the hole freely.
- Page 11 Sur-Lock™ Installation Instructions 14. While holding cover plate in place, wait 15 to 20 seconds, then open door. The alarm will sound. The alarm will continue to sound until the key is turned to the off position. To do this, insert the key into the cylinder and turn counter-clockwise until the key stops (See Figure 10).
- Page 12 Appendix A: Changing The Hand DOOR HANDING DIAGRAM A-1. Remove the Battery Bracket Assembly (held on with 2 screws) and the Lock Bolt Housing Assembly (held on with 2 screws). (See Figure A.1) Lock Bolt Battery Bracket Housing Assembly Assembly FIGURE A.1 A-2.
- Page 13 Appendix A: Changing The Hand A-3. Remove the Lock Bolt Rod and reinstall it through the opening on the opposite side. Secure the lock bolt rod to the bottom post on the Pivot Plate using the Washers and Cotter Pin (See Figure A.3). FIGURE A.3 A-4.
- Page 14 Appendix A: Changing The Hand A-5. Reposition the clip that secures the battery wires to the unit, using caution so as to not pull the battery wires out of the Alarm Board (See Figure A.5). The clip should be positioned on the same side as the Battery Bracket Assembly. If the Battery Bracket Assembly’s location is now on the left of the unit, route the battery wires below the Alarm.
- Page 15 Appendix B: Exploded Diagram Document Part # 1051-01 (Rev 021919) Page 15 of 16...
- Page 16 Screw, 10X1/2 Torx Security PH Self Drilling S/M/S 410 STST 8421-01 Torx Tamper-Resistant Bit TR25 X 25 8424-01 Screw, 6-32X 1/4 Pan Phillips M/S Zinc For Assistance, Contact LockNet Immediately At (800) 887-4307 Document Part # 1051-01 (Rev 021919) Page 16 of 16...
Need help?
Do you have a question about the Sur-Lock I/O 2000L Series and is the answer not in the manual?
Questions and answers