Table of Contents
Advertisement
Advertisement
Table of Contents

Subscribe to Our Youtube Channel
Related Manuals for Evolve BAMBOO GTR

Summary of Contents for Evolve BAMBOO GTR
- Page 1 USER MANUAL BAMBOO GTR CARBON GTR...
- Page 2 CONGRATULATIONS ON YOUR PURCHASE! From all of us at Evolve, we wanted to thank you for choosing us. We are stoked to welcome you to the Evolve community! Evolve Skateboards are an exciting product and will provide you with endless fun.
-
Page 4: Table Of Contents
CONTENTS BAMBOO GTR CARBON GTR FOOT PLACEMENT REMOTE DO NOT RIDE BEFORE READING WARNING MESSAGES CHARGING THE BOARD CHARGING THE REMOTE TURNING THE BOARD ON / OFF TURNING THE REMOTE ON / OFF REMOTE SCREEN GUIDE REMOTE MENU CONTROLS PAIRING/SYNCING THE REMOTE... - Page 5 CONTROLLING THE BOARD CHANGING WHEEL AND GEAR SETTINGS SELECT KMH OR MPH BATTERY INDICATOR DISPLAY CHANGE BATTERY INDICATOR DISPLAY LOW BATTERY WARNINGS ON THE REMOTE TRIP METER AUTO SAFE FUNCTION POWER SAVE FUNCTION SPEED LIMITER R2 TRIGGER RESET PROCEDURE OTHER REMOTE OPERATION FUNCTIONS AND TIPS HEAT PROTECTION WARNING ERROR CODES MAINTENANCE GUIDE...
-
Page 6: Bamboo Gtr
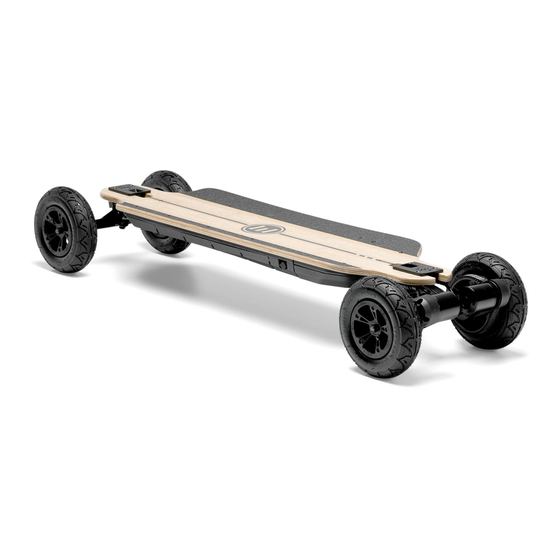
BAMBOO GTR 1. Battery 2. Motor Controller 3. Charger port 4. ON/OFF switch 5. USB ports 6. Front truck 7. Rear truck 8. Motors 9. Belt 10. Deck 11. All Terrain Wheels 12. Street Wheels... -
Page 8: Carbon Gtr
CARBON GTR 1. Battery 2. Motor Controller 3. ON/OFF switch 4. Charger port 5. Front truck 6. Rear truck 7. Motors 8. Belt 9. Deck 10. All Terrain Wheels 11. Street Wheels... -
Page 10: Foot Placement
FOOT PLACEMENT REGULAR GOOFY FOOT PLACEMENT DOES VARY PERSON TO PERSON. THE CLOSER YOUR FRONT FOOT IS TO THE FRONT TRUCK, THE MORE CONTROL YOU WILL HAVE. -
Page 11: Remote
REMOTE A. Brake B. Mode 1 Button C. Mode 2 Button D. On/Off Button E. Lanyard Loop F. LCD Screen G. Accelerator H. Safety Switch Charge Port... -
Page 12: Do Not Ride Before Reading
DO NOT RIDE BEFORE READING ALWAYS wear a helmet and relevant safety equipment when riding the board. ALWAYS ride your board at speeds at which you are comfortable without power or brakes. Due to a low battery on your board or remote your board can lose brakes and power during your ride. - Page 13 PRO and GTR modes are very powerful and the remote acceleration and brakes are highly sensitive. Be sure to be very gentle with these controls to avoid being thrown off the board. Start by trying to move as slowly as possible within these speed modes while using both the brake and accelerator.
-
Page 14: Warning Messages
WARNING MESSAGES INJURIES Whenever you ride an Evolve board, you risk serious injury or even death from loss of control, collisions or falls. To ride safely, you must read ALL instructions, safety messages and warnings in this manual. AVOID WATER The board is not waterproof. - Page 15 RIDING ON HILLS Riding on hills can be extremely dangerous; what goes up must come down! So if you ride up an insanely steep hill and you intend to ride down this same hill, you must know how to control your speed without the use of the electric brakes.
-
Page 16: Charging The Board
CHARGING THE BOARD BEFORE USING the board, allow the battery to be FULLY CHARGED. Connect power to the charger by inserting the charger plug into a power point. Now remove the rubber grommet from the charger port on the board and insert the charger plug. The charger will show: GREEN LIGHT = FULLY CHARGED RED LIGHT... -
Page 17: Charging The Remote
CHARGING THE REMOTE To charge the remote, simply dislodge the rubber grommet covering the charge port and insert the Micro-USB plug of the charge cable carefully into the charge port of the remote, and the USB plug end into a suitable USB port. The remote will show: GREEN LIGHT = FULLY CHARGED RED LIGHT... -
Page 18: Turning The Board On / Off
TURNING THE BOARD ON / OFF To turn the board on, press the ON/OFF BUTTON in. It will illuminate to a solid blue light indicating the board is on. To turn the board off, simply press the ON/OFF BUTTON in again and the light will turn off as the button returns to the off position. -
Page 19: Turning The Remote On / Off
To turn the remote ON, quickly press the ON/OFF BUTTON one time, the remote will vibrate once and the LCD screen will power on, displaying the Evolve logo. The ON/OFF BUTTON will light up on the remote and display the default screen. -
Page 21: Remote Screen Guide
REMOTE SCREEN GUIDE 175mm km/h Trip: A. Speed mode E. Gear Setting B. Bluetooth Connection F. Wheel Setting C. Board Battery G. Speedometer D. Remote Battery H. Trip Meter NOTE – DEFAULT SCREEN SHOWN... -
Page 22: Remote Menu Controls
REMOTE MENU CONTROLS To access the menu, turn the remote on, then double tap the ON/OFF BUTTON. When in the menu use MODE 1 and MODE 2 to navigate/scroll through menu lists. Use the ON/OFF BUTTON to confirm selections. MODE 1 BUTTON Scroll Up MODE 2... -
Page 23: Pairing/Syncing The Remote
PAIRING / SYNCING THE REMOTE 1. Turn the skateboard on. 2. Turn the remote on. 3. Press and hold the MODE 1 BUTTON on the remote for one second or until the Bluetooth symbol begins to flash. 4. Once paired, the Bluetooth symbol will switch to a solid symbol and the battery display will show a reading. -
Page 24: Changing Speed Modes On The Remote
CHANGING SPEED MODES ON THE REMOTE Once your remote is on and paired to your skateboard it will begin in ‘SAFE MODE’ as the first speed mode setting. Now press either MODE 1 or MODE 2 button once, this will change the speed from SAFE MODE to the previous speed setting of your last ride. - Page 25 Custom mode allows you to set the power curve that’s just right for your riding style. The power curve can be adjusted via the EXPLORE BY EVOLVE APP which is available on the ITUNES App Store or on the Android Play Store.
-
Page 26: Safety Switch
SAFETY SWITCH The SAFETY SWITCH is located under the accelerator trigger. It must be pressed by your 2 and/or 3 finger as you engage the accelerator trigger to begin riding. The speed mode display on the LCD screen will turn a solid color once you press in the SAFETY SWITCH. -
Page 27: How To Accelerate
HOW TO ACCELERATE With the safety switch depressed, pull the ACCELERATOR trigger slowly and you will begin to move forward. The further you pull the trigger in, the faster you will go. Once over 5km/h you can release the safety switch. For more information refer to the SAFETY SWITCH section. -
Page 28: How To Brake
HOW TO BRAKE Push the brake trigger forward SLOWLY and you will begin to slow down. The further you push the trigger, the stronger the braking will be. When riding very slowly the brakes will be softer than when you are riding at a higher speed. Have your weight on the back foot when you apply the brake function to stop you from flying forward when applying the brakes. -
Page 29: Controlling The Board
Evolve Skateboards highly recommend starting in ECO MODE when learning to ride the board and use the remote. Be sure to be very gentle with the trigger control to avoid being thrown off the board. -
Page 30: Changing Wheel And Gear Settings
SCROLL Street ON / OFF ON / OFF Return NOTE – THE STREET BOARDS ALL COME WITH 32T GEAR AS STANDARD. THE AT BOARDS COME WITH 66T GEAR AS STANDARD. OTHER GEAR SIZES AND WHEELS ARE AVAILABLE ON EVOLVE WEBSITES. -
Page 31: Select Kmh Or Mph
SELECT KMH OR MPH 1. From the default screen, double-tap the ON/OFF BUTTON. This will now display the menu screen. 2. Scroll down by pressing the MODE 2 BUTTON until you reach ‘Options’, then press the ON/OFF BUTTON. 3. Press the ON/OFF BUTTON to change the unit of measurement for your region (KMH or MPH). -
Page 32: Battery Indicator Display
BATTERY INDICATOR DISPLAY When the remote is connected to the board, it will display how much battery is left in the skateboard and remote in real time. The battery of the skateboard is displayed as a small percentage symbol (%) in the top right-hand corner of the LCD screen, and as a small battery bar under the percentage symbol for the remote battery. -
Page 33: Change Battery Indicator Display
CHANGE BATTERY INDICATOR DISPLAY You have the option to change the skateboard battery percentage display to a skateboard battery bar if you prefer. 1. Double-tap the ON/OFF BUTTON. This will now display the menu screen. 2. Scroll down by pressing the MODE 2 BUTTON until you reach ‘Options’, then press the ON/OFF BUTTON. -
Page 34: Low Battery Warnings On The Remote
LOW BATTERY WARNINGS ON THE REMOTE There are low battery warnings set on the remote that provide you with notice of when to expect the skateboard to run out of power. See below at what stage the warnings come on: 1. -
Page 35: Trip Meter
TRIP METER The trip display will show your distance travelled for your current ride only. Once you turn your board off the trip meter will reset itself and return to 0 value. 175mm km/h Trip: TRIP METER NOTE - FOR BEST ACCURACY, BE SURE TO HAVE SELECTED THE CORRECT WHEEL AND GEAR SETTING SIZE ON YOUR REMOTE. -
Page 36: Auto Safe Function
AUTO SAFE FUNCTION The auto safe function is a feature of the remote that is designed to detect any potential issues with the control of the board. This can relate to anything to do with the battery performance, motor controller performance and remote operational control. The auto ‘Safe’... -
Page 37: Power Save Function
POWER SAVE FUNCTION To maximize the battery run time in the remote, there is a power save function that makes the remote screen turn off when the remote is at a low angle. Power save will automatically activate one minute after the remote is turned on. -
Page 38: Speed Limiter
SPEED LIMITER The speed limiter has been designed to cap top speeds for certain country laws as well as for those riders who are happy only to ride at a certain speed. The power and torque is still exactly the same when the limiter is activated, however the top speed is limited. -
Page 39: R2 Trigger Reset Procedure
R2 TRIGGER RESET PROCEDURE If for some reason you are experiencing symptoms such as difficulty changing speed modes, unable to turn the remote off before the board and ability to brake but not accelerate, this is usually caused by knocks to the remote which then moves the triggers from its original position within the remote case. - Page 40 4. Perform the following sequence of button presses: Double click Double click Double click ON/OFF BUTTON. MODE 2. MODE 2 again. MODE 2 MODE 2 ON / OFF The remote should now be in the trigger setting screen 5. With ‘Set ACC Min’ highlighted, pull and hold the ACCELERATOR TRIGGER all the way in.
- Page 41 7. With ‘Set Brake Min’ highlighted, release the BRAKE LEVER entirely and press the ON/OFF BUTTON once to set the value. Acc Trigger: XXXX Brake Trigger:XXXX Throttle: Set Acc Min: XXXX Set Acc Max: XXXX ON / OFF Set Brake Min: XXXX Set Brake Max: XXXX...
-
Page 42: Other Remote Operation Functions And Tips
OTHER REMOTE OPERATION FUNCTIONS AND TIPS • If you accidentally press both the accelerator trigger and brake trigger at the same time, the brake function will work and cancel out the accelerator. • If you hold down the accelerator and brake triggers then let the brake trigger go it will not accelerate. -
Page 43: Heat Protection Warning
HEAT PROTECTION WARNING To protect the entire electric system from over heating, we have created software that is designed to reduce the board performance. This forces it to cool down and prevent the rider continuing to put stress on the electric system. If ever the system does reach this protection mode, the remote will automatically go to PRO speed mode and will vibrate one time and the km/hr reading will change to a red colour. -
Page 44: Error Codes
This error code may be displayed if an error has been detected from one, or both, of the motors in operation. The error will indicate ‘Motor1 Err’, ‘Motor2 Err’ or ‘Motor1&2 Err’. IF EVER THE BOARD DOES EXPERIENCE AN OPERATIONAL ISSUE, PLEASE CONTACT YOUR LOCAL EVOLVE SKATEBOARDS SUPPORT TEAM FOR ASSISTANCE. -
Page 45: Maintenance Guide
MAINTENANCE GUIDE If you regularly clean and maintain your electric longboard, it will last a long time and ride at its best: • Always clean your bearings for best roll and quietest/ smoothest ride. Bearings get dirty and affect ride quality which may reduce battery performance and cause possible bearing failure. -
Page 46: Battery Care
BATTERY CARE Your battery and therefore your board, should always be stored at room temperature. Excessive heat can permanently affect or damage the battery. The board does have heat protection software in place should this occur whilst riding to prevent the battery from overheating. -
Page 47: Trouble Shooting
TROUBLE SHOOTING This manual is a quick start guide only. For detailed information regarding tips, maintenance and trouble-shooting, please visit WWW.EVOLVESKATEBOARDS.COM. Here you will find links to your local distributor for detailed information. WARRANTY THIS BOARD IS COVERED BY A 12 MONTH MANUFACTURERS WARRANTY (TIME PERIOD MAY BE DIFFERENT IN OTHER COUNTRIES SUCH AS USA AND EUROPE) THAT COVERS DEFECTS IN WORKMANSHIP AND MATERIAL.
Need help?
Do you have a question about the BAMBOO GTR and is the answer not in the manual?
Questions and answers
How to check the miles
To check the miles on an Evolve Bamboo GTR, use the remote control while it's connected to the board. The remote displays distance traveled in miles during the ride. It shows updates in real time, such as "4.1 miles in," "9.5 miles into the ride," or "20.6 miles." Keep the GPS running on the remote to track the distance accurately.
This answer is automatically generated