Advertisement
Available languages
Available languages
Quick Links
SMARTEC ECONET
TRANSLATOR KIT
Installation Instructions
This water heater is pre-installed with Smartec EcoNet Translator. Refer to
below instruction to setup the translator and WiFi module.
CAUTION: Disconnect power before working on the water heater.
Warning: WiFi module needs to be installed indoors.
STAND-ALONE OPERATION SETUP
1. If only one Gas Tankless Water Heater is connected to the EcoNet Bus,
you can now start using the SMARTEC EcoNet Translator to monitor and
control the water temperature of your Gas Tankless Water Heater through
the EcoNet App (see WiFi instructions). Remember to wait 60 seconds
before starting operation.
2. The user can enable/disable the water heater and set/view the water
outlet temperature using the Remote Control connected to the unit or
wirelessly through the EcoNet App.
MANIFOLD OPERATION SETUP
If more than one water heater is connected together in a Manifold
configuration continue with this section. Otherwise, skip to Alarms section.
1. Remove front cover from the water heater.
2. To allow the SMARTEC EcoNet Translator to control Gas Tankless Water
Heaters in a manifold configuration, each manifolded unit should be
connected to a SMARTEC EcoNet Translator.
3. Connect manifolded units serially using both/any of the Econet ports
located on the EcoNet Translator and the provided RJ25 cable.
4. Enter the setup menu by pressing the two buttons simultaneously located
on the SMARTEC EcoNet Translator for 5 seconds. If successful, you will
see a "1" instead of a "01" on the display.
5. Press the right button to change the number assigned to each water
heater. The number displayed will increase with each button press.
6. Each unit in the manifold should be numbered sequentially. This means
that if the user has 4 units connected in a manifold mode, then they
should be numbered 01, 02, 03 and 04. Maximum number of units
supported in manifold is 20.
To return to the main menu press the left button.
7. Connect the Remote Control included with the water heater only to
number 01 when in manifold configuration. The remote control connected
to number 01 will control all units in manifold.
8. The user can enable/disable the water heaters and set/view the water
outlet temperature using the Remote Control connected to number 01 or
wirelessly through the App.
Pressing the left button scrolls the menu items. Pressing the right button
chooses the menu item and changes the menu choice as follows:
Menu Item
Function
1
Instance / EcoNet Bus number (1-20)
2
Number of Manifold Heaters (1-20), 1 = No
manifold operation.
3
Recirculation Mode 0= OFF, 1=ON
The menu will exit after 10 seconds if no buttons are pressed. Changes
will be saved upon menu exit.
9. Only unit number "01" will have menu item 2 available. This menu item
tells the manifold manager (number 01) how many heaters are connected
in the manifold system.
10. Pressing the right button when in menu item 2 will increase the number
of manifolded units the manager will detect.
Once all units on the manifold are numbered correctly, the configuration
will be completed. Power cycle all units. Wait 60 seconds before starting
operation.
* All switches in the water heaters controller must be in the off position.
RECIRCULATION PUMP OPERATION
If you have a recirculation pump installed in your system follow the next
steps to setup your system.
MANIFOLD
Use menu item 3 to turn ON recirculation mode only in the water
heater unit with number 1 assigned. All other units connected in
the manifold are left as is. Power cycle all water heaters in the
manifold.
STAND ALONE
Use menu item 3 to turn ON recirculation mode. Power cycle your
water heater.
Note: Recirculation mode is intended for setups of 3 or more manifolded
units.
HIGH TEMPERATURE SETTING
If you have a water heater chip that allows a higher water temperature
set-point (185°F) installed in your unit follow these steps to set it up with
the EcoNet translator. The following steps are for stand-alone units and
number/instance 01 in a manifold setup.
With unit ON:
1. Change your set-point to 100°F using the remote or the EcoNet App.
Wait 10 seconds.
2. Disconnect translator from unit.
3. Turn off unit by pressing the power button on the remote control.
4. Turn DIP1 switch 4 ON (Refer to the water heater Use & Care Manual).
The remote control starts to blink.
5. Press max button for 2 seconds.
6. Turn DIP1 switch 4 OFF.
7. Press the Power button in your remote control.
8. Connect translator to unit.
9. Wait 60 seconds.
10. Change the set-point to the desired value using the remote control the
EcoNet App.
Note: If you change the set-point to 140 and below you will have to
repeat the process again.
For manifold setup it is necessary to complete the following process for
each water heater that is not number 01:
1. Disconnect translator from unit.
2. Turn off unit by pressing the power button on the remote control.
3. Turn DIP1 switch 4 ON. The Red LED in the control board starts to blink.
4. Press max button for 2 seconds. Red LED stays solid.
5. Turn DIP1 switch 4 OFF.
6. Disconnect water heater unit from wall power.
7. Connect translator to unit.
8. Plug back water heater unit to power outlet.
ALARMS
If the EcoNet WiFi module is configured correctly, the user will receive a
notification in the App regarding the detected alarm.
Additionally the remote control may display the alarms.
When an alarm is detected, the number displayed in the translator will blink.
When this occurs, the user should connect to the App in order to identify the
issue that was detected.
To clear warnings or alarms press the left button on the EcoNet translator
for 5 seconds until all segments on the LED displays are on. Then release
the button and alarms will be cleared.
TROUBLESHOOTING
Verify that the WiFi module is connected and properly configured.
●
If a fault is detected in any of the water heaters connected to EcoNet,
●
please refer to the EcoNet App in order to troubleshoot any alarms in
your water heater.
If your WiFi signal strength is too weak at your Water Heater's location,
●
you may still be able to use the WiFi Kit by using a WiFi Range Extender.
Contact your favorite electronics retailer for more information.
If connection is lost, verify that the lights in your WiFi module are solid. If
●
not, unplug and plug the power cord to the module.
Contact customer service if a fault is detected.
●
Phone:
1-866-720-2076 - Water Heater Customer Service.
1-800-255-2388 - EcoNet Customer Service Number (Module WiFi)
Website: www.Rheem.com/EcoNet
Error Code
Description
Solution
Unknown Error from the
Contact water heater customer
A100
Tankless Control
service.
There is water present inside
the water heater, check for
A107
Water Detected
leaks or other sources of
water.
Verify the water sensor is
Water Sensor Not
S300
connected properly to the
Installed
EcoNet translator.
Possible Freezing
Heat Exchanger temperature
S103
Conditions
is too low.
Friendly reminder to have your
S104
Service Reminder
water heater serviced. 200 hrs
of operation have passed.
Change filter if installed, if not
S105
Change Water Filter
disregard warning.
Verify connection between
Translator to Water
EcoNet translator and water
A201
Heater Comm.Failure
heater control board. Reset
power to unit.
Verify EcoNet wiring to WiFi
EcoNet Water Heater
A203
module or to another EcoNet
Comm.Failure
translator. Reset power to unit.
In manifold, verify wiring
Water Heater Comm.
A203
between units. Reset power to
Failure Instance X
all water heaters.
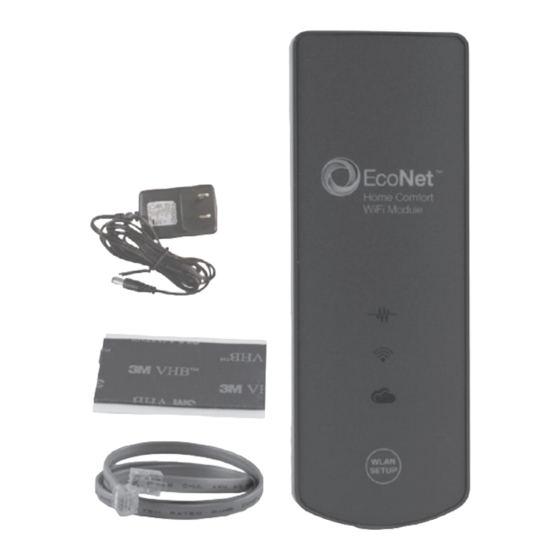
ECONET WiFi KIT
Installation Instructions
BEFORE YOU BEGIN
The EcoNet WiFi Kit is intended for use with EcoNet Enabled products.
●
DO NOT attempt to use this kit with other equipment.
The EcoNet WiFi Kit requires a broadband home Internet connection
●
and WiFi network in order to operate. Use a mobile phone or other WiFi
capable device to ensure that the home's WiFi network is accessible
from the Water Heater's location.*
STEP 1: Record the MAC Address.
Locate the MAC Address on the back of your module as depicted in
●
Figure 1, and record it. You will need this information in the future and
may be asked for it during the setup process. Take a digital photo using
a mobile device, or write it in the space provided below.
MAC Address: _____-_____-_____-_____-_____-____
STEP 2: Connect the Communication Cable.
Insert one end of the Communication Cable into the jack found on the
●
bottom of the WiFi module as depicted in Figure 2.
Remove front cover from the water heater and insert the other end of
●
the Communication Cable into one of the EcoNet port on your EcoNet
Translator.
Replace front cover and power the unit.
●
STEP 3: Permanently Attach the WiFi Module.
Ensure that both plugs on the Communication Cable are securely
●
attached as described above.
Remove the protective paper from one side of the Adhesive Tape and
●
affix it to the back of the WiFi Module above the label with the MAC
Address.
Select a location for attaching the WiFi Module to the indoor location
●
of your preference which does not cause severe tension in the
Communication Cable.
Remove the protective paper from the remaining side of the Adhesive
●
Tape and press the Module against a clean flat surface of the Water
Heater as depicted in Figure 3 for indoor models.
WiFi module and power connector need to be located indoor.
●
STEP 4: Install the power cord.
Install power cord into power jack at bottom of module and plug
●
transformer to a power source.
AP18492 (01/17)
Fig. 1
Sample
Media Access Control (MAC)
Address location
Fig. 1
Fig. 2
Fig. 2
Exemple
Emplacement de l'adresse
MAC de commande d'accès
au support
Fig. 1
Fig. 3
Fig. 3
Muestra
Ubicación de la dirección del
Control de Acceso a Medios (MAC)
STEP 5: Co
After the W
●
three LEDs
ready to be
the module
Fig. 5
Fig. 5
If you have
●
Store or Go
Ensure tha
●
While near
●
instructions
NOTE: Some
after the firs
continue inst
remaining in
Additional Ti
Fig. 5
Advertisement

Related Manuals for Rheem ECONET Series

Summary of Contents for Rheem ECONET Series
- Page 1 1-800-255-2388 - EcoNet Customer Service Number (Module WiFi) located on the EcoNet Translator and the provided RJ25 cable. NOTE: Some Website: www.Rheem.com/EcoNet after the firs 4. Enter the setup menu by pressing the two buttons simultaneously located on the SMARTEC EcoNet Translator for 5 seconds. If successful, you will...
- Page 2 1-800-255-2388 - Número de Servicio al cliente de EcoNet (Modulo WiFi) corriente eléctrica y conexión máxima de unidades conectadas en un manifold es 20. Sitio Web: www.Rheem.com/EcoNet al equipo. Para volver al menú principal, oprima el botón izquierdo. La luz LED central indica Código de...
- Page 3 Le voyant DEL inférieur indique une connexion active au nuage/serveur. Fig. 1 SMARTEC ECONET PASO 5: Conexión a Internet. Le bouton WLAN SETUP ECONET WiFi KIT 8. Connecte (CONFIGURATION DU RÉSEAU Después de instalar el módulo WiFi y de energizar el calentador de agua, 9.
- Page 4 ● e branchée sur Téléphone: 1-866-720-2076 - Service à la clientèle des chauffe-eau. menu. L’appui 1-800-255-2388 - Service à la clientèle pour EcoNet (WiFi) fie le choix du Site Web: www.Rheem.com/EcoNet. Exemple Code Description Solution Emplacement de l’adresse (1-20) d’erreur MAC de commande d’accès...
Need help?
Do you have a question about the ECONET Series and is the answer not in the manual?
Questions and answers