Table of Contents
Advertisement
Advertisement
Table of Contents

Related Manuals for Emcotec RC Electronic DPSI RV Mini Series


Summary of Contents for Emcotec RC Electronic DPSI RV Mini Series
- Page 1 Bedienungsanleitung...
-
Page 2: Table Of Contents
DPSI RV Mini Family Operating Instructions Version 1.0 Contents 1. Preface ..................... 4 2. History....................5 3. DPSI RV Mini at a glance ..............6 4. Overall layout ................11 5. Characteristics ................12 5.1. Dual Current Supply .............. 13 5.2. - Page 3 DPSI RV Mini Family Operating Instructions Version 1.0 10. Servo-Matching ................39 10.1. Programming ............... 40 10.2. Changing Servo Direction............ 41 10.3. Setting Servo Center ............41 10.4. Setting End-Limits..............42 10.5. Deletion of all Programming ..........43 10.6 Supplemental Hints for MAGIC-Version ....... 43 10.7.
-
Page 4: Preface
Operating Instructions Version 1.0 1. Preface With a DPSI RV Mini dual current supply from EMCOTEC you purchased a high grade, modern and secure product for your remotely controlled model. We appreciate your trust and assure you that you made the right choice! Long lasting experience for years in development and manufacturing of electronically systems as well as the knowledge of the world’s best... -
Page 5: History
DPSI RV Mini Family Operating Instructions Version 1.0 2. History For all times, EMCOTEC was and is the leader in "safe current supplies" around RC-Models. Novelties and developments were initiated by EMCOTEC: • First dual current supply with servo current distribution and electronically switches (DPSI 2001) •... -
Page 6: Dpsi Rv Mini At A Glance
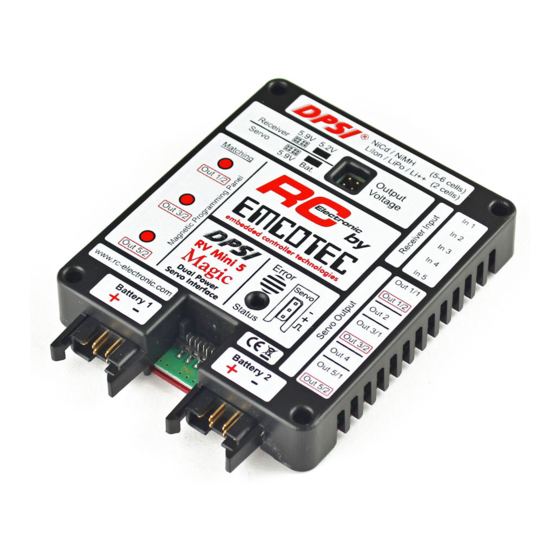
DPSI RV Mini Family Operating Instructions Version 1.0 3. DPSI RV Mini at a glance The DPSI RV Mini – family consists of four different dual current supply systems with servo current distribution for models of medium size which fit all applications: DPSI Version Receiver- Servo-... - Page 7 DPSI RV Mini Family Operating Instructions Version 1.0 The DPSI RV Mini 6 is mainly used by jet- and glider-pilots (as well as engine driven planes and helicopters) were more channels are necessary but only one powerful servo actuates one rudder. Here too, additional (less powered) servos can be directly supplied by the receiver.
- Page 8 DPSI RV Mini Family Operating Instructions Version 1.0 A biplane with 4 aileron servos, split elevator- and one yaw-rudder servo. The throttle servo may be directly connected to the receiver as an option. Examples for the DPS RV Mini 6 (Magic) A glider with spoilers and tow release.
- Page 9 DPSI RV Mini Family Operating Instructions Version 1.0 A glider with flaps and spoilers. The yaw rudder (and if so one tow release) are directly connected to the receiver. An acrobatic airplane with one servo per rudder, the yaw rudder is actuated by 2 servos. Page 9 of 54...
- Page 10 DPSI RV Mini Family Operating Instructions Version 1.0 A jet with flaps and spoilers. The turbine-ECU is directly connected to the receiver, as well as landing gear doors or other electronically systems. A helicopter with 4-point-control of swash plate (2 roll- und 2 pitch-servos). 1 = throttle. The gyro (tail rotor) is supplied directly by the receiver (5.2V) or via channel 6/1 of the DPSI (5.9V).
-
Page 11: Overall Layout
DPSI RV Mini Family Operating Instructions Version 1.0 In these examples, the outputs of the DPSI RV Mini are assigned to the corresponding rudders. Outputs at the DPSI are labeled "Out 1/1", "Out2", and so on. Additional servos and auxiliaries can be directly connected to the receiver. -
Page 12: Characteristics
DPSI RV Mini Family Operating Instructions Version 1.0 5. Characteristics With the DPSI RV Mini - systems a new dimension is reached as far as safety and comfort about current supplies for RC receiver equipment is concerned: Dual current supply (battery switch) Separate electronically high power switches for both batteries Up to 50A peak current load Switching without microcontroller and therefore failsafe (CSHC=... -
Page 13: Dual Current Supply
DPSI RV Mini Family Operating Instructions Version 1.0 High grade plastic housing with integrated latches for battery connectors Large area heat sink for heat dissipation Each system 100% tested and provided with individual serial number Delivery inclusive all accessories Developed and manufactured by market leader (Made in Germany) 5.1. -
Page 14: Detached Voltage Regulators
DPSI RV Mini Family Operating Instructions Version 1.0 5.3. Detached Voltage Regulators Until now, the receiver set was supplied directly by the connected battery (or corresponding battery switch). The output voltage of batteries depends heavily on the actual discharging state. Because 5- cell NiCd or NiMH batteries are utilized more often for optimal servo power, a fully charged battery reaches voltages up to 7.5V after turning the charger off. -
Page 15: Servo Current Distribution
DPSI RV Mini Family Operating Instructions Version 1.0 Even fast tail rotor servos or gyro systems which only "allow for" small voltages can be supplied by the receiver with 5.2V. Additionally, the receiver supply is protected against voltage peaks. This means: all disturbing pulses induced into the supply voltage are limited to safe values. -
Page 16: Hfib (High Frequency Interference Blocking)
DPSI RV Mini Family Operating Instructions Version 1.0 5.6. HFIB (High Frequency Interference Blocking) In order to even increase safety, a highly effective filter is looped in into each servo's signal path. Disturbances, "caught" by long servo cables are almost completely eliminated directly at the servo connector and therefore do not reach the receiver. -
Page 17: Error Detection And Indication
DPSI RV Mini Family Operating Instructions Version 1.0 Each matching system has its own microcontroller (there are three in the DPSI RV Mini 5 Magic, one in the DPSI RV Mini 6 Magic). Resolution (precision) is more than 3000 steps and the delay of the servo signals is only 1500 micro-seconds! 6. -
Page 18: Safety Features Of Dpsi Rv Systems
DPSI RV Mini Family Operating Instructions Version 1.0 Hint: At delivery, low voltage recognition of the DPSI RV Mini systems is programmed for 2-cell LiPo batteries. If other battery types are to be used, the corresponding battery type must be programmed in first place (see chapter 9.10.)! Output voltages for receiver and servos are both set to 5.9 volts at delivery. - Page 19 DPSI RV Mini Family Operating Instructions Version 1.0 In order to allow for optical power-on control, an ultra bright LED has been built into the switch actuator of the DPSI RV Mini. It signals power-on and low voltage or other errors of the battery / batteries by blinking even over large distances.
-
Page 20: Contents Of Delivery
2 pieces MPX high-current sockets for the batteries 4 pieces of shrink tubing for MPX high-current sockets 2 pieces of voltage selection jumpers Operating instructions, EMCOTEC 3D sticker Delivery of DPSI RV Mini 5 (6) Magic: "DPSI RV Mini 5 (6) Magic" Base Device... -
Page 21: Mounting Hints And Programming
DPSI RV Mini Family Operating Instructions Version 1.0 9. Mounting Hints and Programming 9.1. Mounting the DPSI RV Mini The DPSI RV Mini is simply mounted onto 4 pieces of silicon hoses (gasoline hose). Just mount the package vibration damped onto 4 "stilts", as shown in the picture. -
Page 22: Hole-Spacing For Mounting
DPSI RV Mini Family Operating Instructions Version 1.0 9.2. Hole-Spacing for Mounting 9.3. Mounting the Receiver The receiver can be directly glued onto the DPSI RV Mini by means of dual sided adhesive foam rubber (approx. 5-10 mm thick). The programming marks must remain free for Magic versions. -
Page 23: Connecting The Switch Actuator
DPSI RV Mini Family Operating Instructions Version 1.0 9.4. Connecting the Switch Actuator Mechanical switches risk malfunctions. There are vibrations at a fuselage's side wall especially with large models. In order to avoid any mechanically influence in DPSI RV systems electronically switches with self-holding circuitry are utilized. - Page 24 DPSI RV Mini Family Operating Instructions Version 1.0 Pin-Switch-Actuator in DPSI RV Mini: The pin, put into the "ON" socket (red) turns the DPSI RV Mini on. Putting it into the "OFF" (black) socket turns the DPSI RV Mini off. Even if the pin gets lost a powered system remains on.
- Page 25 DPSI RV Mini Family Operating Instructions Version 1.0 The On/Off switch can be arbitrarily positioned (e.g. at the fuselage's side wall). Put the connection cable with its plug into the multi point connector of the DPSI RV Mini until it locks (see picture). If eventually a swap or disconnect is in order, carefully remove by moving upwards out of the multi point connector (grapple the cable directly at the plug).
- Page 26 DPSI RV Mini Family Operating Instructions Version 1.0 DPSI RV magnetically switch-actuator: The central ultra bright LED in the switch actuator housing is lit when the DPSI RV Mini is powered. In case of errors (e.g. low voltage) or during programming, the LED indicates the states by different blink codes.
-
Page 27: Connecting The Receiver
DPSI RV Mini Family Operating Instructions Version 1.0 9.5. Connecting the Receiver Connect the receiver to the DPSI RV Mini using the delivered patch cables (see print on housing). When connecting the receiver not all inputs of the DPSI RV Mini must be used. Just connect as many cables as needed. -
Page 28: Selecting Batteries
DPSI RV Mini Family Operating Instructions Version 1.0 9.6. Selecting Batteries All commercially available batteries are selectable (NiCd and NiMH) as well as Lithium-Ion (LiIon), Lithium-Polymer (LiPo) or LiFePo (A123). Independent of the selected output voltage these batteries are usable with no restrictions. - Page 29 If the batteries must be placed far away from the DPSI RV Mini due to COG (Center of Gravity) purposes (long connection cables) it is desirable to twist the wires. We recommend using our EMCOTEC Lithium Polymer batteries. These are delivered completely wired and can be connected to the DPSI RV Mini right away.
- Page 30 DPSI RV Mini Family Operating Instructions Version 1.0 Selecting the output voltage Meanwhile almost all servos are suitable for a 5.9V supply voltage. Therefore, the default setting for servos directly connected to the DPSI RV Mini is 5.9V. If 7.4V servos are to be used, the output voltage can be set to battery level ("Bat.") by jumper.
-
Page 31: Soldering Battery Sockets
DPSI RV Mini Family Operating Instructions Version 1.0 9.7. Soldering Battery Sockets Delivered Multiplex high current sockets are marked + and – on their soldering side. Observing this marking is mandatory! Dismantle the cable about 5mm, and then tin it. Before soldering, push the delivered shrink hose over the corresponding cable. -
Page 32: Charging The Batteries
This makes it a "2S2P“-battery. Cell number (voltage) stays the same, charging current may be doubled. Corresponding charging cables are available from EMCOTEC. If in doubt it is reasonable and safer to disconnect the batteries from the DPSI RV Mini for charging. Just tilt the plug a little (to the side) and pull it from its DPSI RV Mini latches with slight zigzag moves. -
Page 33: Setting The Voltages
DPSI RV Mini Family Operating Instructions Version 1.0 Removing the battery plugs from the DPSI RV Mini: 9.9. Setting the Voltages The output voltage of the DPSI RV Mini can be set in 2 steps for the receiver as well as the servos. This is done using delivered jumpers which are plugged to the multi-pin connectors of the DPSI RV Mini depending on the desired output voltage. - Page 34 DPSI RV Mini Family Operating Instructions Version 1.0 Selecting full battery voltage for the servos (receiver stays at 5.9V): The positions of the jumpers on their multi-pin connectors and their corresponding output voltage are printed onto the housing of the DPSI RV Mini.
-
Page 35: Programming The Batteries
DPSI RV Mini Family Operating Instructions Version 1.0 9.10. Programming the Batteries Because DPSI RV Mini systems monitor the battery voltage intelligently, they need to know the utilized battery type (e.g. 5-cell or 6- cell batteries or LiPo batteries). Therefore the battery type must be programmed once –... - Page 36 DPSI RV Mini Family Operating Instructions Version 1.0 Battery types are defined as follows: Type no. Buzzer Code Battery Type / Programming 1x beep 5 cells NiCd / NiMH 2x beeps 6 cells NiCd / NiMH 3x beeps 2 cells Lithium-Ion 4x beeps 2 cells Lithium-Polymer 5x beeps...
- Page 37 DPSI RV Mini Family Operating Instructions Version 1.0 Programming the battery type at a glance: Page 37 of 54...
-
Page 38: Connecting Servos
DPSI RV Mini Family Operating Instructions Version 1.0 9.11. Connecting Servos The DPSI RV Mini 5 (Magic) distributes 5 receiver channels to 8 servos in total (with 3 "built-in“ V-cables). The DPSI RV Mini 6 (Magic) distributes 6 receiver channels to 7 servos in total (with 1 "built-in“... -
Page 39: Servo-Matching
DPSI RV Mini Family Operating Instructions Version 1.0 10. Servo-Matching There are built-in V-cables in a DPSI RV Mini allowing two servos to connect to one receiver channel (Mini 5 has three V- cables; Mini 6 has one V-cable). As a specialty, MAGIC versions... -
Page 40: Programming
DPSI RV Mini Family Operating Instructions Version 1.0 10.1. Programming No external operating unit is necessary for programming the slave- servos such as a PC or a programming box. Only the delivered magnet serves to activate the corresponding programming function. Everything else is done with the transmitter (the remote control system). -
Page 41: Changing Servo Direction
DPSI RV Mini Family Operating Instructions Version 1.0 Hint: Whenever programming is activated the green LED blinks for controlling purposes in the DPSI RV Mini Magic at a rate of 0.5Hz (1s on, 1s off). A fast blinking of this green LED indicates a failure (=> missing receiver signal). 10.2. -
Page 42: Setting End-Limits
DPSI RV Mini Family Operating Instructions Version 1.0 Holding the stick in its end position the steps increase or decrease automatically after 2.5 seconds. This serves for quicker settings. Hint: Due to the high resolution it is possible that the change in servo positions is only visible after several single steps. -
Page 43: Deletion Of All Programming
The servo therefore could be damaged or function incorrectly if the full range is being used. Therefore approach limits carefully. An additionally connected servo tester (e.g. EMCOTEC Mini Servo Tester – part number A71050) which indicates the corresponding servo position digitally can be helpful if in doubt. -
Page 44: Changing The Model
DPSI RV Mini Family Operating Instructions Version 1.0 10.7. Changing the Model If an already programmed DPSI RV Mini is to be used in another application (e.g. changing the model) all settings should be generally deleted (see "Deleting of all Programming"). This holds true if even a servo with different direction is built in. -
Page 45: Technical Data Of Servo-Matching
DPSI RV Mini Family Operating Instructions Version 1.0 A range check takes place at every programming attempt. It is therefore not possible to position the servo center position outside of the maximum value. This inhibits malfunctions (e.g. V-curve of servos). 10.10. -
Page 46: Connecting Optional Products
DPSI RV Mini Family Operating Instructions Version 1.0 * Caution: Programmable values for end positions of the servos can be higher than the mechanically resolution of the servo. The servo therefore could be damaged or function incorrectly (e.g. wheel spinning) if the full range is being used. Therefore approach limits carefully. -
Page 47: Error Indication
DPSI RV Mini Family Operating Instructions Version 1.0 In case one battery is not connected, the DPSI RV Mini starts in programming mode. This programming mode automatically ends after approx. 30 seconds. Within these 30 seconds, the second battery must not be connected if reprogramming is not desired. - Page 48 DPSI RV Mini Family Operating Instructions Version 1.0 ⎯⎯⎯⎯⎯⎯⎯⎯⎯⎯⎯⎯⎯⎯⎯⎯⎯ 1. Overload (short circuit): Error signal: constant beep If current consumption of the DPSI RV Mini gets too high a constant beep is output. In this case, an external short-circuit is detected which can lead to total damage of the DPSI RV Mini (depending on the duration of the short).
- Page 49 DPSI RV Mini Family Operating Instructions Version 1.0 ⎯ ⎯ ⎯ ⎯ ⎯ ⎯ ⎯ ⎯ ⎯ 4. Battery Malfunction: Error signal: endless 0.1 seconds beeps / 0.1 seconds pause If a battery fails of a DPSI RV Mini (e.g. broken cable, loose contact or battery defective) a fast buzzer signal is output (5Hz).
-
Page 50: Safety Directions
DPSI RV Mini Family Operating Instructions Version 1.0 Hint: Limits for recognizing low voltage are especially set up for operating RC models. When utilizing the DPSI RV Mini for other purposes erroneous information could eventually be output. If this is the case the error indication (if disturbing) can be completely inhibited (see also "Programming the Battery Type“). - Page 51 Do not expose the DPSI RV Mini to any extremely hot or extremely cold temperatures, moisture or humidity. This would lead to danger of malfunction, damage or decreased efficiency. Only use EMCOTEC approved accessories in connection with the DPSI RV Mini (e.g. switch actuator, external voltage monitors, etc.) We recommend the usage of EMCOTEC Lithium-Polymer batteries for the DPSI RV Mini systems.
-
Page 52: Technical Data Of Dpsi Rv Mini-Systems
Hole spacing for mounting 78.7mm x 67.7mm Weight approx. 105 grams Warranty 24 month Technical modifications and errors excepted! (C) EMCOTEC embedded controller technologies GmbH (P) July 2008 Version 1.0 from 01.October 2008 Robert Hussmann www.emcotec.de www.rc-electronic.com Page 52 of 54... -
Page 53: Warranty
Version 1.0 16. Warranty EMCOTEC GmbH shall issue a 24-month warranty on the DPSI RV Mini. The guarantee period shall begin with delivery of the equipment by the retailer and shall be not extended by any guarantee repair or guarantee replacement. - Page 54 Copyright information: This manual is copyrighted by EMCOTEC GmbH. All rights reserved. This document may not be copied either entirely or in part, nor may it be transferred to any type of medium or translated into any other language without the express written approval of EMCOTEC GmbH.
Need help?
Do you have a question about the RC Electronic DPSI RV Mini Series and is the answer not in the manual?
Questions and answers