Table of Contents
Advertisement
Advertisement
Table of Contents

Related Manuals for Invixium IXM TITAN

Summary of Contents for Invixium IXM TITAN
- Page 1 IXM TITAN Installation Guide...
-
Page 2: Table Of Contents
I/O Cable: Top Connector Pin Out I/O Cable: Bottom Connector Pin Out Hardware Tools Required For Installation Hardware Installation Steps Connections for Power Connections for Communication Connections for Operation Connections for HDMI Out Software Installation System Requirements Software Installation Steps Notices Support INVIXIUM Copyright 2019... -
Page 3: Glossary
Glossary Access Control Panel Common Door Access Control Door Open Schedule Door Strike Power EGND Earth Ground Electrostatic Discharge Ground INVIXIUM Light Emitting Diode Wired Back Normally Closed Cover Normally Open On-the-Go Relay Receive SGND Signal Ground Specific Purpose Input... -
Page 4: Earth Ground
Earth Ground For protection against ESD, which may cause damage or malfunction to the IXM device, Invixium recommends the use of the ground connections between each IXM device and a high quality Earth Ground available at the install site. Please note that installation of any IXM device should be performed by licensed electricians. -
Page 5: Device Handling And Cleaning
Do not use harsh or abrasive chemicals to clean the surface of the sensor, as this may cause permanent damage to the device. Do not use sandpaper, steel wool, scouring pads, chlorine, ammonia, bleach, or any inappropriate products for cleaning. WARNING INVIXIUM Copyright 2019... -
Page 6: Ixm Install Kit For Titan
The IXM Install Kit for TITAN includes: IXM INSTALL KIT Hex Key Wall Mounting Screws (qty 6) Dolphin Crimps (qty 12) Metal Mounting Plate Screw (qty 2) Wired Back Cover Earth Ground Wire Micro USB Extension Cable Metal Mounting Plate INVIXIUM Copyright 2019... -
Page 7: Titan
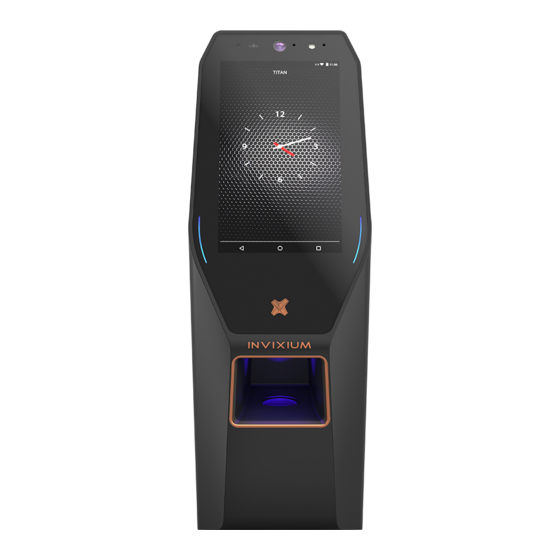
TITAN 21 Megapixel Proximity High intensity Camera Sensor LED Flash 5.0” IPS LCD 5.0” IPS LCD Corning Gorilla Industrial Grade Glass Connectors Multi-color LEDs IP67 & IK10 Aluminium Aluminium Fingerprint or Enclosure Finger Vein Sensor Surge Protection INVIXIUM Copyright 2019... - Page 8 19.50 81.60 89.13 93.30 INVIXIUM Copyright 2019...
- Page 9 82.10 261.42 Side View INVIXIUM TITAN Product & Mounting Plate Actual Dimensions in mm Copyright 2019 INVIXIUM recommends printing this page in Actual Size...
-
Page 10: I/O Cable: Top Connector Pin Out
Relay NC Green/White WDATA_IN0 Wiegand Data Input Line 0 is required. To do this, short the RS485_T wire with Grey RLY_COM Relay Common RS485_D+ wire. White/Black WDATA_IN1 Wiegand Data Input Line 1 NOTE Grey/Red RLY_NO Relay NO INVIXIUM Copyright 2019... -
Page 11: I/O Cable: Bottom Connector Pin Out
DAC_IN1 DAC Input 1 Green/Grey USB1_D+ USB Line 1 Host interface Brown/Yellow SPI3 Specific Purpose Input Line 3 Black/Red USB0_GND USB Line 0 Host interface Purple/Yellow DAC_IN2 DAC Input 2 Black/Red USB1_GND USB Line 1 Host interface INVIXIUM Copyright 2019... -
Page 12: Hardware Tools Required For Installation
Power Drill* Measuring Tape Hammer* Pencil Ratchet-style Crimping tool Manual Screwdriver Installation of any IXM device should be performed by licensed electricians. *Depending on the mounting surface, the Power Drill and Hammer may not be required. NOTE INVIXIUM Copyright 2019... -
Page 13: Hardware Installation Steps
Mark the Screw Holes Drill Holes If required, drill holes where marked and install the appropriate wall anchors (not included) using the hammer. INVIXIUM recommends the use of all 6 holes for mounting. Refer to diagrams from page 9 onwards for actual dimensions. - Page 14 Feed wires through the provided in the IXM Install Kit. square hole of the INVIXIUM recommends mounting plate. the use of an electric or battery-powered screwdriver for this step.
-
Page 15: Connections For Communication
Checklist: Connections for Power & Ground (DC or PoE+) Connections for Communications (Ethernet, RS-485, RS-232 or USB) Connections for Operation (ACP or DAC) Any other connections that may be required based on the application (SPO or SPI) INVIXIUM Copyright 2019... - Page 16 IXM Install Kit. device by lining up the connectors. Secure the Wired Back Cover with the same screws. Next, hang the IXM device onto the mounting plate as shown in the series of diagrams below INVIXIUM Copyright 2019...
-
Page 17: Connections For Power
• 12-24 VDC regulated power supply (Safety tested and FCC/IC/CE certified) • Dedicated Power Supply for IXM TITAN (minimum 2A @ 12 VDC) Use of a battery back-up or UPS with built-in surge protection • If sharing power supplies, ensure that each TITAN is supplied with minimum 2A per •... - Page 18 Connections for Power Over Ethernet (PoE+) Available on MERGE, SENSE 2, TOUCH 2 and TITAN TITAN FV Ethernet/PoE Connections INVIXIUM recommends: • A centralized Power Sourcing Equipment (PSE) for full PoE deployments (not included) • Use of a battery back-up or UPS with built-in surge protection RJ45_PIN4 Both IEEE 802.3at power transmission modes (A and B) are supported.
- Page 19 CAT 5 cabling or better Router connected Router connected WiFi: to LAN/WAN to LAN/WAN • Wireless router to LAN/WAN • 802.11ac protocol • WEP, WPA and WPA2 encryptions supported • DHCP enabled by default TITAN FV TITAN FPLV TITAN FPU INVIXIUM Copyright 2019...
- Page 20 RS-485 Network Communication INVIXIUM recommends: • Daisy chain configuration • Maximum 31 devices in the network • Both RS-485 converter and the last device in the chain should be terminated (not included, refer to NOTE below for correct Resistor vaues) •...
- Page 21 IXM WEB IXM WEB USB-to-Serial Converter B-to-Serial Converter RS-232 Connections RS-232_RX RS-232: RS-232_TX • Connect IXM device directly to the DB9 Serial port of the PC (if available) • DB9 connectors and cables are not included SGND INVIXIUM Copyright 2019...
- Page 22 Connect a Flash Drive via Micro USB OTG cable and perform functions like upgrading firmware and downloading transaction logs • USB port can also be used to connect to a PC running IXM WEB via Micro USB cable • Driver installation is required and will automatically initiate once the device is connected INVIXIUM Copyright 2019...
-
Page 23: Connections For Operation
ACP_LED2 ACP_LED_GND ACP: • LED and Wiegand connections available for ACP operation Top Connector Wiegand Bottom Connector LED • INVIXIUM recommends the use of Wiegand Output Data 0, 1 and GND connection WDATA_OUT0 (16) ACP_LED1 WDATA_OUT1 (18) ACP_LED2 ACP_LED signals can be used if available on the Access Control Panel. - Page 24 DAC Connections (Top) RLY_NC (11) DAC: RLY_COM (13) • INVIXIUM recommends a separate power supply for Door Strike (not included) for this configuration RLY_NO (15) • Snubber Diode required for Door Strike (not included) DAC Connections (Bottom) • Example above shows use of RLY_NO, but RLY_NC may be used instead if required by the Door Strike •...
- Page 25 DAC_OUT Contact DAC_OUT Request DAC_IN2 to exit DAC: DAC Connections (Bottom) DAC Connections (Top) IXM TITAN powers the door strike in this configuration. rike in this configuration • (13) DAC_IN1 RLY_NC (11) • Device can supply 500mA@12V or 250mA@24V DAC_IN2...
-
Page 26: Connections For Hdmi Out
For security purposes, the HDMI cable can be connected to a monitor behind the door i.e. on the inside, to see what is happening on the outside. HDMI Connection TITAN Monitor HDMI Cable Monitor Monitor (sold separately) HDMI Out INVIXIUM Copyright 2019... -
Page 27: Software Installation System Requirements
IXM WEB will install the following: ® Microsoft .NET Framework (version 4.0) †Windows Professional or Enterprise Editions SQL Server™ 2008 Express Edition Service Pack 1 ® Microsoft Internet Information Services (version 7.5) ® Windows Installer (version 4.5) INVIXIUM Copyright 2019... -
Page 28: Software Installation Steps
Software Installation Steps Step 1 Go to ixmweb.invixium.com. Click Get IXM WEB. Provide the required details and Click “Submit”. An email with the latest IXM WEB Package will be sent to the email ID provided. (Contact Support if using a customized solution). - Page 29 When the installation is complete, click EXIT. IXM WEB icon is now on the desktop. Step 6 Run IXM WEB to launch the application in the default web browser to setup the Database and Admin credentials. Step 6 Visit the Invixium Customer Portal for more detailed manuals on invixium.com. INVIXIUM Copyright 2019...
-
Page 30: Notices
Cet appareil est conforme à la partie 15 des règles de la FCC. Son fonctionnement est soumis aux deux conditions suivantes: Cet appareil ne doit pas provoquer d'interférences nuisibles Cet appareil doit accepter toute interférence reçue, incluant toute interférence pouvant causer un fonctionnement indésirable INVIXIUM Copyright 2019... - Page 31 Cet équipement est conforme aux limites d'exposition aux rayonnements IC établies pour un environnement non contrôlé. Cet équipement doit être installé et utilisé avec un minimum de 30 cm de distance entre la source de rayonnement et votre corps. INVIXIUM Copyright...
- Page 32 Informations de la CE aux Utilisateurs (en Français) Tous les dispositifs de INVIXIUM ont le marquage CE de conformité à la directive CEM 89/336/CEE et basse tension de sécurité Directive 73/23/CEE. Les appareils avec composants RFID sont conformes aux Directive R & TTE 1999/5/CE. et sont des appareils de classe 1.
- Page 33 Warning to Users (English) WARNING Changes or modifications not expressly approved by INVIXIUM could void the user's authority to operate the equipment. Avertissement aux Utilisateurs (en Français) WARNING Les changements ou modifications non expressément approuvés par INVIXIUM pourraient annuler l'autorité de l'utilisateur à...
-
Page 34: Support
Contact Invixium Support at support@invixium.com. For detailed information, please visit our website. Enjoy the Experience. Some features may vary based on device models. Copyright © 2019, INVIXIUM. All rights reserved. P/N XAD-00E-151-02G INVIXIUM.COM INSTALLATION GUIDE © 2018 Google Inc. All rights reserved. Chrome™ browser is a trademark of Google Inc.
Need help?
Do you have a question about the IXM TITAN and is the answer not in the manual?
Questions and answers